I have finally finished cutting and building exhaust pipes. I finally got the y-pipe built with a flex pipe and got everything bolted in yesterday. I think it looks pretty good with the exception of the welds. I could have done better, but I am ready to get on with other stuff.[URL=http://s829.photobucket.com/user/YOTA81UNDERTHEKNIFE/media/100MEDIAIMAG09901_zps377db69f.jpg.html] [/URL][URL=http://s829.photobucket.com/user/YOTA81UNDERTHEKNIFE/media/IMAG0989_zps3d0d020e.jpg.html]
 [/URL]
Not much progress this week. I did get the hard brake line run from the rear brake hose to up front in the engine bay. And removed most of the old crappy brake. Ran into another road block with master cylinder and pedal fitment. Story of my life. But if it was easy everyone would be doing it. Right? Well that's what I hear from my friends when I start whining about having to build/cut/ or modify another piece of this car. I just have to stay strong and keep my eye on the prize.[URL=http://s829.photobucket.com/user/YOTA81UNDERTHEKNIFE/media/IMAG0993_zps2310e0ae.jpg.html] [/URL]
Well after taking a few weeks off of building stuff, I feel better and am ready to continue. When I removed the oem brakes, I found out that the brake booster mounting area and the pedal assembly had to be moved further to drivers side fender. Then to contoured sheet metal was right in the way. So that meant that more metal had to be cut out. I got a rough idea of the size of are with a long piece of welding rod as a template. I bought a bead roller from harbor freight and got to work. The photo looks better than it does in person, but not bad for a first attempt. I triple layered the area where the new master cylinder/brake pedal will reside. Just a little grinding and smoothing the spot welds on both sides and a little trimming around the edges. Then it time to cut on the firewall.[URL=http://s829.photobucket.com/user/YOTA81UNDERTHEKNIFE/media/IMAG1028_zpsfe6c06ed.jpg.html] [/URL]
I had to work this past weekend but I did get some time in between work have a little me time. I marked the area for my brake pedal and master cylinders last week. Got them all cut out and just need to fit it one more time and the burn it in. Here is the old piece that the brake booster and clutch pedal were using. Hopefully it will look good when it's all together.[URL=http://s829.photobucket.com/user/YOTA81UNDERTHEKNIFE/media/IMAG1041_zps224b4da6.jpg.html] [/URL]
And here is the new piece.[URL=http://s829.photobucket.com/user/YOTA81UNDERTHEKNIFE/media/100MEDIAIMAG10421_zpsb52f8376.jpg.html]
[/URL]
And here is the new piece.[URL=http://s829.photobucket.com/user/YOTA81UNDERTHEKNIFE/media/100MEDIAIMAG10421_zpsb52f8376.jpg.html] [/URL]
I had some free time this weekend and got my brake pedal plate in the firewall mounted and tacked in.....then found out I was out of welding gas. Well..that will be left for another day. I also scored a seat. I thing its a Kirky but I'm not sure. It is all swiss cheese like. has a bunch of holes, and it only weighs 15lbs. with the mount brackets. So I took out the drivers seat and was going to try to use the factory seat rails so I could adjust it if is needed. But nooooo.. The seat is not that wide and is nowhere near close to fitting even with the Kirky seat mounts. So that means more building. But it will look better than that factory stuff anyway. I will take some pics tonight.[URL=http://s829.photobucket.com/user/YOTA81UNDERTHEKNIFE/media/IMAG1049_zpsfab182c5.jpg.html] [/URL]
I finally got all of my brakes finished up the weekend. One more big check mark on the dwindling list of things to finish with this project. I am so excited. There is not much to look at in the rear, the cool stuff is in the front. Some very small calipers and light weight rotors, accompanied with new hubs and longer studs.[URL=http://s829.photobucket.com/user/YOTA81UNDERTHEKNIFE/media/100MEDIAIMAG10791_zps1dd8ec0d.jpg.html] [/URL][URL=http://s829.photobucket.com/user/YOTA81UNDERTHEKNIFE/media/IMAG1074_zpsc5cdc666.jpg.html]
 [/URL]
In my quest for lowering the weight of this car ,I decided to removed the rear bumper to see if there was some extra metal that could be cut out without sacrificing some strength. Sadly I found that mother nature has already shaved some weight for me.[URL=http://s829.photobucket.com/user/YOTA81UNDERTHEKNIFE/media/IMAG1081_zpsfed4cbf0.jpg.html] [/URL]
It is time to reconsider the inner workings of the bumper. Since there is not much left, it is time for more engineering and R&D.
[/URL]
It is time to reconsider the inner workings of the bumper. Since there is not much left, it is time for more engineering and R&D.
looks pretty good (bumper)
On my car the inner bumper/reinformacement was fine... so I had the shop remove the massive outer bits, and then had them skin the reinforcement
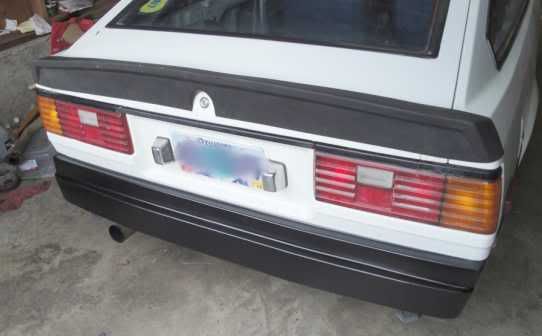
Wow that looks pretty good. So that's what it was supposed to look like.
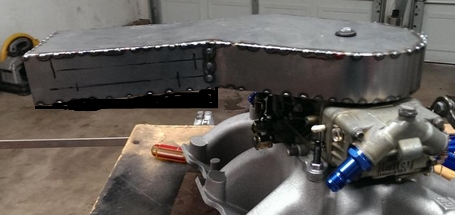
Well I swapped out my gas bottle and started stitching my air cleaner lid together yesterday. 2" looked a lot taller when I test fitted my intake and carb on the motor that is in my car. I may end up with some air flow issues at wide open but this is only so can have an air filter while driving. This will be removed for more spirited driving. It looked intentional, but it was a pure accidental, it slopes to the back side. This will make for a good water drain hole. I would rather be lucky than good any day![URL=http://s829.photobucket.com/user/YOTA81UNDERTHEKNIFE/media/IMAG1113_zps9eeb187c.jpg.html] [/URL]
I also whittled up a support inside the hat so I won't crush it when tightening it down. Hopefully it will work as designed. I still need to cut a hole for the filter but welding comes first.[URL=http://s829.photobucket.com/user/YOTA81UNDERTHEKNIFE/media/100MEDIAIMAG11161_zps7bf7fa05.jpg.html]
[/URL]
I also whittled up a support inside the hat so I won't crush it when tightening it down. Hopefully it will work as designed. I still need to cut a hole for the filter but welding comes first.[URL=http://s829.photobucket.com/user/YOTA81UNDERTHEKNIFE/media/100MEDIAIMAG11161_zps7bf7fa05.jpg.html] [/URL]
Finally got some time to work on some stuff last weekend. I ended up getting my carb hat fully welded up and got the air filter hole cut on Saturday. I like how the filter fits, nice and snug. The wiper cowl is going to hold it down so no need for a top side retainer. I have started working on a dash panel and have been taking some cues from some of the other build thread regarding molds. as soon as I am able to peel it out of the car I will post some pics of the progress.[URL=http://s829.photobucket.com/user/YOTA81UNDERTHEKNIFE/media/100MEDIAIMAG11231_zpsfc5b011a.jpg.html] [/URL][URL=http://s829.photobucket.com/user/YOTA81UNDERTHEKNIFE/media/IMAG1125_zps7c7f423a.jpg.html]
 [/URL]
how deep is the filter? Are you cutting off some(much?) airflow with the filter installed? Could you add a 1/2" lip to your opening to drop the filter out of the airstream??
see poor hand drawn adapted photo
Well I hadn't thought about mounting the filter higher. I will look into that when I get a little further along. I still have some metal in the way in the wiper cowl area. I bought some clips for the cowl so I can remove it pretty easily. Right now it has some push clips Christmas tree things. My filter is just a standard replacement filter that I got out of a used car years ago. It is probably about 1/2" tall. Maybe 3/4". Well it is about where the top marker line is in that photo. But it does overlap to center section on the carb. I am not toooo concerned with it because I intend to remove it when at the track. But it didn't cross my mind to raise it. Good call!
Its is time to cover up the dash area. Install plastic to cover everything up.....check. Empty $100 in spray foam .....check check. Removed said foam from car, a little more difficult then you might imagine,.....check. And make a large mess in your garage and you are well on your way to having your own custom dash panel. I bought an electric carving knife usually used for carving thanksgiving turkeys, but it is going to be my weapon of choice. Or so I though. About 10 minutes into my Picasso, it stopped moving the blade. Well poooh. What do you expect for $14? So I got after it with a hacksaw blade and a sawsall. I later found a couple of small pockets of uncured foam from a month ago. I need to fill in the gaping holes and trim the excess and put it back in the car for some more fitment.[URL=http://s829.photobucket.com/user/YOTA81UNDERTHEKNIFE/media/20150301_112237_zpskcy2u9vx.jpg.html] [/URL]

Man things have been crazy for me the last few weeks. Hardly any time to sit and defrag and let the creative juices flow. Started back on my blob of foam. I would cut a little piece and step back and look at it. Cut another piece and look at it. And again and again. And surprisingly it is looking more and more like a dash. I found a small patch of uncured foam while cutting it up. That was from 3 weeks ago. I guess it is a pretty big piece. I had to add some more foam to the top in front of the steering wheel area. Hopefully it won't take 3 weeks to cure. But I like how easy it is to work with. You do have to have an idea of what the end result will look like and that has been the hardest for me, because I don't have the original and don't really have to follow any sort of design guidelines. It sounds easy, and it is, but I want it to have some sort of "80's" style. I don't want it to look like I just pulled it out of a '95 Honda or corolla. Nor do I want it to look like a sheet metal dash in a gutted out race car. So here it is. Looks pretty good, I think. the Picasso is still in progress.
[URL=http://s829.photobucket.com/user/YOTA81UNDERTHEKNIFE/media/20150405_164600_zpsb8001ogc.jpg.html] [/URL][URL=http://s829.photobucket.com/user/YOTA81UNDERTHEKNIFE/media/20150405_164613_zpsl4uw9zuc.jpg.html]
 [/URL]
Remember this is just going to be for a mold. I won't have any foam inside the dash.
[/URL]
Remember this is just going to be for a mold. I won't have any foam inside the dash.
Oh snap! The ups guy is my hero today. He has just delivered my axle shafts from Moser. One more big check mark off of my list.[URL=http://s829.photobucket.com/user/YOTA81UNDERTHEKNIFE/media/20150423_202139_zpsm2ctfn4m.jpg.html] [/URL][URL=http://s829.photobucket.com/user/YOTA81UNDERTHEKNIFE/media/20150423_202131_zps2odxq2mx.jpg.html]
 [/URL]
Thanks. I added some more foam to the middle area last week and just haven't found time or motivation to make another mess. But I did complete my exhaust dump handle. And it actually works. I have been a little skeptical until now. I need to tweak on it a little. It is a tad corked.[URL=http://s829.photobucket.com/user/YOTA81UNDERTHEKNIFE/media/20150426_170115_zpslaoriwny.jpg.html] [/URL]
Not much to add from this weekend. I did install my axles from Moser. Just wasn't feeling it yesterday. Hopefully this coming weekend will be different.


 [/URL][URL=http://s829.photobucket.com/user/YOTA81UNDERTHEKNIFE/media/100MEDIAIMAG10691_zps6cef65e6.jpg.html]
 [/URL]
I also tied up all of the loose ends for my seat. Finished welding all of the joists and sprayed the with paint and went to the post office and weighed them. People looked at me funny as I put that stuff on the scale but I carried on. The old seat and tracks weighed in at 25.5 lbs. The new swiss cheese seat and fabbed up brackets, if I did my math right, came in at 18.5 lbs. total. Should be a 7 lbs. savings. Every little bit helps, just not as much. I have it figured that it will end up weighing in at about 2500 with me in it when it is all over.[URL=http://s829.photobucket.com/user/YOTA81UNDERTHEKNIFE/media/100MEDIAIMAG10571_zpsf351a86f.jpg.html]
[/URL]
I also tied up all of the loose ends for my seat. Finished welding all of the joists and sprayed the with paint and went to the post office and weighed them. People looked at me funny as I put that stuff on the scale but I carried on. The old seat and tracks weighed in at 25.5 lbs. The new swiss cheese seat and fabbed up brackets, if I did my math right, came in at 18.5 lbs. total. Should be a 7 lbs. savings. Every little bit helps, just not as much. I have it figured that it will end up weighing in at about 2500 with me in it when it is all over.[URL=http://s829.photobucket.com/user/YOTA81UNDERTHEKNIFE/media/100MEDIAIMAG10571_zpsf351a86f.jpg.html] [/URL][URL=http://s829.photobucket.com/user/YOTA81UNDERTHEKNIFE/media/IMAG1059_zpsd11379ff.jpg.html]
 [/URL][URL=http://s829.photobucket.com/user/YOTA81UNDERTHEKNIFE/media/100MEDIAIMAG10581_zpsc0f2a1be.jpg.html]
 [/URL][URL=http://s829.photobucket.com/user/YOTA81UNDERTHEKNIFE/media/100MEDIAIMAG10601_zps9639b32b.jpg.html]
 [/URL][URL=http://s829.photobucket.com/user/YOTA81UNDERTHEKNIFE/media/IMAG1071_zps6ba692d9.jpg.html]
 [/URL]
 [/URL][URL=http://s829.photobucket.com/user/YOTA81UNDERTHEKNIFE/media/IMAG1099_zps82f834ae.jpg.html]
 [/URL][URL=http://s829.photobucket.com/user/YOTA81UNDERTHEKNIFE/media/100MEDIAIMAG10981_zpsf5fe25fe.jpg.html]
 [/URL][URL=http://s829.photobucket.com/user/YOTA81UNDERTHEKNIFE/media/100MEDIAIMAG11011_zpsb8d0ea2a.jpg.html]
 [/URL]
I think the plug blends in pretty good. It is something that I had in my tool box. and after putting the bumper back on the car, it blends in pretty good. I still need to take a picture of that.
[/URL]
I think the plug blends in pretty good. It is something that I had in my tool box. and after putting the bumper back on the car, it blends in pretty good. I still need to take a picture of that.
 [/URL][URL=http://s829.photobucket.com/user/YOTA81UNDERTHEKNIFE/media/100MEDIAIMAG11091_zps66abaceb.jpg.html]
 [/URL][URL=http://s829.photobucket.com/user/YOTA81UNDERTHEKNIFE/media/100MEDIAIMAG11121_zps3a03866b.jpg.html]
 [/URL]
 [/URL][URL=http://s829.photobucket.com/user/YOTA81UNDERTHEKNIFE/media/20150412_160837_zpsvibltcrm.jpg.html]
 [/URL][URL=http://s829.photobucket.com/user/YOTA81UNDERTHEKNIFE/media/20150412_160828_zps0rqsdpek.jpg.html]
 [/URL]
I think it is looking better. It has some shape now instead of just a blob of foam.
[/URL]
I think it is looking better. It has some shape now instead of just a blob of foam.
 [/URL][URL=http://s829.photobucket.com/user/YOTA81UNDERTHEKNIFE/media/20150506_105702_zpskeenbusb.jpg.html]
 [/URL][URL=http://s829.photobucket.com/user/YOTA81UNDERTHEKNIFE/media/20150506_105646_zpswqlactmh.jpg.html]
 [/URL]


