1 2
jmthunderbirdturbo
jmthunderbirdturbo HalfDork
9/11/16 8:08 a.m.

I'm not sure I'm familiar with the term negative pressure. With a scoop under the intercooler core, a draw fan up top, and a vented hood, I should have plenty of airflow. Certainly more than with mounted atop the 2500* turbo, where Ford put it. :)

-JON

NoPermitNeeded
NoPermitNeeded Reader
9/11/16 8:24 a.m.

There is one of these sitting in my grandads yard up in Nashville. This thread really makes me want to give it a little TLC.

crankwalk
crankwalk GRM+ Memberand Dork
9/11/16 12:48 p.m.
jmthunderbirdturbo wrote: I'm not sure I'm familiar with the term negative pressure. With a scoop under the intercooler core, a draw fan up top, and a vented hood, I should have plenty of airflow. Certainly more than with mounted atop the 2500* turbo, where Ford put it. :) -JON

Yeah if you do a scoop on bottom and draw fan on top you should be good to go. If not though, some places under the hood don't get much airflow and an ic could still heatsoak.

jmthunderbirdturbo
jmthunderbirdturbo HalfDork
9/13/16 10:14 p.m.

big update today!

ok, so first off, everyone who owns a car with one of those Vane Air Meters, should buy a wide band 02 and install it. my car is mostly stock. stock fuel system, stock turbo, stock head and cam. my real world mods list is an upgraded pump, a bottom mount inter cooler, and a cone filter. once i installed the 02 bung, and put the sensor it and what not, i got a chance to drive the car some. the fuel enrichment was so far off it was off the gauge. idle AFR was 13. cruiser AFR was 11. under boost was more like 10 or less, as it wasn't reading half the time. now, the VAM is adjustable, you can remove the cover and adjust the spring resistance of the metering door. usually its 3 or 4 notches off. mine was 15. FIFTEEN. now i have 11.5-12.0 AFR under full boost, 14.8-15.0 cruise AFR, and 15.9-16.5 idle AFR. and my gracious does it run better! it idles smoother, it comes off boost without stalling (an issue i have been trying to fix), and it uses FAR less fuel. so, if you have a VAM vehicle from the 80's or 90's, get yourself a cheap WB02 and check your fuel enrichment, as ill bet its way off.

now, on to the update.

i showed you all the seats i cleaned up and dyed back to original color. well, it was time to put them in:

Out with the old...

My little helper, Hannah!

new upper back seat

new passenger seat

new driver seat

all done. you can kind of see the new window/seat switch plate in the middle, as well as the refreshed door panels. its not perfect, but it was about a 3 interior, and now id call it a solid 8. a new dash cover, new carpet, and new door/glass seals would make it perfect. i also removed all the old window tint from the 1/4 windows and rear glass. i HATE tint, in all forms, especially old bubbled purple tint from the 80's. oh, and also, if you smoke inside a car, i hate you, too. you wouldn't believe the color of the THIRTY terry towels i used to clean the glass and all the plastic panels. it was this medium yellow/brown color (yeah, that's in your lungs, good luck with that). the car smalls a LOT better though, i must say.

so, this is the outside, and this is as pretty as its going to get. next year i may paint the car, and when i do, it will be all the tan color of the fenders. but for now, im happy that its straight and mostly rust free. and its a damn sight away from this:

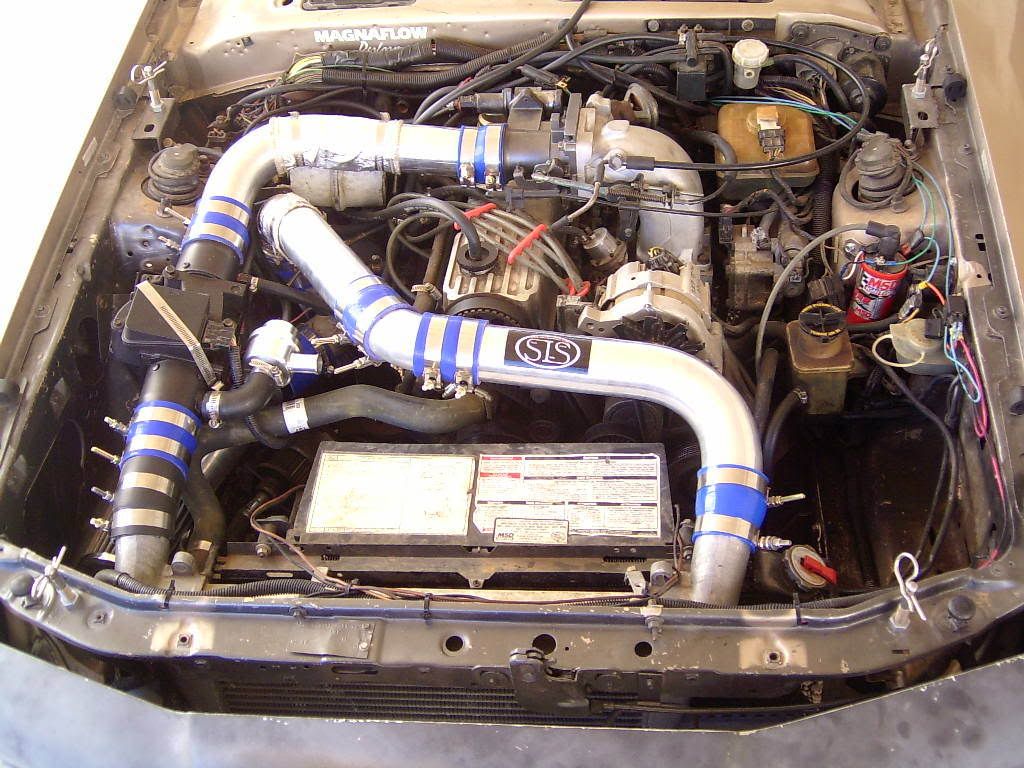
this is the finished product of the engine bay. i installed a fan controller for the radiator fan, and finished up some other odd and ends. i also fixed the drivers window regulator today, which is something i have pictures of, but I'm happy it's done.

im down to 7 things on my "hit list". i need to drop the tank, and fix the fuel level sender. i have a set of tires to install. i have a nice factory FMS spoiler to go on it. its needs an oil change. i have a tiny hole to weld up on the exhaust. theres some other things, but ill get to them when i get em done!

-J0N

crankwalk
crankwalk GRM+ Memberand Dork
9/13/16 10:33 p.m.

Are you running any bypass valve on the charge piping?

Javelin
Javelin GRM+ Memberand MegaDork
9/13/16 11:26 p.m.

Looks wicked dude! The interior turned out very, very nice. On the front fenders, could you take the trim piece off of the original 86 fenders from behind the wheels and put them on the gold ones? Then the trim would match all the way between the tires and nobody would probably notice the front being different.

Are you painting it all gold or a 2-tone like the original 86 scheme? Either way, I'm really digging the 87/88 nose on it, looks slick! And FMS spoiler you say?!? Mmmmm...

classicJackets
classicJackets Reader
9/14/16 12:03 a.m.

What WB02 did you go with, and could you share a picture of where you ended up mounting it? I'm curious what is working for you as I'll have similar starting "mods".

jmthunderbirdturbo
jmthunderbirdturbo HalfDork
9/14/16 2:55 a.m.

In reply to classicJackets:

i posted a pic of the gauge setup, but ill re link it. its an AEM EUGO WB02. i like the gauge style, and i like that AEM uses off the shelf O2 sensors i can buy at any box parts store. the one i have is for an 04 honda something.

from closest to driver to furthest: Boost/Vac - WBO2 - coolant temp.

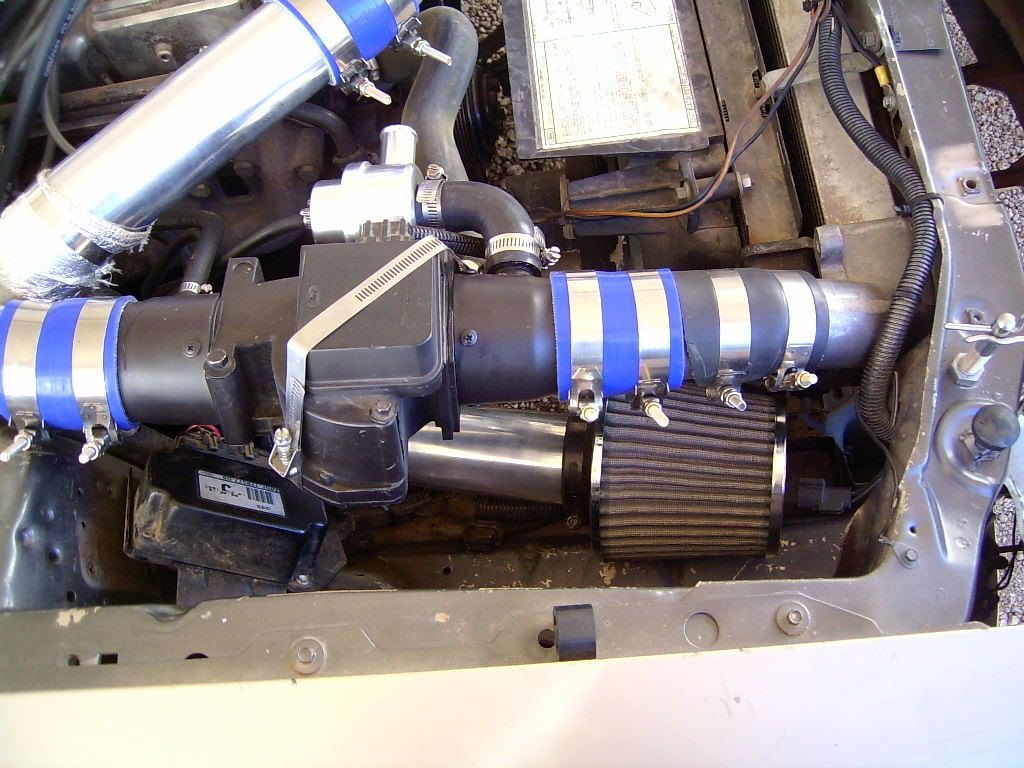
i don't have a bypass valve installed. i own one, but i haven't decided that i need it. i haven't gotten any of the 'trailer hitching', turbo stall, or blown down issues that i'm used to getting with big piping, long runs, and big front mount inter coolers. plus, with the VAM so close to the turbo inlet, i'm afraid i'd just be slamming the VAM door shut, and i have broken a VAM doing that before. so id need to move the VAM down in front of the radiator to give it more room for discharge. its a big piping mess and a bunch of time, and since i'm not getting any blow-back or other related issues with big volume cooler systems, i don't think i need to bother.

i haven't decided what to do about trim yet. i dont like the 85.5 trim, at all. but i'm stuck with it on the rear bumper, at a minimum. right now i simply don't care. i kind of like how ugly it looks. it will be all gold.

-J0N

ssswitch
ssswitch Dork
9/14/16 8:48 a.m.

That interior is looking really good. Downright classy.

Does the vane meter hurt airflow, or is it a pretty good design?

jmthunderbirdturbo
jmthunderbirdturbo HalfDork
9/14/16 9:54 p.m.

thanks for the compliments guys, it feels good to put something together, even if it is just a driver.

as far as the VAM goes, it depends on who you ask, and what your goals are. i think for anything under 275HP, under 20psi boost, or under $1500 budget, its fine. something to note, there are multiple sizes of this meter, two were available on the Thunderbird turbos. my car has the earlier, smaller one. on my last build, it came factory with the larger of the two (1987 vs. 1985.5 build date), and i set it up in blow through configuration. in other words, i removed it from the suction side of the turbo, modified it (sealed it, really), and installed it after the inter cooler, in the pressure tube. this required some tuning of the internal spring and bypass screw, but allowed me to eliminate it as a restriction, so instead of ambient pressure air running through it, i was running 24 PSI air through it. it worked well, and got me deep into the 12's in a stock weight 87 Thunderbird. the opened up a new world of options for intake configurations as well, so i could run as big a pipe as i wanted, and from anywhere, without having to figure in the VAM inlet and outlet size, and location. i ended up running an aluminum 3.5" tube from the front of the car with a 24" long air filter. it was over kill, but i was certain my intake wasn't a restriction. this ALSO allowed me to run a GIANT blow off valve, without losing metered air, and dogging out the engine with a rich spike. i will very likely set that same system up in this car, with the small VAM, for all of the same reasons. this time however, i didn't have the time to make such a large change. maybe next fall... :)

-J0N

jmthunderbirdturbo
jmthunderbirdturbo HalfDork
9/14/16 10:37 p.m.

i found old images of my setup.

feel free to poke around this 10 yr old photobucket...

[URL=http://s180.photobucket.com/user/jmthunderbirdturbo/media/blow%20thru%20vam%20stuff/filterandvam.jpg.html][/URL]

[URL=http://s180.photobucket.com/user/jmthunderbirdturbo/media/blow%20thru%20vam%20stuff/alldone.jpg.html][/URL]

-J0N

crankwalk
crankwalk GRM+ Memberand Dork
9/16/16 1:59 p.m.

Holy hose clamps! I realize those pictures are super old too.

The routing looks good and with a couple welds to eliminate boost leak points, I'd just try to replicate that setup but with the bypass valve recirculated.

jmthunderbirdturbo
jmthunderbirdturbo HalfDork
9/20/16 2:49 a.m.

yes, well i liked that setup well enough, but truly i like my new one better. the piping is shorter, and less invasive to the engine bay. i can work on other things on the car without step one being 'remove charge pipe'. i would like to remove the pipes i have and have a shop bend them up out of one piece of material, but i wont, as i'm poor, and its fine like it is.

i added some baffling and the electric fan to the inter cooler. its seems to function quite well, as i'm not noticing as much of a loss in performance when i make back to back full throttle pulls.

i sectioned out some of the factory air dam, where the pressure is the highest, and "ducted" it to my inter cooler. while moving, this will move far more air than the fan, the fan will be more for when i am sitting in the staging lane.

pic:

i also cut out a nasty 'S' shaped section of my exhaust, where the shop tried to make driveshaft removal easier. i was very un-necessary, so i chopped it out, and welded in a section of stainless (what i had layin' around) pipe with a MUCH less severe bend to it. the throttle response was improved noticeably and immediately. i dont have images of that, but i will tomorrow.

i also dropped the fuel tank and repaired the level sender. i have had this car for 3 years almost, and this is the first time the fuel gauge worked (yay!).

i did some maintenance, too. replaced front tires, adjusted the severely out of range toe setting, and fixed a leak in the turbo oil drain. shes ready to go, with the exception of a small electrical fire i created by being lazy and not fusing a relay, which later shorted out and melted 15ft of fresh wiring. i get to redo the entire setup now, this time with some circuit protection.

-J0N

jmthunderbirdturbo
jmthunderbirdturbo HalfDork
9/21/16 4:11 a.m.

It's DONE! That's right folks, I'm sure that's an odd thing to read for some of you, but I have officially concluded this project! Yeah! This car is exactly the way I want it; everything works, it rides nice, it runs like a champ, it handles like its 500 lbs lighter than i know it is, and its ugly enough to make Ray Charles flinch. :D

pics or it didn't happen? done!

this is the first full tank of premium fuel that i can actually see register on the gauge.

i will post more pics in the O/T section after friday. hopefully ill have a video to post too.

-J0N

1 2

You'll need to log in to post.

Our Preferred Partners
IpEp7aIdLp3e1eE9THAKCuPymA8h56p66zeFhy062QC5qkt3mNniR6Uwt5m2EL7p