1 2 3
ae86andkp61 (Forum Supporter)
ae86andkp61 (Forum Supporter) GRM+ Memberand SuperDork
12/12/24 12:09 a.m.

More small steps were accomplished today. I added rivnuts and fitted the aluminum license plate adapter bracket I built. I will probably paint or powdercoat it, but it doesn't look too bad with the aluminumy-looking light bracket above it that is fairly similar.

I replaced the rubber grip on the swing away for the spare tire. I definitely needed a bit of the old rubbing alcohol trick to get this one on.

I also put the refreshed stop pin back on the swingarm. Since the whole thing had a nice bit of surface rust, and was also serviceable, I just cleaned it up and POR15'd it.


I also saw this cool photo from Paris-Dakar 1988 and figured I would channel this energy. 😁

ae86andkp61 (Forum Supporter)
ae86andkp61 (Forum Supporter) GRM+ Memberand SuperDork
12/13/24 12:32 a.m.

A couple small tweaks today.

I looked into the brake lights sticking on. The contact switch isn't obviously out of adjustment. It is adjusted such that it goes on almost immediately upon pressing the pedal, but I wouldn't call it misadjusted. I pulled the clevis pin, and the pedal pivot has zero resistance/stickiness that I can feel. I fiddled with the pad for the contact switch a bit, and greased the clevis pin before reinstalling it. 🀞

While I was down in the driver door opening, I cleaned the weep holes in the bottom corner of the doors.

Good news: the restoration shop did new seam sealer on the door skin seams before repainting. I can tell because they used a sealer that is black and the original Toyota sealer is white.

Bad news: they were generous to a fault, and the excess sealer almost completely filled one weep hole. It wasn't closed off, but also wasn't draining well. I got a razor blade and some little picking tools, and ended up pulling this booger out:

And yes, it was just as gratifying as you can imagine to yank it out and see the nice clear drain hole! πŸ˜†

ae86andkp61 (Forum Supporter)
ae86andkp61 (Forum Supporter) GRM+ Memberand SuperDork
12/15/24 9:35 p.m.

A little bit more progress today. I turned my attention to the chips and rust spots on the swing away handle. Now that it has a new rubber grip, the metal was looking shabby.

I knocked back anything loose, cleaned it, and POR15'd the rusty spots. I chuckled to myself thinking of the infamous "Don't get it on your hootus" thread! πŸ˜‚ I took fine steel wool to the stainless parts to remove the rust reside transferred from the mild steel parts. Once the paint is dried I think it will look a lot better.

I also received the used inclinometer from Pakistan. The fancier specs of these had central dash-top gauge pods with altimeter/inclinometer, or altimeter/temperature, or dual-tank fuel level and clock. My truck was basic, so it had none of these when new, but I figured it would be fun, plus I thought it was one of the coolest things about these and 80's 4Runners when I was young. The longitudinal indicator was obviously out of calibration and couldn't be remedied with the adjustment knobs. Must have had a rough trip, possibly prior to being parted out, or possibly on the way halfway around the world.

I have no idea how it comes apart, or how to service it, but how hard can it be?

A little bit of Googling was futile because Google searches for technical information from other human DIYers are becoming more and more useless by the day. All the results are links to shop for 2025 Land Cruisers/2025 Land Cruiser accessories, or carpentry/construction levels and tools, or to some useless pop song or social media trend having to do with angles or inclines or Toyotas, or something similar. Getting more specific with the search terms/parameters results in no search results, so I went back to the way we did it before the internet was widespread; take it apart slowly and carefully! πŸ˜†

A little bit like working on a watch! Gears, clock springs, weights, and little machine screws.

It has adjusters on the face, but they have a limited range, and even with the adjuster maxed, the longitudinal one was obviously not right. When moving it manually against the built in weight, it would snap all the way to the stop really quickly at one end of the adjustment range, and snap all the way to the same stop slightly-less quickly at the other end of the range of adjustment. Meanwhile the indicator on the face was upside down. πŸ˜‚

The longitudinal indicator was one full turn out of adjustment on the clock spring. I have no idea how it got that way unless someone was in there before. There's a stop I just cannot fathom the wheel slipping past. I partially disassembled it, moved it past the stop, and got it back together. The stop was a long clear plastic arm that looked potentially brittle but I flexed it gently with breath held, and 40-year-old plastic was kind to me and didn't break. One of the knobs was missing hardware; it was glued on, thankfully not very well so I got it off easily…off to McMaster-Carr to shop M1.6x0.3 machine screws! I’m not sure how well I will fare at getting the cigarette smoke (?) or other mystery yellowish-grey residue off everything, though. 🀒

While I'm in there I can verify if the bulbs are 12V or 24V, plus if they are good, and replace them if needed. Apparently they connect to the dimmer on the trucks so equipped, so I'll have to dive under the dash and see if I can find the wiring. If I'm lucky and the norm for 80's Toyotas holds, there's likely to be an unused connector in the harness. I'll probably do it when I'm in there anyway doing the 12V converter wiring.

ae86andkp61 (Forum Supporter)
ae86andkp61 (Forum Supporter) GRM+ Memberand SuperDork
12/16/24 11:16 p.m.

Spare tire swingarm handle reinstalled after tidying up.

It looks like my custom seats might arrive later this week! With international shipments, I find the ETA provided with the tracking information sometimes changes by a day or two depending on customs, etc. so I'm not holding my breath, but I am excited!

I think I'll probably dive into the interior and tackle a bunch of stuff at once, even if it means having it off the road for a while. Tasks could include sound deadening, wiring in the 12V converter, finishing the door vapor barrier/door card job, installing the inclinometer, touching up some paint and upholstery, getting the seatbelts re-webbed, maybe carpet, maybe cargo tie-downs in the back.

ae86andkp61 (Forum Supporter)
ae86andkp61 (Forum Supporter) GRM+ Memberand SuperDork
12/28/24 12:19 a.m.

I returned from the Christmas holiday to find that my seats arrived! They look spectacular; better than I possibly could have imagined! The cloth centers compliment the leatherette sides nicely, and the weave of the centers feel suitably durable for a truck.

In other news, my 24V DC->12V DC converter also just arrived.

I just arrived back at home after Christmas, but I have family in town at the moment for part two of holiday festivities, so any work will probably be pushed off to January. I'm super-excited to tuck into it once I have the bandwidth. πŸ˜„

ae86andkp61 (Forum Supporter)
ae86andkp61 (Forum Supporter) GRM+ Memberand SuperDork
1/8/25 12:25 a.m.

Today I did the preliminary seat fitment with my custom scheel-mann seats. I’m really happy with how the upholstery came out!

I didn’t fit the armrests yet, or hook up the wiring for the active ventilation and seat heat. They will be coming be coming back out one more time so that I can run wiring from my new 24V->12V converter under the carpet to the seats. I also think if I modify the bracket slightly, I’ll be able to fit dual armrests! 😎

iansane
iansane GRM+ Memberand SuperDork
1/8/25 10:16 a.m.

Dude, those look great! I got the ones in my defender and they're an amazingly nice and comfortable seat.

4cylndrfury
4cylndrfury MegaDork
1/8/25 11:10 a.m.

You couldn't ask for more era-correct 80s seats. Those look phenomenal.

Matt B (fs)
Matt B (fs) UltraDork
1/8/25 4:00 p.m.

Ok I'm officially jealous.  I've been lusting after one of these ever since we bought our 100 series. 

Anyways, I'll second the seats are just about perfect. Great upholstery choices. I've been window shopping on the Scheel-Mann site before, but never noticed the "Built to Order" page before this thread. 

grover
grover GRM+ Memberand Dork
1/8/25 9:11 p.m.

Dual armrests are amazing. Oh how I miss my rover. 

ae86andkp61 (Forum Supporter)
ae86andkp61 (Forum Supporter) GRM+ Memberand SuperDork
1/8/25 11:27 p.m.

In reply to iansane :

Awesome; glad to hear they are working well!

ae86andkp61 (Forum Supporter)
ae86andkp61 (Forum Supporter) GRM+ Memberand SuperDork
1/8/25 11:36 p.m.

Thanks for the kind words everyone! I'm really stoked on the seats, so I'm extra stoked to hear that others are digging the 80's vibe!

In reply to Matt B (fs) :

Custom order takes a little time, but can be worth the wait. Especially when you factor in the selections from partner upholstery suppliers, there are some cool combinations that can be achieved!

ae86andkp61 (Forum Supporter)
ae86andkp61 (Forum Supporter) GRM+ Memberand SuperDork
1/8/25 11:49 p.m.

I got the dual folding armrests installed this evening. I think they will be amazing on the road on a long drive. I also think it will be nice to have the option to fold them up alongside the seat back when doing frequent shifting or more significant steering inputs. 

ae86andkp61 (Forum Supporter)
ae86andkp61 (Forum Supporter) GRM+ Memberand SuperDork
2/11/25 11:29 p.m.

Minor update:

The seats are a huge comfort upgrade, and I'm still in love with the upholstery. I haven't made time to wire in the seat heat and ventilation yet.

It has been cold here lately (at least by our standards) and I'm happy to report no struggles with starting.  Dial in 4-5 turns into the hand throttle, turn the key and watch for the glow plug light to go out (it is on a thermo-sensitive time switch) and then turn the key further and she fires right up! Adjust the hand throttle as needed to get the idle to 950-1000 or so. A few minutes later when the idle starts racing, crank it down until the idle is 850 or so. Another minute and it's happy dialed to 750-800...once the temp gauge is visibly moving up, dial the hand throttle all the way off and the idle settles into a happy 600-some and all's good. 😁

A new upgrade arrived in the mail...period-correct Koito lights! These would have been a dealer option back in the day. 7" Amber lens, H3 bulb, wiring/connectors gone through and refurbished, black housings, and sweet covers with an owl. I can't wait to mount these on the front bumper!

Images isn't working for me right now; I'll upload a photo later.

ae86andkp61 (Forum Supporter)
ae86andkp61 (Forum Supporter) GRM+ Memberand SuperDork
3/2/25 11:51 p.m.

Life has been a bit busy lately, but I carved out some time for the Cruiser.

Here's the lights:

And here one is held up approximately in place:

Before I get to installing exterior upgrades, I have some impending interior work...namely sound deadening, vapor barriers, door cards, seatbelts, a bit of wiring, and some minor bodywork.

I had been mentally toying with sending the door cards out to Rich, the awesome upholstery guy at the Land Cruiser Shop/Selkirk Offroad, but that lead to thinking about making new ones in some material (Wood, ABS, MDF, ??) to replace to soggy and worn fiberboard originals. After musing over that for a while, I realized new Toyota ones aren't that expensive, so I just ordered some. I'm still thinking about having Rich redo the rear seat.


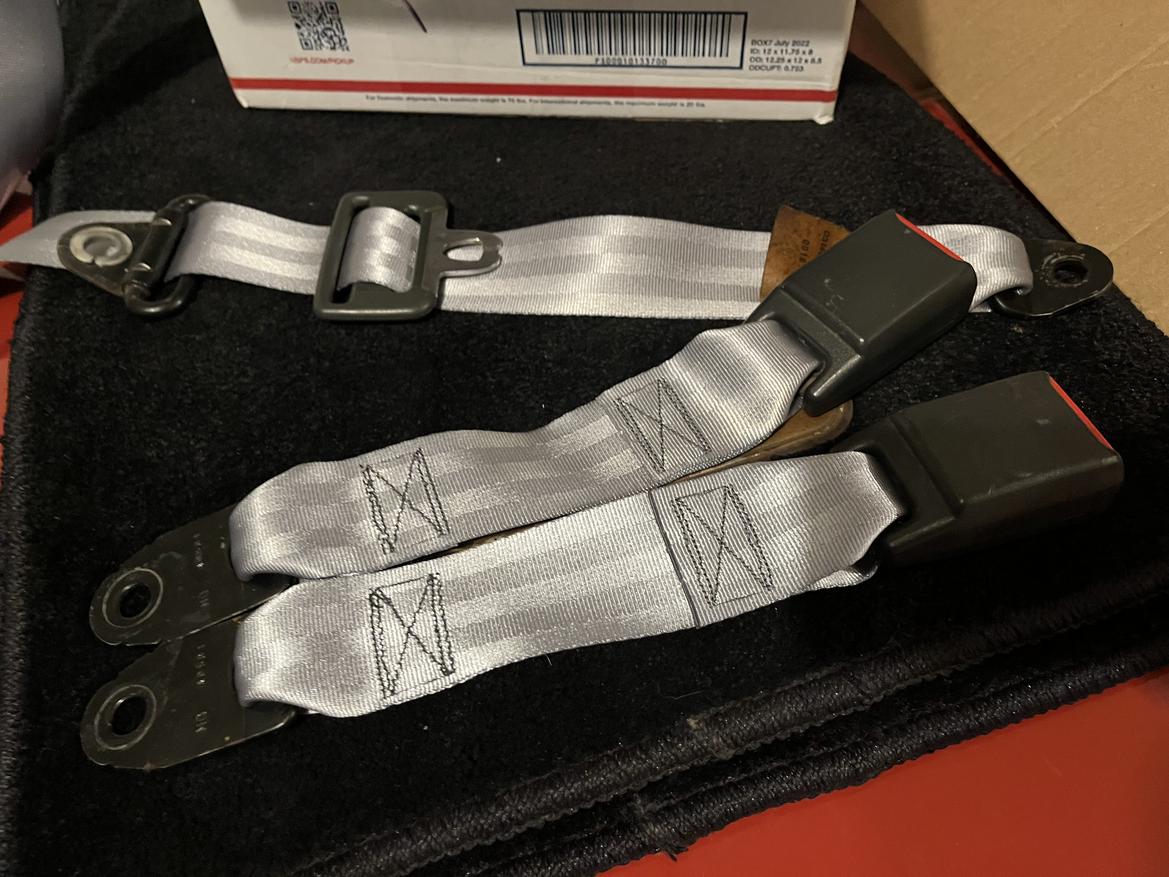
I took advantage of Safety Restore's Black Friday Sale to pay in advance for rewebbing my belts, so I need to pull them and ship them off. While I'm in there, I plan to fix some issues like the missing jack/toolkit trim cover, the missing rear seatbelt retention clips, and the like.

The bottom outboard mounting point for the rear seatbelts had a decidedly non-original-looking bolt. Sure enough, both sides have marginal threads with a nyloc nut stacked on the backside (in the rear fender well.)


I got all the belts out. In the process I think I found the main culprit for the dust leak in the back. When off-roading, fine dust enters the rear of the cabin, creeping out from under the trim panels on the back doors. I'm pretty sure the missing body plug visible below is how the dust gets in. Should be easy enough to fix.

While I was at it, I pulled the eyesore bare aluminum diamond plate off the rear bumper. If the truck will be seeing some downtime, it is a perfect time to get it powdercoated satin black to match all the other exterior trim.

While I was under the rear bumper fishing out a nut I dropped inside the rear bumper/bumper lights, I discovered one of the rear lights has water intrusion! It is still functioning, but probably should be fixed. 
 

I still had a bit of energy, so I tore into the driver door. Surprise, surprise, no vapor barrier here either, and another soft, expanded, warped door card cracked in a couple spots and blown out at half the fastening clips. It turns out fiberboard isn't meant to get wet...who would have guessed? πŸ˜‚

ae86andkp61 (Forum Supporter)
ae86andkp61 (Forum Supporter) GRM+ Memberand SuperDork
3/14/25 12:43 a.m.

I got the newly re-webbed belts back from Safety Restore today...insanely fast turnaround! I'm in Oregon and the belts got to Pennsylvania Monday afternoon this week. They unpacked them, re-webbed them, packed and shipped them, and they arrived back in Oregon Thursday morning around 10am. 🀯

I'm pleased with how they came out. Perhaps I should have done this before sending them out, but I want to tidy up a little surface rust on the anchor tabs before reinstalling them in the truck. I think I can manage with some masking tape, careful scraping, and brush-on paint.

The front seat receptacles are completely encased in plastic sleeves in a way that doesn't allow them to be redone easily. After talking to Safety Restore, I ordered some new receptacles from Toyota to save the hassle. Of course after determining that I shouldn't bother with sending the receptacles, the re-webbed belts beat the newly-purchased Toyota parts that already exist to my house, but I can always temporarily use the old ones and fairly easily swap them over later.

I'm planning to dive into inner door skin crack repair, door sound deadening, and seatbelt work this weekend.

Unlike many other parts, the interior rear side panels are impossibly-difficult to source. I tried every part number for nearly all trim levels in all markets around the world, original 1986 part, the superseded mid-90's part, the early-2000's part, the later-2000's part, the newest part, all NLA in grey! πŸ˜–

I would consider rolling my own with ABS, aluminum, or other sheet material covered in locally-sourced upholstery material, but I already bought new Toyota front door cards that have a specific grain and an embossed pattern in the vinyl. Making my own rear cards would be a ton of labor and wouldn't match unless I also made my own front door cards. We'll see what wins out as the path of least resistance for both front and rear that still looks like a cherry believably-OE interior.

DarkMonohue
DarkMonohue GRM+ Memberand SuperDork
3/14/25 10:17 a.m.

Wow, those belts look fantastic. I need belts for the J20 as well, but I want to add ratchet feature to strap a child seat in, so just restoring the existing ones isn't really an option.

If you can find good rear interior panels in any color, you can make them gray with SEM Color Coat. I've used that stuff a few times and am a true believer. It's amazing how good it looks and how tough it is, assuming proper surface prep and application.

ae86andkp61 (Forum Supporter)
ae86andkp61 (Forum Supporter) GRM+ Memberand SuperDork
3/16/25 3:03 p.m.

In reply to DarkMonohue :

Thanks for the reminder about SEM Color Coat! I used it on my AE86 with thorough prep and had really good results.

The bottom half of this console was blue before I cut it apart to modify it for the 6-speed shifter, plastic-welded it back together, and painted it. The match the SEM achieved with the stock grey is nearly indistinguishable. It also worked well on the faded trim in the hatch area.

Have you looked at aftermarket seatbelt options for the Jeep? With growing interest in classic 4x4s plus the size of the Jeep aftermarket, it seems like there might be something out there. I've talked to multiple customers at work who put more modern aftermarket belts in their classic Broncos, and my dad found a ratcheting 3-point to retrofit to his International.

Back to the Cruiser interior panel, I found a source in Japan (Yoshi Parts) and initiated an order. They emailed me to let me know they have to order from Toyota, and that it would be 3-4 weeks. I said fine. Then they emailed me back to explain that their system doesn't take dimensional weight into account with shipping. It would seem their only shipping service is FedEx (no EMS unfortunately) so my two options are to pay an *additional* $1958 in shipping for the one side panel, or cancel. πŸ€”πŸ€£πŸ˜–

Shipping bulky items internationally is expensive; I get it. We ship car seats at my work, so this isn't news to me. My frustration is advertising international sales and shipping, and then insisting that everything go FedEx Air. Megazip and Parts Souq have slower/more affordable shipping options, but neither one stocks it and neither is willing to try and order it.

ae86andkp61 (Forum Supporter)
ae86andkp61 (Forum Supporter) GRM+ Memberand SuperDork
3/16/25 3:12 p.m.

The primary surface rust is on the front passenger side bottom attachment point for the belt. I'm kicking myself for rushing when removing these to ship them off, as it would have been easier to deal with when I didn't care about the belt. The plan is to knock the worst of it off with purely manual means to avoid knicking the belt, and then brush-on POR15. In my experience, the POR15 adheres and encapsulates well with flakes knocked off, but thin surface rust still intact. This tab is hidden by trim when installed, so as long as it is stabilized and protected, the looks don't matter.

DarkMonohue
DarkMonohue GRM+ Memberand SuperDork
3/16/25 4:32 p.m.

Sounds like a good plan. A wire wheel on a carefully operated Dremel might be another option. You could wrap any vulnerable parts of the belt with masking tape beforehand if you want to be extra careful.

ae86andkp61 (Forum Supporter)
ae86andkp61 (Forum Supporter) GRM+ Memberand SuperDork
3/17/25 7:18 p.m.

Two coats of brushed on POR15 looking pretty good if I say so myself.

ae86andkp61 (Forum Supporter)
ae86andkp61 (Forum Supporter) GRM+ Memberand SuperDork
3/23/25 9:06 p.m.

Today I worked on the Cruiser driver door a bit. I've got several issues to deal with:

  • Sticky/hard-to-crank side window
  • Crack in the paint/metal?
  • Wobbly beltline moldings
  • Missing vapor barrier
  • Dubious door card
  • Completely worn-out old door card trim fasteners that have been reused way too many times 
  • Near total lack of sound deadening

I hope to address all of these issues in one go while I have things torn apart.

I started by pulling the side window glass, followed by the beltline moldings. I have new plastic clips, so I wasn't handling stuff like a gorilla, but also figured I didn't need total kid gloves because if the clips break with standard removal, they are probably old/brittle and should be replaced anyway.

You may have noticed the yellow strip; I started sanding where the crack is to see what is going on below the paint/filler.

Yup, the crack looks to be down to the metal. 😫

Going deeper; quite a bit of filler feathered really far out to blend this in.

Hard to tell what is going on in the back side of the crack inside the door, but there is some sort of build up on the back, but not something that bridges/bonds both sides of the crack as I'm able to flex each side of the crack independently of each other.

I think the root of the problem is damage that was never repaired to the sheet metal on the smaller side of the hole for the beltline trim clip; the small return on the edge of the inner door skin that is angled towards the inside of the door. It looks like it got bent and cracked, which lead to the bigger crack that propagated on the visible part of the inner door skin.

The bend is highlighted by the yellow line. I believe this part is supposed to be flat/straight. I will check by referencing the passenger door and see if I can find other images of bare doors online. The green arrow points toward the crack. With this part broken, vibration goes to work on the crack on the far side of the trim clip hole.

DarkMonohue
DarkMonohue GRM+ Memberand SuperDork
3/23/25 10:15 p.m.

I missed your post about using Color Coat on the AE86 parts. I did similar with mine (lots of red interior parts that needed to be made gray) and with the TE51 (black parts that needed to be blue) that preceded it. Magical stuff.

No, I have not really investigated aftermarket belt options. I'm sure they exist. My mental and financial budgets are just pretty thin lately.

No hope of anyone in your business network shipping European sourced interior panels your way as a favor, is there?

It's amazing how uncooperative manual window regulators get after a few decades. They can come right back with a hood cleaning and de-rusting, and the judicious lubrication. I have used Zep spray white grease with good results, though I think it may be stickier than necessary. Plain white lithium grease might be a better choice.  For vapor barrier, any old plastic sheeting, Visqueen or whatever, will work.

That crack in the door may be a "they all do that" problem, like the "MGB crack" that invariably appears at the rear edge of the wing windows. It's hard to tell from the pic whether that shape is a factory installed brace that has worked loose or some kind of body shop bodge. Keep us posted.

1 2 3

You'll need to log in to post.

Our Preferred Partners
G4AtOggySihwy5K7AmH9nwgLJzHUTizu0lgGfKTBtchPH6ONIEHM5nYUOI9MqnzR