1 ... 3 4 5 6 7 ... 14
obsolete
obsolete GRM+ Memberand New Reader
12/30/20 10:51 a.m.
Gunchsta said:

I've always admired the starquests too, and see you're also from Minnesota. Maybe I'll see this thing around next year! 

Keep up the good work, I love the Ecotec swap and the reasoning behind it. It's refreshing to see people do something other than the prerequisite turbo LS in everything.

Thanks! If there is a Back to the '80s show next year, that's my goal.

mbruneaux said:

Very nice to see a Starquest with a different swap, your logic for choosing the Ecotech would be same as mine.  Great patience and skills!

Thanks! Hopefully I'll be able to get moving on things a little faster in January. Should have other projects out of the way soon and be able to really focus on this one (yes, famous last words, I know). Slowly chipping away at projects instead of throwing myself at them isn't really my style either but it's something I'm trying to get better at.

V6Buicks
V6Buicks New Reader
12/30/20 10:57 a.m.

This is turning out beautifully!  Nice work.

obsolete
obsolete GRM+ Memberand Reader
2/7/21 7:56 p.m.

This thread's not dead! But here we are, it's February, and I'm already way off the schedule I originally set for myself. Isn't that how it always goes with car projects, though? I got crushed by work in January and had some unplanned house projects come up, so I haven't gotten much Conquest stuff done in the past month. The little time I've had in the garage has gone toward my Corvette (the black C5 in the background in some photos). My goal was to finish working on it so I could make room in the garage to pull the engine out of the Conquest. Well, scope creep kicked in on the Corvette; even though I'm planning on selling it in the next year or so, I can't help but improve things while I have it apart. This is all for fun anyway, and I'm enjoying the stuff I'm working on, so I've moved my Conquest project schedule out a few months. I'll keep working on getting the Ecotec engine+transmission setup ready, fix a few 30-year-old car issues, and maybe do some supporting mods for the swap. I can't tear it apart too much though, because I want to keep it driveable on the old engine for summer 2021.

obsolete
obsolete GRM+ Memberand Reader
2/7/21 8:03 p.m.

I made an engine dolly! I pulled the Ecotec off the stand and had it hanging from the crane to play around with the transmission adapter stuff, and I decided it would be easier to have it on a dolly. So, one trip to Harbor Freight and some scrap wood later, here we are. I put the old valve cover back on so the fancy new painted one wouldn't get scratched up by the chains.

obsolete
obsolete GRM+ Memberand Reader
2/7/21 8:10 p.m.

I got tired of looking at the rusty crank and alternator pulleys, so while I was painting some other stuff, I cleaned them up and hit them with a few coats of black engine enamel. Much better.

obsolete
obsolete GRM+ Memberand Reader
2/7/21 8:29 p.m.

While I was getting distracted by other stuff in January, I was also waiting for Speed Gems to fix the issues with my Ecotec-to-SBC adapter kit and return it. Well, last week, it finally arrived! I wasn't thrilled that it took a month for me to get the parts back, but I'm happy to report that this time, everything fits great. They went above and beyond by machining a whole new crank adapter to the correct dimensions instead of just reworking the old one. So, finally, some installed pictures:

The kit came with pressure plate bolts instead of flywheel bolts, so they're about 3/8" shorter than they should be, but good enough for test fitting. I ordered up some ARP flywheel bolts to replace them with.

Clearance to the starter nose is a little tight, but it fits.

obsolete
obsolete GRM+ Memberand Reader
2/7/21 10:42 p.m.

One thing I was worried about with the adapter kit was that the additional mass hanging off the crank would negatively affect shifting, like intentionally bolting on a heavier-than-stock flywheel. Not what I want. The crank adapter is a pretty substantial chunk of billet steel. It weighs over 5 pounds on its own. In addition, the SBC flywheel, clutch, and pressure plate are all larger diameter, so the moment of inertia could end up way greater than a stock Ecotec if I wasn't careful.

So, I used the same skills that got me through college physics classes: I searched Google for the thing I was trying to calculate, clicked on the link for Hyperphysics, and skimmed the page until I found the formula I needed. Then I made a table:

I'm modeling each object as a disc/cylinder with its mass evenly distributed throughout, which is not exactly accurate, but it's by far the most practical, and as they say, close enough for physics. I didn't have an LE5 flywheel to weigh, but I found a forum thread where somebody said it weighs 20 pounds. So, with the Fidanza 10.5 pound SBC flywheel, my combo has a moment of inertia approximately equivalent to a 17.337 pound Ecotec flywheel. Not bad! I didn't bother including the SBC clutch disc or pressure plate in the calculation, since I don't have the matching Ecotec parts to compare to, and they're harder to find weights for. I'm just happy that the MOI of the adapter setup with the flywheel ended up less than a stock Ecotec flywheel. The SBC clutch and pressure plate might put it slightly over, but it won't be too far off, and my conclusion is that shifting probably won't suck; at least it won't be significantly worse than a stock Ecotec. Wouldn't consider this setup for a race car, but it'll work for a street car.

obsolete
obsolete GRM+ Memberand Reader
2/8/21 8:11 a.m.

While I'm playing with the flywheel, why not get rid of that unnecessary ring gear? Well, destroying the flywheel's resale value and potentially damaging it during removal are both good reasons, but I decided to ignore those and remove the ring gear anyway.

The ring gear is held on by some 1/8" cap screws and what looks like some green loctite. I heated them with a propane torch and buzzed them out easily with a 1/4" electric impact. I was hoping that this meant that the ring gear wasn't a tight press fit, but no such luck...

I set the flywheel up on the press and cut a piece of scrap steel tubing to the right length to direct the force toward the edges instead of the center, to hopefully avoid damaging the fancy aluminum part.

I heated the ring gear for a while with a propane torch, then checked it with a thermal camera. Not much progress. Time to switch to the MAP/Oxy torch.

After adding a lot more heat with the hotter torch, I started making some progress. I pressed it off in three steps, turning the flywheel twice to try to get it off evenly without damaging anything, but the ring gear still ended up getting bent. The piece of steel tubing I was pressing on bent too, which wasn't really a surprise, but it barely touched the center of the flywheel. Most of the force was still going to the outside edge.

Yeah, I probably could have spent a little more time on this and set it up better to avoid damaging the ring gear, but whatever. Onward.

Ta-da, no more ring gear! I'll check it for runout eventually, but I don't think the flywheel was harmed at all during the ring gear removal process.

obsolete
obsolete GRM+ Memberand Reader
2/8/21 11:24 a.m.

After test-fitting a bellhousing, the next problem that needs to be solved became obvious: the thermostat housing.


I figured there would be some interference here, and my original idea was to make some spacers like the EcotecMiata kit uses, or just see if I could get them to sell me a set:

But if I want to use this turbo manifold, spacing out the thermostat housing is going to cause clearance problems with the coolant pipe. You can see here that it's already touching the #3 primary tube:


And even with a gap between the housing and the block, it's also touching the adapter plate:


The adapter plate is notched for thermostat housing clearance, but it was designed to work with the older-style thermostat housing that came on 02-05 L61 engines:


I don't really want to use that one. It looks like it would cause even more interference with the turbo manifold, and I don't want to loop the lower radiator hose behind the head to the driver's side of the engine bay. The Conquest lower radiator hose is on the passenger's side, and I'd like to use a stock-style aftermarket radiator, so I want to keep everything on that side of the engine bay.

Most people who use adapter plates on Ecotecs just slap on a CBM water neck. The problem with it is that it deletes both the thermostat and the heater hose ports, which are two things I'd like to keep:

I found a guy who cleverly modified his to incorporate a thermostat, but even if I did that, I still don't see a good way to plumb a heater core.

So, back to the drawing board. Here's a diagram of the stock Ecotec cooling system. Looking at this, it dawned on me: why does the thermostat  need to be mounted back there at all? The port on the back of the head that feeds the heater core doesn't flow into the rest of the housing; they are only connected by a small bleed hole. I could get rid of the thermostat housing and water pipe entirely, and mount the thermostat up by the water pump instead.


Then I remembered this awesome NASA ST4 build where a guy did just that:
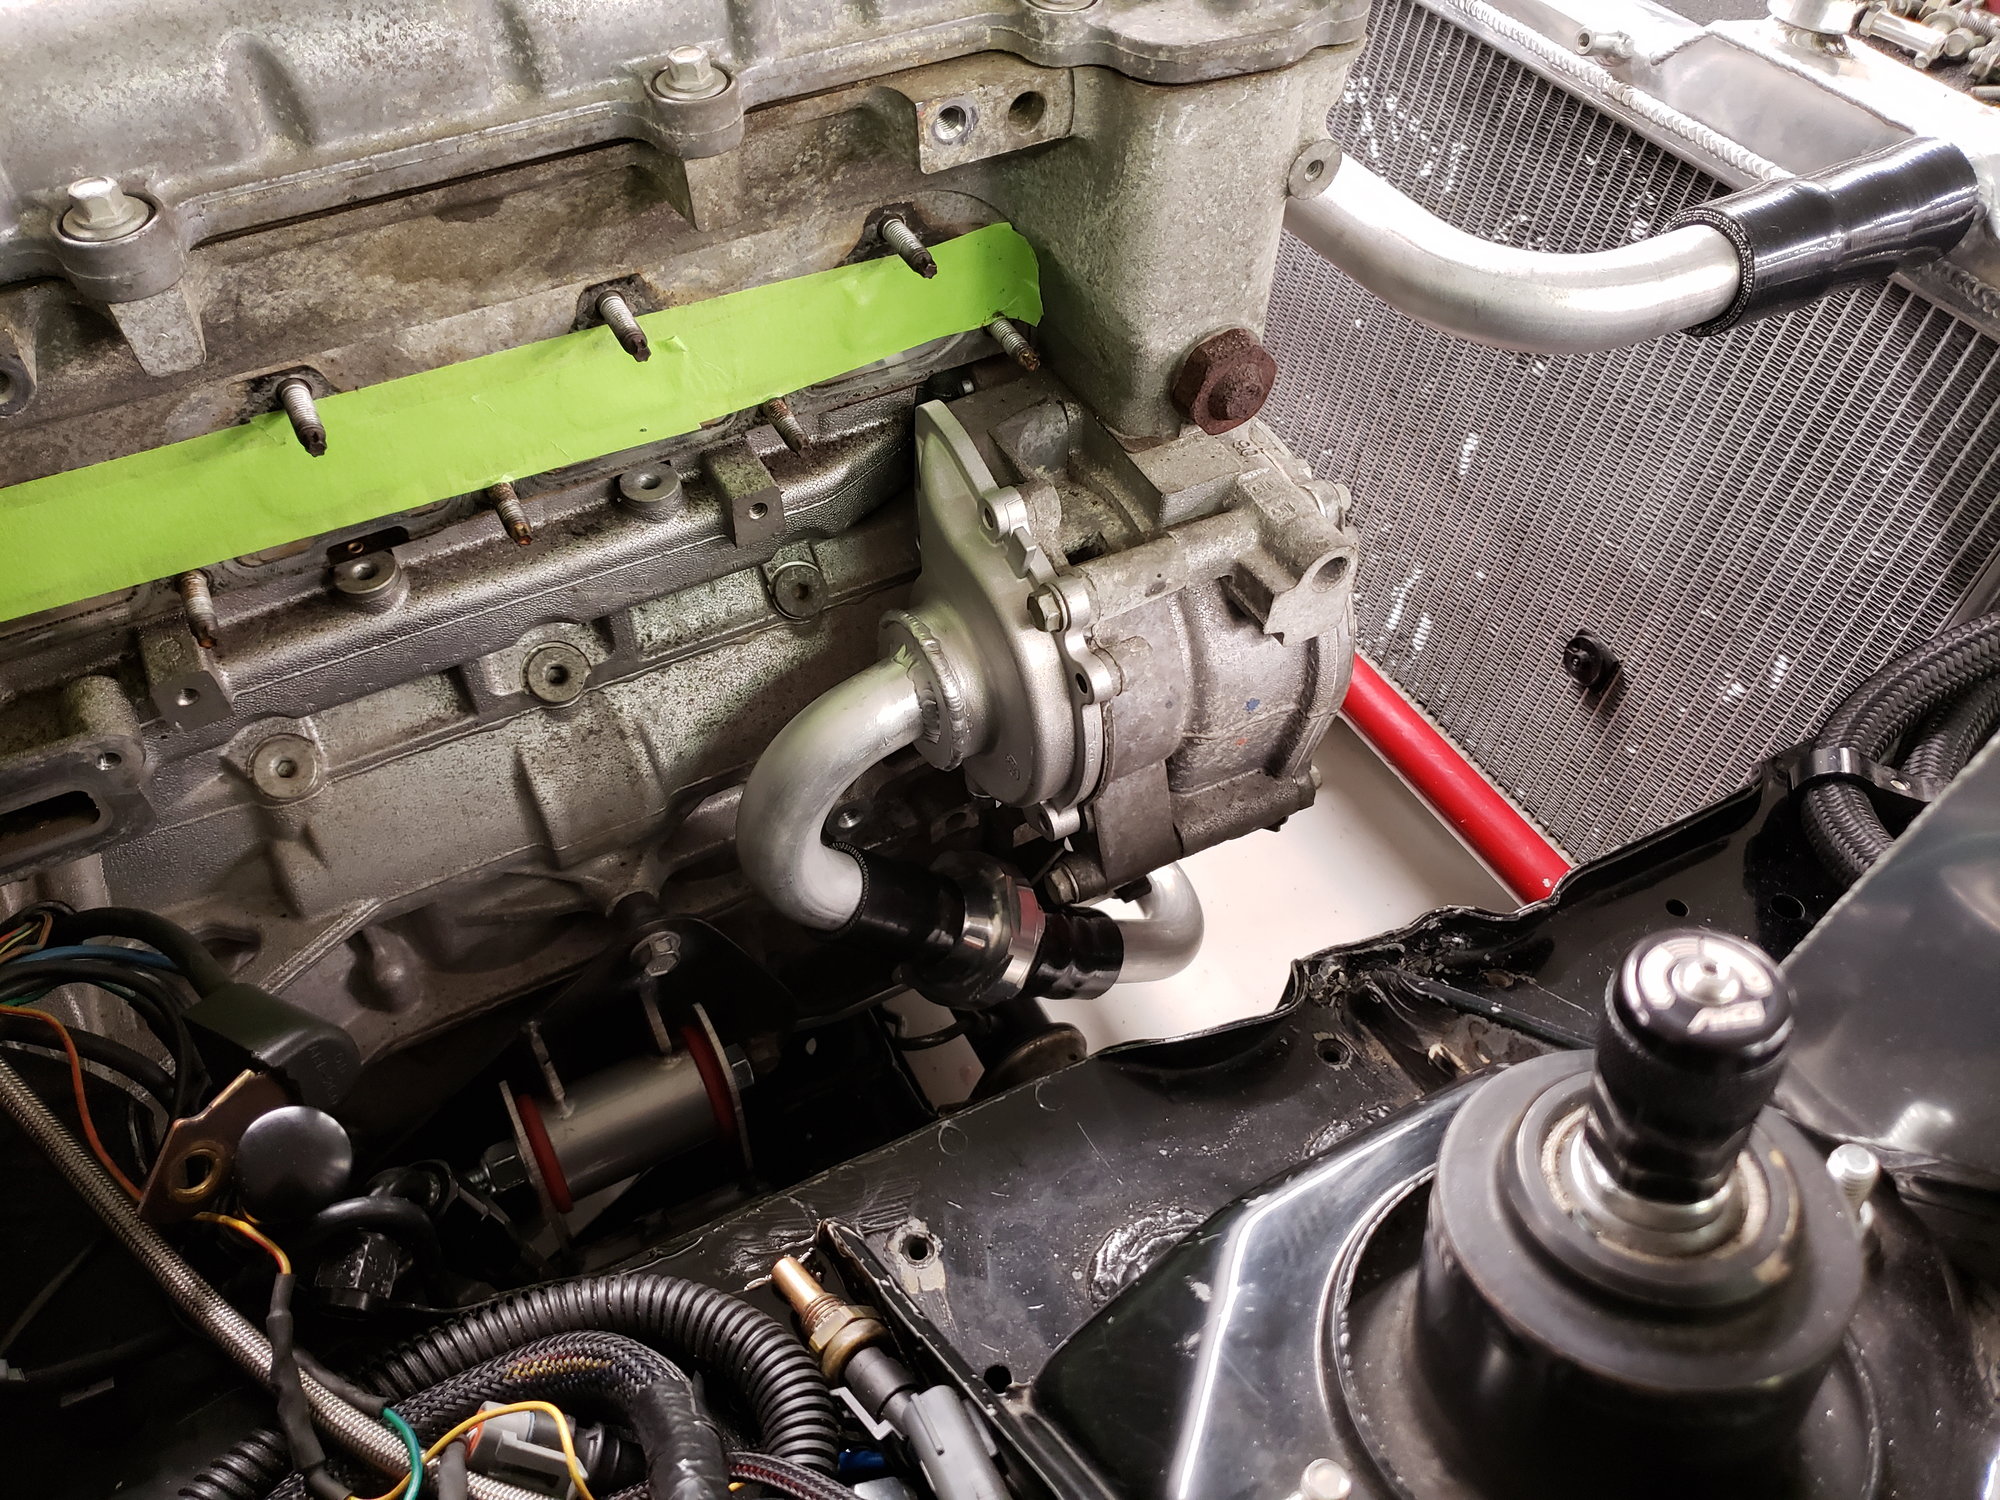
 

I don't have his TIG skills, but I have a local fabricator who will do small jobs like that for pretty reasonable prices, so I think that'll be my plan. I also discovered something convenient. -16 AN ORB bungs, like this one, have an OD of around 48mm. And the ID of the water pipe port on the rear cover of the water pump is...


I also found this nice inline thermostat housing that has 1.5" hose ports with -16 AN ORB threads on the inside. Plus, it has a 1/2" NPT threaded port that I can plumb the return from the heater core into, just like factory. Perfect!
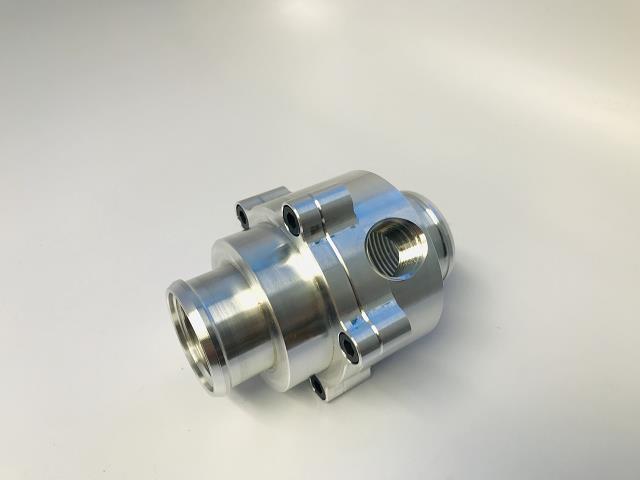
 

So, now I just need something for this port at the back of the head to feed the heater core and mount the coolant temp sensor.


Turns out that such a product already exists, but I think I can make a better one myself for a lot less than $90.

So, that's the plan. Works great in my head, we'll see how well it actually works in real life eventually...

V6Buicks
V6Buicks New Reader
2/8/21 11:44 a.m.

Jeeeez.  Yeah, $90 is a ripoff for something that simple.

Nice work so far!  This is a fun project to follow.

obsolete
obsolete GRM+ Memberand Reader
2/8/21 6:04 p.m.

Thanks! Yeah, with a scrap piece of aluminum flat bar and a drill press and I could make something that will work just as well as that. We'll see how fancy I want to get with it. I'm happy with this cooling system plan, though.

obsolete
obsolete GRM+ Memberand Reader
2/9/21 1:31 p.m.

Ordered the inline thermostat from the Mustang place. It's a really slick piece, the price is reasonable, and it's even made in the USA.

I don't think I'll be using the -16 ports, though. Everything -16 AN or ORB is shockingly expensive, and putting together the combination of fittings I was envisioning would cost a stupid amount of money. Leaning towards just welding an aluminum elbow on the water pump inlet and clamping hoses onto it, exactly like the Miata guy above did.

obsolete
obsolete GRM+ Memberand Reader
2/9/21 1:50 p.m.

I decided to start playing around with the emachineshop software last night. The last time I did any CAD was in junior high school (on a Power Mac 5400/180!) but after some trial and error and about a billion caliper measurements, I was able to come up with this for a water outlet plate:

It could still use some refinement (the whole thing doesn't need to be 3/4" thick) but I think it's got potential. The software can export to .stl format so I can have one of my local friends 3D print a test piece. The automatic quote price from emachineshop is around $42 per piece for a quantity of 10 in 6061 aluminum...the price per piece quickly gets unreasonable in smaller quantities than that.

I can't get automatic quotes if the holes are threaded (as soon as I specify that any holes need to be tapped, the tool says a manual quote is required) so I'll add those last and see what they come back with. If it's not too bad, I may try to find 9 other RWD Ecotec swappers who might want these.

obsolete
obsolete GRM+ Memberand Reader
2/10/21 1:35 p.m.

Found a really nice sandblasted and painted C4 Corvette bellhousing on eBay. It's the one that originally came with the dreaded Doug Nash 4+3 transmission. It has an interesting combination of features:

  • Externally smaller because it's designed for the smaller 153T flywheel vs. the larger 168T, so firewall clearance will be a bit better.
  • Mounting bosses for external push-style hydraulic slave cylinder.
  • Low clutch fork position has the best chance of clearing the Conquest floor pan. I'm not getting my hopes up too much, but it would be neat to have the choice between internal and external slave.
  • Straight-up transmission mounting angle (not rotated 17deg like an F-body).
  • Surprisingly light! It weighs less than 8 pounds, vs. the reproduction "621" bell I have, which is over 11 pounds. If I go external slave, the beefy steel clutch fork will eat up some of that weight advantage.

Test fit:

Side-by side with the 621:

I guess it's time to bolt a transmission on soon, if for no other reason, to figure out which pilot bearing I'm going to need.

newrider3
newrider3 Reader
2/10/21 9:54 p.m.
obsolete said:

It could still use some refinement (the whole thing doesn't need to be 3/4" thick) but I think it's got potential. The software can export to .stl format so I can have one of my local friends 3D print a test piece. The automatic quote price from emachineshop is around $42 per piece for a quantity of 10 in 6061 aluminum...the price per piece quickly gets unreasonable in smaller quantities than that.

I can't get automatic quotes if the holes are threaded (as soon as I specify that any holes need to be tapped, the tool says a manual quote is required) so I'll add those last and see what they come back with. If it's not too bad, I may try to find 9 other RWD Ecotec swappers who might want these.


It looks like your larger hole is blind in relation to the slot and o-ring groove. This is probably jacking up the price since it would require a second setup (flipping the part over and re-indicating and re-fixturing) and an end milled flat bottom hole rather than a straight drilled through hole. See if you can adjust the size of this hole to omit the interference, or model it as a complete through-hole that takes a little bite out of the o-ring area.
Can you do without the o-ring groove? That's an expensive feature, perhaps a regular gasket and sealant would be good enough. Also consider whether the part can be a simple rectangle or made up of a couple rectangular areas with all straight and parallel/perpendicular edges; the angled sides also add to part cost since they're harder to fixture against and harder to indicate/machine.


The $90 premade version you showed above could be replicated at home with some scrap aluminum, a pencil rubbing, drill press, and a $15 pipe tap set; no welding necessary; the sensor is NPT threaded and you can get male NPT nipple to -AN fittings as well. 

twentyover
twentyover GRM+ Memberand Dork
2/11/21 10:17 a.m.
obsolete said:

While I'm playing with the flywheel, why not get rid of that unnecessary ring gear? Well, destroying the flywheel's resale value and potentially damaging it during removal are both good reasons, but I decided to ignore those and remove the ring gear anyway.

  .....

Yeah, I probably could have spent a little more time on this and set it up better to avoid damaging the ring gear, but whatever. Onward.

....

Ta-da, no more ring gear! I'll check it for runout eventually, but I don't think the flywheel was harmed at all during the ring gear removal process.

Pardon me being dense, but without the ring gear, what does the starter turn? I looked for a smaller diameter ring gear somewhere, but wasn't seeing it

obsolete
obsolete GRM+ Memberand Reader
2/11/21 10:40 a.m.
newrider3 said:

It looks like your larger hole is blind in relation to the slot and o-ring groove. This is probably jacking up the price since it would require a second setup (flipping the part over and re-indicating and re-fixturing) and an end milled flat bottom hole rather than a straight drilled through hole. See if you can adjust the size of this hole to omit the interference, or model it as a complete through-hole that takes a little bite out of the o-ring area.
Can you do without the o-ring groove? That's an expensive feature, perhaps a regular gasket and sealant would be good enough. Also consider whether the part can be a simple rectangle or made up of a couple rectangular areas with all straight and parallel/perpendicular edges; the angled sides also add to part cost since they're harder to fixture against and harder to indicate/machine.

The $90 premade version you showed above could be replicated at home with some scrap aluminum, a pencil rubbing, drill press, and a $15 pipe tap set; no welding necessary; the sensor is NPT threaded and you can get male NPT nipple to -AN fittings as well. 

Thanks. Good points about the setup and fixturing. I feel like the stereotypical engineer, sitting in my office chair clicking a mouse to design a part, with no regard for how it will actually be produced. I'm trying to learn, though; that's the main reason I'm doing this, so I really appreciate the feedback. I've actually gone through a couple revisions already to eliminate unnecessary features. The pocket in the center is totally unnecessary, and there's no reason both holes can't be drilled straight through as you said. Having the o-ring groove is the biggest advantage of CNCing something vs. just making it myself by hand, so I want to keep that. I'll try doing flat sides next and see how much of a difference that makes.

Yeah, if I just needed something that would get the job done right away, I could grab a piece of scrap 1/2" aluminum and have a serviceable part that I could seal to the block with RTV in under an hour. Actually, just taking a grinder to a factory thermostat housing and hacking off all the parts I don't need, then soldering/brazing the bleed hole shut, would be a fine option too. I'll see how the CNC route goes, and if it ends up being a dead end, I'll do one of those two things instead.

obsolete
obsolete GRM+ Memberand Reader
2/11/21 10:58 a.m.
twentyover said:

Pardon me being dense, but without the ring gear, what does the starter turn? I looked for a smaller diameter ring gear somewhere, but wasn't seeing it

You are pardoned. I have a picture that shows it, but it's a ways up the page, so I'll post it again. The original flex plate from the Ecotec automatic transmission is sandwiched between the adapter and the crank. That provides the ring gear for the original Ecotec starter to engage.

I wish the adapter kit was designed to mount a SBC starter instead, because guys with the early EcotecMiata kits that use a similar setup have had problems with the Ecotec flex plate being too flimsy and eventually grenading. I'm planning to try to prevent that from happening to me. We'll see how it goes.

So does the flywheel bolt to the crankshaft sandwiching the flex plate and bolt to the outer flex plate mount holes? 

If not that could be a reason for the flex plates detonating frequently.

twentyover
twentyover GRM+ Memberand Dork
2/12/21 10:19 a.m.
obsolete said:
twentyover said:

Pardon me being dense, but without the ring gear, what does the starter turn? I looked for a smaller diameter ring gear somewhere, but wasn't seeing it

You are pardoned. I have a picture that shows it, but it's a ways up the page, so I'll post it again. The original flex plate from the Ecotec automatic transmission is sandwiched between the adapter and the crank. That provides the ring gear for the original Ecotec starter to engage.

I wish the adapter kit was designed to mount a SBC starter instead, because guys with the early EcotecMiata kits that use a similar setup have had problems with the Ecotec flex plate being too flimsy and eventually grenading. I'm planning to try to prevent that from happening to me. We'll see how it goes.

Understand. Clever idea-

obsolete
obsolete GRM+ Memberand Reader
2/12/21 10:49 a.m.
QuasiMofo (John Brown) Forum Supporter said:

So does the flywheel bolt to the crankshaft sandwiching the flex plate and bolt to the outer flex plate mount holes? 

If not that could be a reason for the flex plates detonating frequently.

Yeah, by design, the flex plate gets sandwiched between the adapter and the crankshaft with no other support. If it gets bent at all (by the starter, perhaps) it's free to wobble around and eventually fatigue and crack around the center. There are some pictures of broken ones from Miatas in the thread I linked to in my last post, and that's how they fail.

Here's the whole assembly off the engine. I'm planning to make 3 stand-offs to attach the flex plate to the back of the flywheel using the torque converter mounting holes. I'm waiting on a friend of a friend who's agreed to cut the end off a junk crank to help me get everything aligned properly.

In reply to obsolete :

I think that after that the flex plate should live a long happy life!

The Jaguar AJ V8 has a manual transmission that bolts directly to the engine but no one has an affordable flywheel because the 36-1 crank trigger is integral on the flex plate. Seeing this setup makes me consider adapting a small diameter clutch and flywheel on to the flex plate then running a SpeedyEFI/Megasquirt. It would make a lot of issues with the donor XJR disappear.

obsolete
obsolete GRM+ Memberand Reader
2/15/21 8:29 a.m.
QuasiMofo (John Brown) Forum Supporter said:

I think that after that the flex plate should live a long happy life!

Fingers crossed!

The Jaguar AJ V8 has a manual transmission that bolts directly to the engine but no one has an affordable flywheel because the 36-1 crank trigger is integral on the flex plate. Seeing this setup makes me consider adapting a small diameter clutch and flywheel on to the flex plate then running a SpeedyEFI/Megasquirt. It would make a lot of issues with the donor XJR disappear.

Interesting, never heard of that one before. Sounds like you're looking for a button flywheel. These guys sell blank ones: https://www.powertraintech.com/products/flywheel-7-25?variant=32944967843980. Might be worth talking to them for the other dimensions to see if you could get one of those to work, or if you'd need something custom made. I've also heard Quarter Master is pretty reasonable to work with for custom applications. Tilton makes parts for 7.25" setups too. Goes without saying these are for race-only clutches.

In reply to obsolete :

I was looking at those! 

Now to find a "not $500" clutch and pressure plate assembly.

/Threadhijack

obsolete
obsolete GRM+ Memberand Reader
3/21/21 12:34 p.m.


What do you do with a "winter project" that you never really got started on over the winter? New wheels, of course!


These are NS Drift MDV2 wheels. Cheap, cast, 1-piece, straight outta China. They're kind of a mashup of Enkei 92, Riken, BBS, and SSR mesh style wheels (and probably some others I'm forgetting) while not actually being exact replicas of anything, as far as I can tell. I love the factory widebody Conquest wheels; they're some of the greatest of all time, but if there's another style that looks right on this car, I think it's the old-school mesh. Yeah, larger diameter modern style wheels allow for bigger brakes and better tire selection, and I may end up going that direction someday, but right now, I'm digging these.

The tires on the factory wheels are BFG G-force Sport (not Comp, not Comp II) with 2005 date codes. They're rock hard and very easy to spin...that was kind of fun last summer, but I'm done driving around on >15 year old tires.


The perspective is a little odd and makes the wheels looks like they're about 15x12, but they're 16x9.5. I ordered a pair of 16x8.5s for the front and a pair of 16x9.5s for the rear, but they shipped me four of the 16x9.5s, so I got to pick the two least obviously porous ones with the fewest cosmetic defects and ship the other two back. I'm still waiting for the fronts, but I couldn't resist opening up the garage and test-fitting one of the rears on a warm, sunny Saturday afternoon.

Tire clearance to the strut might be a little close, but if I need to, I should be able to space these out a bit before worrying about fender clearance.


One of the mods from the previous owner (probably 10+ years ago) is Toyota MR2 KYB damper inserts in the rear. The MR2 inserts are a common choice since all of the Conquest-specific rear inserts are discontinued. You can definitely feel how much firmer they are than stock, which makes sense, I think, given the difference in weight distribution between the two cars.


I remember reading forum threads about installing the MR2 inserts, and I don't recall the procedure requiring welding. I thought the MR2 inserts were shorter than stock and required a spacer at the bottom of the stock housing, but maybe the PO decided to cut down the housings instead? It will be interesting to see what I'm dealing with here when I take these apart someday.

1 ... 3 4 5 6 7 ... 14

You'll need to log in to post.

Our Preferred Partners
Ew3DH6COcXriMDjgid7adhf5BO7fWwkmlKXvVVOfJM9RHm1bnu0qiBaE9T8rY0DE