ahaidet
New Reader
10/5/14 9:36 a.m.
As I prepared to pull the old motor I decided I needed additional information. The Haynes manual just wasn't cutting it. I did a quick search for a factory manual and ended up purchasing Keith Tanner's book and also the Enthusiast manual. Both have been excellent resources and in general easier than Googling or posting a question to a forum. (Keith was answering most of my questions on here anyway so I figured his book was worth it... if nothing else but to thank him for his help) Even in today's digital world a good old fashioned manual is still a useful tool when working in the garage.

ahaidet
New Reader
10/7/14 11:38 a.m.
One clever tip I picked up in Keiths book suggests using angle brackets to mount the 1.6 coils on the 1.8 head. I made simple angle brackets fabbed up the old fashioned way with my band saw, drill press and grinder (looks like I can still make things with my hands without using CAD or CNC tools)


In order to use the new 8.2mm Taylor 1.8L wires I purchased with the 1.6L coil required swapping the signal wire between the left and right coil. The Miata is wasted spark so cylinders 1 and 4 and 2 and 3 fire together. Not only did I swap the signal wires I also swapped the order they were connected to the coil.

Final test fitting:

I then cleaned up the brackets with a file and sand blasted them to prepare for powder coating later.
Another way to swap the signal wires: do it in the connector at the end of the wiring harness.

ahaidet
New Reader
10/8/14 9:38 a.m.
That sounds like another good option.
I have more updates to post but I am going to jump ahead here. My friend and I pulled the 93' 1.6L and trans last night.


It went fairly smoothly. After separating the trans and motor I noticed a good bit of oil (not sure if gear or motor) sitting in the bell housing.

After pulling the clutch I am inclined to believe it is gear oil as the rear main seal doesn’t appear to be leaking that bad, just a little seepage. I have seen gaskets for the trans that I believe may need to be replaced based on this finding? Is this a common spot for leaks on the 5speed?

My current plan of action unless someone can make a case for something else is to replace the seals and install it on the Turbo 1.8L I am installing. Since I didn't build the bottom end on the 1.8L both it and the 5speed seem to have similar limits of around 250hp. If I crave more power down the road build a bottom end with a 99 head and install it with a 6speed.. maybe?
Are there any differences between the years of the 5speed that makes one more durable than the others?
More likely it's from a CAS o-ring at some point. That said, there is a seal on the input shaft of the trans that should be replaced when you're in there.
The NB 5-speeds have a slightly altered shift pattern and extra synchros on a couple of gears. That's not going to make a difference in ultimate strength.

ahaidet
New Reader
10/8/14 11:04 p.m.
Tonight I began transferring parts over from the 1.6L to the 1.8L. The 1.8L didn't have an intake manifold brace when I bought it from the junkyard. I assumed the 1.6L brace was the same. Tonight After looking at them closer and removing the 1.6L brace I realized they are not the same.
Here is the 1.8L motor missing its brace.

Here is the 1.6L motor with its different brace.

Any suggestions on where to get a brace for a reasonable price? Does it have a specific name other than Intake Manifold brace?
Leave it off. It just gets in the way. I think we took the one off our shop 1990 in 1990 and none of our other cars have them. It's SOP to remove them on the 323 application as well, otherwise you basically can't change the oil filter. There have been no long term ill effects.

ahaidet
New Reader
10/9/14 7:09 a.m.
Great! That's a simple solution. Thanks again Keith.

beans
Dork
10/9/14 10:37 p.m.
Interesting. I don't ever remember that being on my '95 either. I recall that I could change the oil filter fairly easily with my oversized racoon paws. All the more reason to believe my '95 R had someone's hands in it at some point as it was a very strong car.

ahaidet
New Reader
11/13/14 10:13 p.m.
So... time for an update finally.
I powder coated the brackets I made for the ignition coils, the water pump pulley, and the alternator bracket. First I sand blasted all the parts:

Alternator bracket partly done.
Then I sprayed the powder and baked them.

The booth I made a few years ago out of plywood and a Harbor Freight cart.


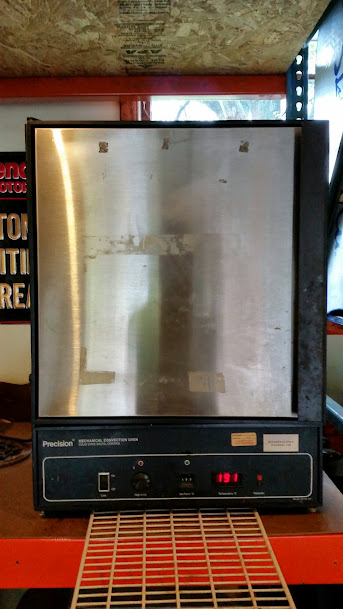
The oven I bought at an industrial surplus locally called HGR.

The parts turned out great.


One problem I found out shortly after the parts cooled...
The alternator bracket doesn't transfer to the 1.8L motor... The 1.6L alternator transfers to the 1.8L bracket to mount to the 1.8L motor. So I wasted my time on the bracket :(
But the other parts still look great.
If anyone is interested in a nicely powder coated 1.6L alternator bracket shoot me a message and we can work out a deal.


ahaidet
New Reader
11/13/14 10:41 p.m.
I replaced the fuel injector connectors with the new ones for the Fuel Injector Clinic injectors.
I stripped back the majority of the plastic wire coverings to gain access to the wires underneath.

I used non-insulated crimp connectors and my ratcheting crimper from Amazon to make the connection and then finally heat shrinked the connector.


I also lengthened the wires to the temp sensor as well to reach the location for the 1.8L sensor.
When I was all done with the connections I ran new wire sheathing to protect it.


Re-installed and connected to FIC injectors.


ahaidet
New Reader
11/13/14 11:33 p.m.
I then cleaned up the transmission.


It took a good bit of effort to clean up inside the bellhousing.
Before:

I am pretty sure the transmissions seals were leaking causing the mess in the bellhousing.
So I replaced both seals on the front of the transmission, the gasket and oil seal.


Cleaned up and seals replaced:

Ready to mate to the 1.8L motor now.
Nice! You have to be itchin' to take this for a spin.
That rewire job makes me happy, especially sheathing the wires like that.

ahaidet
New Reader
11/16/14 11:13 p.m.
ScreaminE wrote:
Nice! You have to be itchin' to take this for a spin.
Yeah I am! But they are calling for snow this week in Northeast Ohio. :( I still have a good bit of wiring and plumbing to complete but I hoping to get it drivable soon so when the weather breaks for a few days I can get it out to do some street tuning.

ahaidet
New Reader
11/16/14 11:16 p.m.
The0retical wrote:
That rewire job makes me happy, especially sheathing the wires like that.
Thanks me too! Makes me want to clean up the whole engine bay with it. I will probably do that after I get it running and am looking for little projects here and there.
It's threads like this that make me sad tall guys don't fit in the Miatas.

ahaidet
New Reader
3/8/15 10:36 p.m.
Well I didn't beat the snow.
I did get the engine installed:

I also installed the FM intercooler as well:

The engine went in fairly smoothly with the help of a few friends.
Then life got super busy around the holidays and the weather turned to complete E36 M3 for a month or more (Northeast Ohio had the coldest February ever, literally). I worked on what I could and got a little done. Now that the weather is starting to break I am getting more focused and the warmer weather makes garage time more comfortable.

ahaidet
New Reader
3/8/15 11:00 p.m.
I was able to make progress on mounting the NGK AGX Wideband Display in the spot under the radio:
Here is a mockup:

I 3d printed a bracket to hold the AGX display and then I 3d printed a panel to hold the AGX bracket as well as some buttons for data logging, traction control and launch control (master switch). I also wanted to install a USB charger and the microphone for the Bluetooth phone connection on the radio.


Yep that panel is awesome, well done!
This is looking great! Keep this up!

ahaidet
New Reader
3/9/15 10:15 p.m.
Thanks for all the kind words guys!


