
In reply to Pete. (l33t FS) :
Yep, looks like creep, or at least a form of it. I'll post more in a bit but there's more where that came from. I work in the gas turbine industry and it's common in seals and springs. It eventually happens to anything exposed to high temperatures but we try to pick materials to maximize life. I'm usually not interested in anything other than OEM Mazda parts (other than ceramic apex seals) but this whole situation has me looking at Atkins' "inconel" corner seal springs. I know their designed-in-house items have mixed reviews but even Inconel 625 would have higher heat capacity than spring steel or whatever Mazda uses. Though, in my work experience IN625 or any of the other common Inconel alloys like 718, 783, etc. are not common spring materials. Cobalt-based alloys like Haynes 188 or L-605 (Haynes 25) are good. Creep-wise they're about as good as the nickel-based alloys but cobalt has the benefit of forming lubricious oxides so they wear less. Where temperature resistance is needed something like Waspaloy is a common choice.
In reply to infernosg :
Would it be easier to just try and get your oil temps lower ?
Got the engine completely torn down last night. There's a lot to take in here so bear with me. Current work bench status:

Front side housing and stationary gear are still on the engine stand draining the last bit of oil and coolant. But let's go back to the start of the day. The previous night I'd pulled the rear side housing and found a corner seal with no spring tension. That definitely wasn't helping compression. Last night picked up where I'd left off and started with pulling the rear rotor housing. This is what I found.

I can't say I'm surprised to see what looks like heat distress here. I can't feel any scoring other than the usual flaking around the edges that was there before the last rebuild. There was a good amount of this brown discoloration around the spark plug holes and a bit around the exhaust port. Some of the apex seals had a similar discoloration but more on that in a bit. I'm going to call this reusable but a resurfacing may be necessary. The real fun began when I pulled the rear rotor and flipped it over. I found ANOTHER flat corner seal! Except this time there was NO SPRING AT ALL! I'm 100% confident I installed all the springs and past compression tests confirmed this. In fact, the rear rotor has some evidence of something being ejected through the engine:


Nothing a bit of light stoning won't fix. I'm going to guess that somehow the missing corner seal flattened, broke, then found its way out. Amazingly there is no damage to either the rotor housing or center side housing. It's worth noting the corner seal with the flat spring and the seal with the missing spring were located at the same apex. The other two corner seals on the front side of the rear rotor still had their rubber plugs, too. Speaking of the center housing, this is how it looks:


Flash makes the wear look worse than it really is. None of this fails the fingernail test. Some have recommended lapping but I'm not sure that's necessary. What's interesting is more of this brownish-orange discoloration. It lines up with the path and areas in contact with the apex seals. It's present on just about everything to a degree and is most prominent around the spark plugs. There's no discernable difference in texture and it does come off to an extent with slight rubbing.
Moving onto the front rotor. Recall this one had three even pulses during the compression test. While none of the corner seals were flat one on the rear was noticeably lower than the others and was missing the rubber plug.

At this point it should come at no surprise that the corner seal on the other side at the same apex was also somewhat flattened. The front rotor housing and front side housing were similar to the others.


The good news is all the expensive bits appear to be reusable. I've committed to getting the rotors side clearance, lightened and rebalanced before putting this engine back together. I'm still debating on lapping and renitriding the side housings (done before) and resurfacing the rotor housings. While both are discolored there really isn't any noticeable wear. I do need to check for flatness, though. As with any rebuild all soft seals and springs will be replaced. I'll cover the apex seals more in the next post but I decided to get new springs for them as well (yeah, NRS Rotorsports is still in business). I've organized and labeled the side seals but I'm considering replacing and re-cutting them. While in spec, I think I can do better with their end gaps.
Now to start cleaning and ready the parts cannon!
In reply to dannyp84 :
The maximum oil temperatures I see are 225F. While that's above what a lot of people will consider "safe" I don't think it's a problem for a few reasons. 225F is the highest I ever see, even on extremely hot days, so while high my oil cooling system is still under control. Also, that 225F is intermittent, usually only occuring in lower gears at lower speeds through slower sections of the track. Water temperature peaks at 200F while moving, so again, cooling system seems under control. If water and/or oil temperature kept creeping higher the longer I'm out there then I'd be concerned. That would mean my system isn't capable of removing heat from the engine. Also, with the upgraded oil system I'd installed about a month ago I was reliably seeing oil pressure in the 90-100 psi range despite the elevated temperatures.
What I think happened is I was just running this engine at the ragged edge. Various engine parts clearly show signs of heat distress. Flattened springs, broken spark plug electrodes, missing corner seal plugs, etc. Timing advance, split and target air-fuel ratio were all based on what made the most power on a dyno. When I get this engine back together I'm going to reduce the timing advance at WOT by a degree or two, increase split a bit and richen the AFRs. I need to pay attention to that last thing. On the dyno we were seeing AFRs in the 12.5-13:1 range, which is safe, but I'm also pushing the injector duty cycle above 90%. It's been theorized that I could be leaning out a bit on track with elevated fuel temperatures. I'm going to have my injectors cleaned and inspected and I plan on bumping base pressure up to 4 bar from the 3 it's currently at.
In reply to infernosg :
is that only showing copper on the 1 side of the bearing? that makes me think your accy drive belt is too tight and drawing down on the e-shaft, is that on the bottom surface or top surface? that would tell you which is which.
In reply to infernosg :
Going a little rich on air/fuel was going to be my next suggestion. Your dyno numbers were really impressive but there's something to be said about a motor that's "fat and happy" especially for continuous lapping at the track.
So I want to talk apex seals and heat for a bit since I noticed some trends during teardown. Here's a shot of the apex seals and springs from the front rotor:
One of these doesn't look like the other, right? Want to guess where it was located? If you said the same apex with the bad corner seals you'd be correct. It's hard to tell from the picture but the springs are also slightly more squished than the others'. While I didn't take any pictures of the rear apex seals the difference is even more pronounced and the springs are even more flattened. The discoloration is similar to that found on the housings. It mostly comes off with some rubbing but more stubborn areas will require sanding with 2000 grit or something not very aggressive. All seals are flat and measure the same width (still need to measure thickness and length), so I'll be re-using these after some light cleaning and there all getting new springs.
What I don't understand is why one apex of each rotor appears to be running hotter than the others. It was only a matter of time before I lost compression in the front rotor as well. I need to do some more measuring but I wonder if this is a weakest link type thing. Are these seals shorter/longer or thicker/thinner than the others? Did these apexes have the largest side seal gaps? Are those apexes wider/narrower? While it's good I found the root cause of the compression loss I don't have the root cause of the failure mode.
In reply to fidelity101 :
Yeah, it's located on one side at the very back of the rear stationary gear bearing. The opposite side looks good and so do all the rotor bearings and even the front stationary gear bearing. I wonder if it's from removing/installing the flywheel nut. I don't have an impact so I use the giant wrench method. Breaking it loose and tightening it to spec involves me putting a lot of force on what is essentially a 3 ft breaker bar.

infernosg said:
In reply to Pete. (l33t FS) :
Yep, looks like creep, or at least a form of it. I'll post more in a bit but there's more where that came from. I work in the gas turbine industry and it's common in seals and springs. It eventually happens to anything exposed to high temperatures but we try to pick materials to maximize life. I'm usually not interested in anything other than OEM Mazda parts (other than ceramic apex seals) but this whole situation has me looking at Atkins' "inconel" corner seal springs. I know their designed-in-house items have mixed reviews but even Inconel 625 would have higher heat capacity than spring steel or whatever Mazda uses. Though, in my work experience IN625 or any of the other common Inconel alloys like 718, 783, etc. are not common spring materials. Cobalt-based alloys like Haynes 188 or L-605 (Haynes 25) are good. Creep-wise they're about as good as the nickel-based alloys but cobalt has the benefit of forming lubricious oxides so they wear less. Where temperature resistance is needed something like Waspaloy is a common choice.
I would NOT use anything atkins in house designed. They have no quality control and its a lot like the corkspork mentality; "well it fits in CAD" however they have no concept of manufacturing. every apex seal I measured from atkins was too thick and wouldn't fit well in the apex seal grooves. every corner seal had an OD out of spec out of the box, the intake manifold for the carb setup I had came with a vacuum leak because the way they did the mounting holes. also the ports don't line up at all and the flange needed to be straightened before I could use it. I HIGHLY advise against them for anything but using their site to find a part number and order it via mazda motorsports.
Atkins is a glorified parts reseller, not an engineering or manufacturing company by any means.
OTOH I have had zero issues with Atkins, have been using them exclusively for my apex seals since 2009. I do use Mazda side and corner seals/springs.
The heat I was speaking of was combustion heat, not fluid temperature. Run lean or detonate, kill corner seal springs and apex seal springs.
i don't use the word hate often, but berkeley them I hate them.
In reply to fidelity101 :
You also had good luck with Rotary Aviation seals, most people who used them found that they stripped the chrome so fast you would think there were dollar bills and a pole involved.
Pete. (l33t FS) said:
In reply to fidelity101 :
You also had good luck with Rotary Aviation seals, most people who used them found that they stripped the chrome so fast you would think there were dollar bills and a pole involved.
oh man so funny you mention that. a 5year motor that had those RA seals in there vs a 7 year motor with OEM apex seals the housing were extra shinny and chatterered on the RA housing and the apex seals wore to a taper but the 7 year motor with OEM seals had the seals wear but still held shape the chrome is showing but its still much more dull than the RA seals were so much that I think these rotor housings would benefit from a quick re-grind and be re-used. I got seals from them lately and I'm not so thrilled with them as the edge seems too rough, i dunno if something changed or what but I don't remember them being that way historically speaking. which I think is why the tend to wipe the housings' chrome away.
I have no experience with any Atkins-designed products other than their serpentine belt conversion kit. My biggest beef with them is they advertise a lot of products as being OEM Mazda that are really things they've sourced or made themselves. Not a big deal when it comes to gaskets and things like that but I don't really have any measure of their quality control. At least with Mazda OEM I know there IS some aspect of quality control. I just feel better when parts come in the little plastic bags with Mazda info on them. I can also count on them for fast shipping. It's not the cheapest but I generally know they'll fulfill and ship my order same day since I'm on the East Coast. Great for when I need a gasket over the week to get something back together for the weekend.
Back to my teardown adventure. It's been a slow day at work so I spent some time measuring the Apex seals. All are flat and straight and measure within +/- 0.02 mm in length, width and height. The only deviations were free spring height. I don't have the best way of measuring but I get around 5.9 mm for the long spring and 3.9 mm for the short on all but two seals - those paired with the failed corner seals. While the front rotor was technically still in spec the rear was pretty bad. Here's the rear:

I'm now slowly cleaning parts so I can take more measurements. Working on the front rotor with some PB Blaster/WD-40 a nylon brush and a green Scotch Bright pad. I've got 99% of the carbon off at this point but I did find some interesting things. First is this pitting in the combustion area:

This is the combustion area immediately "after" the apex with the bad corner seal springs (bottom of the picture). This is not new. It was present before the last rebuild. Picture from 2012:

While it isn't new I don't know if this could possibly have anything to do with the overheated corner seals. The other discovery contradicts and earlier statement of mine. I was definitely getting contact between the rotors and the side housings:

This explains the discoloration on the side housings. I thought this was mainly a high-RPM thing. My engine has never been above 9000 RPM. I wonder if I was getting some kind of eccentric shaft flex. My end play was on the high side at 0.0025 in. but still in spec. Not that that may have anything to do with it. Looks like side clearancing is the right decision. I still don't have any explanation for why one apex appears to be running hotter than the others. I really want to measure rotor and housing widths to see if that reveals anything. More cleaning tonight...
Another week goes by and I'm slowly making progress. Too slowly, really. I've got my parts list and am ready to fire the cannon but Mazda Motorsports won't approve my account for some reason. I've been told you can get one even if you aren't "racing" as long as regularly track your car. I spoke with a rep over a week ago and was told I needed some kind of timed result. Problem there is every organization I run with makes it a big point to NOT time HPDE or open track sessions. I've spoken with some friends in NASA and SCCA and they told me to upload proof of being on track - my registration record, and any time information I might have (e.g. Garmin Catalyst, TrackAddict, etc.). I've done this and I'm still waiting on confirmation. It'll be a massive cost savings if I can use Mazda Motorsports for stock parts. After some more inspection I've decided I'll be replacing all seals except the apex seals. I don't want to take my chances with the corner seals and the lip wear on my oil seals was out-of-spec.
I've got just about all the engine parts cleaned. Just need to spend some time with the housings. So far I've really just wiped down the contact surfaces with acetone and WD40. Overall they look... ok? Front:

Front of center:

Rear of center:

Rear:

Most of the discoloration has no "feeling" to it. There is some tactile step wear in the spark plug area but I haven't attempted to measure depth. I don't have a reliable straight edge. I think I'm just going to clean these up real good and run with them. I was also trying to figure out why the front looks so different and I finally remembered. I had all the plates lapped and re-nitrided before being ported. We ended up breaking through the water jacket on the front so it was replaced. The shop that did my ported told me the replacement was lapped but I'm now guessing it wasn't re-nitrided. Considering most of my issues were with the rear it doesn't look like that was an issue though.
I am taking this opportunity to make some some upgrades. I dropped my rotors off with Mike at Rotary Science to be side-clearance, lightened, scalloped and balanced. I'm really interested in what the scalloping will net me. I haven't been able to find any apples-to-apples before and after dyno results so I guess I'll be the first. I also managed to grab a deep sump, baffled, reinforced oil pan from JDL Mfg. Unfortunately this means I won't be able to keep my AWR engine mounts and I'll need to machine about 1/4" off the factory mount to keep the engine in the correct location.
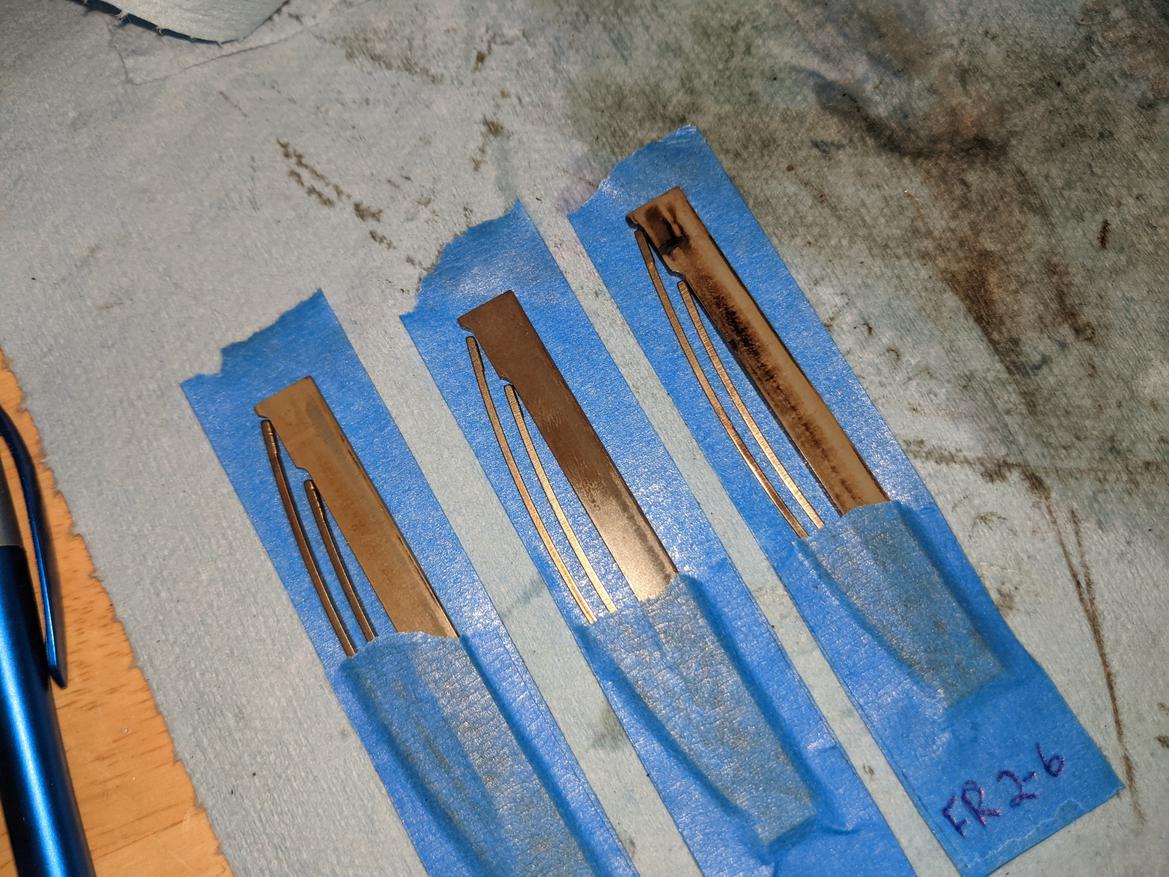
Good news: I finally got my Mazda Motorsports account sorted out so I can order stock parts. My parts list spreadsheet says I'll save about $500 over using one of the normal online parts houses. The parts cannon is loaded and ready to fire but I'm waiting to see if I can find a used corner seal that matches up with the rest. It only saves me a couple bucks but I'd rather use a seal that's already bedded in. I spent last night measuring corner seal dimensions and rotor bore depths:

My nomenclature is rotor, face then position. The position is based on the side seal slot identifying number. So FR 2-4 is the corner between seal slots 2 and 4 on the rear face of the front rotor. The outliers are highlighted. RF 2-6 is the seal that lost its spring and has somehow grown in diameter. The measurements agree with my observation of it being a tight fit in its bore. This is the seal being replaced. I need one that's 0.4320-0.4327 in. in diameter and 0.2720-0.2732 in. thick. I have no idea what the spec is for clearance as the Mazda SST is a go/no-go gage. At least my seals and bores are consistent within 0.001 in. I think the larger thickness of RR 1-5 is due to a burr from where the spring contacts the underside of the seal. I'm going to hit it with a file and that should put it in line with the others.
Bad news: I was inspecting my exhaust manifold and I found some cracks around the support bracket.

I'm not too surprised. The bracket bolts to the transmission for support but it's always been a struggle to get it bolted up. I'm guessing there was some permanent thermal expansion/contraction after the manifold was made. It felt like every time I removed it, it was more difficult to reinstall. Basically I'd get the manifold bolted to the engine and then I have to push/pull it quite a bit to get the transmission bracket to line up. I was looking at how I could modify the bracket for an easier installation when I saw cracks in some of the welds connecting it to the pipe. I ultimately decided to cut off the bracket as well as a small gusset plate on the opposite side (also cracked). While cleaning up the weld remnants I found the first crack. I plugged the exit and filled the tubes with water and found a total of three leaks: two where the bracket was welded and a third, which looks like an incomplete weld further upstream. One of them is pretty significant and I'm now thinking this contributed to my rear rotor "running lean." I've picked up a fluorescent dye inspection kit to see if I can't find any more cracks, but the big question is if something like this can be repaired...
curious on the JDL fitment and how that fits/engine mount combination.
In reply to infernosg :
The bracket probably cracked because it does not allow the exhaust to expand.
I have measured an inch of exhaust expansion on a street driven GTO. Mazda hung the exhaust there off of a link that could swing, that is a good idea to copy.
In reply to fidelity101 :
Me too. I was ready to pull the trigger on one of Pineapple's earlier this year but was too slow and they no longer make them. Jorge's looks similar. The extra capacity and true baffles will be welcome additions but weirdly, I'm most excited about the o-ringed flange. The task I hate most about rebuilds is scraping off old RTV so I'll take any chance I can to avoid using it. He told me his flange is .375" thick. I went and measured the stock pan and my Racing Beat baffle plate and got a combined thickness of about .125". So to keep the engine at its previous height I'll lower the right side by .25". Easiest way looks to be to go back to OEM (have to ditch my AWR set) and machine the .25" off the passenger's side mount.
In reply to Pete. (l33t FS) :
Yep, that's exactly what happened. When I cut the final weld on the gusset there was a visible AND audible stress relief. For now I'm just going to leave it unsupported. I have two sets of hangers further down and with the engine and transmission pretty solidly mounted (95 durometer poly mounts). If movement is too much I'll have a hanger welded to each primary and use two more stock donut mounts at the factory frame rail locations.
My bigger concern is getting the exhaust fixed. I need the flange machined flat but because my manifold is so big I'm having a hard time finding a show willing to do it. For the cracks is that something that can just be welded? I'd think putting that much heat into a localized area would further distort the pipe and/or increase the possibility of cracking again. Worst case I'm thinking some red RTV or JB weld and exhaust clamps like this:

yes I am most excited about an o-ring myself, im waiting for the machine shop to final clean my pan and baffle right now. it is the biggest mess and most pain in the ass part of a teardown/overhaul. I wanna see some fitment when you get it in. I am running mazda comp engine mounts but the bracket is the banzai racing for my cosmo RE, which fits like E36 M3, so I wonder how much space I got before I go to that pan and likely fab my own engine mount brackets.
Pineapple makes theirs in batches but doesn't sound like they will get them made all that often - I too missed that boat and asked about a sheet metal pan but they were not planning on doing a sheet metal for the FC style at all. JDL's advertised time is usually double but he does deliver.
So my parts order ended up requiring three sources: Mazda Motorsports for 90%, Mazdatrix for 9% and then eBay for the last 1%. Seriously. Apparently front inner oil control ring springs are on backorder. Fortunately, I was able to source everything though. Splurged a bit and went for the competition outer oil control ring springs and front Torrington bearings. Not sure what makes them "competition" but oh well. So since the parts cannon has been fired all I can do is hurry up and wait. Not a big deal since I'm still waiting on my rotating assembly (almost done) and apex seal springs and I still have like two more parts to clean (housings).
In the meantime, I decided to play with a dye indication finder kit. Spent way too much money for three bottles from McMaster but they got here the next day. Step one is clean. Not very exciting. Step two is spray the area to be inspected with what looks like very anemic blood.

The has to sit for 10-30 minutes so it can run everywhere (literally). Then you spend 10 minutes wiping off all the excess. Finally you spray on the developer. It's basically like aerosolized baby power. It coats the part in a fine powder that lets you see dye more easily. As expected, there were several cracks. This is by far the worst area:

and a bit to the right (upstream):

and there are others. In total there're 5 spots I want to fix. I had found three of them with the water test. I've since cleaned the part but lined all the cracks with red sharpie. I don't think I've posted a photo of the manifold without the brackets:

Before I cut everything off the primaries were practically touching in the middle. That's why they were wrapped together in the past. I may actually be able to wrap them individually now.
I know a guy with a welder who's going to give fixing this a shot. I'm not sure what the process is. Just run a bead along the crack? He also has a machine shop so he's going to deck the flange for me as well. It's slightly warped (inside contacts first) and was definitely causing a slight exhaust leak.
Parts have arrived!

Unfortunately there was one small mishap:

It was received like this. Oddly, Mazda apparently packages a lot of parts in groups of five. So just about everything I ordered came in two small bags +2 extra. This side seal was one of the extra. I assume it just got mishandled. Everything was packaged really well so I think it unlikely this broke during transit. Fortunately all it took was a call to Mazda Motorsports and some pictures like that above and they're sending me a new one. Not a big deal since I'm still waiting on some other parts (apex seal springs and oil pan), still need to do some machining (exhaust manifold) and need to pick up my rotating assembly. Speaking of...

I'll take ~1/4 g imbalance. Between the lightening and the scalloping both rotors dropped around 200 g or about 5% of their original masses. This engine should end up being pretty fun.
I ordered a coolant system pressure tester since I have a good amount of pitting and corrosion in my coolant seal slots and on the mating housing surfaces. I'm pretty sure it was all there before and I didn't have any problems but I'd be lying if I said I wasn't concerned. In an ideal world I'd have the plates lapped, re-nitrided and have the seal slots re-cut. I'd also get the housings re-surfaced, do the spark plug cooling mod and machine off a few thousands from each side. Problem is that all would take the better part of 6 months and I'd likely lose the entire season. I'm hoping the liberal use of Hylomar will get me at least another 5 years out of these parts. Maybe then I'll be smart enough to preemptively pull everything and get all the work done in the offseason. Or maybe by then I'll be lucky and have a set of RE plates and S6+ housings.
Did you get this back together? The end of the season draws near..
I have seen videos of this car on youtube. i finally found a build thread. I have been working on a similar build with my sa22c. 12a bp semipp with efi ida.
In reply to chiquito1228 :
That looks glorious. I asked my friend who is building the bridgeport 13b for my fb whether peripheral makes sense, he seemed to think that on an n/a motor you don't see the benefit unless you can rev to 10 or 11k.


