1 ... 7 8 9 10
infernosg
infernosg Reader
4/6/23 10:36 a.m.

Yep, the oil pump is o-ringed but I'm not sure how much benefit it provides. Like Pete said there are several other locations where oil can seep out. I like the idea of sealing as many interfaces as possible though. I've been fortunate to never lose an o-ring. I'm not sure if it's plain luck or the abatements I used - hylomar on the sealing surfaces, SMALL amount of RTV instead of a front cover gasket, etc. I like to think the o-ring is pretty well secured. I also give the oil time to warm up before going crazy and I run thinner oil than most rotary owners seem comfortable with. I'm not sure what everyone's fascination with 20W50 is. If this Atkins regulator does bypass at 120 psi I'll probably drop down to 10W30. As long as I see 90+ psi at WOT I'm happy.

In reply to WondrousBread :

That's an interesting idea. My concern would be keeping the pipe in place. It'd have to be a loose enough fit to allow installation into the front side housing and also allow the front cover to slide over it. If too loose couldn't it slide forward and block flow altogether? I'd want something press-fit and probably Loktited too, which seems like it would make installation a pain. I've seen 110+ psi at cold start and have yet to have an o-ring fail or see evidence of leaking. Once the car is warmed up and at speed the pressure drops. Hot idle is 50 psi and max at WOT is 90+.

The best solution I've seen is to bypass the front cover altogether. There's already a passage in the front side housing that could be opened up and tapped for a fitting. This would eliminate the failure point at the front cover/housing interface and also two 90 degree turns the oil has to make. The problem is it also eliminates the front pressure regulator so it'd have to be replaced with an external regulator. Then you need to plumb in a return and at some point it makes more sense to build a dry sump setup.

WondrousBread
WondrousBread Reader
4/6/23 12:00 p.m.

Installing (and uninstalling) the tube would be a pain, I agree.

Maybe it's possible to lathe a custom tube from round stock that has a small flange where the o-ring normally sits, and then run a gasket on the front cover instead of o-ring. Or run an o-ring with identical OD and slightly larger ID. Then the flange will prevent the tube walking forward or back. Hmm.

Of course if you DO intend to go dry sump, then the external regulator is a better option. I just find external oil lines make me nervous. I have custom AN cooler lines right now that seem fine, but the possibility of them failing is always in the back of my mind. I wouldn't want to add any further points where failure is an option.

infernosg
infernosg Reader
4/7/23 11:07 a.m.

In reply to WondrousBread :

Something like a crushable spacer might work. I'm thinking of a coper tube with a "bulge" in the middle that fits into the holes in the front housing and cover. When the front cover is torqued down this bulge is flatted  in the area intended for the o-ring both creating a seal and retaining the tube. I can't help but think this is oversimplifying something, though. If it were that easy Mazda would have done something. It's not like little copper crush tubes would be expensive or difficult to make.

I'm not 100% certain of the function of the front pressure relief valve. According to the FSM it should bypass at like 150 psi, yet people say they need to be shimmed when upping the rear regulated pressure to 110 psi. My best guess is it has something to do with protecting the oil cooler at cold start since initial pressure could be high until the entire volume of oil in the engine moves. I need to study the 09-11 RX8 oil system. Mazda got rid of the rear oil pressure regulator in those cars. I don't know if the entire oil system was redesigned to accommodate this or they realized the rear regulator wasn't needed. Seems like a possible solution would be to ditch both OEM regulators and use an aftermarket external regulator before the oil cooler. If using the front housing as the oil feed you could use the factory turbo drain or even the original oil feed in the front cover as the bypass return.

Dry sump was never something I was planning on. I never set out to make this a full on race car and that seems excessive for a track day car. I trust AN lines and connections more than internal o-rings. At least I can easily inspect, repair and/or replace AN lines and fittings.

dannyp84
dannyp84 HalfDork
4/7/23 5:54 p.m.

I've had an AN line fail on me once, but I was already skeptical of it during installation when the connection didn't have as much resistance as the other lines we did that day, (this was for the FC oil cooler on my FB). I ended up replacing the line with hydraulic lines I had made at Advance Auto, which wasn't cheap but they're rated to sustain much higher pressure than my oil pump will ever make.

I'm going to help crew for Logan from Defined Autoworks on the 22nd when he does some NASA time trial in the 4 rotor RX7, if you don't have a solution by then I'll ask him about it and see if he's ever come across the same issues.

infernosg
infernosg Reader
4/11/23 1:20 p.m.

I chickened out and went with my tried and true o-ring + RTV. I'll keep the metal gasket in the parts cabinet for the future. The more I've looked into it the more I like the metal tube insert idea. While I personally haven't had issues with the front cover o-ring it would eliminate a lot of uncertainty. The tricky part will be designing something that is firmly set in the front side housing but can also easily slide into the front cover. It'll likely require machining to both so I'll file this under ideas to do the next time the engine is apart.

Reassembly has started. The front cover and oil pan are back on and the engine is back on its mounts. The new baffle certainly makes installing the oil pan a major pain with everything still in the car. Wouldn't be a problem on the engine stand though. Speaking of mounts, I'm going back to the Mazda Competition engine and transmission mounts. I really have no complaints regarding vibrations with the aftermarket polyurethane mounts but I'm kind of sick of the guesswork involved when reinstalling the engine. The OEM mounts have locating tabs and offset studs that make them only go in one way and when they do you know the engine is in the right spot. With the aftermarket ones it always seems like I'm pushing/pulling the engine around to get it in the right place. I've got an order in with Mazda Motorsports but it looks like the transmission mounts are backordered so the polyurethane ones will go back in for now.

Once everything is together there's not much else in store for the RX7. The next track weekend is at Dominion Raceway and is still more than a month away. I'm thinking about using this year's bonus money toward a set of Paco Motorsports hub stands and maybe some scales. I already do my own alignments via string but these things would make the job so much easier and I've always wanted to corner balance the car. In the meantime I really need to switch my attention to the 79. I'm taking it to DGRR this year and there's a whole lot of deferred maintenance I need to catch up on...

dannyp84
dannyp84 HalfDork
4/11/23 2:08 p.m.

In reply to infernosg :

I'd love a crash course in string alignment, as my car is too low for most alignment racks and the techs always complain about having to work on it.

infernosg
infernosg Reader
4/12/23 1:35 p.m.

In reply to dannyp84 :

The general idea is you want two strings, one on each side of the car, that are parallel to each other and equal distances from front/rear hubs on each side. How you do this is up to you. Really creative folks make contraptions that hang from the front and rear of the car that can be located the same way every time. I use four jack stands and two lengths of 1" pipe, which involves lots of fiddling to get both sides and each corner even. Ideally, this means the strings are aligned with the chassis so you end up with zero thrust angle. From there, take measurements at the front and rear of each tire to determine toe. I run 0 toe up front so I want the measurements at the front and rear of each front tire to be equal on both sides. I run zero to slight toe in out back so I again want all four measurements the same or err on the side of the front measurements being slightly longer.

Hub stands make this process easier. You can easily access all the adjustment nuts and bolts since tires aren't in the way. The Paco Motorsports version comes with integrated bars that you tie strings to, which is the "creative contraption" I mentioned above for getting everything aligned in one shot.

dannyp84
dannyp84 HalfDork
4/12/23 3:37 p.m.

In reply to infernosg :

I understand this method for adjusting toe, but will the string system allow you to adjust caster as well?

infernosg
infernosg Reader
4/13/23 9:46 a.m.

In reply to dannyp84 :

Strings are for toe and thrust angle. For camber and caster you need an angle gage. I've never had a way to adjust caster outside of loosening bolts/nuts and tugging on things so I don't mess with it. There aren't any off-the-shelf suspension bits for the FC that allow for caster adjustment. Not sure what's out there for the other generations.

In car news reassembly is about done. I need to install the air box, oil filler neck and work out the new catch can lines, then add fluids and it's ready to start.

Leviathan888
Leviathan888 New Reader
4/13/23 2:54 p.m.

I'm a bit late to this thread, but on page 1 you were talking about all the unnecessary wiring you removed. "In the picture below the wires on the left would be all the remained of the stock power/emission harness". Does that include things like O2 sensors and engine feedback? Trying to educate myself and wondering if that could create engine problems?

Pete. (l33t FS)
Pete. (l33t FS) GRM+ Memberand MegaDork
4/13/23 6:57 p.m.

Caster is technically adjustable on 1st-gens but realistically you can't do very much before you run into issues, and stock seems to be best anyway.


I always kinda wanted to make WRC style string adapters that thread onto the spindles, but never ran into enough bother when I have access to an alignment rack.  Maybe for "Colin"...

infernosg
infernosg Reader
4/14/23 10:37 a.m.

In reply to Leviathan888 :

Unless you're running a carburetor and distributor you absolutely need sensors and feedback to control the engine. I run an aftermarket Haltech ECU and its suite of sensors so my car has nothing left of the factory engine/emissions harness and control system.

dannyp84
dannyp84 HalfDork
4/24/23 10:40 a.m.

Did you paint your water pump housing? I had mine sandblasted to clean it up and I thought it was aluminum but my shop magnet sticks to it. I'm thinking I need to paint it so it doesn't turn rust color over time.

infernosg
infernosg Reader
4/24/23 12:56 p.m.

In reply to dannyp84 :

I did, but it's also aluminum. IIRC the 12A water pumps are cast iron. The one on my 79 definitely is.

Car-wise not much has happened. It's been started and the coolant system bled and I took it on a small drive to run errands. No leaks and everything appears to be working fine. Oil pressure seems a little lower than before but that might just be because it's warmer than before. Cold start pressure is still 100+ psi. It'll hit ~115 psi with some light throttle but I don't like really revving the engine until oil temperature comes up some. Hot idle (1200-1400 RPM) is around 50 psi and it's 80+ psi at 3000+ RPM. Been playing with the SA the past couple weeks getting ready for DGRR so this one will have to wait some more.

infernosg
infernosg Reader
5/10/23 1:27 p.m.

Took a couple weeks off from the FC but now it's time again. Next HPDE at Dominion with the WDCR SCCA is in less than 2 weeks. I've driven the car a few times and everything seems good. No leaks and oil pressure seems stable. It's been harder to start when hot, which is strange considering I changed nothing that should affect that. Only thing I can think of is maybe changing the catch can arrangement and deleting the PCV somehow affected the amount of air going into the engine so I may need to tweak the startup fuel tables a bit. The issue only seems to manifest itself if I try to restart the car 5-10 minutes after shutting it down once fully warmed up. After longer cool down periods and completely cold starts aren't an issue. Hopefully this won't be a problem at Dominion...

While they won't be ready for Dominion I've got the next set of upgrades/changes planned. I got the Chase Bays adjustable proportioning valve and brake lines kit for use with the factory master cylinder. It was more expensive than I'd like for what I'm sure is just a re-branded Wilwood proportioning valve and some pre-made lines but it should make for a quick and easy install. My setup (929 master cylinder) is a little different but I'm hoping everything will still work out. I also sent out the S5 TII vacuum booster to Brake X-Change to be torn down, inspected and repaired (if needed). These two changes should really help my rear lock up issues. I've also got a set of FD calipers I'm cleaning up and rebuilding. While my current front brakes seem to be working fine I know I have at least one sticky piston. The goal is to have all these installed and ready before Pitt Race in July.

Since all-word posts are boring here's the more recent engine bay shot with the new catch can arrangement:

No more FD EVAP solenoid or PCV valve. Air is drawn in through the open port at the bottom of the charcoal cannister. That goes through the cannister taking fuel vapor with it, then out one of the top ports to the lower crank case port on the center engine housing. From there it collects any oil vapor and goes out a massive 10 AN port on the oil filler neck and into the catch can. After (hopefully) depositing its contents in the catch can air is sucked into the engine through any vacuum in the air box. The air box should generate significantly less vacuum than the intake manifold but still enough to circulate air through the crank case. While this definitely isn't as effective as the PCV setup it'll hopefully prevent my intake getting covered with oil should the catch can fill. Alternatively, I do have a 10 ORB to 3/4" barb adapter with one of those rocker filters attached. On track I may swap the air box line for that just to prevent ANY oil from getting to the intake. Worst case there is it'll cover the side of the engine, which is significantly easier to clean.

dannyp84
dannyp84 HalfDork
8/25/23 2:55 p.m.

I saw earlier in the thread where you had removed your front hubs, have you ever removed the rears? I need to put longer wheel studs on my FC to make the new wheels work, and I'm confused as to what exactly has to come off to install them. The forum says the hubs need to come off, but with the knuckle still attached in the rear I don't see how that allows access to getting longer studs in..

infernosg
infernosg Reader
11/14/23 11:05 a.m.

Now that the season is over I can reflect a little. My last post was from before Dominion Raceway back in May. The new oil/PCV setup seemed to work well enough. For Dominion I put a breather on the catch can and capped off the port on the air box:

The total weekend catch can accumulation was less than a tablespoon:

It's worth noting the Dominion runs counter-clockwise so this could have had some impact. More on that later. The event went well overall - I knocked something like 5 seconds off my personal best and was bumped up to the intermediate HPDE group with the SCCA. However, I was seeing higher than normal oil temperatures and lower than normal pressure. Ambient temperatures were in the upper 70s/lower 80s but I was seeing 240F max oil temperature and pressure was dropping into the upper 70s/low 80s psi. Neither are horrible, but I'd prefer to see oil temperatures in the 220-230F range and pressures over 90 psi. Temperature is definitely a factor and for some reason track direction also seems to make a difference. My oil pan is completely baffled so that should matter...

The only casualties of the weekend was (another) dead IAT sensor and a front hub dust cap:

Thanks to Kevin, I was quickly hooked up with a replacement dust cap and learned about drilling a 1/8" oil to prevent pressure from building. Since then no issues losing dust caps. As for the IAT sensor, it was brand new for Dominion. The previous one lasted me Summit Point in November 2022 and VIR earlier this year before crapping out. In total I've gone through something like 4 sensors since getting the car running in 2017. Every time one or both of the leads in the open element ends up broken. My best guess is my intake gets some pretty intense pressure pulses and eventually the leads fatigue and break. I was told to look into Rife sensors and their IAT design is a little different. I've been using it since May and it's survived three events without fail. It's got a wider temperature range so its fidelity isn't as great in my operating range (always seems to read a little high) but it works.

My next event was Pitt Race in July. It was my first time at the track and the event was through AutoInterests. They're very "education focused" and the entire day is filled with classroom sessions, track time and "car control" sessions on a skid pad. I learned a ton but it is physically exhausting. Pitt Race itself reminded me a lot of VIR. I suppose that makes sense as I think the owners share some amount of stakes in both tracks. Very much a "country club" feel to it, but also the track length and elevation changes. Unfortunately, it pretty much rained all weekend. The only true dry sessions were the first two on Saturday and I was still learning the track. On Sunday I bailed on one run after 10 minutes and avoiding another altogether because of the rain. Visibility and traction were non-existent. Because of the schedule and weather I really didn't take any pictures or record any video. I have some Garmin Catalyst data I hope to be able to use in the future though. For reference on how wet things were here's a picture of some water still in the car after a 7+ hour drive home in the dry:

At Pitt Race the car did well. No issues to report. Oil temperatures were lower and oil pressures were higher but I think a lot of that is due to the weather. The only change I made between Dominion and Pitt Race was stepping up to 20W50 oil weight. I've long been an advocate of running the thinnest possible oil that maintains pressure and I was seeing too much pressure dropoff with heat. The Pitt Race event didn't really validate that change so I had to wait until Summit Point in September to see if the heavier oil made any difference.

infernosg
infernosg Reader
11/14/23 1:48 p.m.

After a ~2 month break my next event was at the Shenandoah Circuit at Summit Point with the SCCA. This was another first for me and probably the track I've been the most nervous about in a while. Based on description and video it's a very "busy" track. Depending on how you count them there are something like 20 turns in a track that's a little over 2 miles in length. It also has a replica, concrete and all, of the Nurburgring's Karussel. It threatened to rain the entire weekend but it generally held off and the weekend ended up being dry. Despite being overcast temperatures hovered in the low 80s.

I requested an instructor for the first session since it was a new track to me. After a few laps I had the layout committed to memory and it wasn't nearly as bad as I'd feared. The instructor agreed I was good to go and I ran SOLO the rest of the weekend. One of the cool things about the WDCR SCCA (and maybe others?) is the last sessions of the day they run the instructors with the intermediate HPDE group with open passing (with point by). Very intense, but also very fun. Even though I've run at hotter events I don't think I've ever sweated that much before. Speaking of hot, the car was. Oil temperature hit 240F. Water peaked around 215F. This is the hottest I've ever seen the car get. I suppose it's the result of both a tighter, more technical track and more traffic. Shenandoah is also run counter-clockwise and I was seeing oil pressure drop to the low 80s psi so I guess the thicker oil helped somewhat. My lap times generally increased throughout the weekend but since it was my first time I don't have much to compare too. It'll be a good baseline for 2024. The only thing I didn't really like was the entire "paddock" was grass. Grass + hot, sticky tires meant the first lap of each session was spent scrubbing all this stuff off the tires:


That weekend's casualty ended up being the exhaust. I entered the "Karussel" a little hot in one of the later sessions and lost the back. I didn't spin but the rear of the car left the banked area and I high-centered the car. The exhaust took the brunt of it. I didn't notice the full extent of the damage until I got home:

There's a bit going on in this photo. One, that little tuft of scrubble is all that was left in this muffler. Safe to say it wasn't doing much muffling. The bigger issue is I broke the flange that holds the two halves of the exhaust together. Even though the remaining bolts held the muffler together I was left with a pretty big exhaust leak. At the time I was thinking my next event was in October so I needed a quick fix. Since the OD of the muffler is about 4.5" I got a big 4.5" exhaust clamp:

It's not pretty nor does it completely seal but it held everything together.

The October event didn't end up happening due to family obligations but I did make it to NASA MA's Fall Finale at Summit Point again this year:

This one was fun because I took 2 of the older kids along with me and it was my daughter's first time. They're far too young to ride with me but at least we were able to get in some parade laps each day so they both got a chance to ride around the Main circuit. I was in the HPDE2-instructed group though I ran SOLO both afternoons. As it typical of West Virginia in November the mornings were cold (mid-30s) and the afternoons were mild (low-50s). Perfect track day weather. No issues with engine temperatures at this event. I think the hottest oil got was 205F and the hottest water was 195F. Oil pressures were 90+ psi all weekend. Overall I had a great time and knocked 4 sec off my PB from last year. There's a lot more time in this car. Summit Point Main is one of the tracks where I struggle with rear brake lock up. Nearly all the heavy braking zones are downhill. I had to brake earlier and lighter than most so I gave up a lot of speed at the end of the straights. Something else I need to address over the Winter...

One last thing I forgot was after VIR this year I started running race plugs during events. I found that I was eroding the factory street plugs pretty quickly after just one or two events so starting with Dominion, at each event (except Pitt Race due to the rain) I'd warm up the car each morning on the street plugs then swap over the race plugs to avoid possibly fouling $30 spark plugs. After 3 events they still look great:

Everything still has nice, sharp and square edges.

So that's a wrap for the 2023 season. I've definitely improved as a driver and I'm pushing the car harder than ever, which is starting to reveal various weak spots and other areas for improvement. I've got big plans for the Winter and I need to get going since in all likelihood my first event in 2024 will be VIR in March.

infernosg
infernosg Reader
11/14/23 5:03 p.m.

So we're caught up to the present, which means it's time to discuss my plans for the Winter. I have three areas I want to address: brakes, aero and cooling.

Let's start with brakes. Rear lock up has been a struggle. It's particularly bad at VIR and Summit Point Main but really it's any time I have to get hard on the brakes. I've never corner-weighed my car but the RX7 is supposed to be 50/50 from the factory though I've removed a lot of weight from the car overall (about 300 lb). I need to do something about the rear brake bias and, to a lessor extent, pedal feel. I've toyed with running different F/R pads but I think I need to just bite the bullet and get an adjustable proportioning valve. Earlier this year I bought a kit from Chase Bays (https://www.chasebays.com/collections/mazda-rx-7-fc-fd/products/chase-bays-brake-line-relocation-mazda-rx-7-fc-for-oemc) thinking I could get it to work with my brake setup (Mazda 929 booster and master cylinder). While possible, I think I'm better off building my own setup and selling the kit vs hacking it apart. So the plan is to buy a generic Wilwood proportioning valve, make up a few lines and call it done.

The next step is to replace/rebuilt the front calipers. They were last rebuilt circa 2015 and the last time I changed pads I noticed a couple of the pistons were pretty hard to move. Fortunately, I've already got a spare set lying around. They just need to be painted and put together. The hardware was a little crusty so I sent it all out to be cleaned and zinc-plated.

Lastly, I'm going to finally swap in the smaller booster I picked up earlier this year. I like the pedal travel associated with the 929 master cylinder but its dual 8/9" booster is just too much for this car. Pedal effort is fairly light and there's a fine margin between smooth braking and lockup. The replacement booster is slightly smaller at 7.5/8.5". I think the end game is probably full manual brakes but I'm not there yet.

Goal #2 is aero. I don't think I'm ready for big downforce but I need something on the front of the car. My current plan is for a very modest splitter, maybe 1-2" extension from the bumper that's flat back to the front subframe. The radiator and oil cooler are already ducted but the rest of the front of the car is open. I think this causes it to feel a little light at higher speeds. Given my brake bias issues I don't want all the front downforce, though. Mazda was nice enough to have these factory brackets, which look perfect to serve as rear anchors for the splitter.

I'm going to try to work with the folks over at Professional Awesome to develop some brackets unique to the second generation RX-7. Now that the season is over I need to get under the car and start taking measurements.

The last item is cooling. I don't know if I'm just pushing the car harder or not but this year I saw oil and water temperatures 10F+ higher than I've ever seen. I've already procured a spare stock oil cooler that's been cleaned and had the factory thermostat removed. The idea is go with a better-flowing aftermarket thermostat and plug the bypass in the stock cooler. I'm also toying with changing the position/orientation of the factory cooler. Right now there's a 2-3 in. gap between the oil cooler and radiator, which is where the factory AC heat exchanger and power steering cooling loop lived. Since I have neither it's just dead space, which is probably building up a pressure head reducing airflow through both the oil cooler and radiator. I made a quick sketch of the system as it sits now:

The orange circle is tubular cross-member to which the oil cooler is mounted. The thin black lines are my ducting. The total inlet area is approximately 1/3 of the total radiator area and the split going to the oil cooler is about 1/3 of the oil cooler area. At first, there was no split ducting behind the oil cooler. I thought that air going around the oil cooler may build up behind it and hurt flow so I continued the split. Now the issue is about 1/3 of the flow through the radiator has to first go through the oil cooler. Since I have no need for the space between, I'm thinking it would be better to push the oil cooler all the way back to the radiator. My first two options are basically the same, with just the oil cooler orientation slightly different:

Option 1 eliminates all area between the coolers but Option 2 presents more of the oil cooler surface area perpendicular to the direction of airflow. Both move the oil cooler slightly lower and significantly free up area to the radiator. What isn't clear to me is whether any ducting split would even be necessary in these configurations since air can't flow around the oil cooler anymore. Both are relatively easy to implement. Another alternative is to move the oil cooler to the top of the radiator:

The only reason I even bring this up is because an old Mazda Competition guide for the first generation RX-7 gives this as one of the two mounting options for the oil cooler:

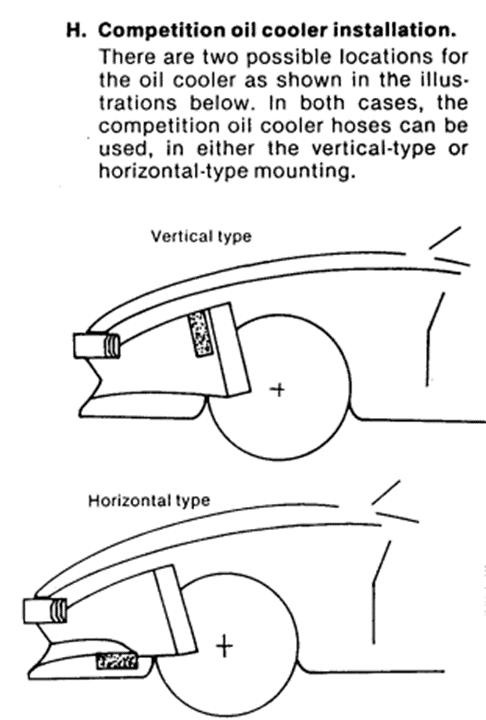
I'm not sure of the benefit of this arrangement other than perhaps the heated air that's gone through the oil cooler is interacting with the hotter part of the radiator (inlet at top). My concern with this setup is oil flowing back into the pan when the engine is off since the cooler would now be above the pump. This configuration also may not be feasible without a lot of cutting.

My last ideas involve ditching the stock oil cooler altogether. It's a 7 row, dual pass design that looks like it has a lot of restriction and pressure drop. It could easily be replaced with something like one of the larger Setrab 1-series oil coolers. I may give up some volume but surface area and flow would be significantly higher. Any of the above arrangements would still work but it also opens up some other opportunities. Something like this, with the oil cooler off to one side with the inlet/outlet at the top:

With a cross-flow style radiator the oil cooler could be on the "hot" side. With something like what's shown above I could even cut out the stock cross bar for more flow to the coolers. I'm thinking for 2024 I should stick with optimizing what I have now (Options 1-3) and if temperatures are still an issue, upgrade for 2025.

The last cooling-related item is slowing down the water pump to avoid cavitation. Reknown rotary tuner Racing Beat says the factory pump and pulley ratios are only good up to 7000 RPM or so. I shift at 8000-8500 RPM. There are several options out there but because of my setup I'm going to look into machining a 3.75 in. 6-rib supercharger pulley to work as a main pulley. This would get my pulley ratio down to 1:1, which should be good for 8500 RPM.

wvumtnbkr
wvumtnbkr GRM+ Memberand PowerDork
11/14/23 5:24 p.m.

Can you post a pic of your current ducting.  Sealing all of the possible air  entrance and exit pathways is HUGE on these cars.  You want 100% of the air coming in the front to have no choice but to go through the radiator.  Water wetter helps too.


Plus, you need a place for the air to get out.  


I dropped 30 degrees f with just making sure the ducting was 100% sealed to air leaking past the radiator.  I found cardboard and gorilla tape helped me make changes quickly and found what worked for me.


I always ran hawk blue front and HP+ rear.  That was even with 240 rwhp and endurance racing.  No problems with rotor life, lockup, nothing.  Cheap too.


I do not like the inline balance adjusters.  If you are on the brakes a long time, they "bleed" pressure to the rear.  I always preferred staggered pads.

infernosg
infernosg Reader
11/15/23 10:10 a.m.

In reply to wvumtnbkr :

Aside from a few small gaps (<1 sq. in.) any air that enters the front of the car has to go through the oil cooler and/or radiator. Inlet:

Backside with radiator removed:

Behind the radiator is a big, fiberglass fan shroud with a 16 in. fan and the hood is vented although there's no duct between the shroud and hood. I use that metal ducting tape to seal off any small holes. I definitely get a good amount of pressure in front of the radiator because I can see signs of the tape "ballooning." Perhaps there's too much restriction behind the radiator? The radiator core is 18 x 18.5 in. and all that air has to pass through a 16 in. fan though I did cut away some of the fan's "finger guard" to reduce restriction. I've considered adding those "speed flaps" to the fan shroud. You can also see I don't have any kind of front undertray. It shouldn't affect air going into the oil cooler and radiator but I'm wondering if its absence is allowing excess pressure to build up in the engine bay. One of the reasons a splitter is on order this off-season.

Since Dominion in May I have been running a 67/33 water/glycol coolant mix. I can't remember why because I usually run 75/25. Probably because I also flushed the cooling system on the 79 and didn't feel like mixing up more. Where I live (central VA) the temperature rarely drops below 20F and the car lives in an enclosed garage so I could probably get away with 80/20. I think that and a splash of water wetter is in store for 2024.

I'm not too terribly concerned with periodically seeing 210F water temperature. It only got that hot at hotter events, on tighter tracks and in traffic. 240F oil on the other hand... I'm leaning toward Option 1 without the duct split since it's the easiest to implement. I just want to make sure I'm not going in the wrong direction.

Brake-wise, I've been running HP+ all around. I've heard/read conflicting testimonials regarding running different brake compounds and adjustable proportioning valves. The guys at G-Loc recommended running staggered pads whereas the folks at Hawk suggestion running the same pads F/R and finding a way to adjust bias. I was thinking something like a Wilwood proportioning valve would behave like the stock one, which I'm currently using, but be adjustable.

wvumtnbkr
wvumtnbkr GRM+ Memberand PowerDork
11/15/23 10:37 a.m.

Wow!  Your ducting looks great!


I did mine differently.  I only mention it because it is a variable between the two cars.


I did not have any directional ducting going to the rad.  Any air that made its way in the front airdam (about 20" x 5" opening) was free to do whatever it wanted.  However, the radiator was sealed on the bottom to the splitter, the sides of the rad where sealed to the "rad support" and there was no path for air to escape except through the rad.  

In other words, I didn't direct the air at all.  Just didn't give it a choice to go around the radiator.


I'm now wondering if your opening is too small at the front.  Edit...  looked at the pics again.  I don't think its too small.  However, I'm thinking a splitter will help put air through the opening versus spilling out under the car.

infernosg
infernosg Reader
11/15/23 11:36 a.m.

In reply to wvumtnbkr :

I need to double-check the area but I'm pretty used I used the 1/3 rule. I wonder if the curvature of the lower bumper is somehow causing air to bypass the oil cooler inlet. Is it deflecting away from the opening? With a splitter I might cut out that middle section so it's a straight shot into the duct.

Any thoughts RE the oil cooler position or ducting? I'm now thinking that sealing behind the oil cooler was a mistake. Just going off the photo around 1/3 of the radiator flow has to come through the oil cooler, which can't be good for flow. I did that because I was concerned about pressure building between them restricting airflow through the oil cooler. In hindsight I haven't noticed any reduction in oil temperature so at the very least it hasn't helped. Seems like pushing the oil cooler back against the radiator would eliminate all these issues.

I like the idea of the "horizontal type" from the Mazda Competition guide. I've thought about ducting the oil cooler flow out the bottom but mounting the oil cooler on its back achieves the same thing. It completely separates oil cooler airflow from radiator airflow. While that's good for both it means the oil cooler won't see any airflow if the car is stationary. I suppose I could always make a small shroud with fans just for the oil cooler.

infernosg
infernosg Reader
12/21/23 10:49 a.m.

Not too much going on as of late. Pretty much been in holiday/end-of-year mode but still trying to do small jobs here and there. Started playing with an idea for a new main pulley. My current setup maintains the stock main pulley-to-water pump pulley ratios, which according to Racing Beat is only good to a maximum RPM of 7000 RPM (https://www.racingbeat.com/manuals/rb-rotary-catalog.2016.pdf page 50). No explanation is given why but I've heard it has to do with pump cavitation at higher speeds. Considering I regularly wring my engine out to 8500+ RPM that would mean the water pump is spinning in excess of 10,000 RPM. Apparently this is enough of an issue that Mazda Motorsports sells (or sold) underdrive pulleys for both the crank shaft and water pump. Unfortunately, my setup uses a tone ring that bolts to the front of the main pulley so I can't use the Mazda Motorsports parts. Racing Beat sells an underdrive main pulley that would work but I'd have to then also get new water pump and alternator pulleys that use the old single-v style belts. I recall reading on Facebook about someone reworking a supercharger pulley so that got me thinking. Enter the Edelbrock 15825:

A 6-rib, 3.75 in. supercharger pulley that looks very close to what's on the car now. Here's a side by side of current and new:

This brings the pulley ratio down to 1.07, which should be good for engine speeds around 8000 RPM according to Racing Beat. Still not as high as I run the engine but I'm concerned the next-smaller option, 3.5 in., would be to small to fit on the crank shaft hub or allow for the tone ring to be installed.

Obviously, this isn't a bolt-on affair. Both sides of the new pulley need to be faced. The center bore needs to be opened up and new bolt holes need to be drilled. The recessed nature of the forward face present some other issues. First, the raised edge interferes with the OD of the tone ring so the diameter of the recessed face needs to be increased slightly. Second, the amount of material I can remove from the "flange" is limited. I don't know how much thickness is required so I figured I'd copy the current pulley. This results in the new pulley being spaced about 1/16 in. further out from the engine. I don't know how forgiving 6-rib belts are to mis-alignment but I'll need to consider spacing both the alternator and water pump pulleys as well. There may also be alignment issues with the tone ring and its Hall Effect sensor.

Despite all that I forged ahead. Unfortunately a math error meant I screwed up the flange thickness (too thing) but at least I could use this as a proof-of-concept. The initial test fit looks promising:

Alignment actually looks really good but the flange thickness is only around 1/16 in. There shouldn't be a lot of side load on the pulley but that's just a little too thin for my liking. Maybe someone else can chime in. Fortunately, these things are relatively inexpensive and I've got another pulley on order. Won't be able to get back around to it until after the holidays though.

dannyp84
dannyp84 HalfDork
4/4/24 10:08 a.m.

In reply to infernosg :

Do you remember what grade stainless and what wall thickness you used for your header? I'm trying to have something built for my half bridge 13b and 321 stainless is prohibitively expensive.

1 ... 7 8 9 10

You'll need to log in to post.

Our Preferred Partners
L4gWuxTKEAnDNhoy3QL9KiqBQafoKEdnAYZPnyEfmVO1RZnp72xQZYi4OlmuBNpT