1 ... 5 6 7 8 9 ... 12
JohnyHachi6
JohnyHachi6 Dork
1/28/14 1:04 p.m.

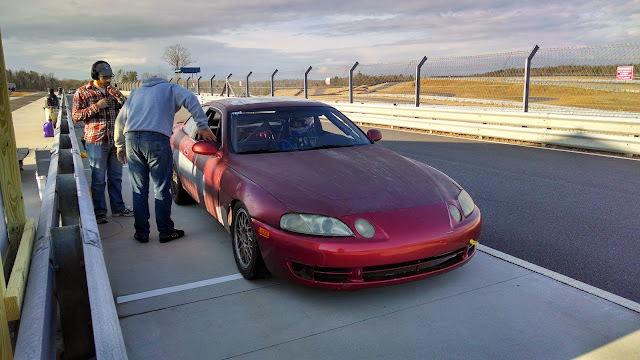
And another shot of the car more-or-less as it is now.


Last night I did take a few minutes to put in the lexan for the quarter windows, tape in the lexan for the back, and slip in the door glass. Glad I did because we're getting several inches of snow now.

fried_rice
fried_rice New Reader
1/29/14 11:49 a.m.

Car looks badass! I'm digging the wheels and the car looks great lowered. I got a little carried away with my wiring harness and ripped the whole thing out minus the engine harness. I removed all deadening as well, didn't really need the dry ice with my air hammer, but it helped a bit. I got my cage a few days ago, but waiting for my Dad to come help me as he was a professional welder for many years. Just wanted to update with some weights. You removed most of this stuff already so I'm not sure how much of a benefit vs time it is. I'll also update you on the wiring, which I hope to be fairly simple, if all fails I have a friend that's done it many times. I plan to skin the doors and weld them on. Car will be about 2600lbs before cage, driver and gas. I'm shooting for 3,000lbs race ready, fully fueled 20 gallons with driver 160lbs. 215-doors w/glass etc 80lbs each without panels or speakers etc 100-coomplete body harness and extra ecu's, cruise control and some misc crap in a box 15-floor deadning 10-firewall deadning 35-HVAC 62.5-hood 25-trunk 25-gas tank 50-spare and jack (rough weight) 50-exhaust (rough weight savings) 5-brakes 130- seats 35-sunroof 34-rear seats 17-AC compressor 15-AC components 10-ABS 25-Steering column w/ wheel 20-cutting rear firewall out 10-cutting rear trunk area out https://imagizer.imageshack.us/v2/791x528q90/24/ov42.jpg https://imagizer.imageshack.us/v2/791x528q90/827/ey1z.jpg https://imagizer.imageshack.us/v2/791x528q90/132/508l.jpg

wvumtnbkr
wvumtnbkr GRM+ Memberand Dork
1/29/14 12:46 p.m.

When I gutted my RX7, I didn't get close to those weights! Those cars must be tanks!

The entire hood of my car (the steel one) weighed 30#. I was able to skin it and it now weighs 15#. I don't have a trunk, but that seems awfully heavy! I know the spare and jack in teh RX7 weigh 21 pounds.

I guess what I am saying is that I would be surprised if you got more than 1/2 that total weight out of teh car without going to carbon or fiberglass for some of the replacement pieces.

Let us know what it ends up being when you are done!

Rob R.

fried_rice
fried_rice New Reader
1/29/14 2:10 p.m.

These cars are Luxury liners and yes everything on them is extremely heavy. That is one advantage the SC300 has over the Supra. I've weighed all these items and it's been documented also by some drifters as well, getting into the 2600lb range. Then you add a 150lb cage and driver, for road racing 120lbs of gas fully loaded. Most of the weights listed are not net losses, just the weight of the part, so if you really want to get down that low you'll have to remove the doors, hood and a trunk or skin them, make some type of sheet metal or custom fiberglass/carbon fiber like you said.

There is a lot of the interior, windows, and misc parts I did not include in the list as they are easy for anyone to pull out and weigh themselves and have been well documented elsewhere.

The only weight other than the cage, gas and me I'm putting back on the car will be door skins and trunk skin. Going to try to run without the hood.

Anyone with scales in Houston wanna come weigh the car?

ptmeyer84
ptmeyer84 New Reader
2/1/14 10:00 a.m.

I will chime in and say I am a big fan of this thread! Very valuable and insightful for a person, like myself, who is considering a dedicated track car build. A good gauge for what is considered a proper level of detail in a build. Keep up the great work, and good luck come race day! Look me up if you decide to get a wild hair and race at MPH in Nebraska .

JohnyHachi6
JohnyHachi6 Dork
2/1/14 11:03 a.m.

In reply to ptmeyer84:

Thanks! It's been great to hear all the words of encouragement. Really glad this has been useful.

JohnyHachi6
JohnyHachi6 Dork
2/1/14 11:23 a.m.

Lots to update.

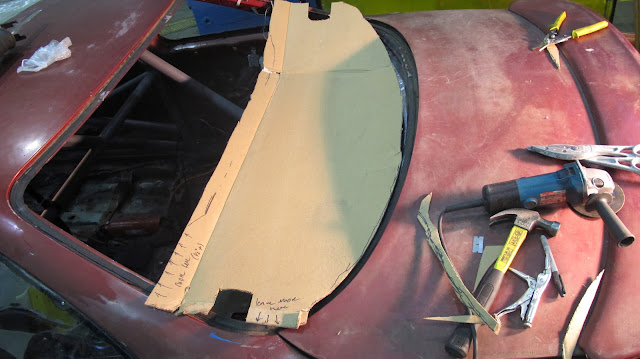
With the rear glass out and the polycarb cut, there was some work that I wanted to do while I had easy access to the rear bulkhead. The OE bulkhead separating the passenger compartment and fuel tank is a giant piece of swiss cheese without the speakers and miscellaneous other item that mounted in it. These holes all needed to be filled, and rather than make a few dozen patch panels, I decided to fabricate some large panels to replace the OE sheetmetal.

Here's the original upper bulkhead.
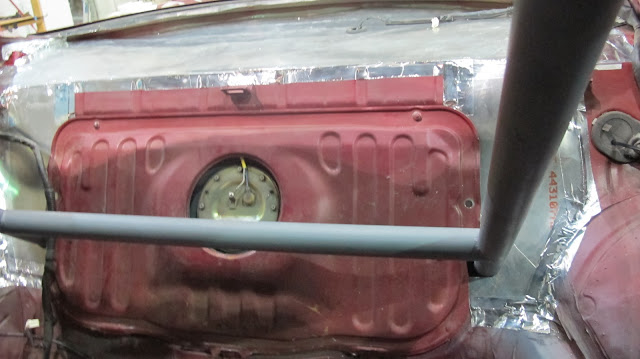
Here you can see the fuel tank access panel removed and some of the lower portion of the bulkhead that was removed to install the cage.
First thing was removing the original metal here.

Then a cardboard template was made to fit the opening. This is a great method for doing sheetmetal work as it's quick and easy to make a cardboard template and transfer it to steel/aluminum sheet and avoids laborious measurements.
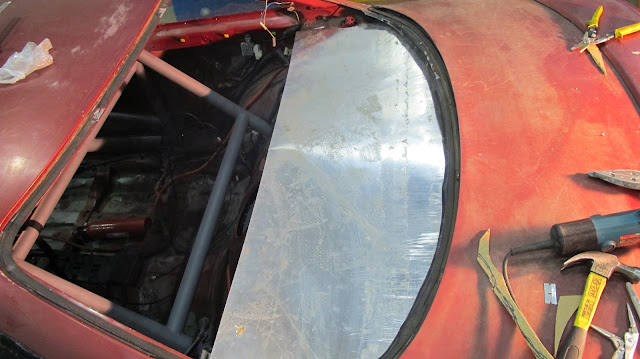
I used some scrap aluminum sheet for the panel - same stuff as the sunroof.

That was riveted in place and I moved on to sealing the large openings around the cage tubes.
More templates for that. Installed those panels along with the OE tank access panel.
I cut a hole for the OE fuel tank wiring and installed that. Then, used some more of that handy aluminum tape to seal the edges of the panels.
I was slacking a little bit with the pictures here, but next I painted all the shiny aluminum with a matte black paint to avoid glare. After that, the rear polycarb was installed. I used a silicone window caulk and riveted the window in to place.

The quarter windows were done using the same process, but I forgot to get pictures of those.

JohnyHachi6
JohnyHachi6 Dork
2/1/14 11:28 a.m.

With the windows back in, the car was ready to hit the road for an alignment. Alignments are pretty much the only thing I ever have done at a shop - just don't trust toe plates and camber gauges to get everything dialed in just right after making big changes.

I took the car to Gran Turismo East here in Atlanta. http://www.granturismoeast.com/ GTE is a top-notch shop and I take all my cars there for alignments when I'm racing them. The guys really know what they're doing and are more than willing to work with modified cars and alignment specs far from the factory settings.

Here are the specs we ended up with.
You can see lots of camber up front, a little less in the back, zero toe in the front and a little toe in out back for stability.

While it was on the rack, I was curious to see if there was anything that came up out of square from the deer hit that allowed me to get such a good deal on the car. The numbers showed no issue there, so that was good news.

There was some bad news too though - while the car was up in the air we noticed oil leaking off the front crossmember. I would have been pretty upset if it were coming from the engine, having gone to great lengths to seal everything up with new gaskets. It turned out to be a severely blown front shock that was spurting out oil all over the place. So, that got put on the list of items to replace.

JohnyHachi6
JohnyHachi6 Dork
2/1/14 11:48 a.m.

After driving the car back, there were some more items to work on last night. First, I wanted to swap that shock with a spare I had picked up from the junkyard. Pulled the two front assemblies out (shown next to the spares).
Here's the blown shock, coated in oil.
I pulled the springs off the spares, swapped everything over and put them back in the car. It's hard to tell, but I think the spares might have been leaking at some point as well. I'll be looking at some new replacements soon - I was really hoping these would last one race, but it's not looking like that will work out...

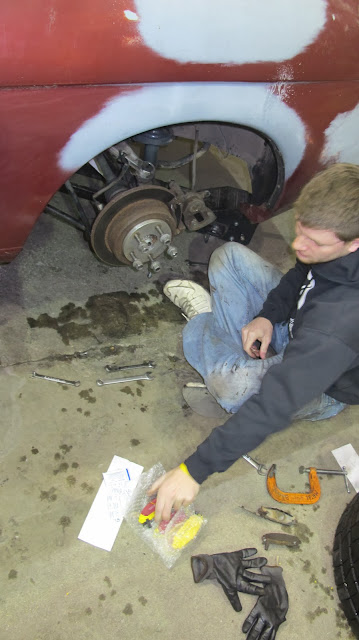
While I was working on that, Matt gave a hand installing the EBC rear brake pads - we're still waiting on the fronts, but they're supposed to be here in the next day or two.


Matt also cut the lip off the driver's fender and removed some of the other sheetmetal from the back of the fenders. Darius had done the passenger's side a few days ago.

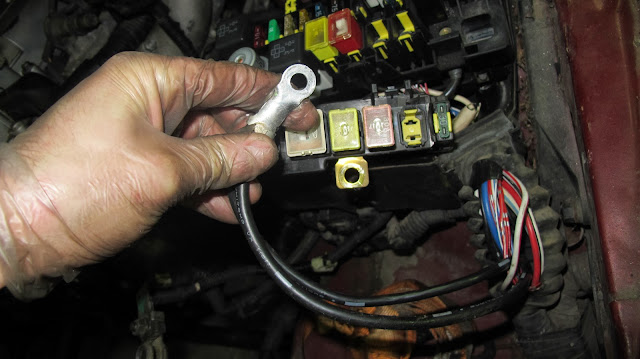
During my drive to GTE and back I noticed that the driver's front tire was just barely rubbing in the fender under hard cornering or big bumps, so I took a look at that. There was a factory wire harness that ran through the top of the inside of the fender, and the bulky plastic case around it was rubbing. I decided it would be best to pull the harness and route it through the engine bay. To do that, I needed to unplug a bunch of connectors in the driver's footwell, pull them out through the grommet and re-run the wiring. It was a pain, but should be a much better place for the wires.

Removing the wiring.

This used to be routed inside the fender, just above the tire. I removed the bulk factory plastic case, replaced it with split loom and ran the wires through the bay.
Here you can see the final routing with the harness coming back out of the bay and though the firewall to the footwell (without running along the inside of the fender).
While I was in there, I also pounded back some of the sheetmetal lips and such to give additional clearance for the tires.

Sky_Render
Sky_Render Dork
2/1/14 12:04 p.m.

I can't tell from the very last pic, but is there some sort of grommet on that sheet metal pass-through to prevent the wire from chafing?

If not, a little trick I learned is to get the smallest-diameter vacuum line you can find, cut it down one side lengthwise, and use that to make a grommet.

JohnyHachi6
JohnyHachi6 Dork
2/1/14 12:07 p.m.

In reply to Sky_Render:

There is a grommet on that - it's a weird two-piece rubber and metal one. Good tip with the vacuum line. I've done something similar with the split loom to cover jagged sheetmetal, but the vac. line sounds even better.

carbon
carbon HalfDork
2/2/14 10:30 a.m.

This is awesome. Cool car!

JohnyHachi6
JohnyHachi6 Dork
2/3/14 1:04 a.m.

Finally got the car out on the track yesterday. Things went pretty well, but came back with a laundry list of smaller items to resolve before the race. Bottom line: it's pretty fast, but had some fuel delivery issues and the tires are rubbing a little up front. Good news is that the suspension setup feels really good for such a budget setup, no fluid leaks, no oil pressure issues, no overheating, no mechanical issues (other than fuel delivery). So, pretty happy overall. I'll post some pictures in the next day or two if I can find time before the race.

Here are some updates leading up to that.

Needed to get some electronics set up for the cooling fan. I picked up a cheapo fan relay from Advance for that. It uses a remote temperature probe designed to be inserted into the radiator fins and has an adjustable thermo-static switch to trip the relay. As I mentioned, I used this same setup in my Datsun, so I'm familiar with it and know it works OK.

I mounted the relay in the OE battery location. Power is routed through the OE ABS fuse block, which is 60 amps. I'm only running the high-speed fan circuit, but have the low-speed wiring tucked in there so I can switch it if we have problems with it pulling too much current (hasn't been an issue in testing).

Here's the relay. You can see the adjusting screw (brass) in the middle and the temperature probe wire (coiled silver).
I made a little aluminum bracket to mount the probe through the back of the radiator shroud.
When we were at the track we didn't have any issues, so seem good so far. We also adjusted the relay so it only comes on after idling in the pits for a minute or so after coming off the track. The temp gauge stayed right in the middle of it's range the whole time.

I also wanted to get the tow hooks set up before going to the track. I think we'll use the OE hook in the rear, even for ChumpCar and just put a larger diameter ring through it. In the front though, the car needed something different as the OE hooks are low and pretty far back under the bumper.

I decided to attach a plate to the end of the driver's frame rail and fabricate a screw-in hook like is used on the RX-8 or some BMWs (probably other modern cars too). I like the idea of a removable hook so I can put in something different if this doesn't work and so I can take it out when I'm working on the car (they can do a number on your shins if you're not careful).

I started with the biggest bolt I had kicking around that I had nuts for and cut out a ring from 1/4" steel plate with a couple of hole saws (plasma cutter was down and I didn't feel like making a trip to the waterjet just for this). I notched the end of the bolt and ring so they fit together.
Welded up a plate for the hook to bolt to.
Drilled out the end of the frame rail so the back nut could be recessed in the rail.
Welded everything up.
Some paint and the bumper back on.

JohnyHachi6
JohnyHachi6 Dork
2/11/14 10:41 p.m.

So... where to begin?

The race is over. We took the green flag in the pale dawn light of Saturday morning and took the checkered 14 hours later in the pitch dark, still turning laps on track. All the drivers got a stint, and the car came home in one large, car-shaped piece. I even drove it around a little afterwards. So, I'd call it a pretty successful maiden voyage.

The bad news is that we had our share of issues and spent about half the race fixing things or letting the car's electronics cool down. As a result we placed 79th out of 109 entrants. Not exactly what I had in mind, but better than putting it on the trailer like many teams were forced to do.

I don't even know where to begin with the updates. It was such a whirlwind leading up to the race that I haven't gone through the small number of pictures/notes I did take of progress before the race. So, I guess I'll go through what I have and add pictures to fill in the work we did as I get a chance to take them or upload them...

JohnyHachi6
JohnyHachi6 Dork
2/11/14 11:21 p.m.

So, rewinding back to the week before the race. As I mentioned, we got a chance to put the car on track up at AMP and were able to get a few dozen laps of testing in. Had some fuel delivery issue and the front tires were rubbing pretty badly under cornering loads. Otherwise, the car was great.


When we got home, I spent some time cutting out more of the inner fender sheet metal and pounding out the areas that we rubbing. I also re-ran the hood release cable, which was getting torn up by the tire, since it runs through the fender. When I was done, I painted everything matte black so I could see if any additional rubbing were to occur.

Here's the inside of the fender where the tires were rubbing.

Cutting out the lips and sheetmetal that was rubbing.
I also went ahead and made some 1/8" spacers to lift the car slightly. I could have cut another set of springs, but I wanted to keep those in case more dramatic changes in ride height were necessary later on. I didn't want to take the time to mill or waterjet these, so I just whipped them up with a holesaw, hand drill and band saw.
Here they are installed. Just a little lift.
I didn't want to go too far as any change in ride height messes with the nice fresh alignment from GTE and I wanted to keep as much of that camber as possible. It turned out that this height worked perfect with the trimmed inner fenders, and we had no rubbing issues during the race.

We had also noticed that some of the wheel weights were rubbing on the front left caliper - there's very very tight clearance in there. So, we rearranged the weights and taped them up again. The steering wheel was also coming loose just a little. So, I pulled off the quick-release hub and found that the main column nut needed to be tightened a little. Really torqued it down well.
I also spent a couple minutes to make a nice aluminum mount for the radio and push-to-talk button for the headsets that I recommended to the drivers. This worked out really well during the race and gave a nice easy location by the shifter for the drivers to hit the PTT button with their hand.

Back to that pesky fueling issue. I figured it was the fuel filter, which hadn't been replaced yet, despite all the crap I had found in the fuel tank. I had been putting this off, because it's difficult to replace without draining the whole tank and there was a lot of fuel in it. I found that there were some sections of rubber fuel line by the tank and clamped those closed with C-clamps allowing me to take out the filter with only minimal fuel loss.

The new filter went in.
And I drained the old filter to see what it had captured.
There was a lot of junk in there, and I was hopeful that this was the source of the problem.

Alas, that evening I took the car out for a good set of pulls on the highway and found that the problem reoccurred, exactly as before.

The next day, with only a couple evenings left before the race, I tore into the fuel system again searching for the issue. I installed a spare fuel pressure gauge and found low pressure. Next, the fuel pump access panel came off the tank and I pulled the pump. Everything looked ok and I temporarily reinstalled it. I turned on the pump while I had visual access to the tank with the pump in it, and saw something strange. When the pump was on, the fuel pressure stayed very low (0-15 psi), but clearly fuel was flowing around in the tank at a high rate, indicated by ripples on the surface of the fuel.

Eventually, I plugged an air line into the fuel line where the filter hooks up and blew air (at extremely low pressure) back into the tank. Finally, I found the issue - a pinhole leak in the high-pressure steel fuel line that runs through the OE tank, from the pump, through the tank wall and eventually up to the rail.

Unfortunately, this is all integral to the tank on this car, so a new tank was in order. Crap - only a day or two until the race at that point. (Pics of some of this to come later)

The next morning, I called around to the local salvage yards (the you-pull-it yards didn't have anything). After an hour or so I was able to get in touch with C&L auto parts here in Atlanta. They had a tank ready to pull and I could come pick it up immediately. An hour later I had the new/used tank ready to install - total cost: $54.00 Not too bad! I also made a quick trip up to the local Airforce base where I bought a pair of 55 gallon steel drums for fuel. $15 each in great condition.

That evening after work, I installed the new tank and after spending hours messing with the finicky seals where the OE lines bolt to the tank, I finally got everything leak-free and ready to go, which was good, because tech inspection started a scant 15 hours later.

Earlier that day, our EBC Yellowstuff front pads had finally arrived from an Amazon vendor, after placing orders with two other vendors only to find that they didn't actually have them in stock.

I took the car for another test drive that night to break in the pads. The car was great and I didn't have any issues whatsoever.

As I was getting home that evening in the small hours of the morning, my friend and one of the drivers, Greg Godreau rolled into town, having driven 16 hours or so non-stop from Austin, TX. The next morning we started finishing up the last few items that we needed for tech. These included: installing the window net mounts and quick release, mounting the fire system pull-handles and nozzles, applying the vinyl number panels and numbers, installing the door lights, taping the tail-lights, purchasing a hand-crank drum pump for the fuel (harbor freight ~$30), and purchasing fuel, bleeding the clutch, and other things that I'm sure I'm forgetting.

That evening, around 7:00 PM, we finally finished loading everything and hit the road, leaving us 3 hours to get to the track and through tech.

JohnyHachi6
JohnyHachi6 Dork
2/11/14 11:42 p.m.

When we got the car off the trailer at Road Atlanta, there was a huge line of cars going through tech. The Wrexus made a great table for our fast-food banquet though. We all took turns getting our gear inspected while we waited. Around 11:00 PM (I think) we finally rolled into the tech shed (an hour after they were supposed to close).

Everything went just about as smoothly as could be hoped. The tech inspector was enamored with the roll cage, which almost made it all worth it. We got our log book and passed all the safety inspections. Worst thing that happened is I almost drilled a 3/8" inspection hole in the cage, instead of 3/16"! Very little sleep does funny things to you. Thanks to whoever started screaming when I got the drill fired up! Our TCV came out right where I was expecting and other than needing to attach some photos to the log book before the start of the race, we were all set.
So, we put the windows back in the car, locked it up, and drove back to Atlanta for a few hours of sleep in our own beds - nice living so near to the track!

JohnyHachi6
JohnyHachi6 Dork
2/11/14 11:54 p.m.

The next morning we arrived several hours before the start of the sprint races/testing sessions and got the car warmed up and de-iced.

We bled the brakes again (I think it happened some time around then) with high-temp racing fluid, made some last-minute wiring additions for lights, checked the fluids and filled up the fuel tank. I frantically pulled on my safety gear as the last few items went together during the first testing session. I pulled out of the paddock just as the cars were following the pace truck out for the first sprint race around 11:00 AM, which worked out great. I chased them down in epic fashion under the double yellows, and pulled in behind the last car in the slowest class and settled into the seat.

I got the signal for the green over the radio and managed a good jump on the field as we crested the hill above turn 12.

It's a good time to say that I'd never driven Road Atlanta before, or ridden on it, let alone raced wheel-to-wheel in a sprint race. So, needless to say it was a little overwhelming. I was astounded at the scale of the track, the technical complexity, the immense elevation changes, and the difficulty of the totally blind apexes. I thought I would pick this up no problem, like I did AMP and Nelson Ledges, but this was a whole different animal.

Despite the trial-by-fire, the car was working great, and after a few laps, I had the corners down enough to start pushing a little. By the end of the session, I'd managed to place the fastest time of the weekend, according to Gattuso (one of the drivers spotting me on the radio). He had me down as running a long string of 1:52.XX laps and one 1:50.X flier.

Here's a nice shot - going for the pass in turn 12.
I took the checkered, probably about 1/2 way through the field, feeling seriously impressed with the car and a bit intimidated by the track, though thrilled to have made it through the first sprint race.

JohnyHachi6
JohnyHachi6 Dork
2/12/14 12:10 a.m.

After that, we cycled through the drivers while we set up our pit stall. Josh was up next for an hour in the seat during the next testing session. After that, John pulled on to the grid for the second sprint race. Unfortunately, we didn't have the fan controller adjusted as well as we thought and while waiting on grid, with the engine running, we started boiling coolant and spat a gallon or so of coolant out of the reservoir. We weren't sure what happened, and didn't want to spill coolant everywhere by running the engine more, so we had the car towed to the paddock, where we found that it was a simple overheating problem, retuned the fan and refilled the system and sent the car back out.

Darius went next, turning laps through the third test session without any issues (to my recollection). Matt went in for the third sprint race. A few laps in, I heard him yelling into the radio. Though I couldn't make out what he was saying, I gathered that the car was down with a mechanical. About 15 minutes later he was finally towed back to our paddock and we had put together that he had some serious vibration issue and had pulled off track and killed the engine.

We popped the hood and found smoke still coming out from behind the engine - apparently from the bellhousing. We suspected severe clutch issues, so I hopped in the car and fired it up. The clutch would only partially disengage and made a horrible rattling accompanied by vibrations. After trying a couple starts, the car stalled and the clutch wouldn't disengage.

We inspected the hydraulics, and found no leaks and a slave cylinder that still moved with the clutch pedal, so we started calling the parts stores for a clutch kit as we put the car on the trailer to take it home for repairs.

...

And, I'll leave it there for now. Lots more to come later..

SyntheticBlinkerFluid
SyntheticBlinkerFluid PowerDork
2/12/14 6:49 a.m.

Wow trial by fire that's for sure!

Hope you eventually get all the bugs worked out.

mazdeuce
mazdeuce UltraDork
2/12/14 7:01 a.m.

I'm on the edge of my seat here! Don't leave me hanging bro!

bgkast
bgkast GRM+ Memberand Dork
2/12/14 9:12 a.m.

Looks good out on the track. Congratulations on the magazine mention!

tuna55
tuna55 PowerDork
2/12/14 9:21 a.m.

Oh come on, finish the story!!

JohnyHachi6
JohnyHachi6 Dork
2/12/14 2:47 p.m.

Haha. Glad to see folks want to hear how it ends.

Ok, so we had put the car on the trailer Friday afternoon and were headed back to the city to pull the transmission. Matt was on his way to get a clutch kit, which was fortunately stocked locally and reasonably priced at ~$112.

We took a couple hours to grab some food, then went to work.

We had the transmission out in an hour or so and immediately saw some mangled teeth on the pressure plate diaphragm spring. When we disassembled the P-plate we found the friction surface (huge cast-iron ring) had cracked completely though in two places and another large crack was almost completely through the ring, leaving it in two completely separate pieces. "Well there's yur problem!"

We didn't have a good way to resurface the flywheel and it actually looked pretty straight against a precision straight-edge, so I hit it gently with a flap disk to de-glaze it and put the new clutch-disc, p-plate and TO bearing.

The transmission went back on without much hassle and we packed everything back up. After getting the car back together, I went for a quick test drive and almost immediately heard a horrible banging noise from the driveshaft. Car went back up in the air and we found a couple of driveshaft bolts that hadn't been fully tightened - whoops! While giving everything another good inspection, I also discovered a huge crack in the exhaust pre-cat. I had seen other teams knocked out of ChumpCar for sound violations, so I spent another couple hours with John and Darius making some patch panels and welding the exhaust back up. Finally we finished up and headed home for a few hours of rest.

I decided to drive the car home so I could test everything out and do some clutch break-in. The car seemed fine and I did as many low-speed, low-torque engagements as I could to mate the clutch and flywheel. All was good and the car got a few hours rest in my garage.

The next morning, we all hit the road. I was driving the Wrexus again and spent a good bit of time on the highway engaging and disengaging the clutch with cool-down between to facilitate break-in. Everything was still great and we made it to the track with a little time to spare.

The team did some more last-minute checks as I put on my gear and I pulled into line in the pits just as the pace truck started leading cars out for the pace laps to start the enduro. I think I was right behind the BioHazard MR2, actually, which would go on to the overall win 14 hours later.

My girlfriend of 12 years, Marnie, was on the radio and I told her to go check with timing/scoring to make sure our transponder was hitting, so we could come in to fix it quickly if it wasn't working. After just one lap, I heard her say over the radio that everyone's times were coming in and they would be going green soon. Another lap later and she gave me a great jump on the field again as I heard the "Green, green, green" and saw the double yellows go down from my position in turn 10. I managed to blow by 3 or 4 cars including BioHazard before everyone caught on that we were racing.

The car was running great, and I made a few more passes. After another lap or two, I went to make a shift and the clutch pedal went to the floor and stayed there. Crap.

I call into the pits and told the team to get the 10mm, a pan, and fluid to bleed the clutch and that I would come in after another lap.

I realized we hadn't bled the clutch the night before and it hadn't occurred to me that it would be a problem since everything seemed fine once the new clutch went in. There had been no leaks and no sign of issue on the drive home or to the track.

I pulled into the pits, with the clutch just barely working well enough to get the car going after stopping at control. The guys threw the jack over the wall and the car went up again.
I was hoping this would be a quick stop, so I kept my belts on and talked Matt and Josh through the procedure over the radio.
A few minutes later, we were back in business. The pedal seemed good and everything appeared to be working and leak free. The car came down and I headed back out, just a lap or two down.

The clutch almost immediately went to the floor again and I called back to the pits once again telling them I'd be back in after another lap. However, as I circulated sans clutch, it occurred to me that the car was totally driveable still. In a strange coincidence I had been practicing my left foot braking and shifting without a clutch in my old Celica recently, as preparation for some future rally driving I imagined I might one day take on. So, I decided to stay out.

I ran the rest of the two hour stint with left foot braking and right foot gas and never once touched the clutch. It was great. The car was one of the quicker ones down the straights, and as I learned the track, I was able to keep up with all but the most nimble cars in the corners as well. The time and laps flew by and soon 10:00 AM was approaching - time for a driver change.

I called in the stop and pulled into pit-in on the next lap. I had to cut the engine at control to get the pit timer and bump-start the car in 1st gear using the starter, but it worked fine and I pulled up to our stall.

The guys came over the wall for fuel while Josh helped me get out of the car. After the fuel was in, we took another couple minutes to try adjusting the pushrod for the clutch pedal/MC. It seemed to work and we sent Josh out. He turned a few laps before the clutch went to the floor again. He came back in and I told him to just keep driving with no clutch. On the way out of the pits though, the clutch started slipping (a whole new issue). I'm still not sure why, but I suspect that the slave cylinder was seizing, causing most of the issues we had.

Josh was concerned about the slipping, but I told him to go for it, since we didn't really have a better option (no parts stores could get a slave or MC for days). Josh pulled out of the pits and made it halfway up the hill from turn one where the slipping got so bad that the car wouldn't go any further. He was towed in a couple minutes later.

When the car final made it back to the paddock, I hoped in again and gave the car a try. There was no clutch, but the car started up and would drive like it had a super loose torque converter. Accompanied by grinding noises from the transmission.

We decided the clutch was in fact toasted and started considering our options. We could get another clutch, but without a new slave cylinder, or at least a properly resurfaced flywheel, there was almost no chance of a successful repair that would last the race. After a few minutes of discussion, I decided that the best plan of action was to pull the trans in the paddock and weld the clutch hub to the pressure plate if there were no other obvious solutions. This would allow us to continue with no new parts and would be a reasonably robust solution.

I called Greg who was sleeping at my place in Atlanta, waiting for his evening stint and asked him to start heading up to the track with his suitcase TIG welder, some scrap metal and my angle grinder. The rest of us set to work pulling the transmission again.

Here's what we found when we pulled off the transmission about 40 minutes later.
All that fluffy stuff coming out of the diaphragm spring teeth is cancer (clutch disc material).

Here's one big chunk wedged into the p-plate.
And here's the p-plate with the clutch disk sitting on top of it. If you're not sure what you're looking at, there's supposed to be a ring of friction material riveted to all those little petals on the clutch disc. This is how we found it...

JohnyHachi6
JohnyHachi6 Dork
2/12/14 3:05 p.m.

A few minutes after getting the parts out of the car, Greg arrived with the welder. I cut the petals off the clutch hub with my trusty tin snips and tapped the hub into the p-plate. It fit perfectly and gave an excellent edge to weld to.

That pile of dark stuff on the left is chewed up friction disc. Let me tell you that stuff is itchy as berkeley when you're rolling around in it under a car. Definitely don't get it on your hootus!
Greg and I got the welder set up and the other guys fired up the generator.
Greg did his best to protect the weld and shielding gas flow from the wind as I welded the clutch hub and p-plate together.
I'd never used a TIG torch with hand-controlled current wheel or a scratch-start setup, so that was a new experience, but I got it down pretty quickly.

The cast iron of the p-plate gave us a lot of cracking issues, which cast iron is known for, but after going over the welds a few times with a lot of filler, we got it to the point where we were relatively comfortable with the results, though some small cracks persisted.


We gave the welds some good whacks with a hammer to make sure the cracks didn't propagate. It seemed stable, so we threw it back in the car and got the transmission back in.

I did some test pulls around the paddock and other than needing to bump-start the car with the starter motor, it seemed great. Greg was suited up, and as the only other team member who had driven one of his own cars without a clutch (and having not gotten a test session the previous day) we tossed him in the car and he headed out on track.

According to mylaps, the entire ordeal (from start/finish to start/finish) took about 5 1/2 hours.

pinchvalve
pinchvalve MegaDork
2/12/14 3:08 p.m.
JohnyHachi6 wrote:

You should seriously consider hand lotion, your skin is starting to look a little funky.

1 ... 5 6 7 8 9 ... 12

You'll need to log in to post.

Our Preferred Partners
Rbf5UXyiATwuwwgih2GomfQfBPqeBn2PrzXYbF8OeDtLPfZIe7xjtvrS92ciDrQP