1 ... 3 4 5 6
DarkMonohue
DarkMonohue GRM+ Memberand Reader
3/7/21 9:17 p.m.
Carl Heideman said:

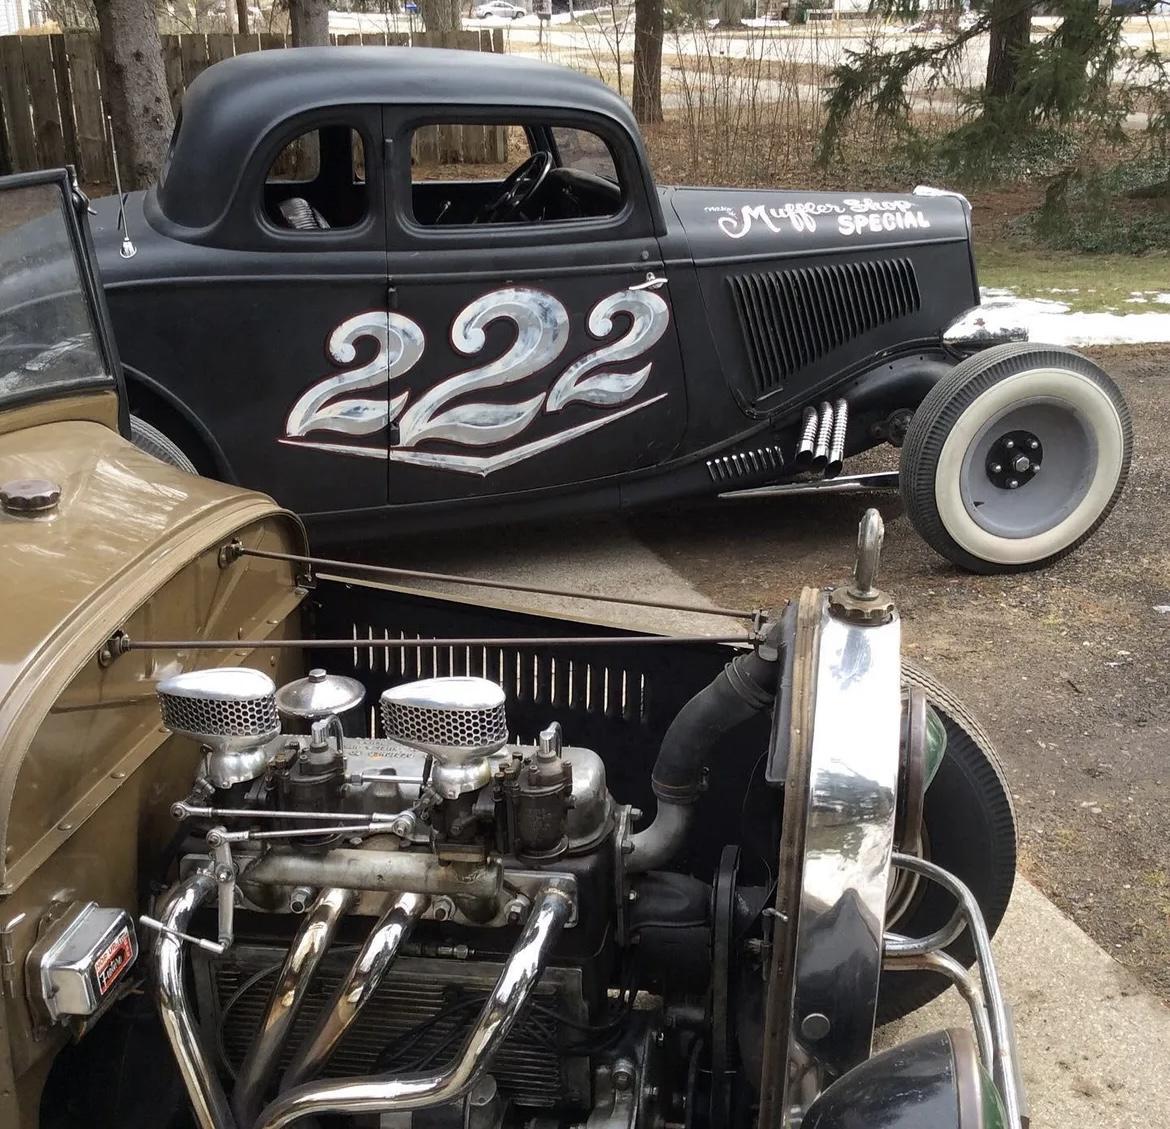
It's funny that he calls it the muffler shop special because it's got three open pipes on each side.  It's not as loud as you'd think and sounds great.

Preach it. Flatheads with straight pipes are right up there with a baby's laughter on the list of sounds that just inherently make your heart happy.


Carl Heideman
Carl Heideman
3/18/21 12:20 p.m.


I scored a couple of supposedly good used flatheads a few days ago. Considering I have 4 cars that use this flathead I thought it would be good insurance for the future. Especially for the pickup due to the issue with the water damaged cylinder. 

frenchyd
frenchyd UltimaDork
3/18/21 1:43 p.m.

In reply to Carl Heideman :

Envy.  Lust.  Want.  What is the going price on a worn but mostly crack free later engine?  47-53?

     Have a lust to build the engine and find a car to put it in.  

Carl Heideman
Carl Heideman
3/18/21 5:12 p.m.

In reply to frenchyd :

These are pre-war 81a engines, which are the early 24 stud (desirable) but smaller displacement (221ci, less desirable) with the hard-to-service front mount distributor (less desirable).  I paid $700 for both, including 2 starters, 3 distributors, new water pumps on one of them, and some other extras.  That's pretty fair.  The later 8BA engines you're talking about are more desirable and harder to find but don't seem to command much more around here.  I bet I run across a motor for $300-500 once a month.  It's always a gamble, but I've had pretty good luck with used engines.

Since all my cars use 81a engines, these will be easy to swap in when I need them.  Swapping to other variants is pretty straightforward, but there are often small parts hunts for things like pulleys or brackets.

frenchyd
frenchyd UltimaDork
3/19/21 4:15 p.m.

In reply to Carl Heideman :

I'm sure it's the same thing I have with finding cheap Jaguars. Knowledge and connections.   
      Thank you, I'll file that away in my brain so when I come across something in those price ranges I'll act.  
My goal is to build a true hot rod even if 90% of it is reproduction or aftermarket. 

Carl Heideman
Carl Heideman
4/11/21 9:11 p.m.

I've been driving the pickup several times a week and doing some minor sorting.  It still needs front shocks.  It's got the stock Houdaille lever shocks but they leak and don't damp anymore.  It turns out the tube shock kits on the market don't fit when the mechanical brake linkage is still there.  I think I'm going to use MGB rear lever shocks in place of the Houdaille's because I've got a lot of good used ones.  I'll just have to make some brackets and links, no big deal.

But distractions are always there and I wanted the 1938 Ford's stance improved.  A few years ago, I bought a Chassis Engineering reverse eye spring, tube shock conversion kit, and front sway bar.  I thought I'd mount them one component at a time and see how the ride is affected.  First up was the reverse eye spring, which in theory would give me about 2" of drop.

You can see the spring is wrapped in the opposite direction for the shackles, which gives about 1" of drop.  The other 1" was supposed to come from the spring itself.

But when I mounted it on the car, it was the exact same height--14-1/2" to the bottom of the front bumper.  Maybe the stock spring was sagging.  In addition to the disappointment about the height, the spring squeaked badly even though it had teflon sliders between most of the springs.  Everyone says, give it some time to settle.  I rarely see quality springs settle--just junk ones.  I put about 100 miles on the car and waited a month and it didn't settle.  So that made me happy.  

I still wanted my ride height down about 2", so I removed the 2nd and 4th spring leaves from the top.  I added two 1/4" spacers at the bottom so the spring clamp would still fit.  The stock Ford springs are pretty hard, so I hoped softening the ride would be okay, especially considering I'm using modern(ish) shocks and a swaybar.  When I took the spring apart,  I found that the top leaf didn't have the teflon sliders.  It also had a harsh 90 degree edge on it, which was most likely the cause of my squeak.  I taper-ground the edges on a belt sander, liberally greased every leaf on the spring, then put it all back together.

The car ended up 1-3/4" lower--close enough to 2" for now.  It was quite a bouncy ride as this car had junk Houdilles too. 

I installed the tube shock conversion.  It uses the 2 mounting holes for the stock shocks and requires drilling a 3rd hole in the bottom of the frame rail.  It also uses a special shackle to mount the shock at the bottom. 

No more squeak and the car is riding very nicely.  I'll install the swaybar in the next few weeks.  And get back to the '32.


Carl Heideman
Carl Heideman
4/11/21 9:47 p.m.

The photos don't show it very well, but the stance is much improved in person. 

jerrysarcastic (Forum Supporter)
jerrysarcastic (Forum Supporter) Reader
4/13/21 1:04 a.m.

Heck yeah, that looks a lot better with just a tiny bit of rake to it.  I think it’s just right. 

Also I guess I’m just noticing for the first time just how small the rear wheel arches are.  Or maybe I’m reacting more to it because the rear tire sidewall looks to be almost flush to the opening.  Is it a challenge taking off the rear wheel or does the suspension droop enough to make it no big deal?


bgkast (Forum Supporter)
bgkast (Forum Supporter) GRM+ Memberand PowerDork
4/13/21 1:24 a.m.

That is a great looking car!

Carl Heideman
Carl Heideman
4/14/21 11:51 a.m.
jerrysarcastic (Forum Supporter) said:

Heck yeah, that looks a lot better with just a tiny bit of rake to it.  I think it’s just right. 

Also I guess I’m just noticing for the first time just how small the rear wheel arches are.  Or maybe I’m reacting more to it because the rear tire sidewall looks to be almost flush to the opening.  Is it a challenge taking off the rear wheel or does the suspension droop enough to make it no big deal?

Thanks Jerry.  I'm pretty happy with the rake.  A lot of people go for cartoonish proportions, which can look great, but aren't very good on the road.  I know you've been working on this on your car, so I appreciate your feedback.  You've got a good eye for the rear.  They are a snug fit, but come on and off just fine with the suspension in droop.  They'll just barely come on/off even with the suspension at ride height (jack stand under the rear axle).  On these fat fendered Fords, one fairly common issue is that the wheels aren't centered in the wheel arch.  They're usually about an inch too far forward, and some guys go to great lengths to center them.  In this case, they're actually a little to the rear of the arch.  This car has had some rust and patch panels, so maybe that's why it's not like the others.  I'm not going to do anything about it anyway.

This rear 3/4 picture gives a little better picture of the rake.  My iPhone, the black tires, and the dark blue body don't make it look as good in photos as in real life. 

Some parts are coming for the 1932 Pickup today, so hopefully I'll get this thread back on track soon.

Carl Heideman
Carl Heideman
7/23/24 9:39 p.m.

Wow, no updates to this for over three years. Shame on me. It has been on the back burner as I've had other distractions.

If you've noticed some of my other build threads, it's kind of a hot rod summer for me, so I got back to this one and I finally installed an alternator.

This shows the original 6V generator fan setup. Powermaster doesn't sell a fake generator that will support a fan drive. I assume it because they think the bearings won't hold up. However, a company called Flathead Doctor makes a kit with a plastic fan that looks authentic, so I laid out the roughly $500 for the alternator and fan setup.

Here it is mocked up on my toolbox.

Two problems:

  1. The fan blades hit one of the coolant hoses (missed the other one by over an inch--crude engine mounts from someone in the past).
  2. The fan was about 3" away from the radiator.

So I figured if I made a longer spacer, I could get better cooling (closer to the radiator) and not hit the hose (look at the angle).

Jeff Vos runs the machine shop next door and he had the right piece of leftover Delrin so I made up a new, longer spacer on the lathe.

Stuck it in the mill to drill four holes.

Kit's spacer is on the left, mine is on the right.

You may know I like to measure things so I weighed before and after.

When I installed it, the fan blades still nicked the hose, so I trimed them all a little bit, made sure the fan is still balanced, and all is good. 

Time to drive it more this summer...stay tuned.

Carl Heideman
Carl Heideman
11/24/24 7:24 p.m.

I didn't drive the truck much this summer as it's pretty quick to foul a couple of plugs in the bad cylinders and it's smoking a fair amount. 

I had a recent epiphany. I bought this motor about a year ago and was going to build a car around it. Then I realized I don't need to...'32 pickups originally came with 'bangers (more torque) while V8s were optional only in passenger cars.

This one has some mods. Of course there's a story behind it. 

DarkMonohue
DarkMonohue GRM+ Memberand SuperDork
11/24/24 7:57 p.m.

<failed gif upload aborted>

What's the old saying? Eight for show, four for go?

DrMikeCSI
DrMikeCSI Reader
11/25/24 3:17 p.m.

I'm in just for those air filters. 

11GTCS
11GTCS SuperDork
11/25/24 5:08 p.m.

In reply to Carl Heideman :

TIL there were OHV conversions for the Ford 4 cylinder engines too.  In for "the story behind it"!

Carl Heideman
Carl Heideman
11/27/24 8:28 p.m.

My sons and I really enjoy a holiday car thrash and it's a bit of a tradition now. This Thanksgiving, we're going to thrash to get the engine swapped and hopefully all the details addressed. We got a start late this afternoon. Nick stopped (he's part of the more to the story which I promise I'll tell soon), and he and Jack worked on cleaning up the 'banger for paint.

The paint on the engine was crusty in spots so Jack got out a wire wheel to strip it.

Then Nick and Jack cleaned it with brake clean followed by lacquer thinner and grease and wax remover before taping some things off..

I sprayed it with some DP90LF epoxy primer, waited an hour and then sprayed it Ford Green Centari.  I had an old can--I wish Centari was still available.

Meanwhile, I started stripping the front end to pull the V8 out.

Our plan is to get the 'banger in on Thanksgiving morning, then go to family events the rest of the day. We hope to have it close to finished Friday but who knows what might happen.

Carl Heideman
Carl Heideman
11/28/24 12:42 p.m.

We slept in a little Thanksgiving morning and got to work.

The V8 came out quickly.

The 'banger went in pretty well. We had pretty tight clearance with the front motor mount so we took it off. We used a couple of big Phillips head screwdrivers in the two top gearbox/engine bolt holes (3/8") as alignment guides. There is a window in the gearbox that let us see the clutch splines (10 splines) so we were able to be sure the first motion shaft and clutch were nicely aligned and it popped together nicely. 

We had a bad bolt on the front engine mount so we had to temporarily use a plated allen head bolt as that's all had in the shop.

Our first setback is the header. It's setup for split wishbone and this truck still has a stock one, so the header hits it. All the speed parts on this engine are vintage and rare, except for the header, which is a modern one from Red's Headers. So not using it is okay.
 

We have plenty of 1-1/2" U bends from other header projects, so we should be able to make something this weekend.

Lots of parts leftover for other projects, plus a few to put back on the truck.

And we went off for Thanksgiving with the family by about noon.

Carl Heideman
Carl Heideman
11/29/24 6:25 p.m.

Thanksgiving Day +1 photo dump 1. Maybe too much detail, but searching the web for 'banger headers, we didn't find many good photos, so I thought we'd post how we're building ours.

First, the flange.

Not shown, I wanted a 3/8x2-1/2" flange just like the Red's Header. I didn't have the right stuff, so I went to see Jeff at the CNC machine shop next door as he always has decent off-cuts. He had 5/8x2-1/2" which we then stuck in a CNC and quickly turned it into 3/8." It's so nice to have friends! Next, I clamped the stock to the chrome header and transfer punched the four mounting holes and inlet holes. Then I drilled the mounting holes (1/2") and used a hole saw  (1-1/2") for the inlet holes and made a test fit.

I then used the gasket to locate the centers of the exhaust holes and kept on hole sawing. I made the first two holes in the drill press and it took awhile, chattering a lot. Jack convinced me it would be better to use the mill. He was right, but I felt guilty using non-grassroots equipment.

I checked the fit, then kept making holes until I was done.

Nick came over to help so he put the finishing touches on the flange and radiused the corners.

Meanwhile, Jack worked on the tubes. He made two Y pieces out of 1-1/2" straight tubing.

He made a cone tool to round the Y pieces to an approximate 2" diameter as that's going to be the size of the downtubes. Using the tool in the press, he shaped the bottom end of the Ys.

We're planning to tie cylinders 1&4 and 2&3 together as that seems to be the best for exhaust scavenging (firing order is 1-2-4-3) and here we were mocking things up and head scratching.

Jack started with cylinder 1 and will do 4 next. 

Cylinders 2&3 will probably go in a position like this on the outside. It looks like we'll be able to have about 15" of tube to the center of each Y, so we should have near-equal lengths. To be honest, we'll probably have the look rule the final fit up as this is as much hot rod sculpture as a performance project.  When I tell the more of the story, you'll learn that this engine is from a car Nick used to own--all of Nick's cars are hot rod sculptures--so we have to follow suit.

I've saved the original exhaust from my '34 Ford for nearly 30 years. It was too loud in the '34, mainly because it exited before the rear axle and was mounted to the floor of the fiberglass body and drummed like crazy. But it had original Smithy mufflers, so I kept it.

We'll be using the mufflers and maybe some other pieces from it, plus some other cast offs we've had lying around. It looks like the small muffler shop offsets in the long pipes will work well for us, even though they're not mandrel bent. We'll use mandrel bent tubing where it really matters.

Our plan is to run two pipes all the way back to the tailgate and not tie the two branches together. If that doesn't look and sound cool, we may make changes. Anyone have any thoughts?

Carl Heideman
Carl Heideman
11/29/24 7:29 p.m.

Thanksgiving Day +1 photo dump 2. When we started this, we were thinking there was a chance to have the truck running with 2 days work--if everything fell into place. This engine was last in a 1929 Model A Roadster Pickup on a 1932 Ford chassis, so we had some hope everything should just fit. As shown above, the header didn't fit because we have a stock wishbone. Our next challenge was the radiator. We figured we'd have some issues, plus the V8 radiator is a four hose radiator and a 'banger only has two hoses. We thought we'd just block off the other two and maybe be lucky. When we mocked things up, the fan nut (and ultimately the fan) were about 1/2" too long to work with the V8 radiator. Not lucky.

When the engine was in his roadster pickup, Nick had previously made this adapter that acted both as a water outlet and a mount for the fan. He used a stock Model A water pump but at this point it didn't pump water. It was just a bearing support for the fan.

To pump the water, he used an aftermarket Model T pump. We were hoping to just reuse all of this, but the clearance issue came up. We called another friend who has a lot of Model A and '32 Ford parts and he said he had a couple of 2 hose radiators from 1932 Ford Model B's that we could try. The good news were that the Model B radiators have a 2" core and the V8 has a 3" core, so our clearance problem was solved.

The bad news is that the Model B radiators have the lower hose in the same spot as we have the generator.

Off to the internet, we found an adapter that will mate an early three bolt V8 water pump to the four bolt flange in the Miller/Schofield head, so I'll be ordering one. That will let us get rid of the Model T water pump, which in turn will let us raise the generator to above the water outlet. Stay tuned.

This has dashed our hopes of finishing the thrash over Thanksgiving weekend. However, we're still pretty sure we'll be able to fire the engine briefly to hear the sound and drive the truck back and forth a few feet to make sure other things are okay. We just won't have a cooling system until a few parts arrive. 

It's still way more fun than frustration. Problem solving is always fun when it's over, just not when it starts.

11GTCS
11GTCS SuperDork
11/29/24 7:31 p.m.

In reply to Carl Heideman :

Ideas?  Carry on, you're doing great? laugh

As an idle thought, if you're running the two pipes does it make any sense to think about an "H" pipe connection similar to a V8 dual exhaust? 

Carl Heideman
Carl Heideman
11/29/24 7:47 p.m.
11GTCS said:

In reply to Carl Heideman :

Ideas?  Carry on, you're doing great? laugh

As an idle thought, if you're running the two pipes does it make any sense to think about an "H" pipe connection similar to a V8 dual exhaust? 

The internet says it won't help. If we like the sound disconnected, we'll probably leave it. If we don't like the sound, we were thinking the same as you--"H" pipe. Hopefully, we'll know soon!

Carl Heideman
Carl Heideman
11/29/24 10:27 p.m.

So here's the story. It's really two stories. 

The details on the engine are the shorter story. It's a Model A 'banger with some pretty rare speed parts on it. First, the head is a Miller/Schofield. Harry Miller of Indy fame (Miller eventually became Offenhauser which became Meyer/Drake--all won a lot of Indy 500s) sold his company to an investment group left by a Schofield and around 1929 put out a Leo Goosen/Harry Miller designed OHV conversion for Model A Fords. Schofield went out of business pretty soon after and the patterns etc. for the head were purchased by Bell Auto Parts. They made some adjustments and sold the heads under the Cragar name for many years (same brand as the wheels but before the wheels).  The history is murky but the Schofield heads were only made for a year or two so they're rare. Next, it has Winfield carbs. Ed Winfield made carbs but later became much better known for his cams. Winfield carbs were nonetheless sought after by racers as he was a sharp guy. The air filters are really cool, and they're fairly new. There's a guy called Crafty B who makes cast aluminum parts. His flipper gas caps are on many famous hot rods. He made those air filters for Nick, and didn't make any more. 2 of 2. There's also a magneto on it that I don't know much about yet, plus a few other neat bits.

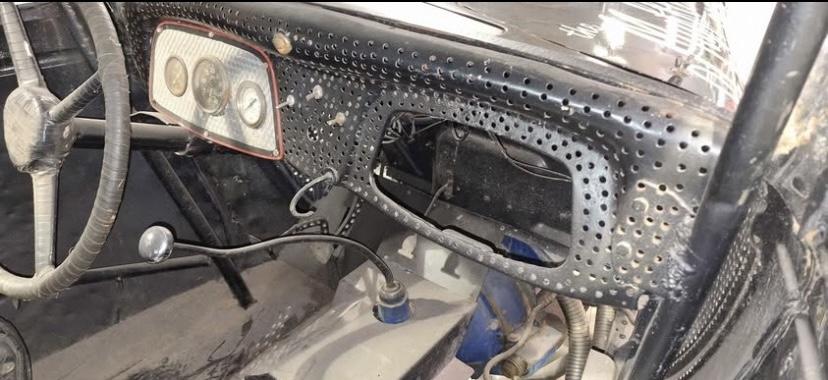
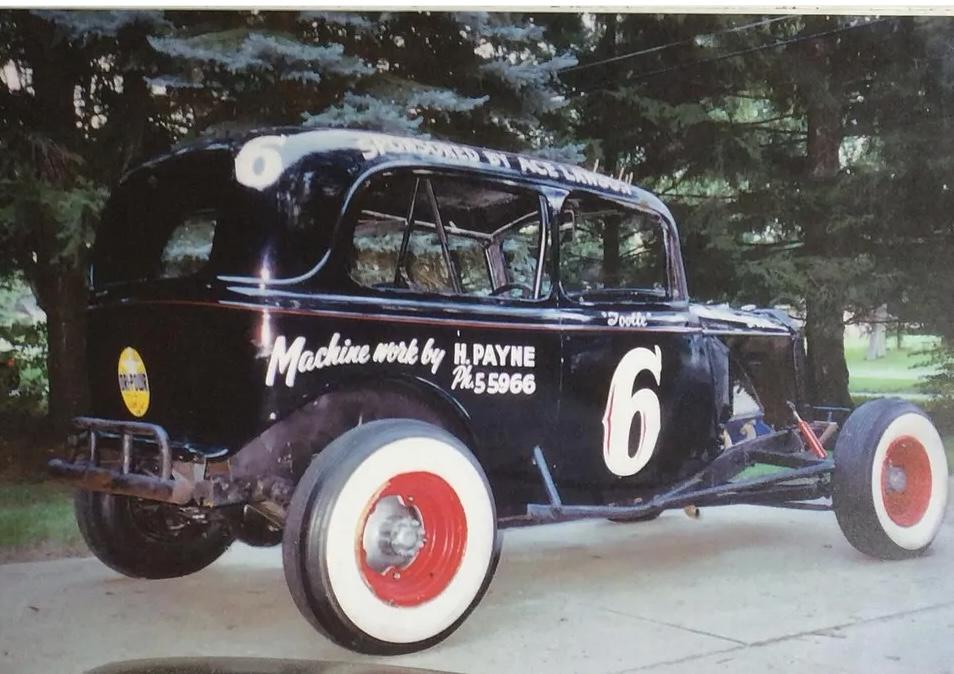
The longer story starts with this Jalopy '34 Ford race car called Tootles. Nick always has interesting stuff come his way and this car was one of his for a short while. It looks way better in this photo than it was in person It had no floors, just a race seat, pedals, and steering wheel. It was junk, but it was a real deal jalopy. The most interesting feature was drilled lightening holes. I've never seen more drilled holes in a car--hundreds of 5/16"ish holes in the brake backing plates, holes everywhere in the frame, firewall, radius rods, and more. Thousands of lightening holes, likely to the point of destroying the structural integrity. And yet the car survived, and Nick ended up with it.

He used to letter a lot of race cars and hot rods and he did a couple for a serious Model T and Model A speed freak.

(edited to add speed hole photos)

Long story short, he traded Tootles for the 'banger engine that this guy had in his inventory.  He then set out to build a car around it.
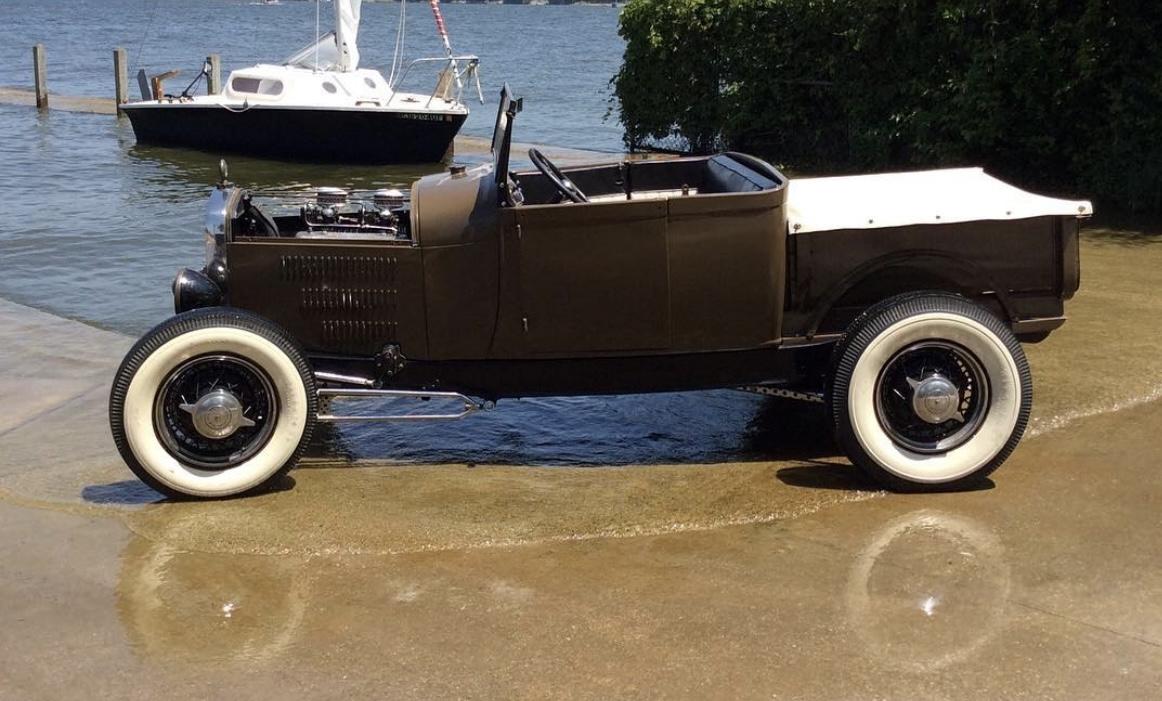
The car was a 1929 Model A Roadster Pickup on a 1932 chassis with all kinds of vintage speed parts on it. Nick has been at this for a long time and has painted/lettered cars for everyone, so he never has trouble finding rare parts from his friends.
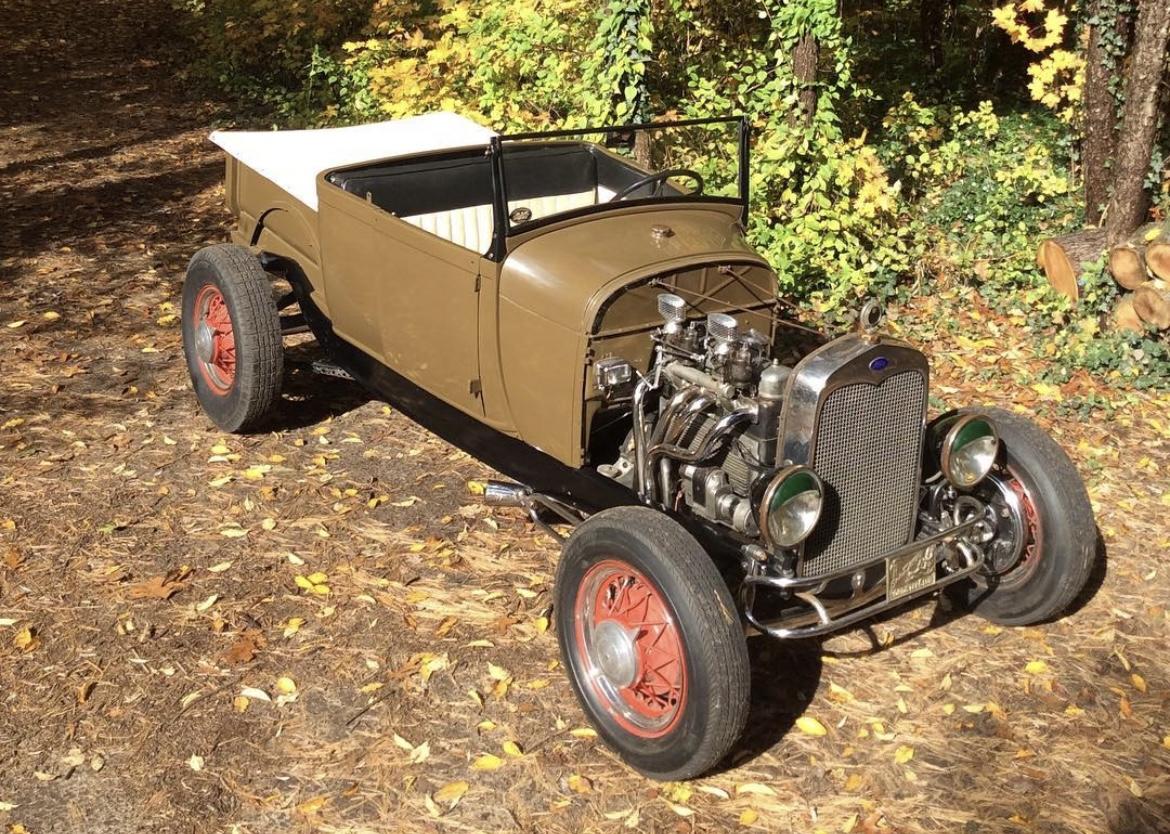
Nick's cars often evolve as he gets bored and changes things up. The pickup was no exception.
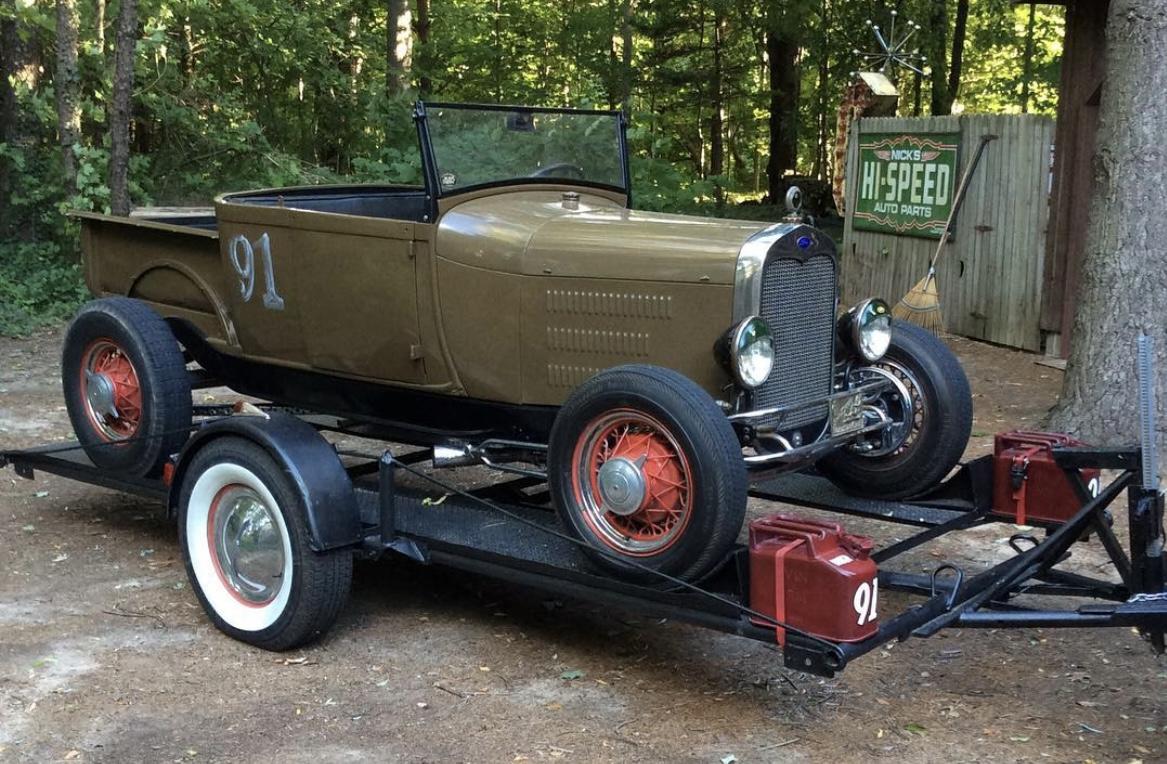
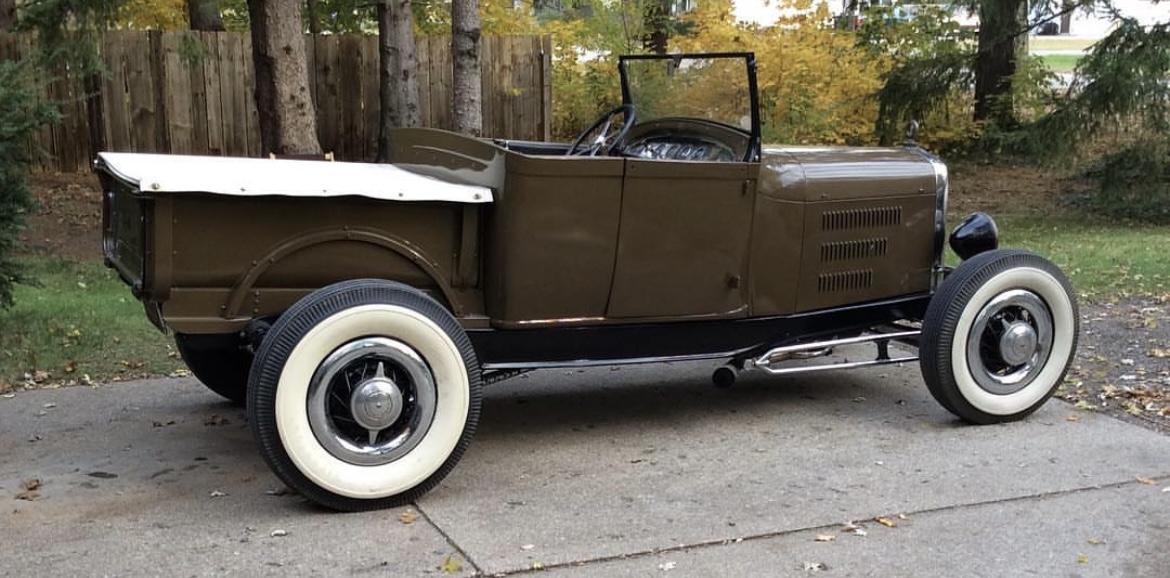
He especially played with the wheels and tires and various versions of hood setups. Not shown, but it eventually had early Halibrands on it.

Nick's built a lot of cars that have ended up in magazines and books, with several covers. One of his cars was featured in many full page Coker Tire ads for a few years. He's known as a hot rod artist, and when he finishes a car, he usually gets offers, sometimes from serious collectors.

He sold the roadster pickup fairly locally and the new owner is taking it in another direction. When the engine became available, I bought it. Nick was pretty happy about that.

Nick's almost 80 and slowing down. He's really enjoying working with us to put the engine back into something cool. But we're the ones having the most fun.

TL;DR, cool engine with a lot of rare parts, came from a cool car built by a very cool guy.

Carl Heideman
Carl Heideman
11/30/24 7:17 p.m.

Thanksgiving Day +2 photo dump 1: More work on the exhaust.

The green tape is where the hood side would be. We don't want to be close enough to burn paint if we run hood sides. We have plenty of room. Today was just iterations of test fits, cuts, sanding, test fits, tack welding until all the tubes were in.

Nick was on hand to help with the aesthetics, and sometimes to hold a tube while Jack tacked it in place.

The tacks are all with MIG and Jack will TIG everything when it's all fitted. Here, he's TIG welding the merged area that will turn into 2" tubing.

We're going to use slip fits, so Jack expanded some 2" OD to 2" ID for the slip fits to the headers.


With the header this far, we started on the rest of the exhaust.

I made up some quick brackets to use as shelves to put the Smithy's on as we get everything fitted. We did use the offset sections from the '34's exhaust to get around a crossmember. Nick built the double clamp bracket along with some other things today.

We're still planning for twice pipes all the way back. Should be close tomorrow.

Carl Heideman
Carl Heideman
11/30/24 7:34 p.m.

Thanksgiving Day +2 photo dump 2: More details. 

This shows the difference between V8 (right) and Model B (left) radiators.

Another view. The V8 radiator is quite a bit heavier--I'll weight them both at some point--it may have been recored at some time so I don't know if all V8 radiators are as thick compared to the Model B.

The throttle linkage went to the center of the firewall for the centered carbs on the V8. On the 'banger, the carbs are on the passenger side and the linkage is about 6" longer. Our friend Don had a Model B linkage.

The gas pedal (not shown) is held on with a roll pin. I had to reverse direction of the arm above and then re-pin the gas pedal. I'm happy with that as I didn't really want to cut anything up or bend too much. Nick built the linkage for the Winfields and I'm glad we kept it all in tact. We'll have some fine tuning but it works well and doesn't bind.

The V8 had a mechanical fuel pump and there is no provision for one on the Model A block (Model A's used gravity). I like electric pumps these days anyway so the cars don't have to crank so long to fill the carbs, so I grabbed a used one from my parts stash and plumbed it in under the driver seat.

A good day's work. There is some  parallax in the photo, but the tubes are parallel from most views. They're pretty close to equal length, with #3 being about an inch shorter than the others.

We started a little casually today and were ready for more friends and family Thanksgiving fun by about 4:00. Maybe tomorrow it will start and run, maybe not. We're having fun either way.

Carl Heideman
Carl Heideman
12/1/24 7:25 p.m.

Thanksgiving Day +3 photo dump: We drove it! It started on about the 3rd try (no chokes on the Winfields). We let it idle for about 20 seconds, then drove it 10 feet. Hopefully, we'll have the stuff to put the cooling system and generator in within a few days.

Jack did most of the work finishing the header and fitting the twice pipes. I mainly worked on details like some wiring changes, finishing the fuel line changes, and other pre-start rituals that don't photograph well. So there's more exhaust pictures today.

Jack spent a lot of time going back and forth between cutting/sanding things to fit and test fitting.

Pretty quickly, he had the pipes tacked and ready for finish welding.

He pulled everything off and started welding.

We didn't keep track of time, but he probably had 2 hours on the header.

This is one of the pipes. We used all cast-off and leftover materials in the shop. We'll eventually clean it all up and paint it with high-temp black paint.

Jack got as far as the mufflers and now we do need to buy some more U bends and straight sections of 2" to get all the way to the back. The "shelves" attached to the running board braces holding the mufflers up aren't necessary anymore and we'll remove them.

This what we'll be using for hangars. We're using threaded rod (not shown) to hold things up now, but will make something cooler.

This is what's left of the orginal '34 exhaust.

These were all full length TIG rods this morning.

We called Nick to come down for the quick start and drive at 6:00. He was as happy as we were. This is how things look after the quick start and drive.

Although Jack did roll up one of my recent parts scores and put some ideas in our heads.

Thrash over, back to customer work...


1 ... 3 4 5 6

You'll need to log in to post.

Our Preferred Partners
zI1vgWGacdvFRSIO8dOndXFaP0ubkZoJylC2IxEbK5Bfkac6CysycAKMftBxoInT