Brakes bled today.....took awhile using gravity/vacuum/manual bleeding (used PVC pipe to push on
pedal while doing the rears). Took several rounds of snugging fittings to sneak up on no leaks (many potential leak points since everything has been replaced). My first time doing brake line flares and happy to say I didn't need to redo any 


"Things from above" (since body is hanging from ceiling) started today (since I basically now have a rolling chassis). 
Removed my iron oxide ravaged clutch cable.
Removed fuel tanks and only broke one bolt off!
Critter debris and lots of rot in left tank, right tank looks pretty clean inside and salvageable.
I may relocate sending unit to right side tank and run one tank to get it going....would
lose 10lbs of weight and offset drivers weight too....would have about 200 miles of range...
Interesting that the bottom of the tanks are stainless....


Think tank sealer will fix this?
Think tank sealer will fix this?
Ferrous tank sealer applied with a 240v hot glue gun, maybe
Repaired fuel level sending unit (it wouldn't move), moved sending unit to passenger tank,
upgraded tank fuel line from 1/4"to 3/8" stainless and extended it to rear of tank.
Ordered gear reduction starter, clutch cable, oil pressure gauge line and misc items.


Painting tank... While waiting for paint to dry....
Installed gear reduction starter to make sure it clears turbo up pipe .... It does 
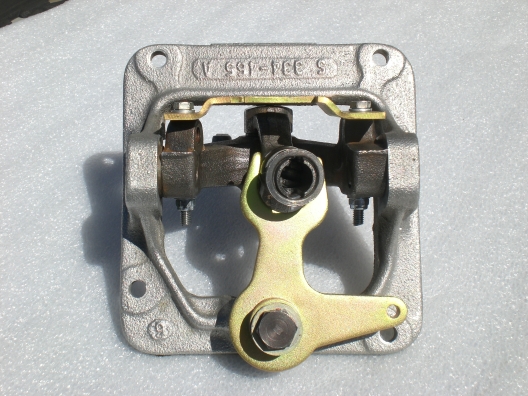
Because I am a pack rat, the next challenge is to turn my stash of rod ends, end links etc. into
a DIY cable shifter.


- Chassis has been persuaded to accept "Shifty" Fabricobble, my hand fabricated shifter, as a new friend.
- Heat shield installed on oil pan to keep header heat out of oil.
- Speedo cable lubricated and now spins easily.
- Shifter cable lengths figured out.


The reason people delete the remote brake servos.....
TurboFource said:

The reason people delete the remote brake servos.....
Holy cow what a convoluted mess

Nukem
Reader
4/9/23 12:06 p.m.
Am I stupid, or are there 2 servos?
No....there were two....I now have none and a Much simpler brake line circuit!
Not sure why a 1600lb car needed this complicated mess!

Nukem
Reader
4/10/23 4:09 p.m.
In reply to TurboFource :
The OG system seems very anti-Lotus
Simple = Good
Easter and then camping (my Trusty '95 F150 needed some pre-trip maintenance), so no progress the past two weeks until today.
Discovered I needed to remove drivers side engine mounting bracket to install header.
Shifter cables ran.
Removed passenger side mounting bracket and drilled a hole through it since it was where my shift cable wanted to be 
Chased threads in transaxle case to mount rear shift mechanism.


Some CAD (cerealbox aided design) ...
"Pinned" 15mm shaft collar so it won't spin/slide on selector shaft (using existing hole in shaft).
One more cable end to deal with....


One step forward.......
Braced the cable bracket bolted to tranny because, lightness=flimsy.
Made lever for side to side motion of shifter....revision time, as with most things on the Europa there is minimal room. My "lever" will hit rear frame in 1st and 3rd positions 
I don't think getting into reverse on accident will be a problem as there is no longer 9lbs of momentum from stock shift tube etc. You will definitely be aware you're shifting into reverse 


Nice work! It's coming together week. How much weight do you think deleting the boosters and piping saved? So much neater without all that!
In reply to Racingsnake :
I wrote down that the boosters weighed 13.2 lbs plus it eliminated
quite a bit of brake line .... so maybe 16 - 17lbs?
In reply to maschinenbau :
Thanks!
Your shifter looks great, much nicer than the Dodge Neon/Audi/McMaster thing I cobbled together for my old car.
Keep up the awesome work.
i really like the pinned collars for anti-slip on the round shaft. are those off the shelf, or did you modify them?
In reply to AngryCorvair (Forum Supporter) :
I modified them.
Version 2.0 ... now it will go in 1st and 3rd 


Inspiration for my fabricobbled shifter ... early Lotus Esprit one ...

I recently found the DeLorean one is similar to the Esprit...imagine that...
I might be the first person to use a ladder to work on their 42" tall Europa....
Thought I was done with rusty bolts.... Decided to remove and paint engine compartment/seatbelt mounting point bracing before lowering body onto chassis.
My arms weren't quite long enough to reach both sides of bolts especially since they were rusty and hard to get loose. Came up with some interesting ways to hold the nuts in engine compartment....
To add to the fun this was all done on a ladder since the body is hanging from my 11' garage ceiling 


Bracing sanded and painted, installed sending unit in the one (passenger side) tank I am going to run. Turns out the W1270 socket that you can use to adjust the differential case nuts is the perfect size to install the fuel sending unit lock ring 
Tank installed with new fill hose, Ladder height is perfect to easily get tank in 
I am thinking of moving the water/methanol tank to where the driver side tank was and use that gas cap to fill it......
Neoprene/closed cell foam frame insulation came in.....


Almost ready to drop body onto the chassis!!!!!


