1 2 3 4 5
Tom Suddard
Tom Suddard GRM+ Memberand Director of Marketing & Digital Assets
2/19/21 5:59 p.m.

Ok, progress update: 

After successfully completing the inner contour machining, the little 3018 started working on the outer perimeter of the part. It made it 6" before snapping the tool. Turns out the aluminum and/or the spoil board is higher in the center, and a .1mm cut turned into more like a .2 or .3mm cut in a hurry.

So I put a new end mill in (I'm using three-flute downcut end mills) and realized while tightening the collet that it was just barely out of true. Maybe a .25mm variance.

I looked everything over a bit more closely, and, uh, I'm an idiot. The original spindle came fully assembled without the ER-11 collet snapped into the nut, so I just assumed that's how it was meant to be used. Turns out the nut's first lip is meant to clip onto the collet, while the second tapered face is what actually applies the clamping force. I just assumed it was cheap or incorrectly machined.
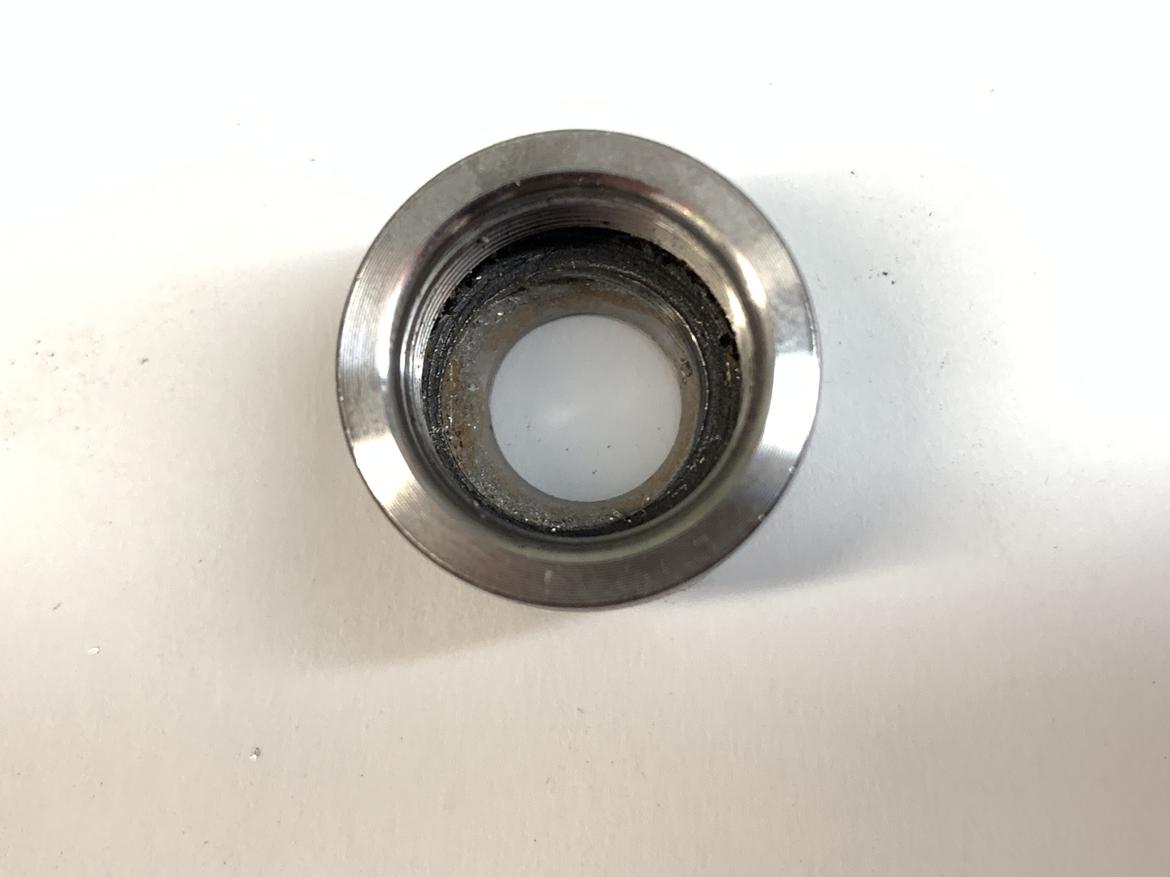
After clipping the collet in correctly and putting a new bit in, the 3018 has never been happier! It's much quieter, running WAY more accurately, and the surface finish has improved a ton. I think I can finally increase the feed and speed (I've been running at 60mm/min). It's also making actual chips instead of just aluminum dust now, which I'm assuming is a good sign.


I also added a fan to clear chips, and the machine is currently finishing the door handle bracket; I'll post results when it's done.


Mr_Asa
Mr_Asa UltraDork
2/19/21 6:41 p.m.

You've learned the primary reason that billet pieces get surfaced before being put in the machine.   With plate its a bit harder to do that, but I think the general idea is to start the cut just above the piece and let it cut the air for one or two passes.

Chips are much better than dust!

TVR Scott (Forum Supporter)
TVR Scott (Forum Supporter) GRM+ Memberand SuperDork
2/19/21 6:43 p.m.

In reply to californiamilleghia :

Yeah, it totally helps.  Aluminum likes to melt into the cutting flutes, so the coolant is great there.

Plastic is more forgiving but it too will melt if your feeds and speeds are off.

Tom, I'm glad you figured out the ER collet!  That would definitely have made for a bad cut!

Slippery (Forum Supporter)
Slippery (Forum Supporter) GRM+ Memberand UberDork
2/19/21 8:10 p.m.

In reply to TVR Scott (Forum Supporter) :

6061 is gummy and can weld to the bit, if you use 7075 that will not happen but its harder and it will rust.  

Brotus7
Brotus7 Dork
2/19/21 9:21 p.m.

All of these cnc discussions have added another search to my prowl. Thanks guys

TVR Scott (Forum Supporter)
TVR Scott (Forum Supporter) GRM+ Memberand SuperDork
2/19/21 9:39 p.m.
Slippery (Forum Supporter) said:

In reply to TVR Scott (Forum Supporter) :

6061 is gummy and can weld to the bit, if you use 7075 that will not happen but its harder and it will rust.  

6063 is the really bad stuff. Great sadness there.  7075 is nice and strong but you can't weld it at all.  And, as you say, it'll rust.

That said, I have a nice chunk of 7075 sitting in the corner for just the right project...

Mr_Asa
Mr_Asa UltraDork
2/19/21 9:52 p.m.

I remember my first experience with 7075.  We got enough donated to build the uprights for our FSAE team midway through the design phase.  I had been designing them around 6061 and was able to take off a little more than a pound of unsprung weight from the front wheels and about 3/4 of a pound from the rear wheels.

Good times.

Tom Suddard
Tom Suddard GRM+ Memberand Director of Marketing & Digital Assets
2/20/21 11:18 a.m.


Success! Haven't pulled it off the machine yet (have other things to do this morning) but figured this thread deserved an update. 

Slippery (Forum Supporter)
Slippery (Forum Supporter) GRM+ Memberand UberDork
2/20/21 12:09 p.m.

Good job!

Did it rapid between those two holes with no clearance?

Tom Suddard
Tom Suddard GRM+ Memberand Director of Marketing & Digital Assets
2/20/21 12:48 p.m.

I forgot to raise the bit after setting the origin, so it dragged it across the stock while moving to the first hole. Oh well, live and learn. 

Chappers
Chappers Reader
2/20/21 7:48 p.m.

Nice! 
I got into CNC routers through a friend who built a V1 Engineering MPCNC.

I built my own for my wife to use. 
She's hammered the crap out of it for a year now (machining 1/2" thick ply) 

I tried cutting aluminum on it, I used a single flute 1/8" end mill (resists clogging)  and use Estlcam with trochoidal milling. 
full depth of cut, it does tiny spirals and takes bites out of the material. 
 

I just got done building my wife a V1 Engineering Lowrider, cutting area 4'x8'. 

Keith Tanner
Keith Tanner GRM+ Memberand MegaDork
2/20/21 8:02 p.m.

I am learning that there are a lot more things to know in order to machine successfully - with bad failure modes - than other toys like 3D printers or laser cutters. It's real machinery and people devote their careers to being machinists. 

californiamilleghia
californiamilleghia SuperDork
2/20/21 8:18 p.m.

I think its also if you are doing full 3D or really just 2 1/2 D  where you are doing  only a couple of depth cuts , 

I really only plan on doing 2 1/2D  making nameplates etc

Mr_Asa
Mr_Asa UltraDork
2/20/21 8:27 p.m.
Keith Tanner said:

I am learning that there are a lot more things to know in order to machine successfully - with bad failure modes - than other toys like 3D printers or laser cutters. It's real machinery and people devote their careers to being machinists. 

It gives an entirely new appreciation for mke's V12 Ferarri build thread, doesn't it?

2Girlsracing (Steffi)
2Girlsracing (Steffi) New Reader
2/20/21 9:45 p.m.

We have a couple of big cnc routers at work, like 9 metre by 3 metre bed big. We have customwood beds that the aluminium gets screwed to when we do sheets. There is a program for machining the beds so they are dead flat to the machine before putting the aluminium sheet on top. 
That way everything stays true and the bed depth doesn't vary at all. Hope this makes sense!

Tom Suddard
Tom Suddard GRM+ Memberand Director of Marketing & Digital Assets
2/20/21 10:33 p.m.

In reply to Keith Tanner :

Oh yeah. Whenever I get a free moment I'll post the workflow vs. a 3D printer for the same part. 

Tom Suddard
Tom Suddard GRM+ Memberand Director of Marketing & Digital Assets
2/24/21 8:22 p.m.

So... a few packages arrived today. Going to be a fun weekend!!

Brotus7
Brotus7 Dork
2/24/21 8:47 p.m.

In reply to Tom Suddard :

Tom Suddard
Tom Suddard GRM+ Memberand Director of Marketing & Digital Assets
2/26/21 12:56 p.m.

It's a secret! But it weighs more than 100 lbs. 

WonkoTheSane (FS)
WonkoTheSane (FS) GRM+ Memberand SuperDork
2/26/21 1:33 p.m.

So one other consideration to make your calculations a bit easier (maybe! :))

The most important number is Feed Per Tooth for your tool & material.  Once you figure that out, you can max out your feedrate or spindle speed and maintain that # comfortably.   For example, if you're cutting aluminum @ 60 Inches Per Minute (IPM) @ 10,000 RPM with a 3 flute cutter, you're seeing .002" of material cut per tooth (60/10000/3).  If you're comfortably cutting that, and you have a 20,000 rpm spindle, you can speed up to 120 IPM and maintain the same tool load (120/20000/3 = .002").  That means, if your machine can take the load of cutting this @ .002", it doesn't matter if you cut at 5 IPM & 800 RPM or 120 IPM @ 20k RPM.    The load being put into the material & tool is the same.  It's written as Fz for Metric (mm/tooth) for some reason.

Of course, you're going to be limited by speed & rigidity, but the numbers scale as far as your machine will allow you.

The real kicker comes in from acceleration & synchronization of your linear axis, and this is where most people start breaking tools or throwing parts, especially while roughing.

------------------

Let's say you're clipping along @ 60 IPM in the X, and now you need to do a 90° turn so you're moving 60 IPM in the Y.  Your machine has to start decelerating your X at some point (depends on how fast you can stop) and it has to start accelerating your Y once the X is stopped (or near stopped, which will round the corner).

The problem is that during your deceleration your feed per tooth is dropping through the floor, which means the tool is not cutting anymore, it's essentially grinding which will put a ton of heat into the part, melting the aluminum/plastic and welding it to the tool which then fuses with the part, cools, and grabs the part and chucks it at the operator. 

You can hear this in the cut as you're machining a square, it has a great cutting noise rrrrrrrrr, then it starts screeching as it reaches the corner, rrRRRREEEEEE, that's what's happening.

So what you really need to know is that the maximum feedrate you can cut at is really the slowest your machine is going to go.  The best way to control this is to always do round corners so you never have to come to a complete stop (X stops, Y starts at one point). 

Tom Suddard
Tom Suddard GRM+ Memberand Director of Marketing & Digital Assets
2/26/21 6:09 p.m.

Very good info! Thank you!!

Finally had a chance to open the boxes, so I can reveal the secret. Talk about gateway drugs! 


I'll make a new thread for this machine once I get it setup. 

Mr_Asa
Mr_Asa UltraDork
2/26/21 8:41 p.m.

In reply to Tom Suddard :

Can you start now with a price and link?

Brotus7
Brotus7 Dork
2/26/21 8:47 p.m.

In reply to Tom Suddard :

How does one pronounce CNCest?  See incest?

This is escalating nicely.

Tom Suddard
Tom Suddard GRM+ Memberand Director of Marketing & Digital Assets
2/26/21 10:26 p.m.

Idk, but if you figure that out, see if you can pronounce the seller's company name:

Tom Suddard
Tom Suddard GRM+ Memberand Director of Marketing & Digital Assets
2/26/21 10:33 p.m.

But stop getting distracted! This thread is about the little machine, remember?

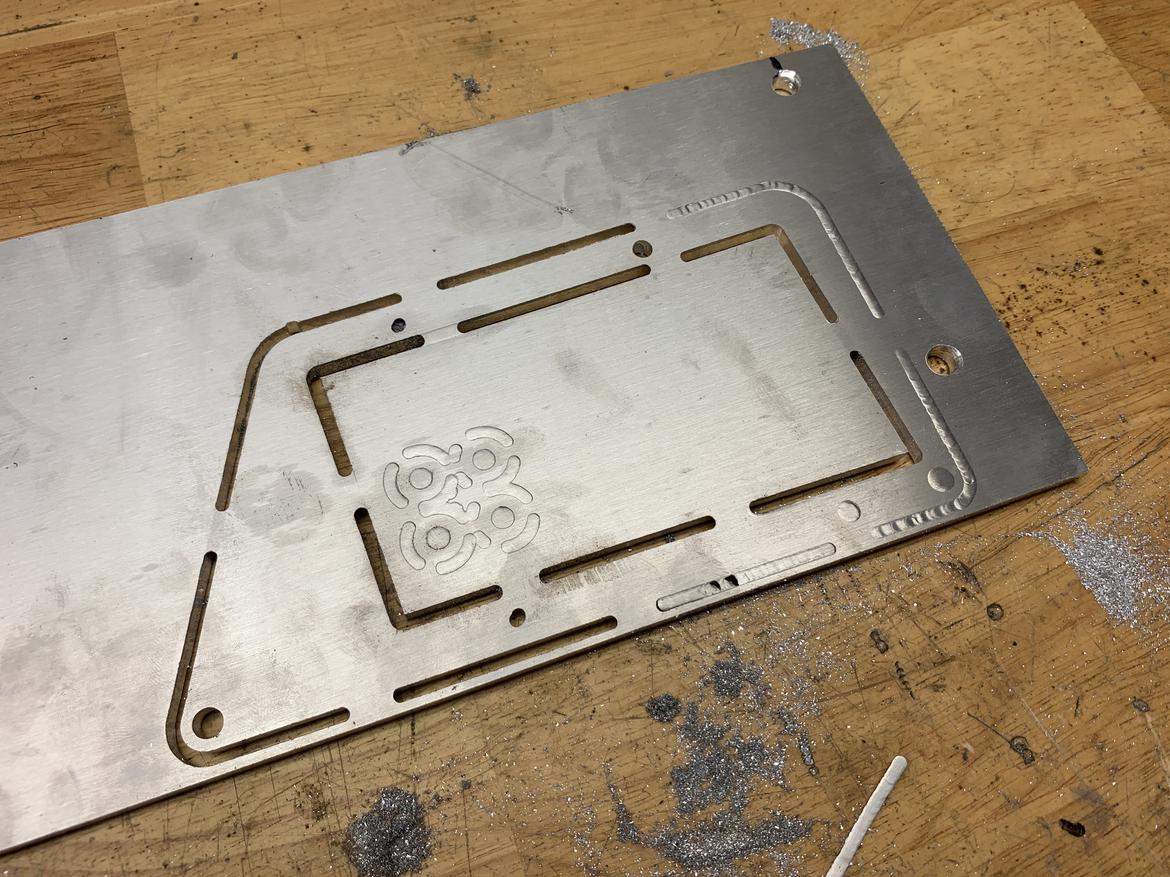
I finally had some time tonight to take my door handle bracket off the 3018. Looks good! You can barely see the outline from my first attempt when my out-of-round collet installation caused a broken bit. 

I used Fusion 360's automatic tab feature to add tabs to the part. These keep chunks of aluminum from flying around.
 

I just barely didn't set the Z depth deep enough; I'll need to adjust next time in order to cut all the way to the spoil board. If I tweak the settings to get a cooler cut (less grinding more cutting) that should fix this effect, too:

I used a screwdriver to knock the extra aluminum off.

1 2 3 4 5

You'll need to log in to post.

Our Preferred Partners
aAWPq9ALay9ILeeyOpHlHxmyuV4McxNsMjD9KiUXBl1uW1UmmzScSncvnUD6lDH5