1 ... 5 6 7 8 9 ... 15
Rufledt
Rufledt Dork
3/1/13 8:37 p.m.

Handle time. I think the last time I showed the handle it looked soemthing like this:

Except for the pencil lines. I held it where I planned on placing my hand, with enough space above for the arrow to go by without hitting where the handle fades into the limb, and drew pencil lines between my fingers. Then, I started doing more excessive rounding with a file:

That pic is the same thing on the belly side, whereabouts my thumb goes.

There's the back, where my fingers go. I kept grabing it, drawing it, figuring out where I need to remove wood for comfort.

It started to take on an asymmetrical shape. This is normal, but not required. You can have a plain, symmetrical shape if that is comfy for you. Most bows I make are like that. If they don't have a shelf (and the string tracks down the center of the handle) they can be shot by both lefties and righties. I'm right handed and i'm not gonna get rid of this bow soon, so i made it for my hand.

You can see on the back how the finger grooves are on one side only. When you're shooting a bow, you don't want a death grip on the thing. There is something called a bow sling:

What this does, is grab the bow after it falls from your left hand when you shoot. I don't really use these. I tend to grip, and miss the bulls eye...

Anyhoo, continued shaping can be done by carving knife, rasp, whatever works. You can see the tool marks from both:

After it was shaped roughly to my liking, I started sanding

Apply oil, wait 5 minutes, and buff

Notice how smooth the fades are:

Now, I just wait until morning and do another oil coat.

The handle is far from done, however.

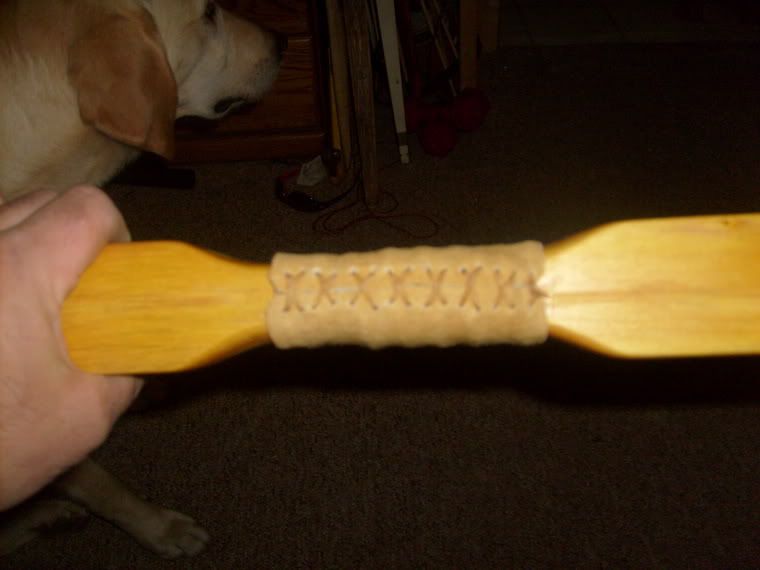
Notice that bow has an arrow rest, a string wrap, and a strike plate- to stop the arrow from scraping against the wood of the bow, making noise. The bow works fine without them, but the strike plate is the bare minimum you should have. It greatly quiets things down, and it stops your arrow from getting scratched. I don't know if I want an arrow rest, but I do want the handle wrapped. you might think this covers up the beautiful grain, but if I don't do that, my sweaty, sweaty hands will soak in and make the wood look all nasty. Yes, I know I said leather handles can do the exact same thing. Yes, I know the dacron wrap looks like crap after a while. I'm thinking of wrapping it in leather anyway, and padding under the leather to make it more comfy. I was considering doing a first run with denim from an old pair of jeans. Then, when I get the leather, I'll use the piece of denim as a pattern. I haven't done it yet, so I still don't know what I'm gonna do exactly. Keep in mind, the finger grooves are fairly uncommon. I almost never see them. In fact, other than my own bows, I think i've only seen 1 other. They are fairly time intensive to make, and they don't work any better. One advantage is the hand placement thing. I can hold the bow and know, without looking, if my hand is in exactly the right spot. On other bows you have to look, but honestly if you can't see, you shouldn't be shooting a bow anyway. Wrapping the handle will cover up some of the visual effect of the grooves, but they can still be felt through a leather handle wrap. More to come I guess.

Rufledt
Rufledt Dork
3/1/13 11:22 p.m.

Shooting basics and bow care time

General rules of bow care:

1: Do NOT leave the bow strung. String it when you want to shoot, shoot if for a few hours or whatever, and when you are done, unstring it. Store them unstrung. If you leave them strung, they take permanent set, and the once strong, stiff, wood limbs become flaccid, with the shooting power of a bow made of cooked spaghetti. Not good. Don't do it.

2: Do NOT pull the string and let go without shooting an arrow. If you draw it back but do not intend to shoot, let the string down to brace height smoothly. Letting it go is called dry firing, and can break the bow. Don't do it.

3: Do NOT let the back of the bow get nicked/scratched. This causes weak points where splinters can happen, causing it to break. If the belly gets scratched, nothing like that happens.

4: Do keep the bow stored in a place with average humidity. Do dry means the thing may break, too damp means it could take set when fired. If the thing is in a dry area for too long, you should reaclimate it to normal humidity. This takes a while. Remember that finish you put on that doesn't allow moisture to absorb rapidly? Well, it will slow down the acclimation process. Your best bet is to just keep it from getting too dry or damp in the first place.

5: Do NOT overdraw the bow. A well made bow doesn't have a huge margin for extra strain. If it does, then it isn't near as fast as it could be. If you draw an efficiently made bow an extra inch, you could cause damage. Don't do it.

Range etiquette:

1: archers stand in a line facing the target(s), with the bows on the ground. If you are holding your bow (suggested if the ground is all damp, for instance if it is dew covered grass) do not nock arrows. When the range is clear, someone yells "range is live".

2: pick up your bows, nock your arrows, and fire away. Be sure to keep the bow pointed forward while nocking, and do NOT whack your neighbor on the head. My wife always does this.

3: when the round is done, someone says "Bows down!" and you put your bows down on the ground.

4: when the bows are down, and only then, you go get your arrows back. Walk back behind the line, and wait until the range is clear. Only then will you start over.

If you think this is crazy, feel free to go back to the last page where I posted the picture of the arrow shot through a Cadillac door. This bow I just made could almost do that if I had heavy enough arrows (heavy arrows extract more energy from the bow, have more penetrating power)

Now, you'll want one of these:

This is a finger tab. It goes on the hand that holds the string like so:

There are MANY kinds of finger tabs. My advice is to try out a bunch and see what works best for you. My uncle made this one for me along with a matching arm guard, of which I don't have a picture. D'oh. Get one of those, too. They go on the inside of your bow holding arm, and if you don't know why you need one, try shooting without one. After cursing wildly from the string shaving some skin off, you'll go buy one. When you grab the string, do so with your index, middle, and ring fingers. Place your thumb on your pinky nail like this:

This tightens the hand up, and it's better for some reason. I don't know exactly why, but this guy: http://www.3riversarchery.com/Dead-On+Traditional++3+DVD+Triple+Feature%21_i7543-1_baseitem.html said it was better, and looking at his credentials, i'm gonna listen.

Stand with your shoulders lining up with the target. Lift the bow and pretend you are 'punching the target' with your bow hand. This helps line your left arm up toward the target. Some people have their arm more in front of their body than straight at it, which causes the shoulder/back muscles to do more work in the bow hand. Bad idea, you'll tire quickly. when you draw, you want your forearm to line up straight with the arrow, and your index finger to touch the same place on your face. I usually put my index finger on my canine tooth. Here's a shot:

That's my wife, btw (pretty isn't she? ). Her right elbow (on the left of the picture, because I like it to be confusing) might be a hair high, but it's more or less ok. Her usual anchor point is the corner of her mouth, but I prefer the tooth. Mouths can move, teeth don't. You're head can move, but mouth can move on the head that can move, which adds variables. Variables hurt consistency. Her bow has no arrow shelf, so she has to hold the bow at a slight angle to keep the arrow from falling off her hand, but you can't see that in the pic.

This one is color coded for a reason. The red are muscles that people tend to use, but you shouldn't. The right bicep should do nothign, and the right shoulder shouldn't really be used. If your elbow is too high or low, chances are you are using the red muscles. Green muscles are ones you should use. Shoulder blade and back muscles are far stronger, and you will be able to use them more efficiently. The shoulder muscle highlighted in red isn't as efficient, because you can only use the very back part of the muscle. The back muscles aren't as natural to use when drawing the bow, but once you get the hang of it, you'll be far better off. This is much easier to teach in person, i'm just hoping you can get it from a picture with crappy painting. Now, look at the left arm. Notice how her elbow is locked. Also, not the best idea. If you lock your elbow and have your arm twisted such that the inside of your elbow in inward, you are just asking for the string to graze your arm between the orange markings. This is painful. Don't lock your elbow, but don't bend it much at all or you'll be using too much left tricep strength to keep your arm out.

Now, with your right arm anchored, don't just let go of the string. They say not to pull a gun trigger, but to squeeze it, right? (I'm not a gun person, FYI, so I may be wrong) If you just let go, you may jerk it. Some people let go while kicking their hand off their face. This is bad news for accuracy. You should, instead, pull your hand back toward your shoulder. See this shot:

My uncle again, mid shot. You can see the arrow leaving the bow, and his hand is still on the anchor point. If he had jerked, his hand wouldn't be touching his face. After release, it isn't uncommon for the archer's hand to end up resting on the shoulder. I would also add, don't lower your bow until you year the arrow hit. This way, you won't develop the habit of lowering the bow earlier. You may end up dropping your hand right as you release, and you'll miss.

Beware of something called target panic. I have it really bad. It's a problem. It's basically where I can't control when I release the arrow, which sometimes happens before full draw, before I get to aim, etc. There are techniques to fix it, it just takes work and I don't shoot enough.

It's pretty late so i'm gonna stop there. Any questions/comments/concerns so far? anybody?

Rufledt
Rufledt Dork
3/2/13 8:54 p.m.
Thinkkker wrote: I want to see more. With more on how to make a recurve.

I have a red oak board that i'm going to (attempt to) make into a recurve. It's a 1 x 2 x 6' board like those of you out there have. I'll probably skip a lot of the basic information I already gave you, and only focus on the newer stuff. No idea when I'll get to that, probably during the time I modify my old oak bow for a bit more power (within a week or 2). both involve heat and bending. Maybe. I haven't fully decided how I'm going to do the recurves on the new bow, there are multiple methods. Stay tuned.

Anything else someone wants to see made? I take requests, apparently.

tuna55
tuna55 PowerDork
3/2/13 9:34 p.m.

I have no requests except keep it coming. I love oils for furniture, too. Handy that it can be reapplied after a few months/years too. Any preference as to which oils? I tend to use Tung for furniture.

Rufledt
Rufledt Dork
3/2/13 10:18 p.m.

I've never used Tung oil for furniture, but I hear it applies just like linseed oil, except linseed oil tends to impart a slight yellowish color to stuff, whereas tung oil generally leaves colors natural. Like I said earlier, I prefer to use oils that are pure. Pretty much any oil you get at home depot or other box stores will be called 'tung oil finish' or something like that, because it is a finish designed to look like tung oil, just like the linseed oil fiasco I described. Getting tried and true brand linseed oil gives me a pure oil, but if often comes with other headaches. The stuff at home depot dries faster and harder, and may require fewer coats, etc... Some people use 'true oil', which is a gunstock finish, but contains varnish.

I like oils for furniture, as well. It gives the wood a more natural look in my opinion, not plastic-y and shiny. Shiny bows can reflect light and scare off deer, too, not that I hunt. I've heard it is because it creates a wood surface look, where the surface is the wood, not covered in a film like varnish, shellac, etc... For my wife's desk (in the background in some pics, don't look too closely, it's all screwed up. It was my first piece of solid wood furniture made from scratch) I used a dye, which changes the color but does not cover up the grain like a stain. A dye covered by an oil looks great IMO. Just beware of blotching. Stain and dye (especially dye) can absorb unevenly and it looks like utter hell. If you want a good fix, use Charles Neil's Blotch Control. Its a great product and Charles Neil is a genuinely great guy and true artist of furniture making who is rightfully proud of this product. I've never used this on bows, mainly because woods I use for bows don't tend to blotch, but i did a side by side test on some poplar and wow, it works exactly like he claims it does, no BS. Maple is a common bow wood that blotches terribly, but like I complained about before, I can't find any straight enough to make an unbacked bow in the local lumberyards/home depots, as ridiculous as that sounds.

If you think oil finish looks good, try applying paste wax after it cures fully. Apply in thin coats, let dry, and buff with a rag. It adds a beautiful shine to the wood, on top of the oil. The tried and true oil doesn't cure as hard (due to the lack of additives) so the extra shine is really noticed. Oils also don't protect against moisture very well on their own, so the wax helps too. Don't want to use paste wax? Lard works great, too, I hear.

I should also add to those reading that don't do much wood working- You can spend all the time in the world sanding the wood smooth, but if you apply a water based anything to the wood, it will 'raise the grain' and feel rough again. Luckily, you can sand that very smooth again with surprisingly little effort. Oils don't raise the grain, another benefit.

I shall indeed keep it coming! How are you coming on yours? I see you're devoting a lot time to your truck (keep it coming, there, too!) and I don't blame you. If I could, I'd be working on my old van, but I can't fit it into my crappy apartment garage. Well, I can, but then I can't fit myself in there, and there's no chance of jacking it up... I hope your face heals quickly! I'm sad to say people can punch themselves in the face shooting bows, too. If you don't draw all the way, your hand can be in front of your mouth. If you release by pulling your hand back, you may whack yourself in the face! It's hilarious, but painful.

fromeast2west
fromeast2west Reader
3/3/13 11:22 a.m.

My bow is currently pulling about 17" with 30 lbs. I've started to check it for twist in addition to curve. I also cut the arrow shelf and am planning to start shaping the handle.

I'm starting to think about were to pick up arrows, string, arm guard and the rest of a very basic kit. I'm tempted to just order some stuff off of Cabela's or some similar outdoorsy site. Is there anything we should look for / avoid when buying gear? What is the grassroots equivalent for targets?

fromeast2west
fromeast2west Reader
3/3/13 11:23 a.m.

btw, the desk looks great, but I'd be tempted to darken the knobs to match the rest of the hardware.

Rufledt
Rufledt Dork
3/3/13 12:48 p.m.

for stuff like finger tabs and arm guard, it would be best if there was an archery store you could go to and try them on first. For my friend, I had like 5 different kinds that he tried on before finding one he liked. Arm guards are kinda the same way. Most archery places will let you try them on before you buy. Arrows, too, are kinda unique to the bow when it comes to hand made wooden ones. Often archery places will have a set of test arrows for you to try, then when you find one that flies right, just get half a dozen of that stiffness/tip weight/length. Failing that, i've had luck with dowels from lowes, but that adds a ton of work, and you need to acquire arrow making tools, a micrometer, and build a spine testing jig. I see you're in California, and there is quite a large community of archers there. You might luck out on paleoplanet.net or the primitive archer forum, and someone may be able to help you out out with extra finger tabs or whatever they have laying around. I personally suggest not cheaping out on arrows. The bottom line ones never fly consistently, but you don't need to be paying crazy money to get matched arrows. I bet there's a shop around you somewhere that has traditional archery stuff. You can also check out 3rivers or a host of other online retailers. I usually use 3rivers, but I've been less happy with them lately. I've also heard some not so great stuff, but I've never been screwed over by them, so i'm hesitant to even mention it.

For targets, the most grassroots option is a box full of phone books, laying flat, with the open pages facing toward where the arrows will hit. You don't want the arrows to hit the book spines, you want the arrows to slip in between pages. That's the longest lasting free target design i've found. Magazines and newspapers work, too. Don't set them standing up, it'll wear out really fast and it won't hold the arrows. When the arrows tilt down after impact, they leave more surface exposed. If your next arrow hits that, the shaft can break. If you wear out the face, replace it with more duct tape/cardboard. If you wear out the magazines inside, recycle them and fill it up again with old newspapers/magazines that you should be saving for this project.

Don't want to deal with that? Buy a Rinehart target. Don't bother with the other ones. Rinehart ones cost more, but if you shoot target points with a traditional bow, you will never EVER wear the target out. Not ever. If you do, they'll send you a free replacement. A one time purchase is cheaper than a different one replaced every year or 2.

Shooting indoors? get a 4'x4'x3/4" sheet of plywood and put it behind the target just in case.

Of course, if you are into leather work you can make your own tabs/arm guards, too. Nothing beats a full on custom set up made by your own two hands! I've never made those myself, since I have a set that I like and I'm gonna stick with it.

I would also suggest seeing how you like archery in general. If you end up LOVING it, you'll save tons of cash in the long run if you learn to make arrows. You can make a spine tester for cheap (2 nails, a board, some clamps and a micrometer) and a lot of other tools aren't needed, or are worth the one time investment.

I agree on the desk hardware, but she really wanted those knobs. Nothing matched them, though. I'm trying to convince her to let me change everything over to brass, much easier to match that way.

Is 30# your goal weight? If so, that's be a great idea. a 1.5" wide oak bow should theoretically be able to draw more, probably upwards of 40-45", but your first bow won't set records anyway. 30# is a good weight for someone to get into archery, too, since it allows you to focus on form and some basic muscle building without straining before going up to heavier weights. When I've tried to go higher, I was almost always faced with tons of set due to my perpetually damp and gray climate. You may run into another problem with dryness and cracking. Those books I talk about suggest lower stress designs for red oak to prevent cracking, but I've never had a problem with that, Mine always take set. The main design and performance author is from California, so his advice is probably more applicable to you.

Luckily walnut seems to be able to resist moisture on it's own, and this new bow took almost no set. It may be because i'm so used to trying everything to make sure the bows don't take set, since I just finished 4 set-filled red oak bows. It turns out the only thing I've found that works is heat treating, something that those books warn against since, you guessed it, it causes red oak to break more easily.

Consider yourself lucky, you won't have to fight climate induced set constantly. I even made a bow an inch wider than it needed to be (spreading out the load to more wood, hopefully to reduce the stress and therefor set) and trapped the back to be like 30% narrower, which can also ease belly stress, but increase the risk of the back breaking. No dice. less than 1" of set after tillering (yay!) but 2" of set after break in.

Rufledt
Rufledt Dork
3/3/13 9:41 p.m.

I started the recurve a bit today. Nothing really to look at, though. I had a 1x2x8' board with a good section in the middle. I'm planning to make this one 60" long, slightly less than some other recurves, but this will be for my wife. Shorter draw length means the bow doesn't have to be as long, since the limbs won't have to bend as far. She wants one, and there's no way I can get a bow heavy enough for me out of this board.

Basic layout is similar to what I said before. The center 2' is full width, and it tapers straight to 1/2" wide at the tips. 2' is a larger percentage of total bow length, but that is because tend to put more stress on the bow, and that means more wood (i.e. more width) is needed to prevent breakage. This will also have a 6" stiff handle, and 6" stiff tips, but there is where the similarities stop. I still haven't decided if I'm going to make the recurve tips by steam bending, gluing, or a combination of both. I also haven't figured out the shape I want, and if it will be a contact recurve or not. Lots of choices. I'll probably make the handle a bit more 'pistol grip' like than my wife's current bow so it'll be more comfy and you'll get to see a bit more about how to make that. I may even carve in a wooden arrow rest, don't know yet. I think I should talk to my wife about all of that. Also I haven't decided if I want to heat treat it or not. Soooo many choices.

Rufledt
Rufledt Dork
3/4/13 5:11 p.m.

More pics of the finished longbow!

From this side, it doesn't look out of balance, but in reality, the lower limb is twisted and bends farther (oops!).

Here you can see the trapping (that is the back is narrowed, creating a trapezoidal x-section)

To me it still is unfinished until the handle and strike plate are on, but functionally this bow is done. You can also see in the above pic that i haven't shortened the string yet, there's still a bit dangling below. That's another thing to 'finish' the bow up.

This bow could also be made to shoot a little faster with some tip weight reduction. Look how wide they are now:

That might seem narrow to you, but it could go narrower. For now i'm just going to enjoy, but if i find it shocks my hand on release I'll shave those narrower.

Soon to come is a theory/why post about recurves and probably some about heat treating, in preparation of what's to come.

Is there a way to change the title of this thread from "making a longbow" to "making archery equipment"? I'm not gonna start a new thread for the recurve. I'm gonna keep all of this in one thread, this is a car forum after all.

Rufledt
Rufledt Dork
3/6/13 5:38 p.m.

News everyone!

First off, the walnut bow ended up having some tiller shifting problems. remember how I said after 1,000 shots the bow will have stabilized (or died)? well, i'm still wayyy under that, so this can happen. Basically, one limb ended up taking on more bend. There is a way to fix that. Figure out what is bending more than the rest, and remove a small amount of wood everywhere else. Don't touch what is bending too much. When I say a small amount of wood, I mean small. I drew pencil lines on the belly where I needed to remove wood, and scraped just barely enough off to remove the pencil marks. I used a very fine rasp and a card scraper. Of course this means i need to do more coats of oil and wax, but that's the beauty of oil finishes, like tuna said.

Also, I should've added to the list of bow care (I think I will) do NOT overdraw your bow. I was screwing around with this walnut one and the oak one I have set aside for heat treating. The oak one is far lighter, and this caused me to over draw slightly past where I usually anchor, when I head a loud "TICK". This is a morbid sound when a bow is being drawn. It usually means somewhere on the back, wood has just cracked. It can be a splinter lifting from a corner, or this:

I followed the crack with pencil marks. Notice how the crack ends on each side when it hits an early growth line? In this case, only 1 ring cracked. The other ones can still take the strain, and it did stand up to being drawn a few more times before I could figure out where the noise came from. That doesn't mean it will last forever, though. Those other rings are under more strain at that point, and if I kept shooting, the bow would likely snap right there. I'm surprised the problem didn't occur here:
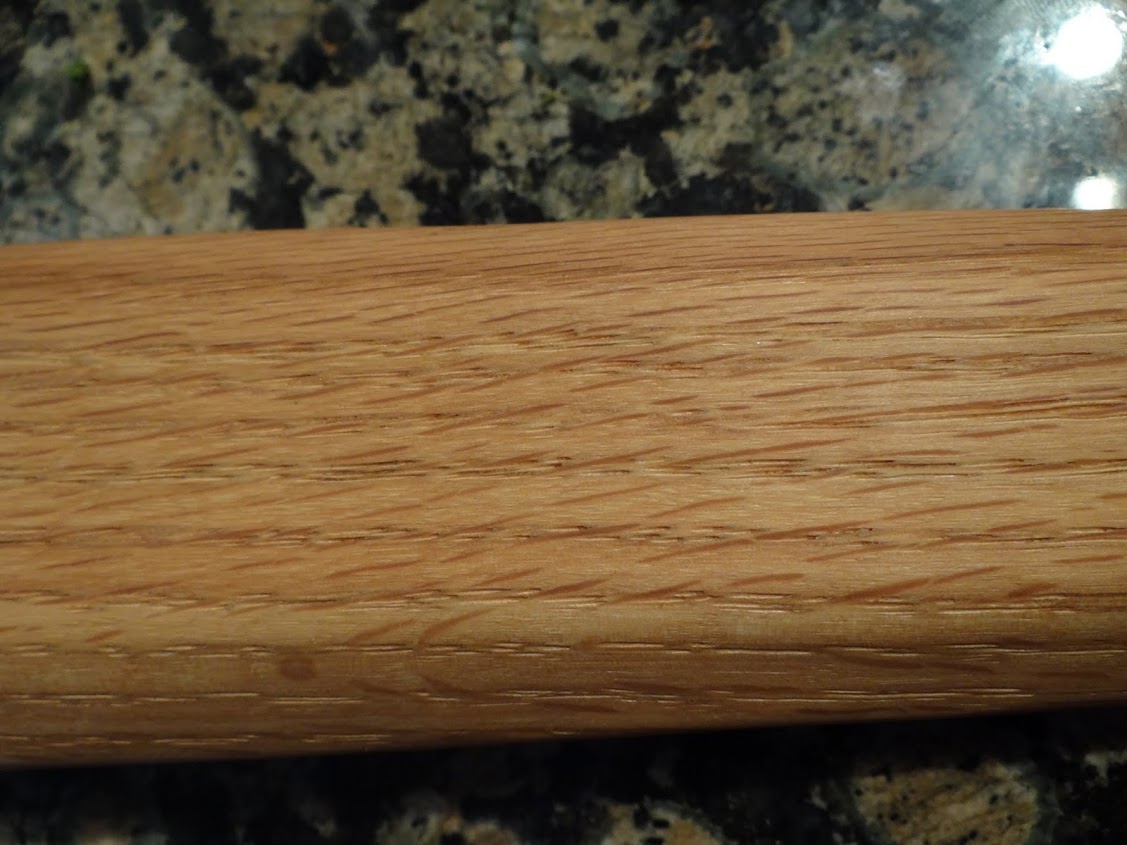
Thats about the same location on the other limb. Remember how I said oak has multiple lines in it, and if they aren't all parallel it means wood fibers are being cut through? Well that part of the limb has some pretty violated fibers. It hasn't caused a problem there, probably because of the flat back distributing stress evenly. I don't know why the other part cracked. I didn't finish this bow very well and there were tons of scratches and nicks all over the back, I probably left one too deep for the bow to handle. Lesson 2 is don't leave nicks on the back of the bow!

All is not lost for that one. I still plan on heat treating it, but I'm also going to back the bow with canvas or linen which I will purchase tomorrow. Something like silk would work as well, but probably not cotton. Cotton actually takes a 'set' in tension, though it's breaking strength is quite strong. The backing will prevent the split from opening further. Flax (linen) actually stacks in tension. Bending wood increases resistance like a spring being pushed down, with a set spring rate increase per inch, but flax has an exponential spring rate. Every millimeter it's stretched, the resistance goes up faster than the previous millimeter. This means the farther the split opens, the harder the flax will try to pull it shut. This should stop it dead in it's tracks.

So, on to why heat treating works so well for bows. Heat treating is done with a heat gun on the belly of the bow. This can do a number of things. For one, wood can be bent with heat. Dry heat and steam heat both work, but using a heat gun tends to 'cook' the wood a bit. Usually, you heat the wood to a medium brown, and for whatever reason this increases the resistance to compress. More compression strength means the back has to handle more tension force, and in this way the bow ends up storing more energy without needing more wood. This is of course assuming the thing doesn't break. More energy storage is reflected in a higher draw weight without higher limb mass, increasing the power to weight ratio of the bow, so to speak, making for a faster bow. you can also retiller the bow back to the original weight, which would still make for faster arrow speed because of the reduced mass. I'm going to try a little of both. I want to raise the weight about 5#.

Remember how, early on, I said bow shape (meaning side view bend shape from unbraced, to braced, to full draw) effects the shape of the power curve? Well adding reflex through heat treating can plump up the power curve in the same way. Look at this comparison between the walnut bow and the oak bow:

Both are unstrung, and the back faces left. You can see the walnut bow has reflex, while the oak bow has taken a lot of set. It's not as dramatic as it looks, since the backs of the bows aren't lined up, the walnut bow is about an inch in front of the oak. It's still easily 3" or more difference. This means the oak one has to bend less to achieve brace height, so it is under less stress early on in the draw. This means early draw weight is very low compared to full draw weight, and the power curve has to bend upward near the end. This means there is less energy stored per pound of full draw weight. This bow is sluggish. The walnut bow has far more early draw weight because the tips have to bend very far to achieve brace height. The power curve, then, starts higher up, and doesn't have to be as steep to achieve full draw weight. You may ask, well then why don't we just glue up all bows with a e36m3 load of reflex? well...
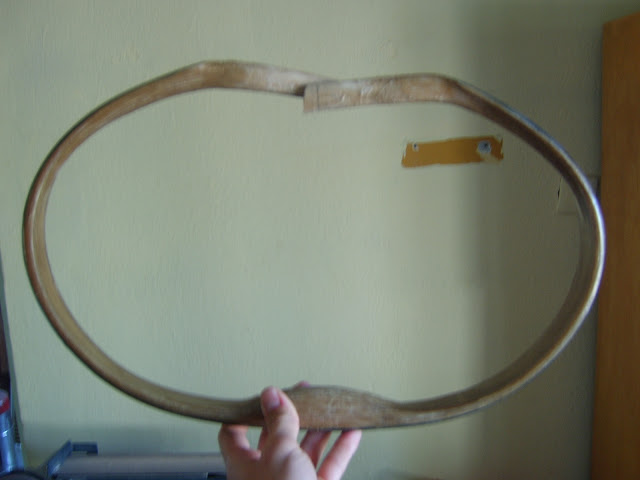
That is a Turkish flight bow with unstrung reflex such that the tips touch. These have MASSIVE energy storage per final draw weight, but there's a catch. They aren't made of wood. There is a limit to how far wood can bend, and such reflex would push the wood to it's limits. There is NO way an all wood bow could do that. Those bows have a thin wood core, with horn glued on the belly and sinew on the back. Horn and sinew can stretch/compress far more than wood without breaking, so such designs are possible. However, the materials weigh much more, and these recurved designs are prone to twisting and breaking. To prevent twisting, they must be meticulously made and have extra limb mass to resist twisting. This extra weight means a good amount of power is used to move the limbs forward. Because of this, hunting weight composite bows like this shoot slower than wooden ones, despite the crazy amount of work that goes into them. As the weight increases, the amount of extra material needed to keep them stable increases only slightly, so very heavy composite bows out shoot heavy longbows.

I'll go over the process of heat treating when I do it, but the way to add reflex is to clamp the bow into reflex and heat it. Clamping it into the shape creates stress, and the heat relieves the stress, making that shape permanent. Because of this, a perry reflexed bow shouldn't be heat treated. The perry reflexing (gluing in the reflex) causes internal stresses, and applying heat would eliminate those beneficial stresses. I suppose I could have heat treated the belly wood and THEN glued it into reflex, but i've never tried that.

Recurves also add power storage per final draw weight in a number of ways. Like I said before, the thing that determines shape of the power curve is the shape of the bow. Adding bend strength will only make that shape steeper, changing the bend shape will change the shape of the power curve. A key thing is string angle. You'll notice, the string will change angle as you pull it back, and the tips will get closer together. A shorter bow has to bend farther, thus the string angle will increase more, and the power curve will look more like a exponential curve. If this hypothetical shorter and longer bow are both 50# @ 28", the shorter bow will store less energy. A recurve messes with the shape a lot. If that short bow is compared to a recurve of the same length, the recurve will not have as dramatic of a string angle, and will store more energy. Recurve tips also tend to rest far ahead of the handle, adding in the 'reflex' effect, increasing tension at brace. More power is the result. In this way, a recurve can store 'longbow' power (or more) in a short package. This makes it easier to carry through the brush without the power loss of the short bow. the longer and steeper the recurve, the more the effect, up to a point.

Remember the wood can only take so much stress, and a well made long bow will push it to the limit as well, so you may not out shoot a well made one with your recurve. There's an anecdote in the bowyers bible #4 where a couple of the authors were shooting through a chronograph at a bow get together. A couple guys with fiberglass recurves confidently shot a couple arrows through the chrono, followed by a board bow made by one of the authors. The bow made from a hickory board shot a wooden arrow FASTER than the recurves. Now, this bow was a particularly fast shooting design made by one of the best wood bowyers alive, shot by a flight shooter who knew how to get every last fps out of a bow. Still, it beat the fancy, powerful, pro made recurves, and it wasn't a flight bow. It was a long lasting target bow. (does anyone want an explanation of the difference between a flight bow and a target/hunting bow?)

Many recurves have a 'string contact' component, as well.

Notice on this bow how the string isn't touching only at the nocks. The string actually contacts the bow a few inches inside of the tips. It may be pulling on the nocks, but the shape (and that's the important part) changes as if the string is pulling on a shorter bow. This makes the power curve increase sharply at the beginning, but as the bow is pulled, the string lifts off, lengthening the distance between string contact point, causing the bow to bend like a longer bow. This again means more early draw weight with the same full draw weight. More energy storage. Check out this power curve drawing I found on the internets:

That does a decent job showing what I mean. Pretend "R/D Longbow" means a longbow with reflex (that's what the R means) but ignore the D. Well, don't ignore it, google it. Most mass produced longbows are deflexed by the handle and reflexed by the tips. This stores a lot of power while being stable. It's a great design, but tricky for a newbie to tiller properly.

Assuming all 3 end at the same max weight (pretend they do) the early draw weight will be different, effecting total energy stored. Not to sound like a broken record, but don't expect that means they shoot faster (though that's a safe bet), there are other factors at work.

There are multiply ways you can make a recurve, but a good way to split them is into 'working' and 'static' recurves. In a working recurve, the recurved part of the limbs will unbend slightly during draw, while a static recurve's tips remain stiff. In general, static recurves store slightly more energy, since the string angle goes up slightly more when a working recurve's ends straighten out (and therefor get slightly closer together). Here's a pic of a static recurve I found on some UK bow website:

Notice how thick the tips are. This is to resist bending. Also notice how bulky they are- far more massive than a longbow would need. This is also a contact recurve, with the strings touching inwards from the tips at brace height. This bow probably stores a ton of energy and feels awesome to pull. It probably shoots awesome, too. take a look and imagine what would happen if the bow was twisted even a little bit, and the strings didn't contact right in the middle of the tips. If they were slightly to one side, they may slip right on by the recurved tips. this would be followed by a CRACK when the thing twisted itself to death. If you want to make a recurve (make a few longbows first) you'll have to be extremely careful.

That bow is a static recurve with NO contact. This kind of bow stores lots of energy, but not as much as a contact recurve. it's also a little less problematic if it's out of balance. This is also very hard to make out of only wood notice how bend the limbs are at brace height, and imagine what they'd be like at full draw. I've shot one of these laminate/wrapped limb horse bows, and it was disappointing. When my 45# bear recurve shot 170 yards or so, the horse bow struggled to make half that. it was a supremely poorly made horse bow, though, and I suspect the wrapping created friction, slowing cast. A well made one would be pretty sweet I bet, but I haven't shot a well made one.

To help the string track straight, some bows take this approach:

This looks dang cool, but adds tip mass. If you can't see, there are grooves cut in the tips to guide the strings. This means there must be more wood than needed to keep the bow working, but the trade off is a little bit more safety. There are ways to keep the extra mass to a minimum, and for those you should check out the bowyers bible #2. I can't explain it coherently enough, and It's probably illegal to photocopy the book.

There are other considerations with a recurve. For one, they are MUCH louder than a longbow. Especially contact recurves. The string slams into the bow limbs, making a whack or twang noise. Also, longbows tend to be more accurate. The longer limbs tend to act like stabilizers, while the lower early draw weight gives a more gentle shove to the arrow leaving the bow. Many production recurves have HEAVY handles, though. This weight also acts to stabilize the bow. When you are aiming and holding at full draw, you may notice a slight shaking. The extra weight dampens that shaking. The weird scaffolding looking crap sticking out the front of an olympic target bow takes this even farther by placing mass farther away from where you hold the bow. These set ups are primarily focused on stabilization, since, well, it's the olympics and the competition is tough. Theoretically, the same bow shooting the same, well matched arrow will shoot consistently no matter what, but humans aren't robotic shooting machines, and sometimes we need help. If you're anything like me, you won't find those as fun to shoot. I have one, and it's crazy stable, and insanely fast (one of the benefits of not being limited to wood. Carbon is far stronger and lighter). For some reason, I don't enjoy it as much. If you do, then pony up the cash and buy one. They are incredible.

yamaha
yamaha UltraDork
3/6/13 6:17 p.m.

In reply to fromeast2west:

I've delt with 3rivers for arrows generally and ye old archery shoppe for odds and ends(stringer, squares, etc).

I deal with my local shop for strings and arrows if I get in a bind.

On a good note, +1 to PSE's warranty department.....my longbow warranty replacement arrived today, under 2 weeks is good turnaround IMHO considering 6 of those days were spent on ups trucks.

Rufledt
Rufledt Dork
3/6/13 6:34 p.m.

That is good turnaround! now get shooting! The warranty is by time, right? Not arrows fired? My advice is shoot as many arrows as possible before the expiration date. To make sure it doesn't happen again, yeah, thats the reason

I have had problems with arrows from 3rivers, but it wasn't their fault. The box arrived looking like someone stepped on it or something. They sent replacements, but it took a while. I think they had to file a claim with UPS or something like that.

Rufledt
Rufledt Dork
3/7/13 9:46 p.m.

Mini update! In preparation of heat treating and canvas backing my oak bow, I went to the fabric store and got some canvas. It was like 4 or 5 feet wide, and I got a yard of it. From the fabric I cut 2 strips 2.5" (the width of the limbs on this bow) by 1 yard. I also have 4 strips about 3/4" by a foot.

In canvas, the fibers are woven. This means half of the fibers are adding weight and not contributing to tension strength, but I'm willing to deal with that in exchange for the ease of gluing. To apply fibers all in one direction, you have to put them down either individually or in bunches. It's FAR more time consuming. Just make sure when you cut the canvas, you follow the individual fibers in one direction. Violating wood fibers in bow selection can cause limbs to be weaker, and violating canvas fibers do the same. The short strips are to wrap both ends of both strips. This will prevent it from pulling up off the bow when it's under a lot of strain.

Remember how the bow has a dacron wrapped handle?

Well, that has to be removed before heat treating. Heat melts polyester, and it may just melt the string to the handle. See the knot at the bottom of the handle? That's holding the wrap tight. It isn't glued on or anything. I like stuff I can remove if needed.

Here you can see the wrap removed. See how I glued the strike plate on, then the fabric for the arrow rest, and then just wrapped over it all? Those things are attached with barge cement. It can be peeled off and the surface rubbed. All of the rubber cement would ball up and come off cleanly. What wont come of cleanly is the wax left behind by the string, as well as the wood finish. The last coat I used was tried and true linseed oil with beeswax, and it's going to get in the way of gluing on the backing. Specifically, it's going to stop the glue from adhering. I have to remove all of this. I'm probably going to shave off the wood on the surface of the back to do this because I HATE sanding. A fresh wood surface actually absorbs wood glue better, anyway. First, however, I'm going to heat treat it, probably tomorrow. After the heat treating and gluing on the canvas, I'm probably going to end up re-sanding (d'oh!) the whole thing, since I didn't really give it a good finish to begin with.

Before I do any of that, I want to put that dacron I removed to good use. The string was 4 strands, twisted in one way. If you remember, that's exacly one half of the strings I made earlier, except this one is like 25 feet long. I doubled it back over and reverse twisted half of it. Where the end comes back around, I made a knot and melted it a bit with a lighter:

Don't burn it, just melt it slowly. This locks it together. I did that again with the other half, and ended up with 2 new bowstrings:

These are over 6' long, but there will have to be a timber hitch/bowyers knot on both ends, because there is no loop end. My wife's bowstring is like that. Basically, I leave one knot permanently tied on, and loosen the other one for stringing/unstringing. Never had a problem with it, it's just kind of annoying to use.

What will I use for a handle wrap, you ask? This:

That's right, top quality goat-or-lamb hide. I got this at the same fabric store off of the cutoffs table. These are usually attached like so:

wrapped together at the front. I'm going to use it for many bow handles, since this lamb-or-goat was lamb-or-goat sized, and handles are more squirrel sized. Not only are they wrapped, but they are often glued on with the same rubber barge cement. Usually, the leather soaks up the glue and gets stretchy. When this happens, you wrap it up in front, and it dries nice and tight onto the handle. I'm gonna do it soft-side out, because I like the feel better. I'm gonna do this to the walnut bow, as well, and probably to my wife's bow once I fix the handle.

Sorry for all of these mini updates. I haven't had time for a lot of bow work lately. Maybe this weekend

yamaha
yamaha UltraDork
3/8/13 12:35 p.m.

Mine is rawhide leather, I like it better than rubber and smooth leather that have been on other bow's I've used.

Rufledt
Rufledt Dork
3/8/13 5:48 p.m.

Agreed, I don't like rubbery smooth leather either. I'm gonna try and glue the smooth side down. Originally I planned on getting some brain tanned deer or bison hide, but I couldn't pass up $15 when the others were so much more expensive. I cut out the shape of a piece, but I haven't attached it to the bow yet. I couldn't get any leather strips to sew the handle on, so i'm gonna try artificial sinew, but not in a normal shoe-lace pattern. I'll have to see how that works when I get to it. Maybe this weekend.

Today, I did some heat treating. I went over it a bit before, but to recap, heat can cause wood to take a different shape, which can improve the power curve. It also makes the wood resist bending, raising draw weight or allowing the same draw weight with less material, improving power/weight ratio of the limbs. It can also help prevent moisture absorption, and it can make the wood less likely to take set. So, to heat treat anything, you will need the following:

I place to clamp the bow, with the belly up. I clamped to a counter top like so:

I guess it's hard to see, but I clamped both ends town (with a piece of wood 3/4" thick between the bow and the counter) and i put a piece of wood 3/4" thick under the limb. This means I'm clamping the bow perfectly straight again. Often, people clamp the bow in slight reflex, hoping to gain some of that out of the process. A chapter on heat treating in the bowyers bible books shows a couple reflexing jigs, but the author said he never used red oak. Heat treating will cause additional stress to the back while shooting, and reflex will do the same. The back already cracked on this bow, so I don't want to over stress things. I also plan on gluing some reflex in when I attach the canvas backing, though that will likely be eliminated when the canvas stretches initially. I just want a straight bow with a bit more speed, not a broken bow. Keep in mind, ONLY heat treat the belly, not the back. Some people recently have theorized that heating the backs may also provide some benefit, but i'm gonna let them break some bows to figure it out before I try.

You will also need a heat gun. I use this one:

It's the cheapest one they had at home depot. It works, though not very quickly.

Hold the heat gun about 6 inches or so away from the wood, with the heat gun on high. You may need to figure out what works best for the heat gun or hotplate that you have, but 6 inches works for me. You want the area to SLOWLY heat up, and the belly to turn brown. The chapter in the book suggests darkish brown, not black. I only go to a medium brown, because I don't want to risk the back breaking under the increased stress. Call me a pansy, I don't have enough bows to waste one. Also, that guy has WAY more experience (and broke a lot of bows) working out how to heat treat to the max, I'm still a heat treating noob. What happens when a noob puts a turbo on his D15 engined civic and tries to beat a corvette? He cranks the boost up until it blows rod chunks, oil, and shame all over the road. I don't want that with my bow.

Anyway, hold the heat gun (or rig up a stand of some kind) until the wood is medium brown, and then move it down a little bit at a time, until you have heat treated the whole thing. If the wood browns very quickly or gets scorched, move the heat source farther away. You want a slow roast, not a scorch. Scorching the wood won't cause the bow to break, but it means only the top layer of the wood has been effected, and the effect won't be beneficial. The belly surface may hold the bow into reflex, but it'll be crushed back into the original shape during break in. Slowly heating allows the effect to penetrate deeper into the belly.

Here's what the wood looked like before:

Keep in mind this wood is oiled, and has been sitting around for a long time. This gives the surface of the wood a darker color than normal red oak. Those of you with red oak boards know what it actually looks like. Here's an after shot:

It's actually not all that different looking, but imagine that color on unfinished red oak and you'll get what i was going for. Leave the thing all clamped up until it cools off to room temperature, then do the other limb.

You can scroll up to see how much set this bow had before heating, but now it looks like this:

Some of that will go away during break in, hopefully gluing the canvas back on at reflex will help keep some of it. I also have to tiller it after heat treating. When I did my wife's bow, it kept a pretty good tiller so I just left it with it's 5# higher draw weight, and better power curve from the removal of set. I may not have the same luck here.

This isn't the only way give a bow a bit of spunk. Coming up next is weight removal. I plan on tillering this bow by removing width, not thickness like usual. The wood is already thin enough to bend to my draw length. Like I said before, the best way to reduce weight without reducing bending strength is to narrow, not to thin, so that's what i'm going to do. Since the bow is trapped and the back is so narrow, i'll be removing width only from the newly heat treated belly. If you see the 'after' pic above, you may notice that the wider areas of the limb were mostly heat treated in the center of the limb. If i'm gonna remove the wider parts of the belly, why bother heating it? I'll see how this works during tillering. Narrowing the belly and not the back will mean, in the end, the back will be under relatively the same strain as before, and with the new canvas backing, it won't break. That's the hope, anyway. I'm also going to be removing tip mass as much as possible to reduce mass where it moves the most.

Up next it shaving off some back wood to remove the finish and wax, and applying the canvas backing, including a splint over the transverse crack in one of the limbs. I did some reading of those books, and they seem to suggest a canvas backing alone would solve the problem, but I don't mind a little extra caution over a break.

Rufledt
Rufledt Dork
3/8/13 10:16 p.m.

So I had a really good day, bow making wise. In addition to the heat treating, I helped my sister in law cut her bow to length and mark out where to remove wood for rough shaping, and I finished my first leather handle. Up until now, I've been doing things that I have already done (and in some cases, failed) before, but this leather handle is a first. Until now, i've done bare wood handles, cordage wrapped handles, adhesive-backed leather handles, and even leather cordage wrapped handles, but I've never cut out a piece of leather from a hide and laced it into place. The results, as you will see, were not perfect, but i'm not redoing it. I'l call the screw ups "character." I'm sure you of all people will appreciate a little hand made character... Yeah, that sounds better than 'screw up.'

You'll need: a piece of leather

I don't really know how to explain coming up with this shape. I cut it a little bit too large with one perfectly straight edge (which will be the top of the wrap), and then test fit and cut it down slowly to shape. Notice how the other edges aren't exactly straight/parallel? It's going on a complex shaped surface, and that's the shape that I came up with. Look at the rough fitment:

It's hard to get a good test fit photo when I need both hands to test fit, one to hold the camera, and my wife wasn't home from work yet. Notice how it isn't large enough to fit? That's intentional, as you will see later.

Adhesive:

I got that from 3rivers. They suggested it, and it works exactly as they say it does. I'm sure there are other options, but that's a safe bet. Lastly, you'll need some kind of string. Since I don't have a lot of leather working tools, I'll have to use a needle and artificial sinew as thread. There are many ways to wrap up the handle, and here are a few:

X's across the front (and also underneath between the x's)

This one is like lacing up shoes.

Looping around? I don't know. Since I have no way of controlling myself, and because I can be overly ambitious (read: stupid) I'm gonna use this pattern:

I used 2 bow strings to figure out the pattern. That picture is actually wrong, I remade another similar pattern.

Before all of that, I'll need a strike plate. Start with a piece of leather and cut out a small piece:

Then cut it to whatever shape will work

Then figure out where it goes, and barge cement it in place:

See the handle wrap already laced up and slid down on the bow? I told you i was overly ambitious/stupid. Pretend I did the strike plate first. Now, onto the handle. I used 2 strings looped around at the top, for 4 strands total going down the handle. I had to do 1 string at a time, using my prototype wrap to guide me:

Then the other

I did it loosely, because I can slide it up on the bow and tighten it. I figured out where I want to put it:

Now, slide it back down, spread some rubber cement on the handle, and slide it back up again:

try to spread the glue around under the leather. You'll notice the leather soaks it up and gets stretchy. use that stretchyness to help you pull the front together and tighten the wraps.

My overly complicated wrapping made it difficult to tighten in time, and the glue started setting underneath. Because of this, I didn't get it even:

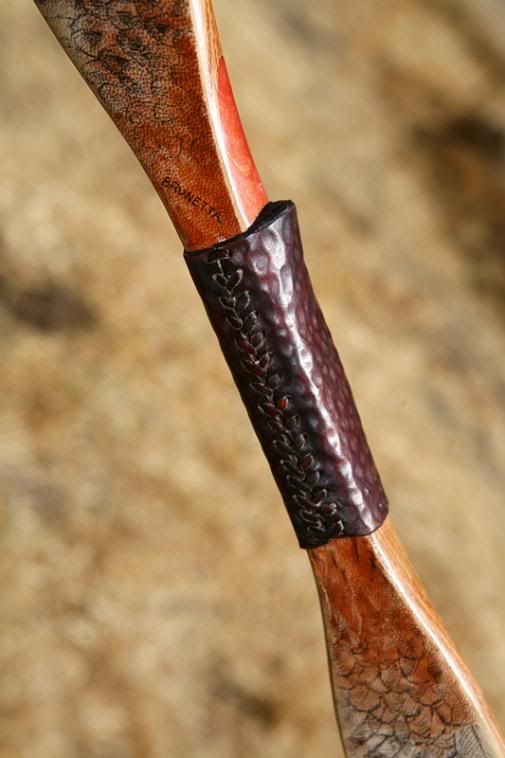
You can see the uneven threads, and also how the cool pattern is totally invisible when it's actually tight. D'oh. Live and learn I guess. You can see in that pic how the shaping of the handle is preserved by the tight leather. There will be extra string sticking out the bottom:

Tie a knot, pull the extra underneath the wrap, and cut off whatever sticks out.

You may have extra glue oozing out the edges:

Wait for it to dry (about a day) and just rub on it with your finger. The glue will ball up and come right off with no residue. Good stuff, that rubber cement.

Congratulations, if you have been doing all of this stuff, you'll now have a completed longbow with a leather handle, an oil/wax finish, a self made string, and a set of arrows you 'constructed' yourself. If anyone is interested I can attempt to make a fingertab and arm guard out of some of the remaining leather. My sister in law needs a set and I have the rest of a goat-or-lamb hide to be used in archery related ways. I also plan on making a bow sock (exactly like it sounds, it's a big cloth sock looking thing to protect the bow during transit/storage) out of the extra canvas and a little leather. Just let me know and I'll do it!

fromeast2west
fromeast2west Reader
3/8/13 10:33 p.m.

I'm still following along, but didn't have much time to work on my tillering this week. I'm currently at 20" of draw w/ 30 lbs.

My current question about the process is about determining final draw distance. I tried to estimate how far I'd draw the bow by holding a tape measure in my off hand w/ the 0 right at the front of the bow, and then held the other end of the tape measure in my right hand at about the point it felt like I would be comfortable shooting. I tried to leave some flex in my bow arm.

I came up with just under 30". Does that seem reasonable for someone who is 6'3"? Is there a proper way to measure, or anything I should keep in mind?

Thanks

Rufledt
Rufledt Dork
3/8/13 11:50 p.m.

Some people measure that way, but bows aren't always the same thickness. I usually measure from the belly side of the handle to my anchor point. The belly side of the handle is where my tillering stick starts measuring, too, so that way I can keep things consistent. I generally make my arrows fairly long, too, to avoid nasty injuries.

I'm 5'11", but I have disproportionately long arms, kinda like a chimp, and my draw length is 29.5". If you are more human shaped than me and you're 6'3" then just under 30" sounds perfectly reasonable. Measuring from the belly of the handle where the thumb and index finger meet on your bow arm may give you a different number. Most bows are measured at 28" because that is the average, but draws from 26 to 30 are common for men.

Then there are people who draw farther than their mouths. Japanese bows for example are drawn very far back, and there's a good reason. If you have 2 bows both braced at 6" with the same amount of set, but one is 40# @ 27", while the other is 40# @ 30", the longer draw bow will shoot faster. Up to 27" the first bow will be slightly heavier, but the second bow has 3 more inches of thrust. It also stores more energy. Try drawing the 2 lines on a graph, it'll be clear why some want more draw length. Personally I find it hard to aim without the face anchor, and accuracy is more important than arrow speed.

fromeast2west
fromeast2west Reader
3/9/13 3:06 p.m.

So things were going pretty well. I had the bow drawing to 24" w/ the 30 lb. weight and noticed two small splinters forming.

Here's the overall shape at 24"

and here are the two small splinters.

I had been thinking about backing the bow anyway, so I didn't think the bow was doomed. I broke out the 1500 grit sand paper and did what I could to get the back as near perfect as possible to see if that would get rid of the splinters.

I started to focus my tillering mostly on shaping the curve of the bow and removing any twist the limbs exhibited and thought that the overall draw length would increase as I removed wood towards those ends.

I did another test and the bow was drawing to 27" with 30 pounds. I set the bow up on the tillering stick at 27" to check for shape and found that the smaller of the two splinters was gone. ...yay. ... the bad news, the other splinter had gotten worse... maybe really bad, I don't know.

I assume I'll have to back the bow now, which is fine: but is this splinter/crack now too big to fix?

I still have the second board glued up and rough shaped that I can switch to, but I'd like to learn what I can from this bow (and save it if possible), and then maybe switch to wood source/type that doesn't require as much luck or compromise. I think there's a decking supply company nearby that sells Ipe

Rufledt
Rufledt Dork
3/9/13 4:26 p.m.

I see you have a problem there! There are a couple things I see that could've caused that.

Here's your picture with blue lines over the rings:

That's some considerable run off. You want the blue lines to run parallel, like this:

It looks like the dark streaks (oak's radiating lines) go straight and parallel, but you want both ring lines and radiating lines to run parallel to the edges and to each other. When they cross each other at an angle, you have violated fibers and the possibility for a splinter. Also notice how the corners are rounded on that bow. There are no hard edges. Hard edges cause splinters to lift, since the poisson effect explained earlier raises back edges during bending. Your bow above shows some fairly hard edges, though it looks like you rounded them slightly. You want the edge to be more rounded than that. Lastly, The tiller pic doesn't look too bad, certainly better than most people's first attempt, but it looks out of balance. The left limb is bending more, and the right limb looks a little stiff from mid limb to the tip. I bet if the ring lines were straight and the edges rounded, you wouldn't have had the splinter. That's good news, because tillering is the hardest part, and you have a great start.

The bow can be saved, but you're right, you have to back it. There are some options. First, if your other board has straighter ring lines, just make that one and set this aside for now. For this bow, you can run some very thin superglue deep into the crack, and clamp it. Then you'll need to back it either with a strip of wood (like hickory 1/8" thick) or a layer or 2 of canvas. You'll probably also want to wrap around the wood by the splinter to help hold it down.

Ipe is a great bow wood, but it almost always needs a backing, usually hickory or bamboo. Any wood sawn into boards runs the risk of violated fibers, and the only wood that is fairly tolerant of grain run off is hickory. You may want to start with that. Red oak doesn't have to be a compromise wood, but you do have to be careful of grain run off. In fact, cherry is much worse in that regard. It is even more likely to break, but if it doesn't, the bows don't take much set and end up being quite fast. If making a cherry board bow, always back it. Beware that decking supply stores often have treated wood, and you don't want a bow made of that. Ipe doesn't really require treating, but it will still need a backing.

You might have luck at a lumberyard. You can try hickory or white oak, as those 2 woods are the champs of not breaking, though you'll still want grain as straight as possible. Both take heat treating exceptionally well, too, but you should make a plain bow out of it first. Give your other board a run first, though. If the ring lines aren't straight, you can back it with canvas first. I'll try to do that on my oak bow ASAP and post up a how to.

Also, i'm impressed you got to such a draw length with that board. It goes to show you didn't have any major tillering problems. You were also right to think fixing balance problems would slightly increase draw length. when you are near final draw length, you want to work as slowly as possible. Random question, before the splinter happened, how much set did the bow take?

Rufledt
Rufledt Dork
3/10/13 9:12 p.m.

More update- I know i'm getting WAY ahead of myself, but I'm going to make a bow from an actual split-from-a-tree stave, the old fashioned way. Lots of new info to explain there if you guys still want me to keep it coming! I'm going to make the bow either way, so I'll probably post all about it. I haven't acquired the wood yet, only found a source of affordable staves. Currently talking with the guy to figure out shipping costs. It is a 6' long log after all...

Rufledt
Rufledt Dork
3/12/13 2:29 p.m.

This page is once again full of pictures, so i'll post a couple things as I do them, not all together. The next page is not far off...

Making a wooden recurve, part 1! (kinda)

I said before that recurves can be beneficial in a number of ways. They are a way to get a shorter bow with the energy storage (or more!) of a long bow. The tips tend to be heavier, though, so speed-wise they aren't necessarily faster. They are better off shooting heavier arrows than fast longbows, as their benefit is their kinetic energy storage.

For this reason, hunters often prefer recurves. Small size means they don't get in the way when stalking through the brush, and their energy storage equates to more penetrating power with heavier arrows. A recent (within last few years) test published in primitive archer magazine showed that at 20 yards, a simple 40# long-ish-bow (the minimum weight in many states for bows used to hunt) shooting wooden arrows has the penetrating power to go through both lungs, heart, and ribs of a deer, with many of the test arrows poking out the other side of the deer a few inches. Extra power isn't necessary, but neither is a LS3 in a miata, and we all seem to think that's pretty awesome. I won't argue with power.

I'm making this one with and for my wife, out of a red oak 1x2 from home depot. The recurves will be made by heat bending, a common (and traditional) way of bending wood. When wood is moist, it is more malleable. That is why too-damp bows feel easier to draw, take lots of set, and end up shooting like a wet noodle. Dry heat also allows wood to bend permanently, hence why the oak longbow I heat treated in a previous post was able to be straightened. A combination of these things, like boiling, allows wood to be very easily bent into a variety of shapes.

To start, I shortened the board to 62", considerably shorter than longbows. This is that whole recurves-are-shorter thing. If a longbow was recurved, it wouldn't have the speed of a normal longbow. The extra tip weight caused by the recurves would have a HUGE distance to travel, and that would rob speed. It's likely the power gain wouldn't be that high, either, so you never see really long recurves. Longbows with reflex, yes, but not recurves.

We also drew the standard lines on the front of the bow. This bow has 2' of full width in the middle, tapering to half inch wide at the tips. We also marked the board to be full thickness for the center 1', and then tapered that to 3/8 thick at the tips. Here's a pic of the tips ready for bending:

You can see there are both sets of lines marked, but we only planed the board thickness, not width. There is a good reason for this. If the bow isn't as thick, it will allow the water and heat to penetrate easier, allowing for it to bend easier and with less chance of splintering. Not narrowing with width allows for corrections in case the bending process adds a little bit of twist. The tips won't have to be bend sideways, just cut to be straight.

Wood that is bent with steam/boiling is prone to straightening out when it encounters bending force, especially oak. The bending process also breaks down the wood a bit, leaving it weaker. The only way to make sure the wood at the tips doesn't bend is to add reinforcement, in the form of a 1/4" thick slat I will glue under the recurved tips:

These will be bent together making for a perfect glue joint. The look i'm going for is like this:

I said before that adds tip weight, but I'll show you how to minimize that when the tips are being shaped near the end of tillering. Now, before boiling, it's a good idea to soak the tips for a number of hours. Some suggest 8 hours, some a day, some don't bother. I only have 6 hours I can set aside for soaking before I have to boil it (and make it to bed on time) so I'm gonna pretend like the thinner wood allows for only 6 hours. You'll need a deep pot:

I'm only bending the last 6" of bow, and that pot is 7" deep. Perfect. Here's how I set it up:

The clamp keeps the thinner slat from falling into the water, and I'll use it to hold that to the belly side of the bow during boiling/bending. I don't want to reach into boiling water to retrieve it! The belly slat sticks out of the water, too, because it is too long. I'll trim it down later. In that pic the stove isn't on, it's just resting there. I'll turn it on later. I'll post all about it when that time comes and when I finish making the form I'll use to bend the tips.

Rufledt
Rufledt Dork
3/12/13 8:49 p.m.

Let the heating begin! I clamped the thin piece in place, where it will be glued on the bow, and cranked up the heat!

Bubbles are forming while it's heating. That's a lot of water, it will take a while to heat up. You don't need tons of bubbling, after all it's the water that is heating the bow. The steam bending method is reported to not be as effective on oak, so I chose boiling instead. Once it's brought up to a boil, you can turn the temperature down to more of a simmer. Let it simmer in the water for a good hour or so. Then, you'll need a form .

Remember how I said I wouldn't argue with your methods, so long as they work? I'm gonna need a bit of that right now. Here's my form, made from scrap wood, and a can (full) of Mt. Dew Live Wire, the very best flavor.

Simply put the tip of the bow into the slot on the right, drop that walnut wedge between it and the fence, bend the bow (quickly, don't let it cool, but don't yank it and cause a splinter) over the Mt. Dew can, and clamp it to the form. That's the plan, anyway. Like I said, I've read all about this, but i've never tried it. More to come in about 30 minutes when I actually do it. Hopefully that'll make it to page 8. This one may be the most photo-cluttered page since the hotlink thread!

Rufledt
Rufledt Dork
3/12/13 10:11 p.m.

Heat bending success! I did it just like I said, with some key differences. I'll have to describe it all, because this turned out to be a 2 arm affair, nothing for pictures. Oh yeah, and use oven mitts. I don't know how hot the surface was, but I'm sure it was somewhere between burning hot and scalding hot.

I had planned this out to be about a 45 degree angle, and the fence (on the right) was at 90 degrees from the board. The wedge wasn't at enough of an angle, and the bending forces tried to slide that up, so I had to use a clamp to hold it down. The second difference (from how I thought it would go) is that I had to bend one board at a time. Luckily, the thicker of the 2 is part of a 5' long lever, plenty of leverage. Like I said, It didn't want to bend easily, but with constant pressure it bend over slowly (10 seconds or so to get it bend). Whenever I would let off, it would try to straighten, so i had to get them both bend far enough to slip a clamp over them. The remaining bend was achieved by tightening the screw on the clamp.

Some stuff did go wrong, though. You may notice the splinter lifting on the edge. Here's a closeup:

Remember how I left the whole deal extra wide? Yeah, these splinters will get cut off. I didn't even think of that, but I'm glad I left the boards full width. The tip also lifted off of the base of the groove:

This wont be a problem as long as both are reasonably even. It wouldn't come all the way up out of the groove because I was pushing on the board. My next form will be a good deal different. It also won't be made of scraps from my garage nailed together.

You'll notice it looks like the walnut cuts into the oak here. This is because the wood was more malleable, and it flexed under the pressure of the usually much softer walnut. The next wedge will be full limb width to fix that problem. I dont believe this will be a problem. Again, I'll be cutting a lot off here, most likely enough to solve any problems caused by the too-thin wedge.

From here, just leave the whole works clamped overnight. Some people quench the thing in cold water for 15 minutes. I'm not gonna bother, I'm just gonna leave it clamped up. You'll also have to wait a while before bending. Remember, wet wood will take a lot of set, and I just left the limb soaking in water for half a day. I'm gonna do the other limb tomorrow. By the time I rough cut out the limbs, glue the bracing onto the recurves, round the back edges, figure out what I'm doing for the handle, and so on, it'll probably be sufficiently reacclimated to start tillering.

Just an FYI, I also plan on some moderate heat treating, as it seems to be the only way to keep red oak from taking set in my perpetually gray, damp New England climate. Maybe even a canvas backing to keep it from blowing. Remember, recurves can put more stress on the limbs if you aren't careful.

There's also no reason why the bend has to be so sudden like on mine. Tons of possibilities.

1 ... 5 6 7 8 9 ... 15

You'll need to log in to post.

Our Preferred Partners
8UBEYqfpMoPpcKpWvkOS1bBcboh5dRdPOg7A0Uv15HMCBIC2j4lr5z8Yv10VWrMU