t25torx
t25torx HalfDork
6/10/14 7:01 p.m.

Spurred on by Nicksta in another thread I figured it was about time I shared yet another build thread with you guys.

So about 2 years ago my mom called me saying she had seen a boat for sale up the road from her house, I had been wanting something to get out on the lakes and go fishing with my son in, so I stopped by and took a look at it. Now about the only thing I now about boats is they are supposed to float, everything else, well I figured I'd learn it on the way.

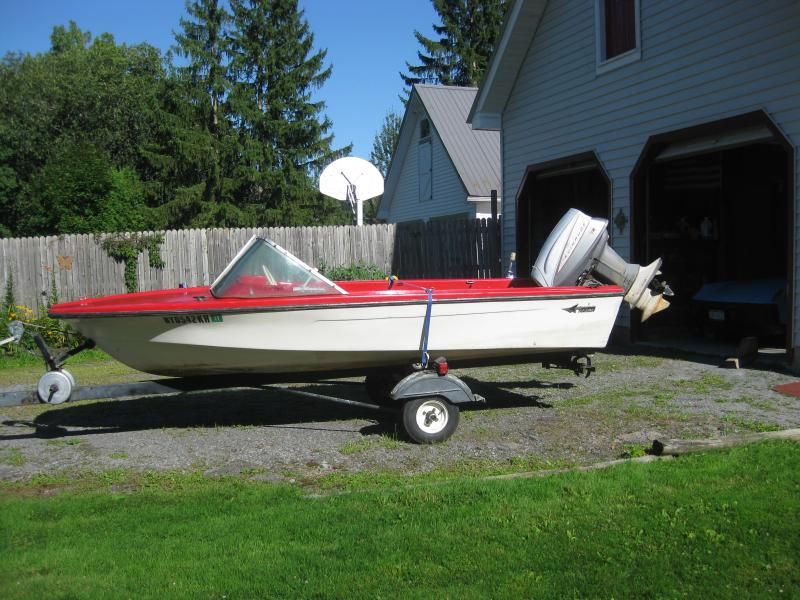
So a deal was struck and $320 later I had a 1972 MFG Niagara, with an 1985 Force 50hp outboard and trailer being towed behind my truck. I did some research on MFG's and found out that most were built with fiberglass stringers so even if the flooring was soaked the stringers would still be good so I wasn't too worried that I had just dumped a bunch of money into the lake already. I also saw this as an opportunity to see if one could actually go boating for less than grand.

I got it home and started cleaning it out, so I could get to the bad flooring from where the fiberglass layer had cracked and leaked water in over time. So as I said I knew nothing of boats or boat repair so I signed onto a boating forum and those guys helped me out quite a bit. I'm just going to copy pasta what I put over there to keep from repeating myself.

t25torx
t25torx HalfDork
6/10/14 7:04 p.m.

First off as you can see in the pictures I have some floor board rot going on, looks to have originated from the crack on the starbord side, whats going to be the best option for fixing this section and the crack on the side. It's about only the front half of the floor, the rear seems rigid with no soft spots and the transom feels solid also. I would rather go with a composite flooring solution than marine plywood so any suggestions would be appreciated. Second thing is the steering. it's got the old cable winding drum setup and I'd like to go to a Teleflex system and was wondering which type of mounting system I should go with, the transom mount or the splashwell mount? Third up is getting some replacment parts, I am going to need a windshield and I'm finding that they are not easy to come by, and I also need to get some seats and would like to find some older loung seats that need to be recovered so I can get them recovered to match the new paint I plan on laying down on it, so where would be the best place besides ebay and craigslist to find these items?

Thats about it for now, I'm sure i'll have more questions and updated pictures for you guys. I guess I should also tell you what I have in mind for the boat. I plan on doing a mild restore to it, definitely giving it the retro look with some lime metalflake on the upper deck and pearl white on the lower section. I plan on carrying that theme over to the seats with some white vinyl with metalflake vinyl inserts, kinda tuck and roll look. I need to find more period correct steering wheel though to bring it all together.

On to the pictures.

t25torx
t25torx HalfDork
6/10/14 7:07 p.m.

Well I went ahead and bit the bullet and purchased a new Teleflex No Feedback 4.2 rotary helm and 13' cable, also purchased a secondhand adjustable linkage off eBay to get it connected to the motor. The old steering was the factory steering that had the dual cable wind up helm, so I knew I wanted something a little nicer than that.

I had time tonight after mowing the yard to get int and cut out the remaining wood up front. I used a circular saw for the first cuts then went back in with my angle grinder and a cut-off wheel to get closer. The bow actually came up very easy, the starboard side fiberglass was already de-laminated from the hull so it just peeled of, the other side I cut with my grinder. Thankfully it came out in one piece so I can use it for a template when I make my new one. So I'm going to let it dry out for a couple days and then I'll shop-vac up all the wood bits and get some new wood to start putting in. I wonder how much fiberglass mat and epoxy I will need..?

t25torx
t25torx HalfDork
6/10/14 7:10 p.m.

Alright I finally got the floors in! I used some Boatyard Resin along with some Evercoat Sea-Glass fiberglass mat I purchased off Amazon.com. It took about 3/4 gallon of the resin and 32 square feet of the fiberglass mat to cover the new wood and man, is that ever a messy job. I also ordered some adjustable seat pedestals off the "zon" to attach the folding seats that came with the boat. I'll eventually swap them out for some much nicer seats, I just want to get it river worthy at this point and start using it.

After I got the floors done I could turn my attention to the wiring and steering. I removed all the old steering cables and pulleys. I also pulled all the old wiring out so I can redo it and to run it all through tubes under the gunwales. Another couple of parts I picked up off eBay are the old jetboat steering wheel adapter, for the Teleflex, and the steering arm link in the back to connect it to the engine. I'm not sure if it's the right length though for this motor, it doesn't seem like it's long enough to move the motor to the ends of it's pivot points. Anyone have any thoughts on this?

Today I pulled it outside and started painting the hull on the inside, I'm using tractor implement enamel. I've used it before on other outdoor projects and this stuff hold up great, and dries super tough. I just put one coat on, I might do another coat later. I haven't decided what I want to use over the floors, I was thinking some bass boat carpet, but I haven't decided.

Floor's in!

t25torx
t25torx HalfDork
6/10/14 7:11 p.m.

Time to rip out these old steering cables and pulleys. Watch out for the old wasps! You can also see the cable tubes under the gunwales, for some reason the PO decided not to use those to keep the cables all nice, neat and out of the way..

t25torx
t25torx HalfDork
6/10/14 7:14 p.m.

Here's the inside all painted up. It's Ford Tractor Light Gray.

Steering wheel adapter worked great.

Modified the seat pedestal so it would go lower by cutting about an inch off the tube. It won't go up as high but with the low sides I won't really have a need to raise it sky high.

t25torx
t25torx HalfDork
6/10/14 7:20 p.m.
t25torx said: The paint has dried enough that I could get in and start working on it today. I got all the lights and bilge pump rewired to new switches and also wired in the new ignition switch. I'll need to buy a battery for it next and get some gas in the tank so I can see if she starts up.

So after this point I turned my attention to the old Force Outboard, again I have never worked on outboards or 2 strokes beyond replacing a carb on my weedeater, and that really didn't go so well. So I was pretty out of my element when it came to this thing, and I hate carbs and also have never touched a points ignition system ever. But I waded in and was helped out by the guys on that forum. Here's how that all went.

t25torx said: So I'm down to the point with my project boat that it's time to try and start it up. No telling how long this thing hasn't ran. I replaced the water impeller and changed the lower unit oil. Also had to replace the fuel hose as the old primer bulb and hose were shot. So this weekend I get some time to try and start her up. Attempt 1: get it to crank, choke solenoid works, no start. Attempt 2: same thing. So I get my dad who's on vacation to help m crank it while check for spark at the plugs, by grounding them out on the block. No spark on either one. Hmmm. I double check my wiring and everything looks right. So I take the flywheel off and looks like the points aren't opening correctly or the gap isn't set right, plus they are really dirty. I clean them up with some 400 grit sandpaper and set the gap to .020 (did a search on here and found that as the correct gap in a thread). I put it all back together and attempt 3: Tries to start a couple times, I can see fuel sometimes spitting out the front of the carb and sometimes the motor wants to kick back. I get my dad to help me check the spark again, this time I have spark on plug #2, no spark on #1 though. Swap the coils around, no change, swap plug wires and plugs, no change. So with all that out of the way, I think I have some bad points or condenser.
t25torx
t25torx HalfDork
6/10/14 7:23 p.m.
t25torx said: Okay so i found a set of NOS parts on ebay for the points and condensers. I installed them tonight but before i put it all back together I wanted to take some pics and make sure everything looks good to you guys. There's one wire that I'm not sure is supposed to be in there or maybe I'm missing a wire. Anyways on to the pictures. Full shot. Now originally there was a blue wire running from the screw that holds the left condenser to plate, and it ran to the connection of the black and white wires are connect. I removed it since the other side has no wire, I'm hoping someone can tell me if it's supposed to be there or not, or if there is supposed to be a wire on the other side like it. This is how I set my points. When that mark is inline with the black piece like in the picture I have a .020 gap in the point. I don't have a manual so i have no clue if this is how they are supposed to be set. So input on this would be appreciated also.

Turns out that blue wire wasn't supposed to be there at all.

t25torx
t25torx HalfDork
6/10/14 7:26 p.m.
t25torx said: Well, following the good advice here I took another shot at getting the engine running tonight. With the help of a friend I got the gaps set, timing set and spark checked. Then it was the moment of truth. IT RUNS! This engine probably hasn't run in over 10 years. I have to wonder who put that wire from the condenser ground to the point wire. So I still have some more tinkering to do with it, as of now it will just idle, and only if I hold the choke in, so to me that means it's not getting enough fuel. I'll take the carb apart this weekend and also check the fuel pump and filter also to see if I can get it to idle out right and take some throttle.

I have a video of the momentous occasion. Youtube video.

t25torx
t25torx HalfDork
6/10/14 7:28 p.m.

So I'm pretty sure I found the source of the fuel starvation issues.. Hmm, that doesn't look like the stock bolt configuration, no wonder it was leaking fuel like a faucet.

The bolt is about 1/2 inch too long I imagine.

So why such a long bolt? Oh here's the answer. Stripped out threads at the hole entrance.

And with the bolt all the way in like they had it, the main jet hole is covered up, only allowing a little gas around the threads.

So now I get to figure out how best to repair all this. I guess the real way would be to get a tap and die to cut some new treads in it for a little bit larger bolt. What say you guys?

t25torx
t25torx HalfDork
6/10/14 7:29 p.m.

It was funny, there was just so much little stuff done wrong I have to wonder who the last person to "work" on it was, and if this thing ever ran. I can certainly say it never ran on this boat. The control cables were backwards, shifter cable was going to throttle and vise-versa, the starter solenoid was not grounded so the starter wouldn't engage, this wire grounding out the ignition point, and then this carb bolt blocking the fuel path. All little stuff, where you fix one thing, then find something else wrong.

Oh and I did replace the impeller on the pump, I have a second video where I ran it in a tub of water for longer and it did have a decent spray of water coming out the exhaust.

The carb was non repairable, you can't see it in the pic, but there was a small crack in the bolt boss, and when I tried to drill it out more and tap it, it expanded to show itself. So I have a used unit off eBay head my way, and will keep this one for parts. I'll update once I get the new one on and hopefully have it able to do a full throttle pull.

t25torx
t25torx Dork
6/10/14 7:37 p.m.

Alright I got the used carburetor installed. And it's alive again! This time you can actually give it throttle and have it not trip over itself. The needle seat and seals in the carb need to be replaced.

https://www.youtube.com/embed/8c2pE0ZhT-c

After I replaced the seals in the carb it was running pretty good, still didn't want to idle right, but I figured it needed to run some of the old gas out and maybe it would clear up.

So I did the only sensible thing to do, I took it to the river so i could see if it would actually float and move under it's own power. And much to my amazement.. it did! But not without a little coaxing.

t25torx said: I got it out on the water today, probably for the first time in 15 years. It was having some issues starting up and staying running while I had the hood on it. So I took it off let it idle some and warm up, then headed out down the river. I went about 3 miles and turned around and came back. It runs great at half to full throttle, anything less than half though and it starts to stall out and will die while trying to idle.

Here's the video footage to prove it.

https://www.youtube.com/embed/NQCPVHEkpDw

https://www.youtube.com/embed/Sq0n1g-6fg0

So at this point I had done it. I had proved that you could go boating for under $1000. But my elation didn't last long...

t25torx
t25torx HalfDork
6/10/14 7:39 p.m.

Well I'm pretty sure I found the issue. After cleaning the carb up again and resetting the float level, I decided to check the compression since I had borrowed a tester for another one of my projects. I came back with 120 on the lower cylinder and 60 on the top. So I guess I'll be taking the head cover off the engine to see whats going on inside there. What should I be looking for in there, I don't guess I'll be able to see any obvious ring damage unless I take the pistons out.

A couple days later..

So my good luck with this motor has finally run out. I guess this is a good reminder to always check compression before dumping any time or parts into an unknown motor.

Went to remove the head cover after soaking the rings in ATF did nothing to bring up the compression, and this carnage is what I found.

It's a shame really, and I'm surprised it ran as well as it did. I haven't decided yet what I want to do. Part it out maybe and recoup some funds for a newer motor is more the direction I'm leaning.

t25torx
t25torx Dork
6/10/14 7:50 p.m.

Okay so after I took the motor off the boat I noticed it was leaking brown water out the lower mount bolt holes..not good. I could take and squeeze the transom and water would come out of those holes, so the transom was toast. After contemplating putting more time and effort into this one I decided to just go and get the other Niagara I found on craigslist. I had sold over $350 in parts from the old blown motor so I had pretty much broke even on that deal.

Last Sunday I made the trek up to Tampa and picked up the new member of the fleet. It doesn't have the serial and date plate so I'm not sure what year, it is, but it's no '72 like it stated in the ad. I'm thinking more early 60's, hard to tell though. It also had a rotted transom, but the PO (previous owner) had already hacked away about half of the old wood with his chainsaw, so rather than start from scratch on the '72 I'm just going to move the good stuff from the '72 to this new one. I found a local dealer for the Arjay 6011 transom core stuff in Sarasota so I'll be picking up a 5 gallon pail of that to pour into the transom cavity.

Here's how she looked after the tow home. This one had two things I really wanted for the '72, the glass and the factory steering wheel. The glass is actually in really good shape, not crazed and cracked like I was expecting, the steering wheel though is starting to crumble on the outside. Not sure how I'm going to restore it. I was actually thinking of trying to find a place that could scan and 3D print a new one for me.

Here you can see the small cracks forming, eventually I'll replace this with some new polycarbonate, but right now a good sanding and polishing will pring it back into good nic.

Here's the steering wheel I was lusting over, plenty of holes in the dash and no gauges. I'll probably just fabricate some aluminum panels to go over the holes in the middle of the dash.

The floors are a little soft also but they are solid fiberglass in this boat versus the fiberglass over wood construction of the newer boat, so at least I don't have to worry about rotten floors. I'll just beef up the old fiberglass with a couple new layers.

Not sure what these little blocks are for. I'll probably knock them off and clean up the left over glue.

I like the fact that the splashwell in this boat is able to come out. It will make it so much easier when I take the floor out.

Here you can kinda see the left over wood from the PO's attempts to clean it out.

Unfortunantly the PO mangled the top part above the transom cap. I'll have to glass that back later also.

t25torx
t25torx HalfDork
6/10/14 7:53 p.m.

Clearing out the transom started by removing the splashwell, which was just a matter of removing some screws, and then popping out the old mangled and corroded brass drain tubes. Theses will get replaced with stainless or pvc once the transom is poured.

The old rotten brass drain tubes had to come out also.

She's comin' apart!

Ah out of the way.. Wow this really opens up the boat.. I makes me want to cut the splashwell down some so it's not so long.

These guys had to go. Will be replaced with stainless steel units in the future.

t25torx
t25torx HalfDork
6/10/14 7:56 p.m.

Took a dinner break after this then came out and started digging into the old wood. I used an old shower rod that I hammered one end flat into a chisel like device to stab and scrape the old wood out. Then took my small shopvac to suck the old wood out. I still have a little more to cleanup on the walls to do.

So that's where it stands right now. Need to buy the transom fill, swap over the Teleflex and other accessories from the other boat. Rewire it, and buy a new motor. Will i be able to keep this one under a grand? It's doubtful for sure, but i will probably be able to keep it under challenge money so if I go over the $1000, then $2014 will be the new budget.

Toyman01
Toyman01 GRM+ Memberand UltimaDork
6/10/14 8:24 p.m.

I love those old boats. They have character that the new ones never will. Keep up the good work.

Autolex
Autolex Dork
6/11/14 8:32 a.m.

A quote every good boat owner knows; break out another thousand... :D

t25torx wrote: Will i be able to keep this one under a grand? It's doubtful for sure, but i will probably be able to keep it under challenge money so if I go over the $1000, then $2014 will be the new budget.
Apexcarver
Apexcarver PowerDork
6/11/14 11:30 a.m.

If someone wants an old boat that only needs a little work, message me. I have one and I havent had time for it for several years.

(1972 MFG Gypsy with a Johnson 65 outboard)

Seriously, message me. I intend to take pics and throw it on CL next time I am up where I have it stored in western md.

914Driver
914Driver MegaDork
6/11/14 4:22 p.m.

Torx, thanks for the pictures. Everyone needs a boost of enthusiasm once in a while, I think you did it!

Dan

nicksta43
nicksta43 UltraDork
6/11/14 10:30 p.m.

Thanks for this The blue one looks very similar to my dads. The steering wheel is the same. The dash and bow cap are a little different and the splash well looks different. It's the same color and the hull looks the same. It brings back so many memories. I spent so many foggy mornings laying out off the front of the boat spotting for stumps while dad navigated us back into some little cove where all the crappie were hiding.

martinbutler
martinbutler New Reader
1/5/15 10:24 p.m.

This post has received too many downvotes to be displayed.


Autolex
Autolex Dork
1/6/15 9:50 a.m.
martinbutler wrote: Whereas about your concern on your bloat floor. I would suggest you to go for carpeting. You can go for a Custom Carpet.

you sell carpet for canoes?

914Driver
914Driver MegaDork
1/6/15 11:51 a.m.

Watching with interest, I'll throw my own build up later. (when it warms up a bit)

You'll need to log in to post.

Our Preferred Partners
6QUFbKCtAFMJUJCR82UKCK566HmKwnr9IFxE4YRIbtn65NEVioLhsP3MzkdDpxZa