1 ... 15 16 17 18 19 20
Tony Sestito
Tony Sestito UltimaDork
9/21/22 10:02 p.m.

While I was messing with the carb, I decided that I should probably clean the ol' K&N air filter. I haven't cleaned it in about 15 years, so it's long overdue. Still had my old cleaning kit kicking around, so I got to work. 


Cleaned... 


Oiled...


And installed. That's better. And yes, the X-Stream lid isn't supposed to come apart like that, I know. 

Oh, and it's going to pour here tomorrow, so I made sure to cover the damn shaker this time. 


Might start calling this the Trash Am.

And yes, I'll be ordering a shaker seal and epoxying the drain outlet back on real soon. No more milkshake oil! 

Tony Sestito
Tony Sestito UltimaDork
9/22/22 4:46 p.m.

Another quick thing: I haven't been able to get the current radio in the car to work. It's a Pioneer from around 2009, and it's not great. I am planning on swapping decks to something else (either that Yamaha on the last page, one of my old Alpines, or another radio) but I figured I'd get this one going first, even with just the two dash speakers. Better than nothing, right? 

The issue was the power wire was unplugged from the fuse block. Well, that was easy! 

The problem is that the dash speakers, which are ancient Boston Acoustics 3.5's that I installed back in 2002 where the old center dash speaker was, have finally given up the ghost. They are a crackly, blown mess. Guess I'll be listening to the sound of droning Flowmasters instead. It's fun to be thinking about radio options. 

Tony Sestito
Tony Sestito UltimaDork
9/24/22 9:09 a.m.

Yesterday, I decided to throw caution into the wind and attempt to get the car to the inspection station. This was going to be a 70-mile drive round trip, and I was understandably nervous. The last time this car left town was well over a decade ago. But I see people on YouTube do it all the time with random vehicles they don't know, so why couldn't I do it with one I do know? 


So, I packed the car with some tools, fluids, and some coffee, and pointed the beak toward the gas station. 


This was the first time the car had been to the gas station in a very long time. No, that leak under the car was not from me. 


Loaded up on some breakfast, and I hit the road. 


I took all back roads to get there, and some of them are quite scenic. This one goes through old farmland, and with the tree canopy, it always reminds me of one of the Gran Turismo tracks. Always have to give it a little extra throttle here. 


Closer to my destination, there was lots of traffic. And this car's had a history of weird idle issues for various reasons, so I was afraid of it shutting down on me. But it did just fine. 


To my surprise, my dad (in the C6 convertible) met me at the inspection station. He needed to get one too. It felt like the car was getting anointed with some church sacrament, and family was there for the event. 

So, did it pass? Yes it did! 

That said, my nephew said the front end met spec but could be tighter, specifically the ball joints. This car still has its original, riveted ball joints, so I'll have to address that. I also plan on refreshing the control arms and adding new bushings, as the old ones are really bad. 

On the way home, I felt great, but the car didn't. The carb was doing the stuck float thing again, and this time, hitting the bowls with a blunt object was not helping. It was sputtering and popping, but under throttle it was ok. Luckily, my parents live a mile away from the station, so I limped it there. More fiddling with the carb, and nothing helped, so I dug around the garage for a liquid solution. 


Lucas to the rescue! I dumped a healthy amount of this in the tank, because at this point, it wasn't going to get any worse. And I hit the road. About 5 miles in, to my surprise, the carb cleared up. And when I mean it cleared up, it REALLY cleared up, because the car ran better than it ever has since I dropped the 400 in back in 2008!


This is the look on my face after realizing that I'm driving my fully legal, great-running project car that I bailed out of Project Car Hell. I never thought I'd see the day. Yes, there's a ton of stuff to do to the car, but being able to drive it again makes me very happy. The engine still has a lifter tick, the brakes need to be sorted, and there's no interior, but none of that stuff mattered in that moment. 

Next on the list is stopping all the various water leaks, starting with the shaker seal. I am not sure the factory-style seal will cut it with my modified shaker base and hood clearance, but I did find a roll of garage door seal in the garage yesterday that might do the trick. Need to get this done before winter! 
 

chandler
chandler UltimaDork
9/24/22 11:55 a.m.

Yeah buddy!

Dusterbd13-michael
Dusterbd13-michael MegaDork
9/24/22 3:13 p.m.

Amazing update to read. Ive waited a long time to see you get your mojo back with this one.

EricM
EricM SuperDork
9/24/22 5:22 p.m.

Nice!

AAZCD-Jon (Forum Supporter)
AAZCD-Jon (Forum Supporter) SuperDork
9/24/22 5:51 p.m.

Spending time in the garage is great. Getting out of the garage onto the road is great-er!

84FSP
84FSP UberDork
9/24/22 7:29 p.m.

Loving seeing her come back to life.  We need more folks to join the cult of the screaming chicken!

84FSP
84FSP UberDork
9/24/22 7:30 p.m.

Loving seeing her come back to life.  We need more folks to join the cult of the screaming chicken!

Noddaz
Noddaz GRM+ Memberand PowerDork
9/24/22 9:17 p.m.

You need to find this on-line.  Not buy it, just be able to read it and use what you can.

I used to have one, but I haven't seen it in 30 years.  Do the rear spring, front eye re-location.   

Tony Sestito
Tony Sestito UltimaDork
9/24/22 10:01 p.m.

In reply to Noddaz :

I'm familiar with the VSE/Herb Adams stuff. Guy was one of the designers of this car's suspension! The Fire Ams were awesome. This car does at least have the WS6 package, which is a good start. Even with old, worn springs/suspension, the car handles really great. 

AngryCorvair (Forum Supporter)
AngryCorvair (Forum Supporter) GRM+ Memberand MegaDork
9/25/22 8:06 a.m.

Freebird!

Tony Sestito
Tony Sestito UltimaDork
9/25/22 7:28 p.m.

A few weeks back, I was talking to a friend of mine about old school car audio stuff. He knows I'm into that stuff, and mentioned he pulled an Alpine cassette deck out of a parts car a few years back and had no use for it. I bought him lunch as payment, not knowing what model it was or any of that. He dug it out today and sent me a pic:


It's a TDM-7582, which dates back to the early 2000's. This is likely one of the final Alpine cassette decks they made, and it's a full-logic model with CD Changer control. It's the same vintage as one of my old favorites, the CDM-7871, which is a CD player with the CD Changer bus. I believe I can get an aux-in cable that runs off the CD Changer port, just like the one I have for my 7871. Going to clean it up and see if it still works. 

NOT A TA
NOT A TA UltraDork
9/25/22 8:44 p.m.
Noddaz said:

You need to find this on-line.  Not buy it, just be able to read it and use what you can.

I used to have one, but I haven't seen it in 30 years.  Do the rear spring, front eye re-location.   

The spring eye relocation is often referred to as the Adams mod works well and is still done today. Harry Quackenboss (Herbs chassis guy) came up with it and I had discussions with him about it as well as other chassis/structural things when I was developing chassis reinforcement components for my 2nd gen F body product line. If you do the spring eye relocation you should do the spherical spring eye upgrade at the same time as long as everything is apart. Be forewarned though it's a project to get the spring pockets out of almost all the 2nd gens now due to the mounting hardware rusting.

Tony Sestito
Tony Sestito UltimaDork
9/26/22 11:19 a.m.

If I ever decide to track/HPDE the car, I'd throw the whole bag of tricks at it. But for now, I'm just looking to freshen up things. The most extreme I'll likely get is poly bushings. The body mounts and some other odds and ends are already poly, and they have held up well, so I'll likely do poly for everything else when the time comes.

Noddaz
Noddaz GRM+ Memberand PowerDork
9/26/22 1:51 p.m.

One thing I wanted to do on my 1972 Camaro but never did was fab brackets from the cowl area to the front of the sub-frame.  I only had so much money back then.

I guess some things never change.

Tony Sestito
Tony Sestito UltimaDork
9/26/22 3:42 p.m.

In reply to Noddaz :

If they are still around, Pro Touring F-Body made those. Their website is still up. 

I'm happy with the WS6 braces, and I need to re-install my cool aftermarket cowl braces that have been sitting in my garage for the better part of a decade now. 

Gearheadotaku (Forum Supporter)
Gearheadotaku (Forum Supporter) GRM+ Memberand UltimaDork
9/26/22 3:57 p.m.

Great to see this on the road!

Noddaz
Noddaz GRM+ Memberand PowerDork
9/26/22 5:36 p.m.

In reply to Tony Sestito :

That is nice to know, but my Camaro is long gone.  

Scott

Tony Sestito
Tony Sestito UltimaDork
9/30/22 10:13 a.m.

I've been looking into ways to seal the original shaker to avoid my "milkshake oil" situation, and after doing some research, I started to remember that when I bought the car, there actually was a seal on there. It fell off early on, and I never reinstalled it because the engine lived under a cover most of the time. And also, the 403 didn't have the same issues with water getting into the engine, since it had a traditional intake manifold. 

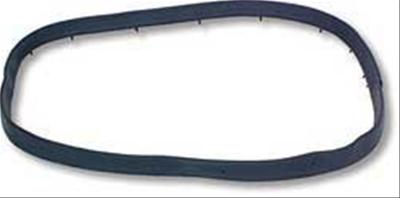
So, looking into factory-style shaker seals, I kept seeing ones that looked like this: 


They have small nubs on the seal to attach to the shaker. Looking at my shaker though, and there's no holes for the nubs to plug into. That's odd. Then, I looked into this a bit, and found out that back when they were new, GM released a TSB of sorts, and had dealers drill holes in shakers to attach this style of seal to them, because the originals were falling off. 

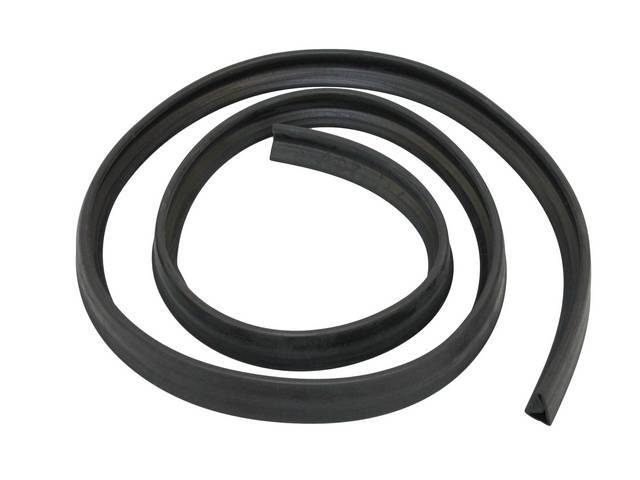
Not wanting to drill holes in my shaker, I kept looking, and I found this one: 


This is what I remember being on the car. It glues on with 3M Super Gasket Adhesive. And the best part: it's half the price of the other one! So, I have one on the way. I'll be doing some shaker rehab soon, including riveting the shaker base on instead of it being bolted on, cleaning up the old gasket material to the best of my ability, and getting this new gasket on. 

All this to "look cool". I really need to find a Turbo Bump hood. 

Tony Sestito
Tony Sestito UltimaDork
10/5/22 2:07 p.m.

So, I haven't driven the car at all since my last adventure to get the thing inspected (stupid life getting in the way again), but I did make good on a promise I made to the car. Before I left the driveway on my little adventure, I told the car that if it behaved, then I'd buy it a present (besides the shaker seal I posted above). Since it made it back largely in one piece, I made good on that promise. I ordered up some new front grilles. 


The 1979-81 cars are notorious for having issues with the grilles. They are made of plastic, and most of them have disintegrated over time, as the plastic gets extremely brittle as the years go on. Mine have been basically missing since sometime in the early 2000's. I haven't decided whether I'll install them on this nose or my spare nose that's in better shape, but I think the car will appreciate it. 

zordak
zordak Reader
10/6/22 9:53 a.m.

It does not want you to buy it pretty things, it just wants you to spend time with it.

Tony Sestito
Tony Sestito UltimaDork
10/6/22 1:49 p.m.

In reply to zordak :

That's probably true, but it's getting them anyway! In my experience, this one actually likes it when it gets cleaned up.  The other problem child in the driveway is the one that doesn't like getting dolled up, and it spits parts at me when I do. 

Also, the grilles showed up today. They aren't "factory correct" since they have a glossy finish to them rather than the matte finish the stock ones have, but they look great. I was going to make some out of a sheet of honeycomb mesh, but this is far easier and takes way less of my time. And it'll look better. 

I also bought a new driver's door handle since the one on the car broke. This will be the 3rd one on the driver's door since I bought the car. They are notorious for breaking in half on the 2nd gen cars. At least the late 2nd gen ones are dirt cheap. 

Tony Sestito
Tony Sestito UltimaDork
10/10/22 8:41 p.m.

I tackled three projects with the Trans Am over the weekend: sealing up the shaker, replacing the driver's door handle, and installing my new grilles. First, let's start with the shaker. 

Some GM engineer in the late 60's decided that these cars should have a hole in the hood and a funny little hat on the carb, and Trans Am owners have been dealing with the consequences ever since. While I love a good shaker on just about any car, I don't love what happens to them when the cars end up as decrepit road roaches (and I mean that with all the love in the world). When I bought my car, the shaker seal was flapping in the breeze. I sealed it and re-sealed it over and over, but it still fell off anyway, as they typically do. While this didn't really matter when I had the Olds 403 in the car, it definitely DOES matter with a Pontiac V8 under the hood. The intakes on the Pontiac V8's sit elevated off of the lifter valley. There's a valley pan that makes up the difference, and it's baffled and has some holes in there for bolts to hold it down, the PCV system, etc. And when water pools up on that, you get this:


Milkshake oil is not what you want in your crankcase. And without a seal and proper drain on the shaker, you'll get this every time it rains unless you cover the engine in a tarp or garbage bag. So, it was time to fix that. 


This shaker lid has been around. It's pretty beat, and someone cut out the back of it with what looks to be their teeth. It's rough. I have another one, an uncut '79 shaker, but I am saving that for when the car is nice, so this is what we're working with. 


Luckily, my drain still exists. The original tube is long gone, but I have this clear tubing that works even better. As you can see, it's separated from the shaker over the years. You can also see the pile of old adhesive that once held on a seal. That's gotta go. 


After scraping all of the old adhesive off and removing the drain , I cleaned and prepped the shaker. Yes, it's still gross, but I assure you it's clean. 


They make two seals for the car, as I noted a few posts above. This one is the glue-on only seal. It came with this print-out which reminds you not to attach it to the perimeter of the shaker, because GM didn't. Noted!


National Parts Depot recommends that you use 3M Super Weatherstrip Adhesive part # 08008. Basically, you have to go slow, wait until it's tacky, and attach the seal methodically. 


As I went, I used some clamps to hold it in some of the trouble spots. This proved to work very well. 


MOAR CLAMPS! I let it cure overnight, adjusting the clamps a few times where spots were lifting up. I also used JB Weld to re-attach the drain to the shaker. 


The next day, I inspected the seal and found more spots that didn't seal, so I added adhesive where it needed it, clamped it, and checked on it throughout the day until everything was fully set. And after a water test, water was staying in the shaker and going out the drain tube. Nice! 


After bolting it back on, it has a positive seal against the hood. While the hood still sits way too high (it did before any of this), the shaker is now sealed off as it should be for the first time in almost 2 decades. 

Tony Sestito
Tony Sestito UltimaDork
10/10/22 8:53 p.m.

Next, the door handle. 


If you own or have owned a 2nd Gen F-Body, this is a familiar sight. They all do this. I think this is handle #3 since I've owned it. Aftermarket or stock, they all break eventually. Such is the ownership experience of owning one of these. 


Basically, you remove the door panel, contort your body in unnatural ways, and unbolt the old handle's two 7/16 nuts with a flex head ratchet while dropping said nuts into the door and cursing until you end up here. New door handle was $14.99 via Amazon. Last time I bought one, it was about $40, and that was about 14 years ago. They do make a "stock quality/correct" one in the resto catalogs, but they are around $80 and still break in half just like the cheaper ones, so there's no advantage there. 


The Dorman unit (the non-broken one on the bottom) looks beefier in a lot of places, so it's got that going for it. 


They make two different length handles for 2nd Gen F-Bodies. The early cars have a shorter handle, and they don't make a $14.99 version of those, so I'm thankful that mine is a later '79 Trans Am. 


After more cursing, bloody knuckles, and pain, this is the result. While I was in the door, I cleaned out the debris on the bottom and lubed the window tracks. The rod that actuates the door mechanism can be a real pain, and that is what took the most time to get right. It kept turning and falling off, but eventually you'll get it where it wants to be. Make sure to lock it in place on the new door handle with the supplied retaining nut! 
 

1 ... 15 16 17 18 19 20

You'll need to log in to post.

Our Preferred Partners
tSVD4xVFposvwx1ilpTIaktwanHupe98Lv1Zg6hRXiRGb0PEAnIl8fICijzdldEw