


Today's progress is test fitting intake that i built, cleaning and painting front hubs and putting the new studs in them and ordering the correct seals.
I need to clearance the ps shock mount more, but were getting closer to roller!

Today's progress is test fitting intake that i built, cleaning and painting front hubs and putting the new studs in them and ordering the correct seals.
I need to clearance the ps shock mount more, but were getting closer to roller!

getting closer to real update time

Your ability to make progress on so many projects is truly exceptional. That crank pulley needs some love!
In reply to AngryCorvair (Forum Supporter) :
It does. I keep forgetting to save cardboard to lask off.

I'm pretty sure that the alternator needs to ground through the bracket that mounts to the block, so you'll want to grind paint away at the mounting surface. Or that's just internet lore and not true.

So in the neon thread you mentioned vehicle liquidation. Iffen you turn Black loose will you end up using "sister stepside" to tow this to upcoming events?
Nah. If the black truck goes, so does the prius and the sale of the three will be to buy a newish 3/4 ton truck for dd and truck stuff.
Previous budget was 4086.66 with 1619 recoup
new money:
ptfe fuel lines: 125
six piston wilwoods:250
wilwood rebuild kits: 40
hardware for fuel cell and front suspension:50
relocate shock mount: 25
grip tape: 16
ball joints: 70
ball joint boots:26
uca spacers: 20
wheel seals: 36
water pump and gaskets: 40
ecu flash: 50
fuel cell top: trade
Sales
Jfz calipers, stock springs, extra steering shaft, extra control arms, misc junk: 400 and fuel cell top
new total: 4434.66 with 2019 recoup
so, since the last update I’ve been to Mexico, had thanksgiving and Christmas, resurrected my 60 degree v6 powered Miata, fixed the broken duster, and made improvements in the neon. Also did holiday parades for the girlscouts, cleared land, and other things. Busier than a one armed wallpaper hanger. The naskart has been slowly being chipped away at, however. And its now front burner again.
As is customary, ill try to make a coherent post vs the actual ping pong ball in a blender style of progress I’ve been making.
First up, we finished cutting the duster body down to a manageable chunk. And gave the floorpan to a guy to use the trans tunnel.
 20221104_182549 by Michael Crawford, on Flickr
 20221104_195419 by Michael Crawford, on Flickr
 20221104_195829 by Michael Crawford, on Flickr
 20221104_195838 by Michael Crawford, on Flickr
 20221104_203357_001 by Michael Crawford, on Flickr
 20221104_204046 by Michael Crawford, on Flickr
Brother Dustin is having far too much fun chopping up the mopar. We start to fit the body to the chassis next weekend…..
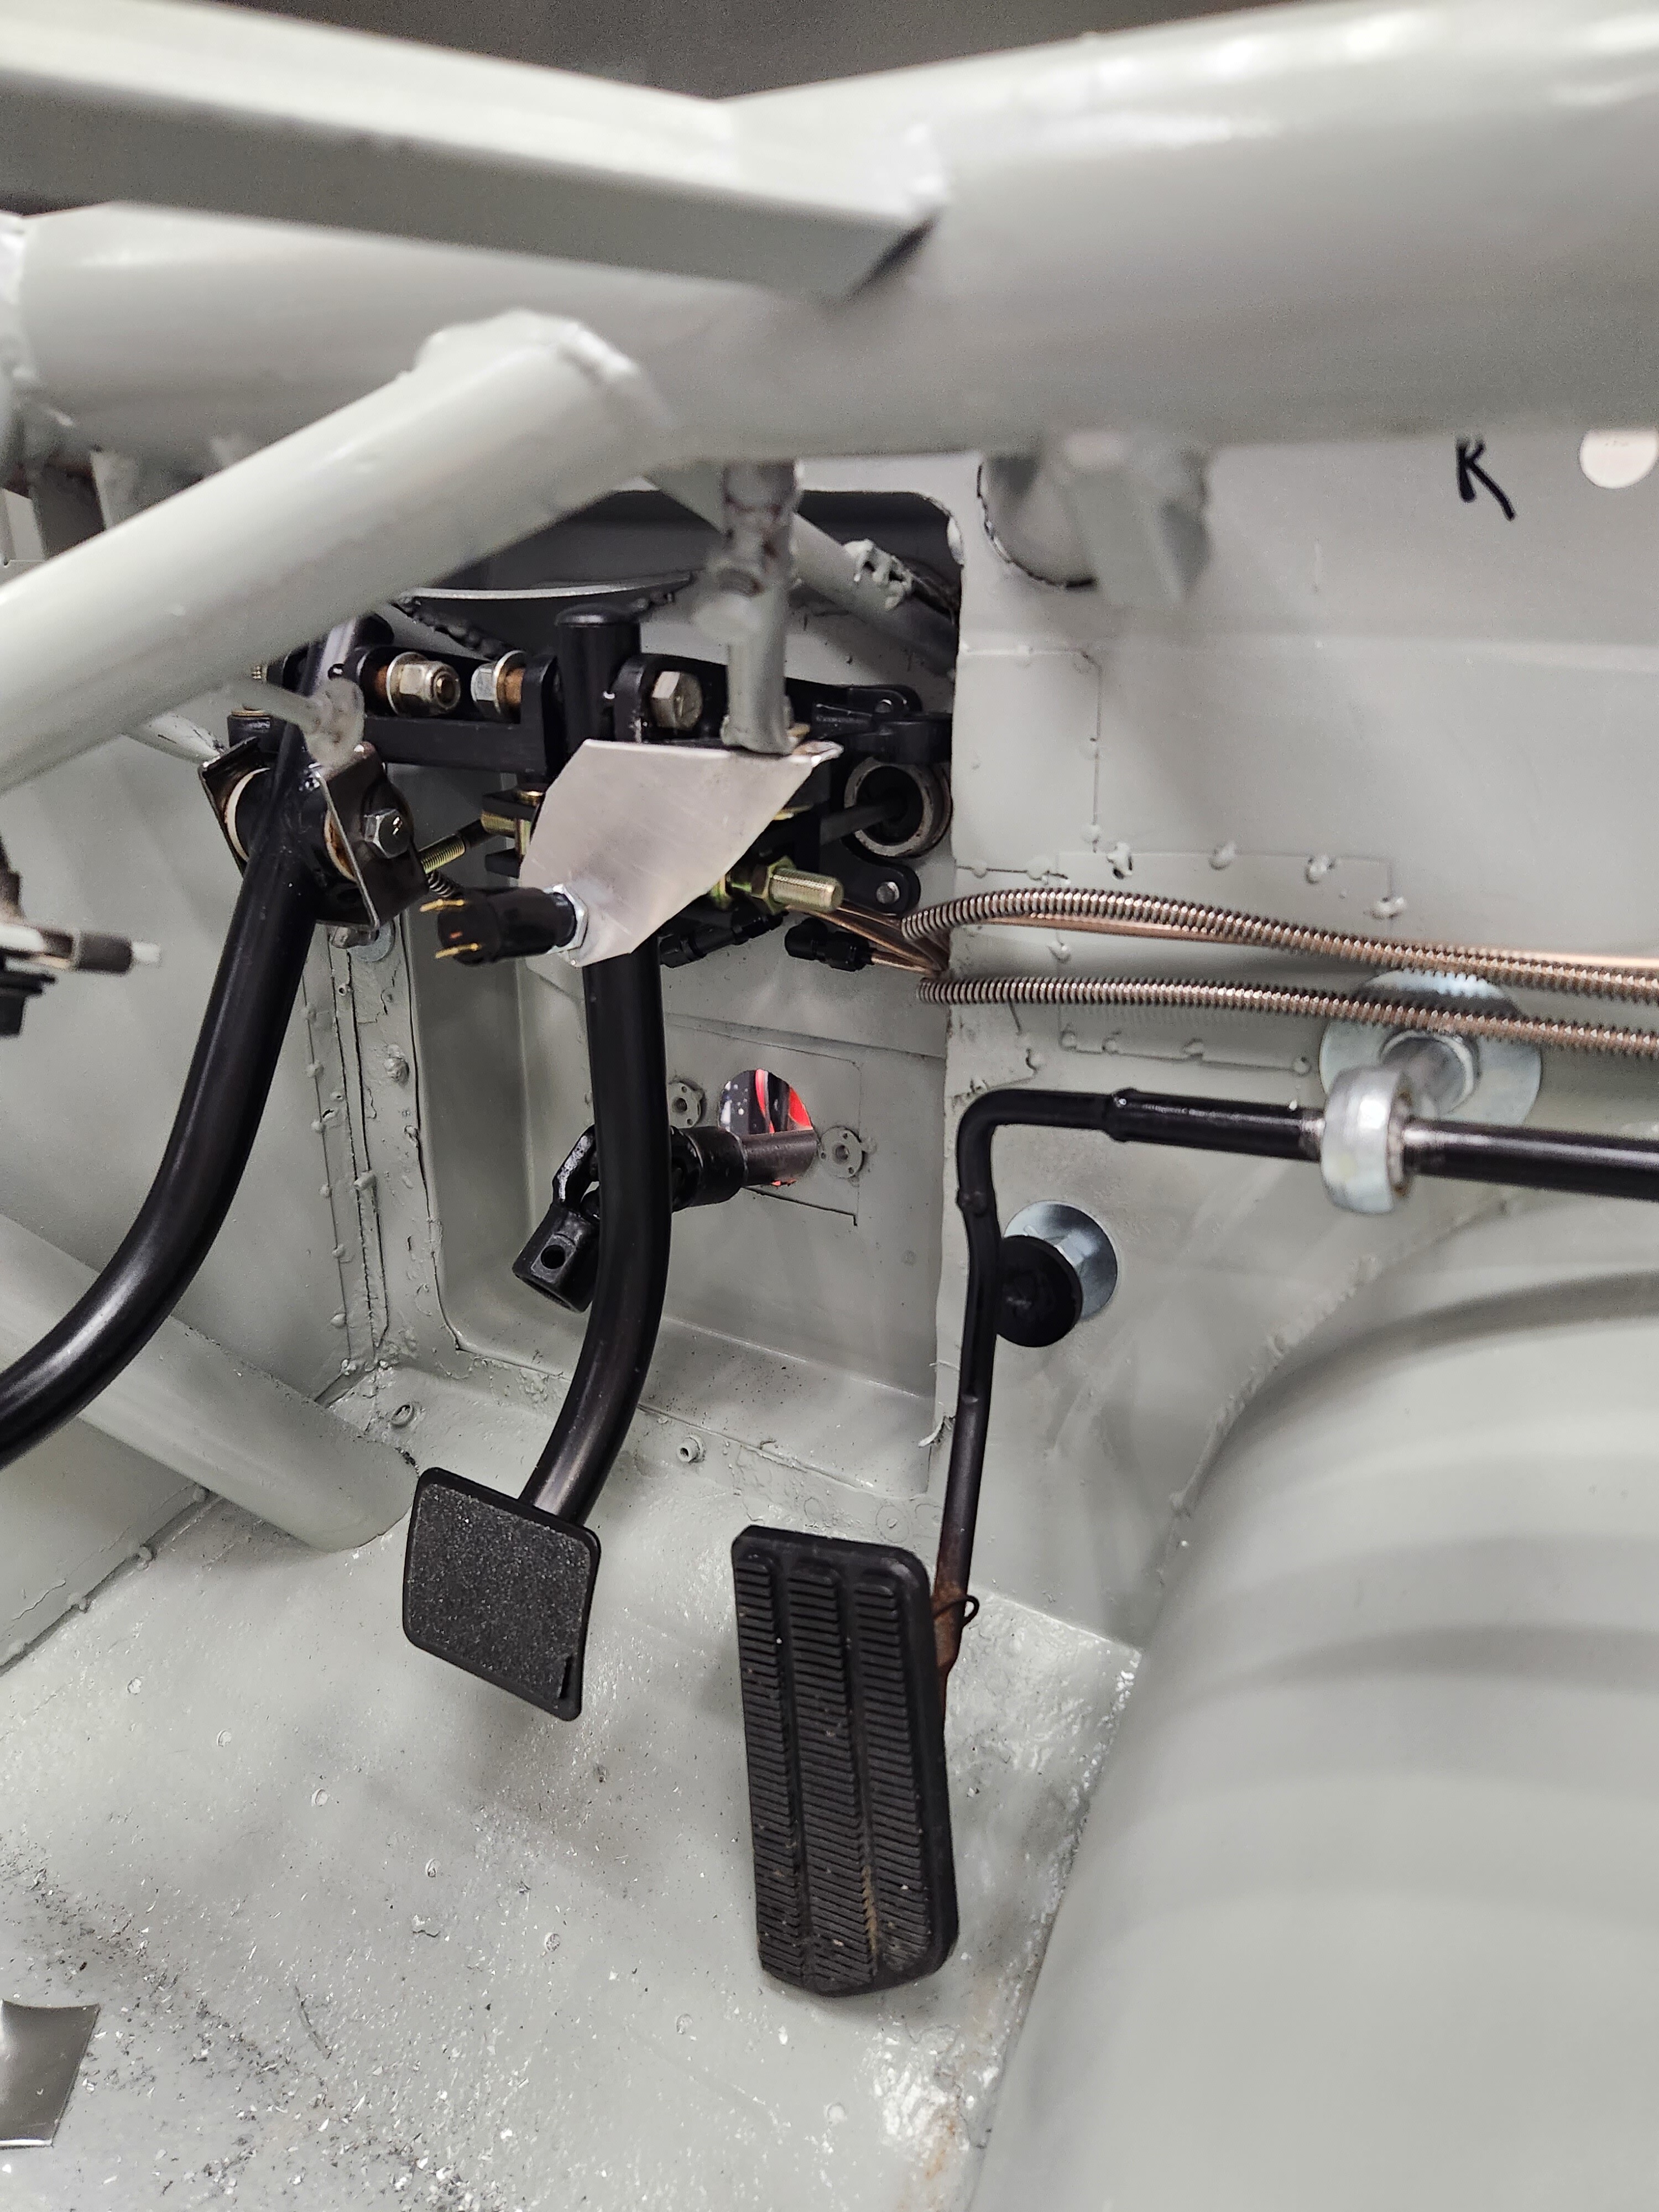
Speaking of the chassis, I spent some considerable time getting it ready for the body. First was plumbing it. I fought with the fuel lines far too long, going through iterations of steel and nicopp, finally landing on PTFE lines run behind metal shielding throughout the interior to bulkhead fittings front and rear. In between round on the fuel lines, I ran all new hardlines for the brakes and clutch, wrapped in brake line armor. The adjustable bias valve was given a bracket doubler to stiffen the mount, and the pedals were put in with bushings and grease. Master cylinders rebuilt, fresh flex lines, etc. I also ran through the bias adjuster setup to make sure it was right. Everything was assembled with locknuts and locktite as we went, and I made a brake light switch mount. I riveted the lines to the chassis with p clips. Also visible in the following pictures are the throttle linkage that is painted and mounted, the kick panel mounts, etc.
 20221203_124950 by Michael Crawford, on Flickr
 20221203_171053 by Michael Crawford, on Flickr
 20221203_205623 by Michael Crawford, on Flickr
I also redid the front suspension. I knew the right side lower shock mount fouled the spindle during right turns, so I had the welder down the way from where I work relocate it for $25. I also noted that the lower ball joints were hit with a grinder at some point, which makes me nervous. So I got replacements. We also found poly boots for them. Goal is long life and limited service. I actually sourced boots for all the front suspension joints and put zerk fittings in everything. I relubed the spherical bearings that are the LCA mounts. Sandblasted everything, repainted, cleaned and regreased wheel bearings, chased threads, etc,
 20221215_170820 by Michael Crawford, on Flickr
 20221210_171647 by Michael Crawford, on Flickr
 20221211_172133 by Michael Crawford, on Flickr
For alignment, I found a pair of aluminum spacers at SRI to make it sit at a static 1 degree negative camber.
 20221216_093142 by Michael Crawford, on Flickr
I also got froggy with brakes. I’ve known about the grand national 6 piston calipers they ran on the short tracks and road courses that have been long discontinued. However, I found a pair and a couple spares. So, all the brakes!!!
 20221109_064703 by Michael Crawford, on Flickr
 20221127_165514 by Michael Crawford, on Flickr
 20221215_170823 by Michael Crawford, on Flickr
 20221224_092130 by Michael Crawford, on Flickr
I traded the original JFZ and old mismatched/removed parts to a guy that’s restoring some 80s stock cars for $400 and a fuel cell topper. I hit the topper and my floors and shift turret with some aluminum brightener and an SOS pad to give it a uniform brushed finish.
 20221224_094627 by Michael Crawford, on Flickr
The top is a late 80s vintage piece. Its neat, with check balls and all. I love it. The cell build will need to wait until the body is on so I can make sure it all lines up with the filler in the quarter.
 20221215_170757 by Michael Crawford, on Flickr
I also built the intake manifold out, started hanging stuff back on the hemi orange painted LS. Long way to go on that yet.
 20221111_191829 by Michael Crawford, on Flickr
 20221218_110002 by Michael Crawford, on Flickr
Today I finished up the grip tape on the floors, riveted everything back in place, bolted the seats back in, etc. its ready to haul back down to dads for the body install.
 20221226_161059 by Michael Crawford, on Flickr
 20221226_161044 by Michael Crawford, on Flickr
Next stop, skinning it. Until next time, friends.

Looking really good, Michael!!
In reply to jimgood :
Thanks! Im really happy with how its turning out. Im hoping its as good to run as it looks....


New to me water pump done. Had to cut the clutch fan off. Nut was stupid stuck.

That's a lot of walmart curbside stickers for one box of diet dew
Patrick said:That's a lot of walmart curbside stickers for one box of diet dew
Jenny fell in love with being able to make her grocery list on the Walmart app throughout the week and pick it up on her way home from church on Sunday. For whatever reason our Walmart puts every curbside pickup sticker on the box of Diet Mountain Dew we get every other week. Probably the same guy and he thinks it's funny. Can't say I'd do any different.

Really looking forward to the body going on!
AxeHealey said:Really looking forward to the body going on!
So are we.
Ill admit this is the make it or break it point for me. I know it'll be super close.

FYI, if that brake light switch gives you problems, they make a switch that tee's into a brake line and uses fluid pressure to trigger it. You can put it just about anywhere.
I wouldn't want that sharp piece of metal where my tender shins might hit in an impact
Example
In reply to HalfFast :
Wearing steel toed boots as my only Footwear for years, I hadn't thought about that. Need to look at that more closely.
 had to take a picture. Tgese are lined up at the main hoop and rear of the door opening. Staring, i think the a pillar bar and front of door opening will be the happy place, and the rear opening will fall where it may.
Can anyone overlay these two and give me a better idea before breaking out the plasma?
yea yea yea it's so close....but I gotta know is the IR compressor single or dual stage.......yes I'm a doofus .....happy new year Y'All
In reply to 759NRNG :
Happy new year to you as well my friend!
And single stage. Its big enough to do most everything i need, but battery tools have gotten so good i rarely turn it on anymore.
wanna sell it? wink
In reply to 759NRNG :
Not yet?
Yeah, line up the A pillars and the rest will fall into place
have to put 325 in the stripe instead of 340
Patrick said:Yeah, line up the A pillars and the rest will fall into place
have to put 325 in the stripe instead of 340
The stripe and half roof are going away eventually. However, i want to find someone to make me a 325 wedge callout like the older 340 cars had on the hood.
And i think youre right on the a pillar. Need to set a fender there to double check, and worst case i may have to split the difference.

Looking great Michael! Looks like it will be close but if anything, the bump on the a pillar might be the rub. Worth trying to fit it though. I pulled the a pillar back further than I needed on mine by about 1.5".
You'll need to log in to post.


