


In reply to NOHOME :
I had 20psi earlier when cranking on the starter to prime the system. Im not sure why the gauge read 0 after fire, unless it just hadn't built pressure yet or the nylon line broke/kinked

In reply to NOHOME :
I had 20psi earlier when cranking on the starter to prime the system. Im not sure why the gauge read 0 after fire, unless it just hadn't built pressure yet or the nylon line broke/kinked
Since we know its RIGHT THERE as far as the impossible swap goes, i guess its time to chip away at the gummy plastidip. I have no idea what happened here, but it has turned to pudding instead of rubber. Which means it doesn't peel. Not too big an issue with the metal body panels, but the plastics are going to suck. Very curved and easy to gouge.
I know ill be repainting the car, but am trying to preserve the factory finish as much as possible to make life easier.
Todays first look after pulling the bumper out of storage....

One other thing that we learned last night was that the car doesn't turn off with the key. You have to flip all the toggle switches to shut down.
That doesn't seem safe to me.
So, we're going to set the feed line to the toggles on a switched relay. That way its still independent, but is shut down with the key in event of emergency.

Aircraft stripper and a scrub brush may not have been the right idea....

In reply to Dusterbd13 :
As we learned with our mirrors, aircraft stripper isn’t safe for all plastics. Lucky for us our car looks bettter without mirrors. Not sure you’ll look as good without bumpers.
Oh crap. Hopefully i didn't fubar it too bad. . .
In reply to Dusterbd13 :
It doesn’t look as bad as our mirrors but looks like you’ll need to paint them.
Yup. Painting was a given, but to do so required removing the plastidip.
Mineral spirits is my next stpp as i have 5 gallons...
I wonder if dry ice would make it easier....
The 30 seconds i spent with mineral spirits just now seems promising. I think.
Stupid nylon oil pressure gauge line was kinked.
50lbs cold idle.....
Doesn't accept throttle input worth a damn though.
Probably vacuum leaks.
Next: vacuum lines and cooling system and belt.
Then outside for a real first run video.

Passengers side needs some tidying up, and i need to make a new throttle cable mount. And measure for a belt. And....
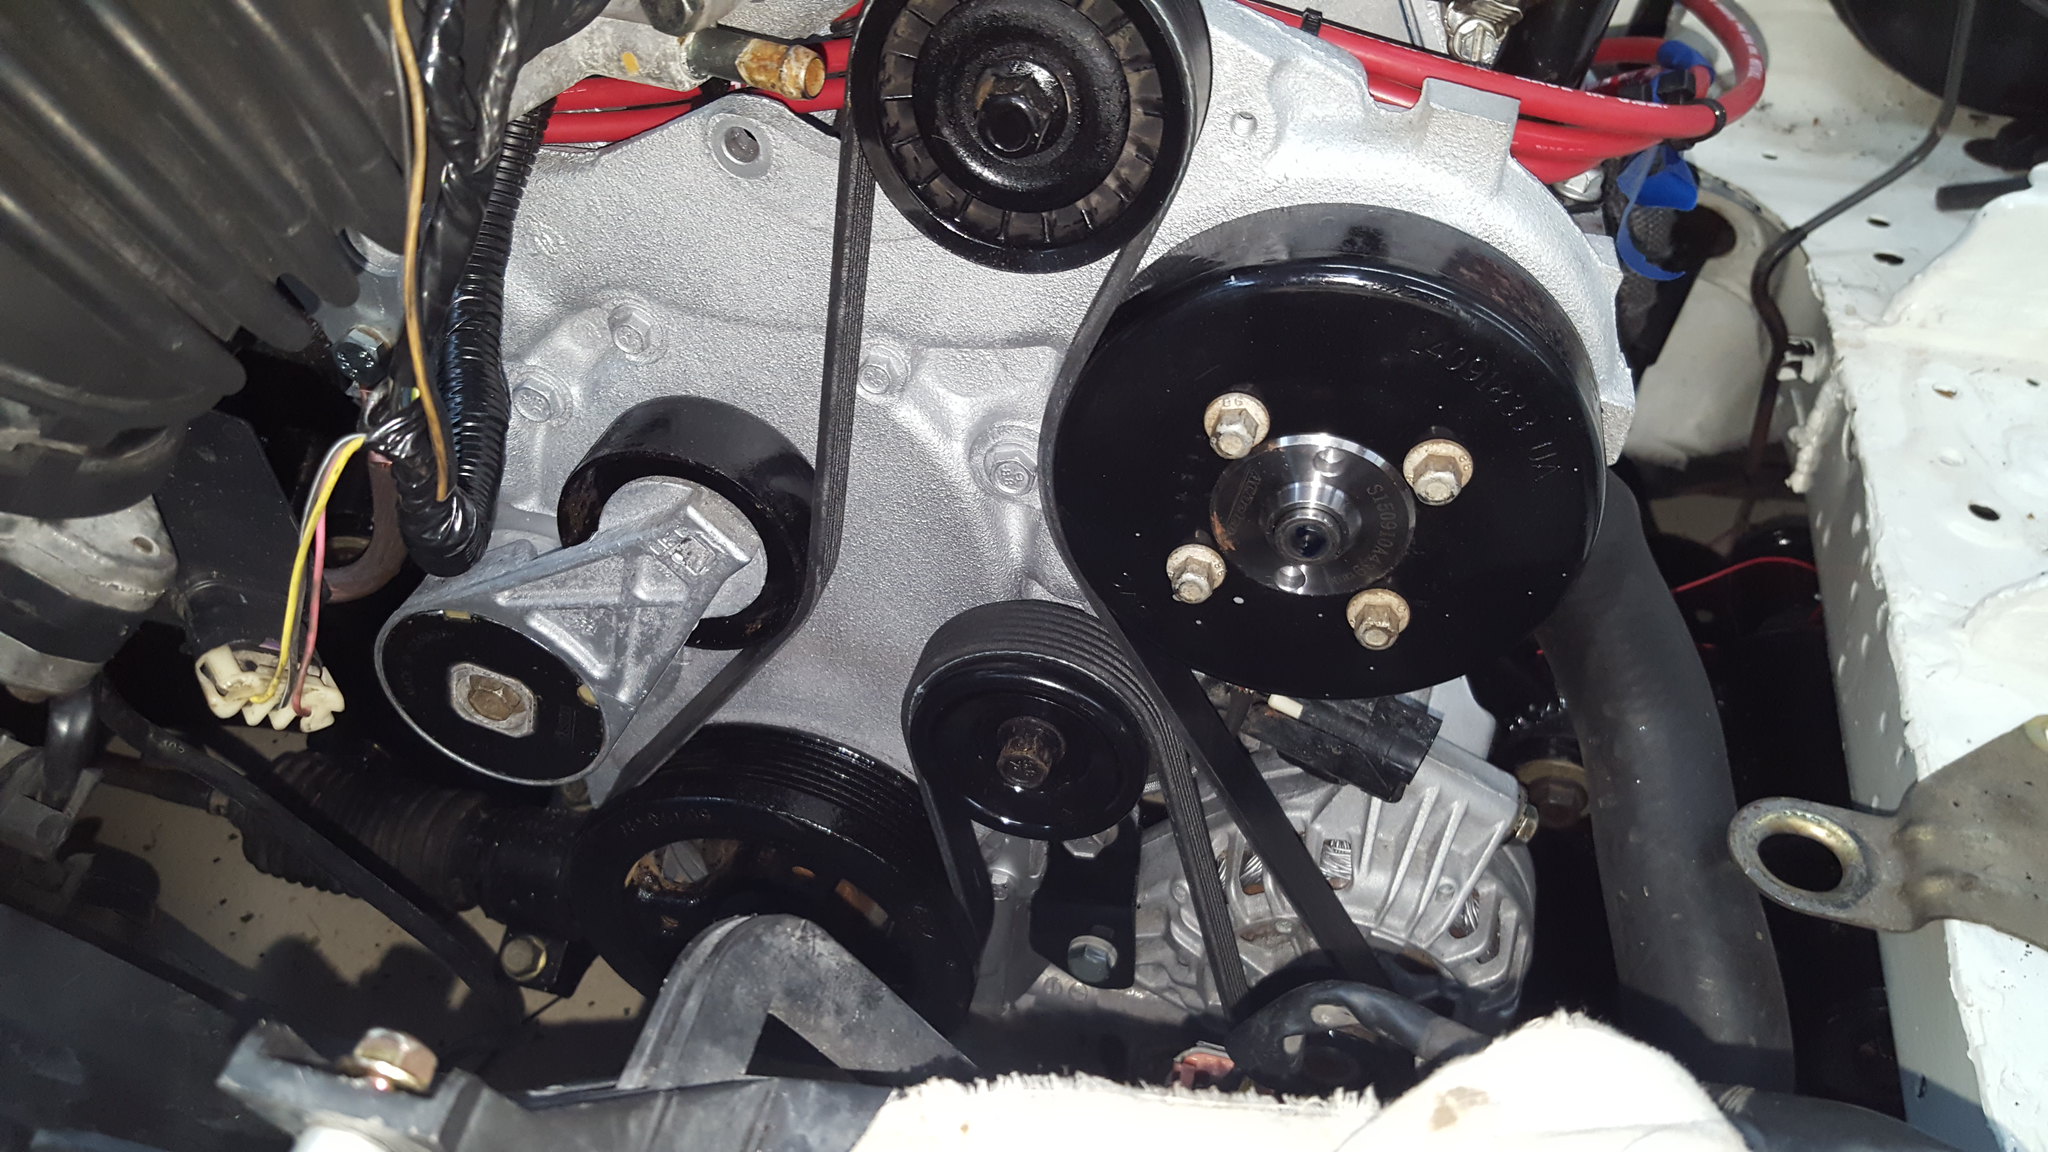
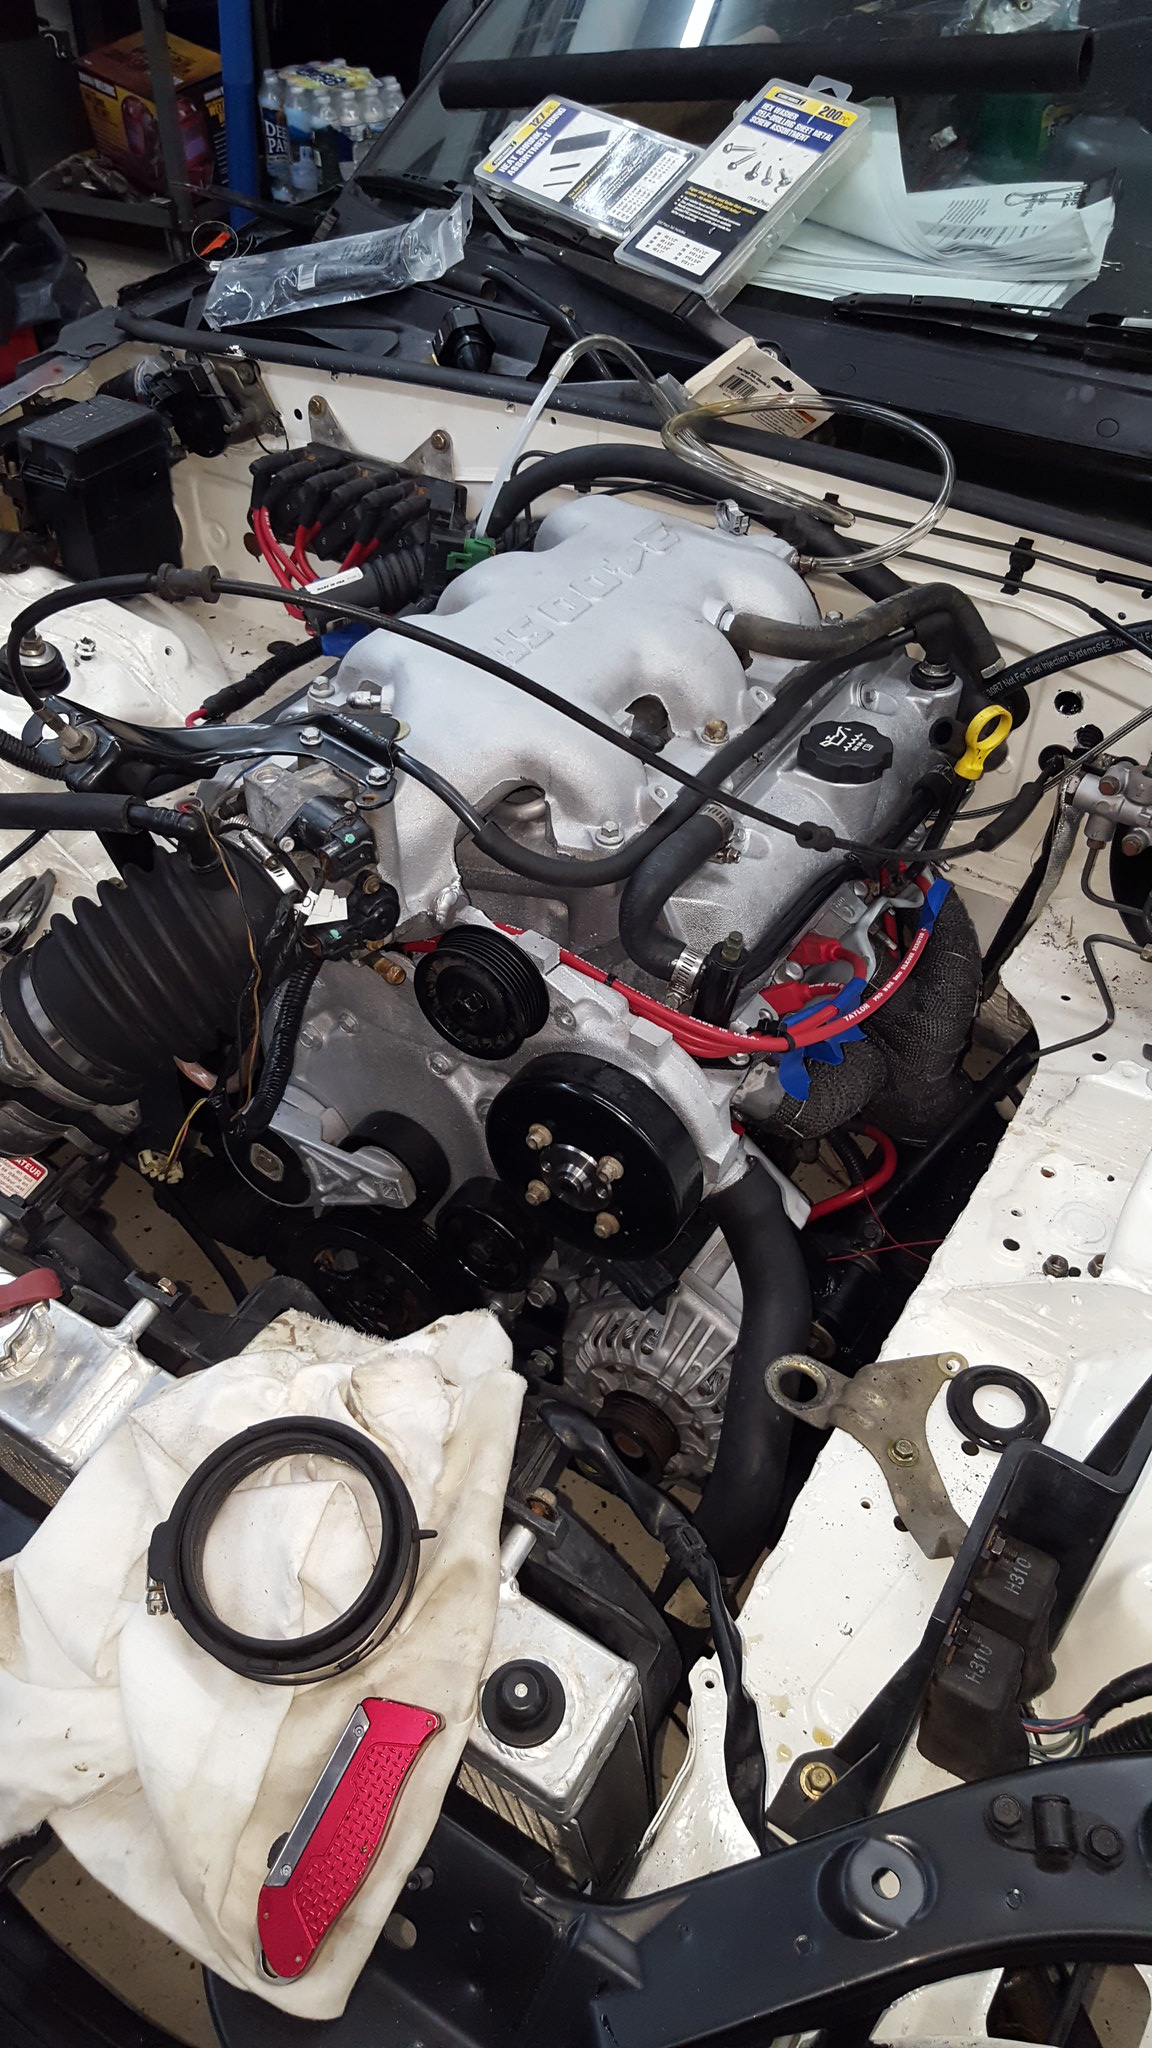
Someone a few pages back was asking about the belt setup.
Heres the complete assembly.

Tensioner is maxed out, but it's maxed out at bottom of travel. Meaning that the belt can grow about 3/4 inch and were still tight.

Nice work, but I notice you said you hoped you didn't "fubar" it too badly
doesn't the --bar part stand for "beyond all recognition"? ![]()
Seriously, keep up the great work!
In reply to Bent-Valve :
Yes it does! Not remembering what exactly i wad hoping not to fubar though....
In otger news, this car runs surprisingly well without the 24x crank sensor wired up.
And it shoots fireballs
Found the comment about fubar. Ive always heard it two ways: beyond any recognition or beyond any repair.
It sems to have survived reasonably well. So we have that going for us.
Should have a fair sized update at the end of today. We been busy.....

Mom really enjoyed the video.
And it shoots fireballs
YES!
Well, as long as they are out the exhaust, a mis-timed sbc 350 I was building sent a memorable one out the carb one time. Pyro calmly said "there's fire" or something like that, what she should have said was "the entire engine is on fire". We still are working on communication 20 years later. I digress.
Patrick said:Mom really enjoyed the video.
If you get your mom down here or to the challenge, she can drivr it!
In reply to Bent-Valve :
I feel you on the wife. Married 13, known each other since 10th grade.
And firballs out the open headers are cool.....

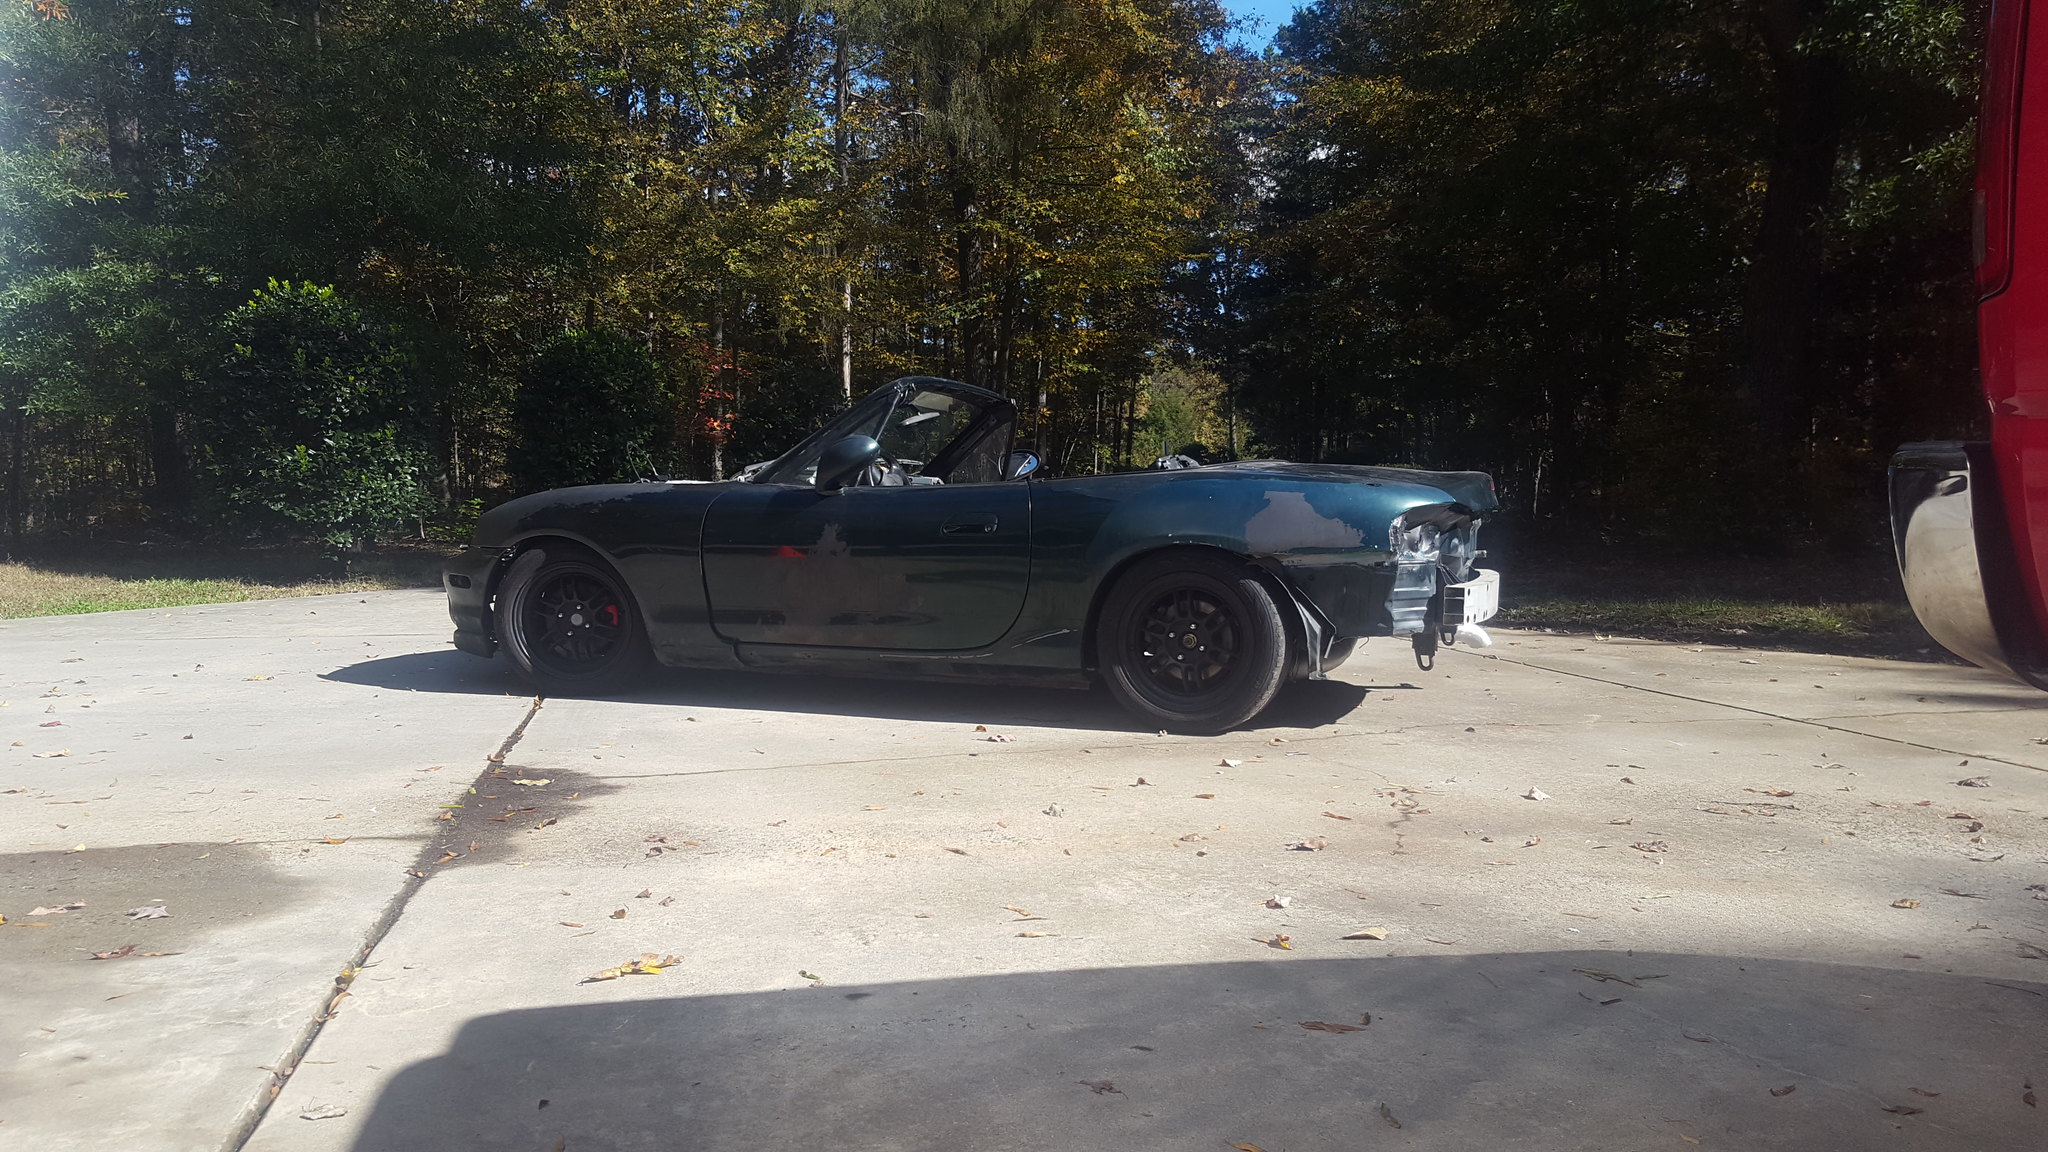
Not moving under its own power yet, however this is the furthest it's moved since I started on it

In reply to Dusterbd13 :


Dusterbd13 said:Someone a few pages back was asking about the belt setup.
Heres the complete assembly.
Tensioner is maxed out, but it's maxed out at bottom of travel. Meaning that the belt can grow about 3/4 inch and were still tight.
me, thanks.......
In reply to 759NRNG :
No problem! Does it make sense now with the spring loaded tensioner?
Challenge budget so far:
previous challenge budget: 1932.70
recoup total: 820
new money:
oil filter sandwich plate: 5
oil pressure gauge fitting: .97
belt: 21.99
removed purchased oil filter sandwich plate: -17.99
removed quart of holy freaking green: -14.98
removed oil pan gasket and plugs per new rules (I deleted them from my spreadsheet and dont feel like looking at the moment. Additionally, I found the other oil pan gasket....)
Recoup: 820
new total: 1877.19
I've been like a ping pong ball in a blender lately. Doing way too much on way too many things. So this update will be a little scattered. Between going with my family to all sorts of fall events, working WAY too much, fixing the duster, etc, ive been having a hard time keeping track of what im doing with this.
So, to start:
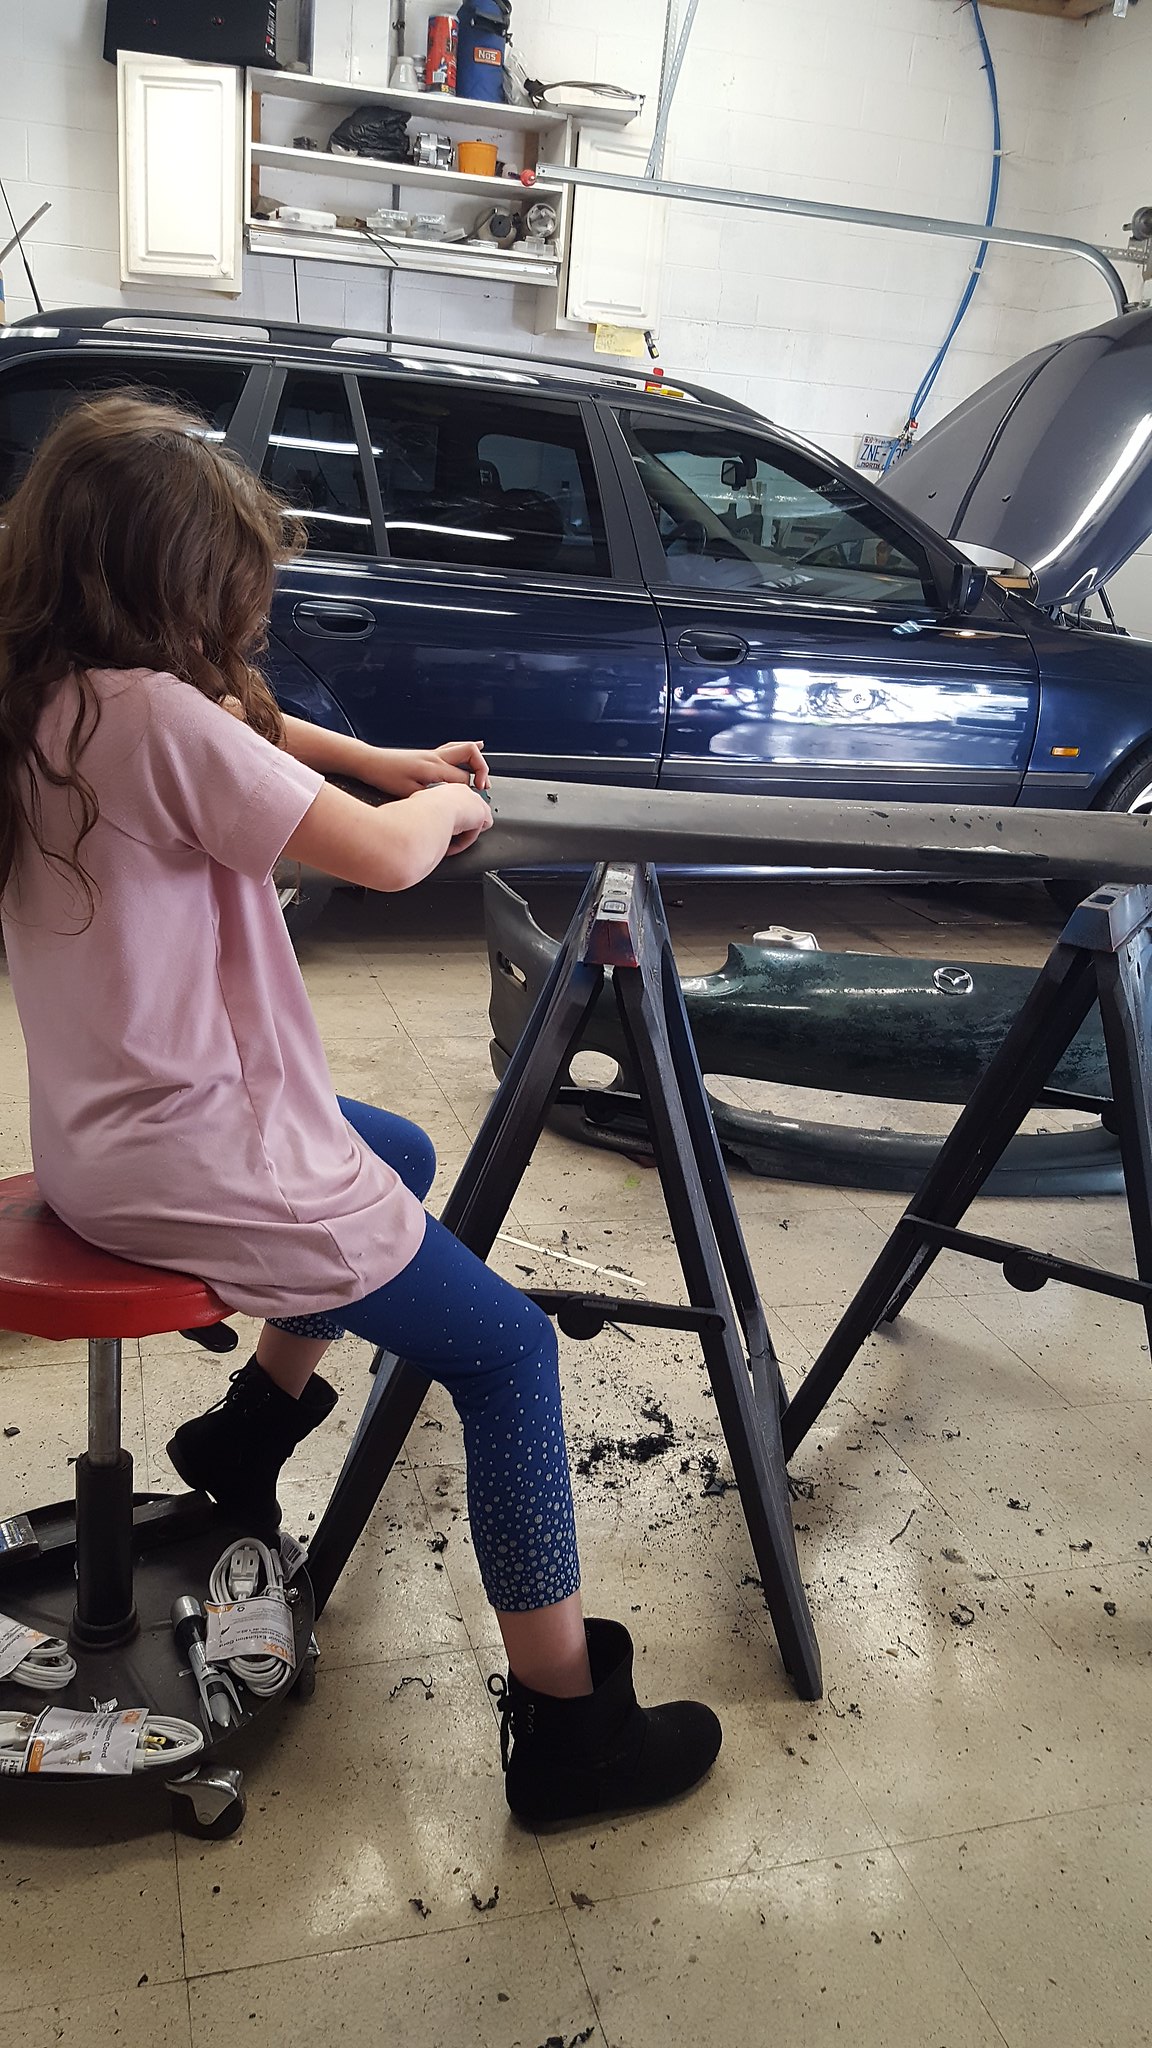
the plastidip that was done to this car has turned to goo over much of it. Ive been working on peeling/scraping it from the plastics. I tried aircraft stripper, and luckily it didn't damage the plastic. But it wasn't my best idea. Ive found mineral spirits and lacquer thinner with an sos pad, as well as a razor blade to be the most effective means so far. And child labor. (she likes peeling the stuff that will peel) we've got the front bumper done, rear most of the way, and lots more to go everywhere else.
 1540468889_15404688612351221519150_mmthumb by Michael Crawford, on Flickr
 20181025_141225 by Michael Crawford, on Flickr
 20181029_144150 by Michael Crawford, on Flickr
next up is belt routing. I finally figured out what size belt fits. Spent way too much on a belt, but have learned that the original application is a dodge intrepid. Ill snag a used belt next time at the junkyard. That'll cut $19 from the budget. And it'll make me happy to have mopar parts on this.
 20181026_185835 by Michael Crawford, on Flickr
 20181026_185904 by Michael Crawford, on Flickr
I also picked up some free slicks for the 14s. 21X7x14 avon medium compound. Should cut $140 from the budget if they prove as fast at the SM7 on 15x6 in testing. Im sure as hell going to try! Very nice guy with some awesome garage hardware. And a really nice day and drive with my wife.
 Screenshot_20181027-205009 by Michael Crawford, on Flickr
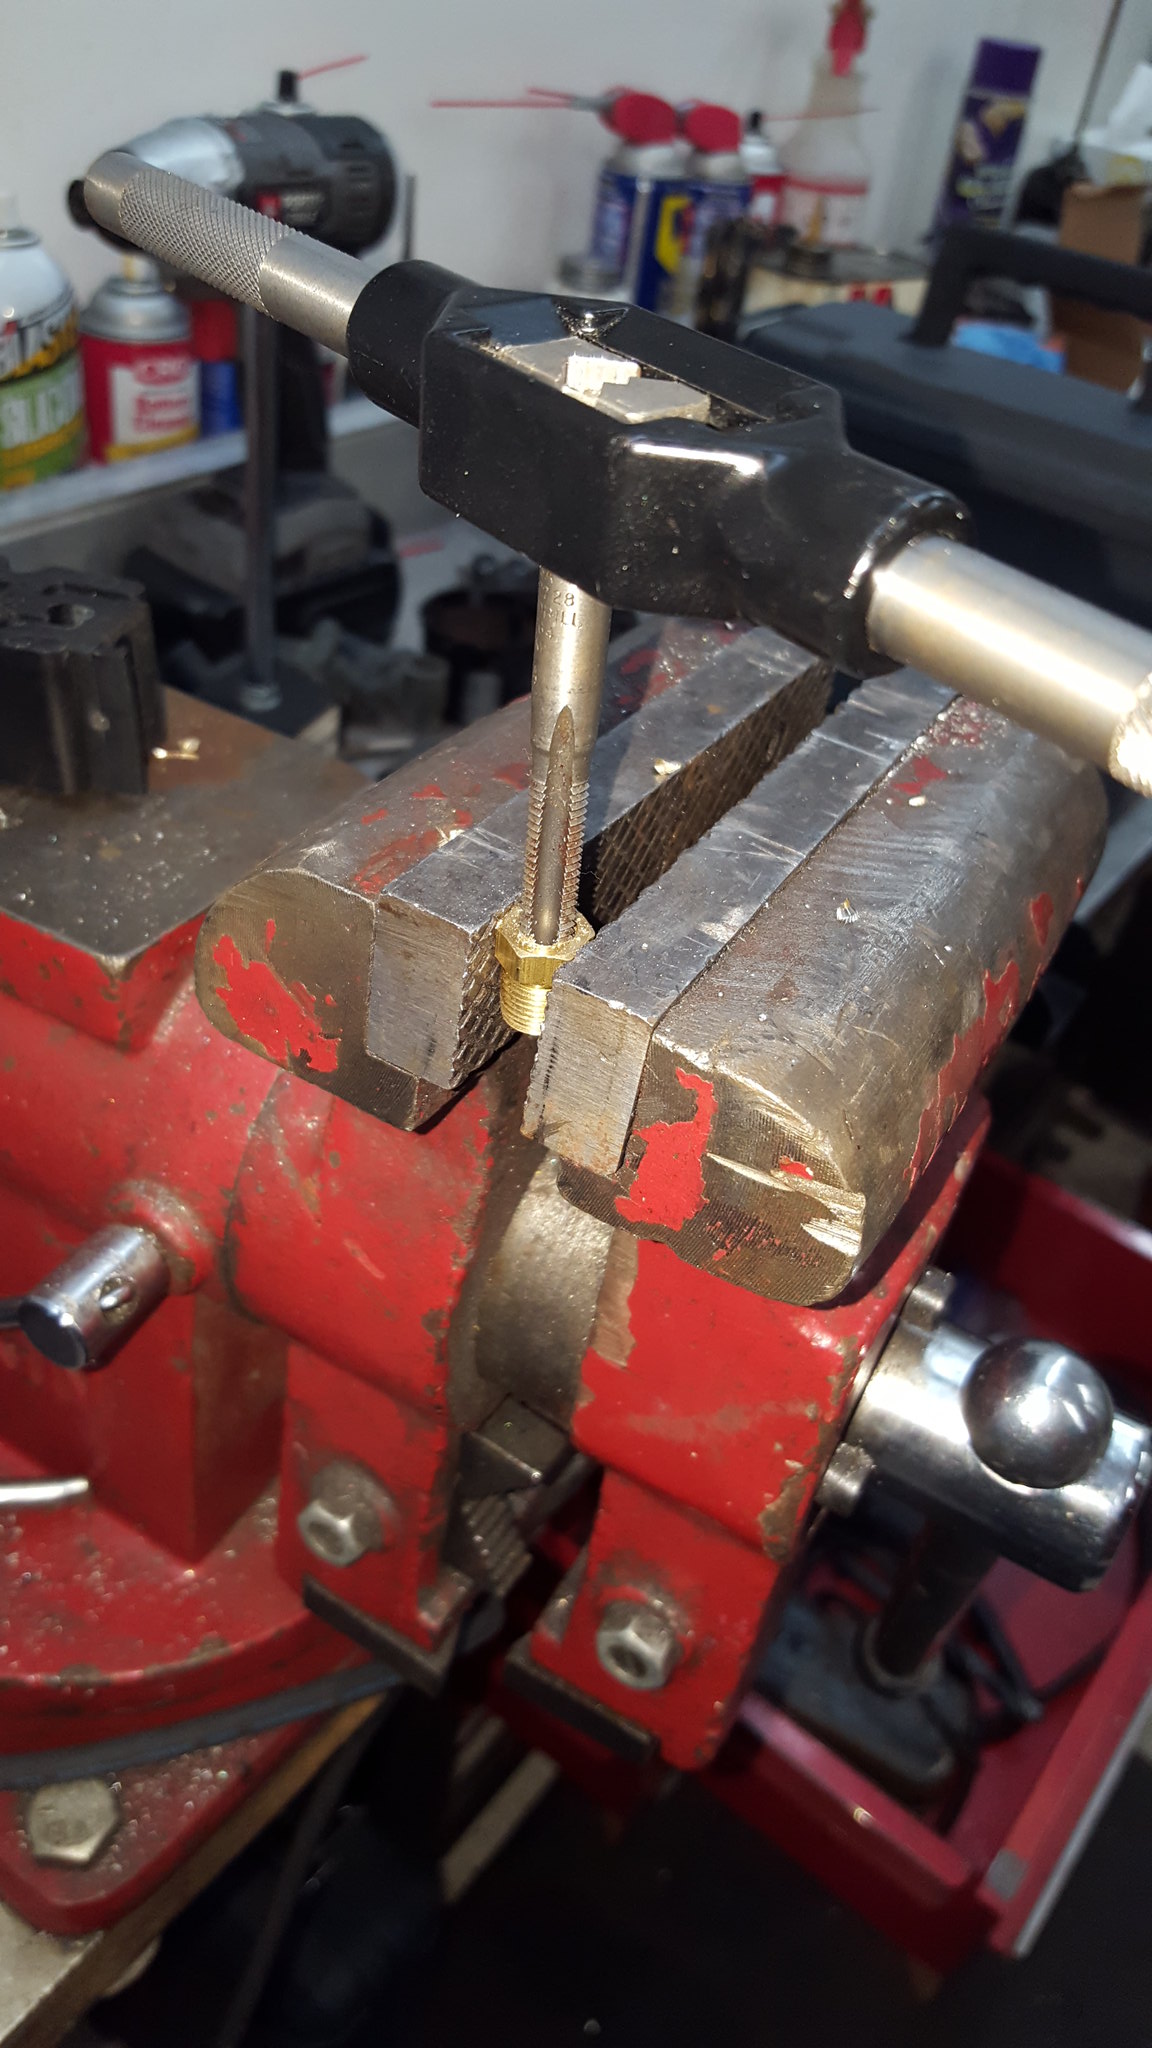
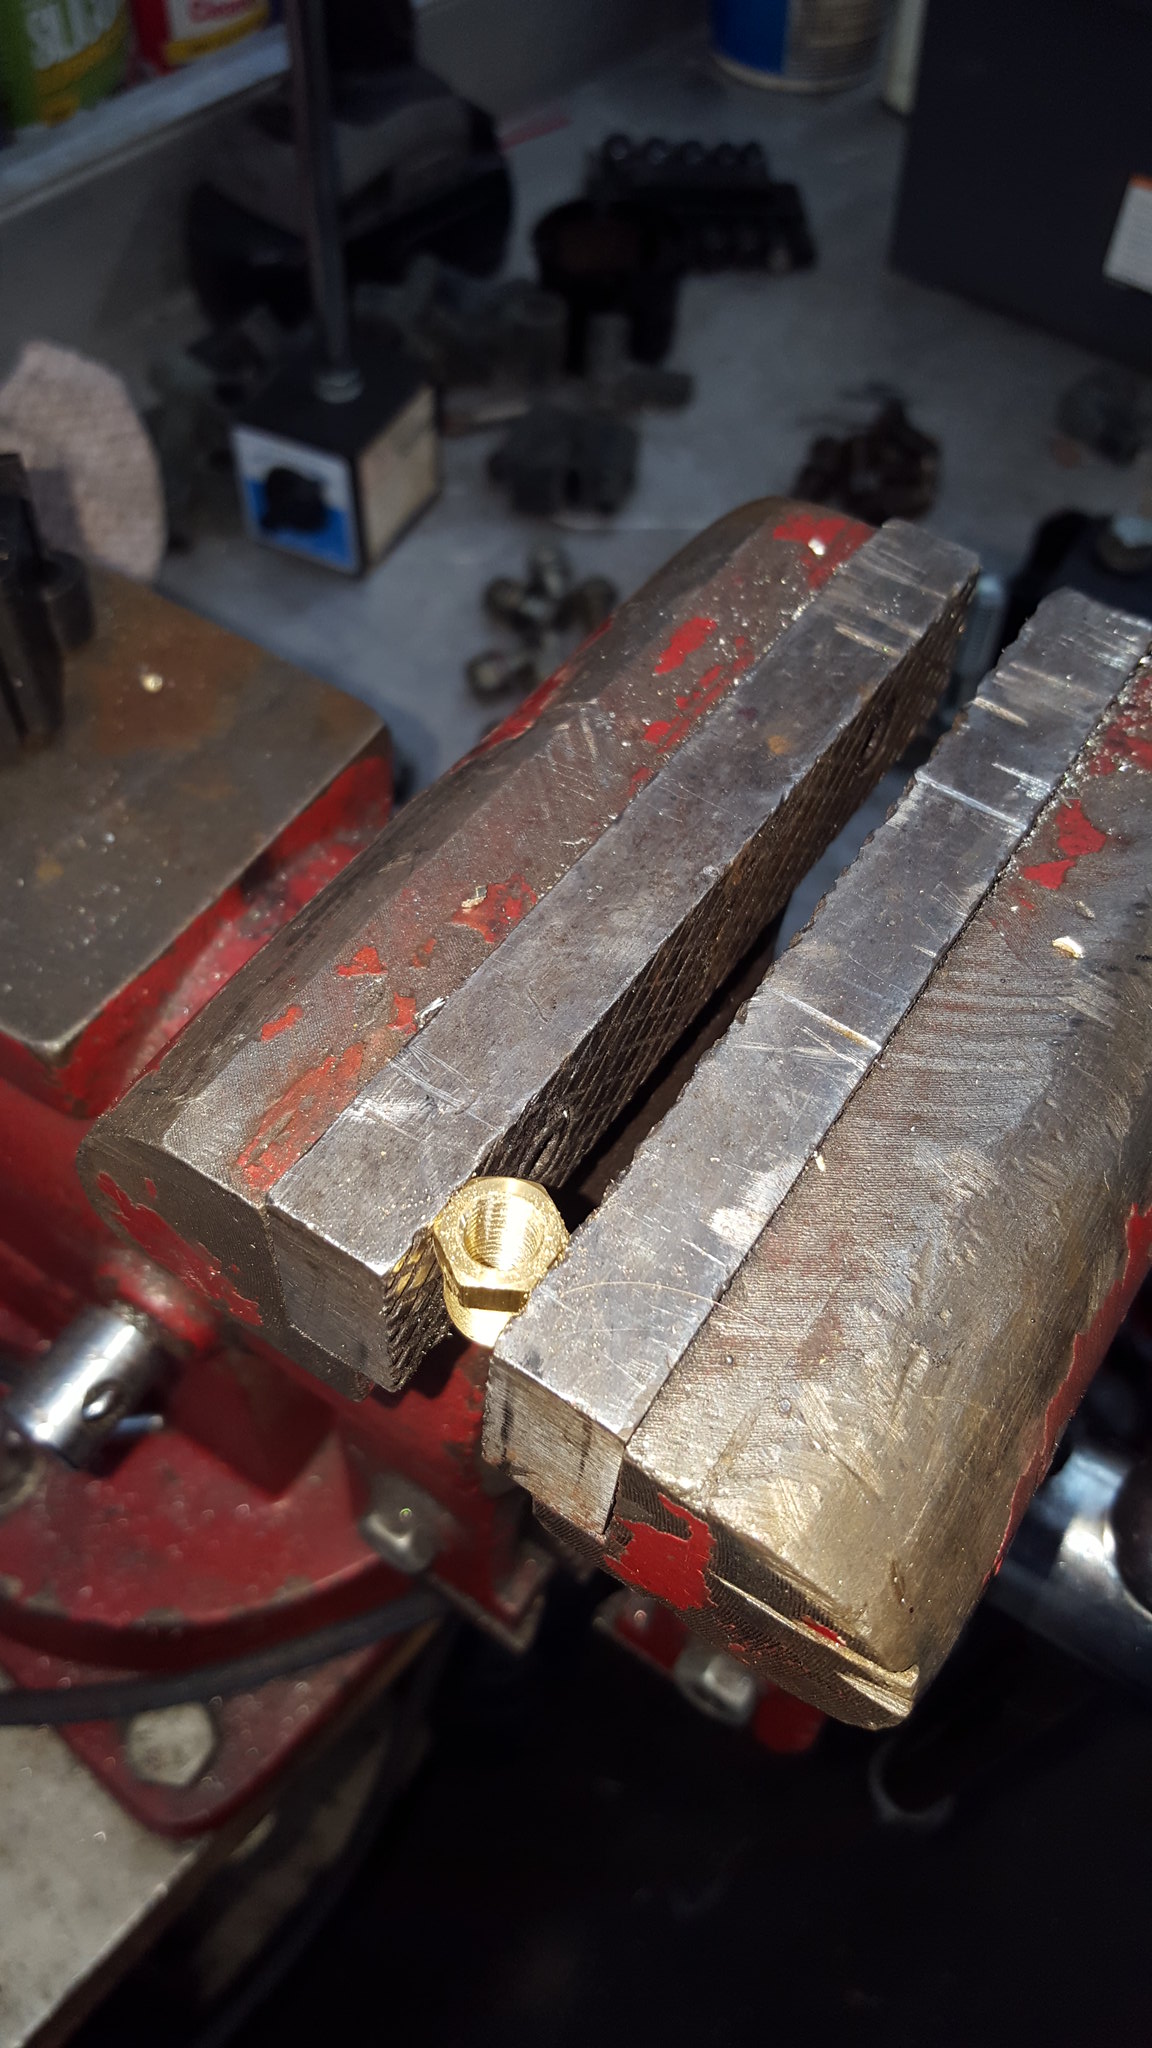
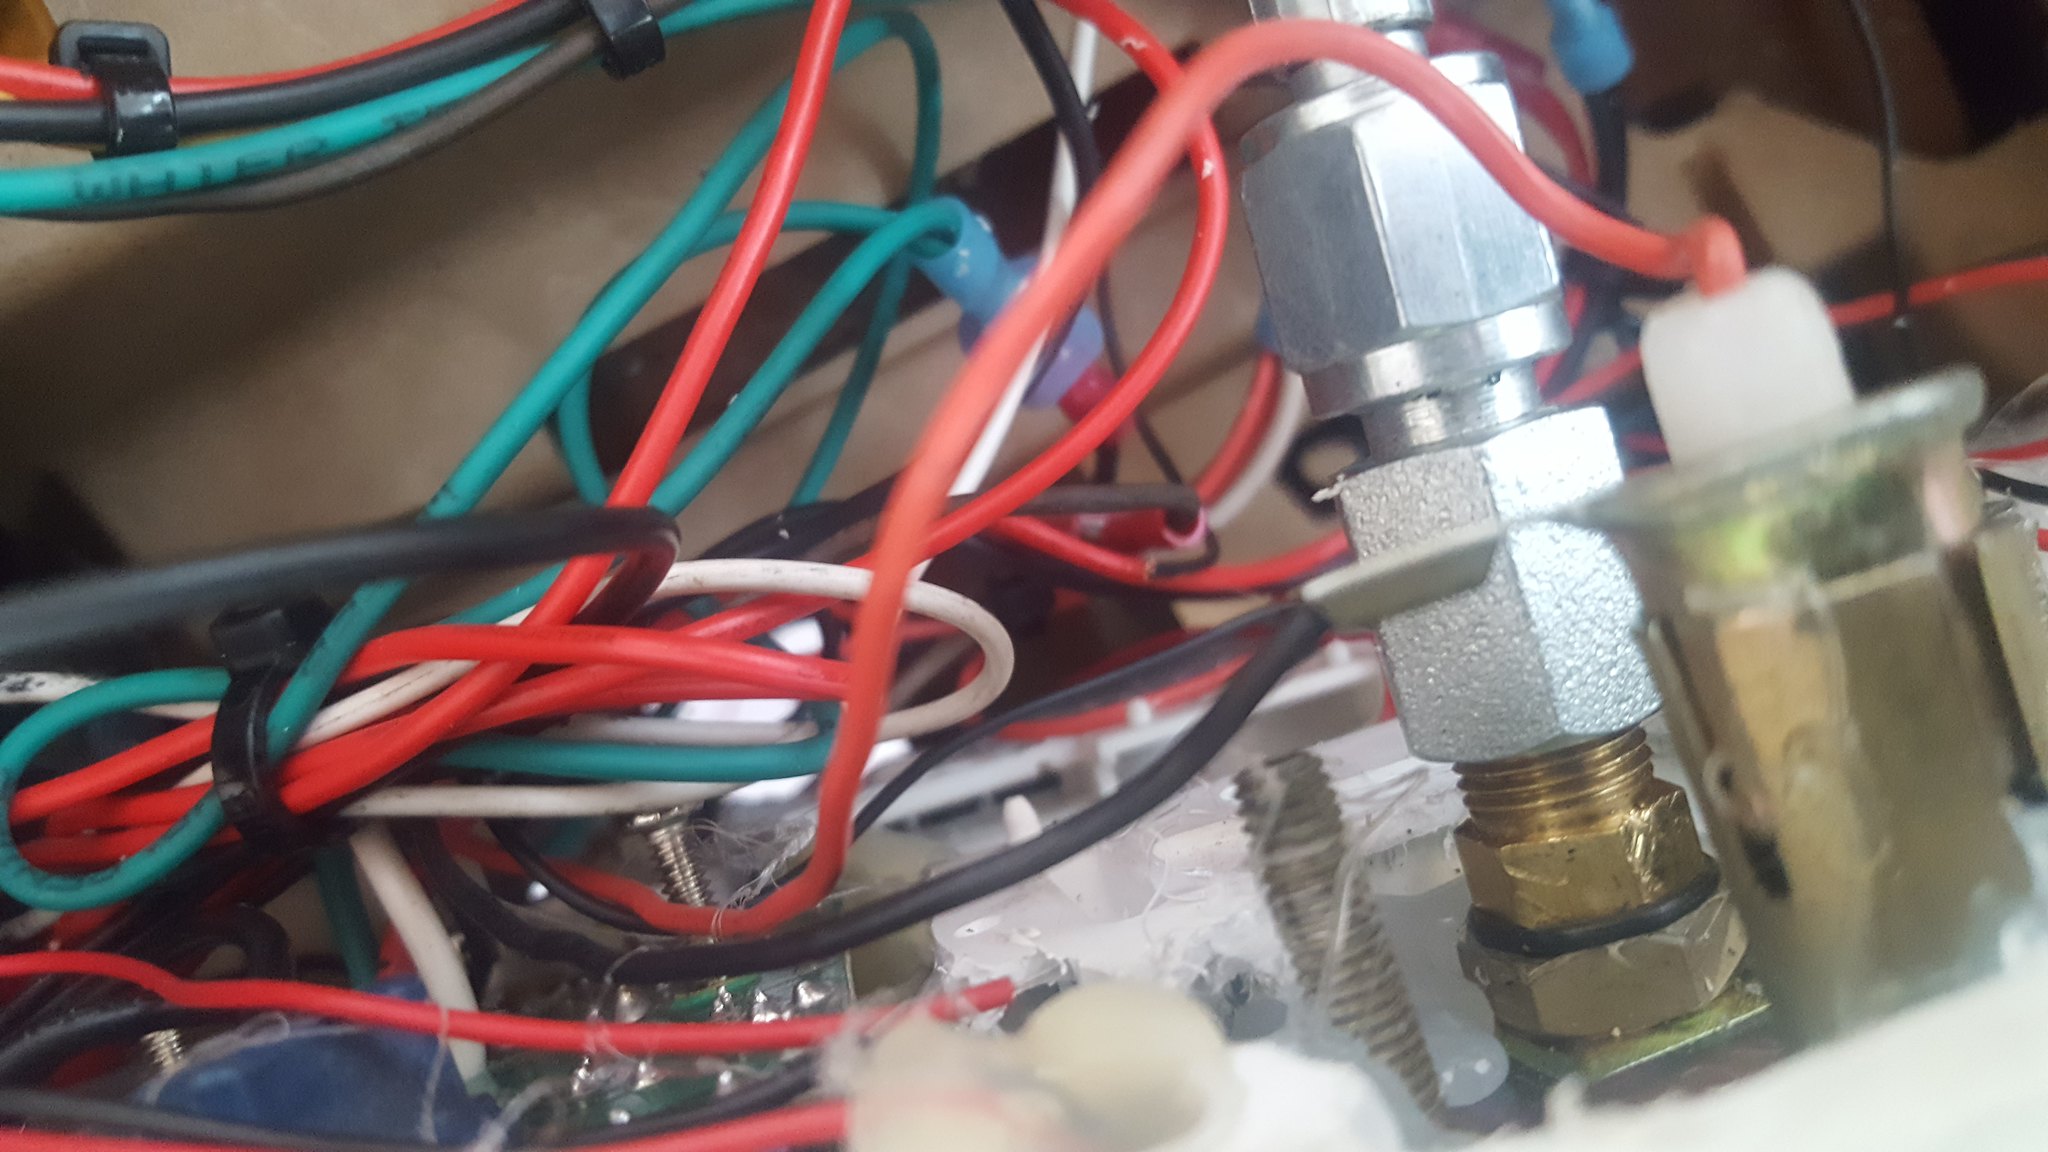
the kinked oil pressure line was really bothering me. The ultra-lites I bought, and then self traded for came with a braided line and a couple of fittings. The engine side fit my oil pressure sandwich plate fine, however the gauge end wouldn't fit. It was 1/8 female NPT, and the sunpro wasn't. So I bought a brass block off plug with a hex head for $.97, drilled, and tapped to make an o-ring sealing bushing (the threads were I think, 5/16 fine. Don't quote me)
 20181019_202159 by Michael Crawford, on Flickr
 20181026_194239 by Michael Crawford, on Flickr
 20181026_194626 by Michael Crawford, on Flickr
 20181104_105634 by Michael Crawford, on Flickr
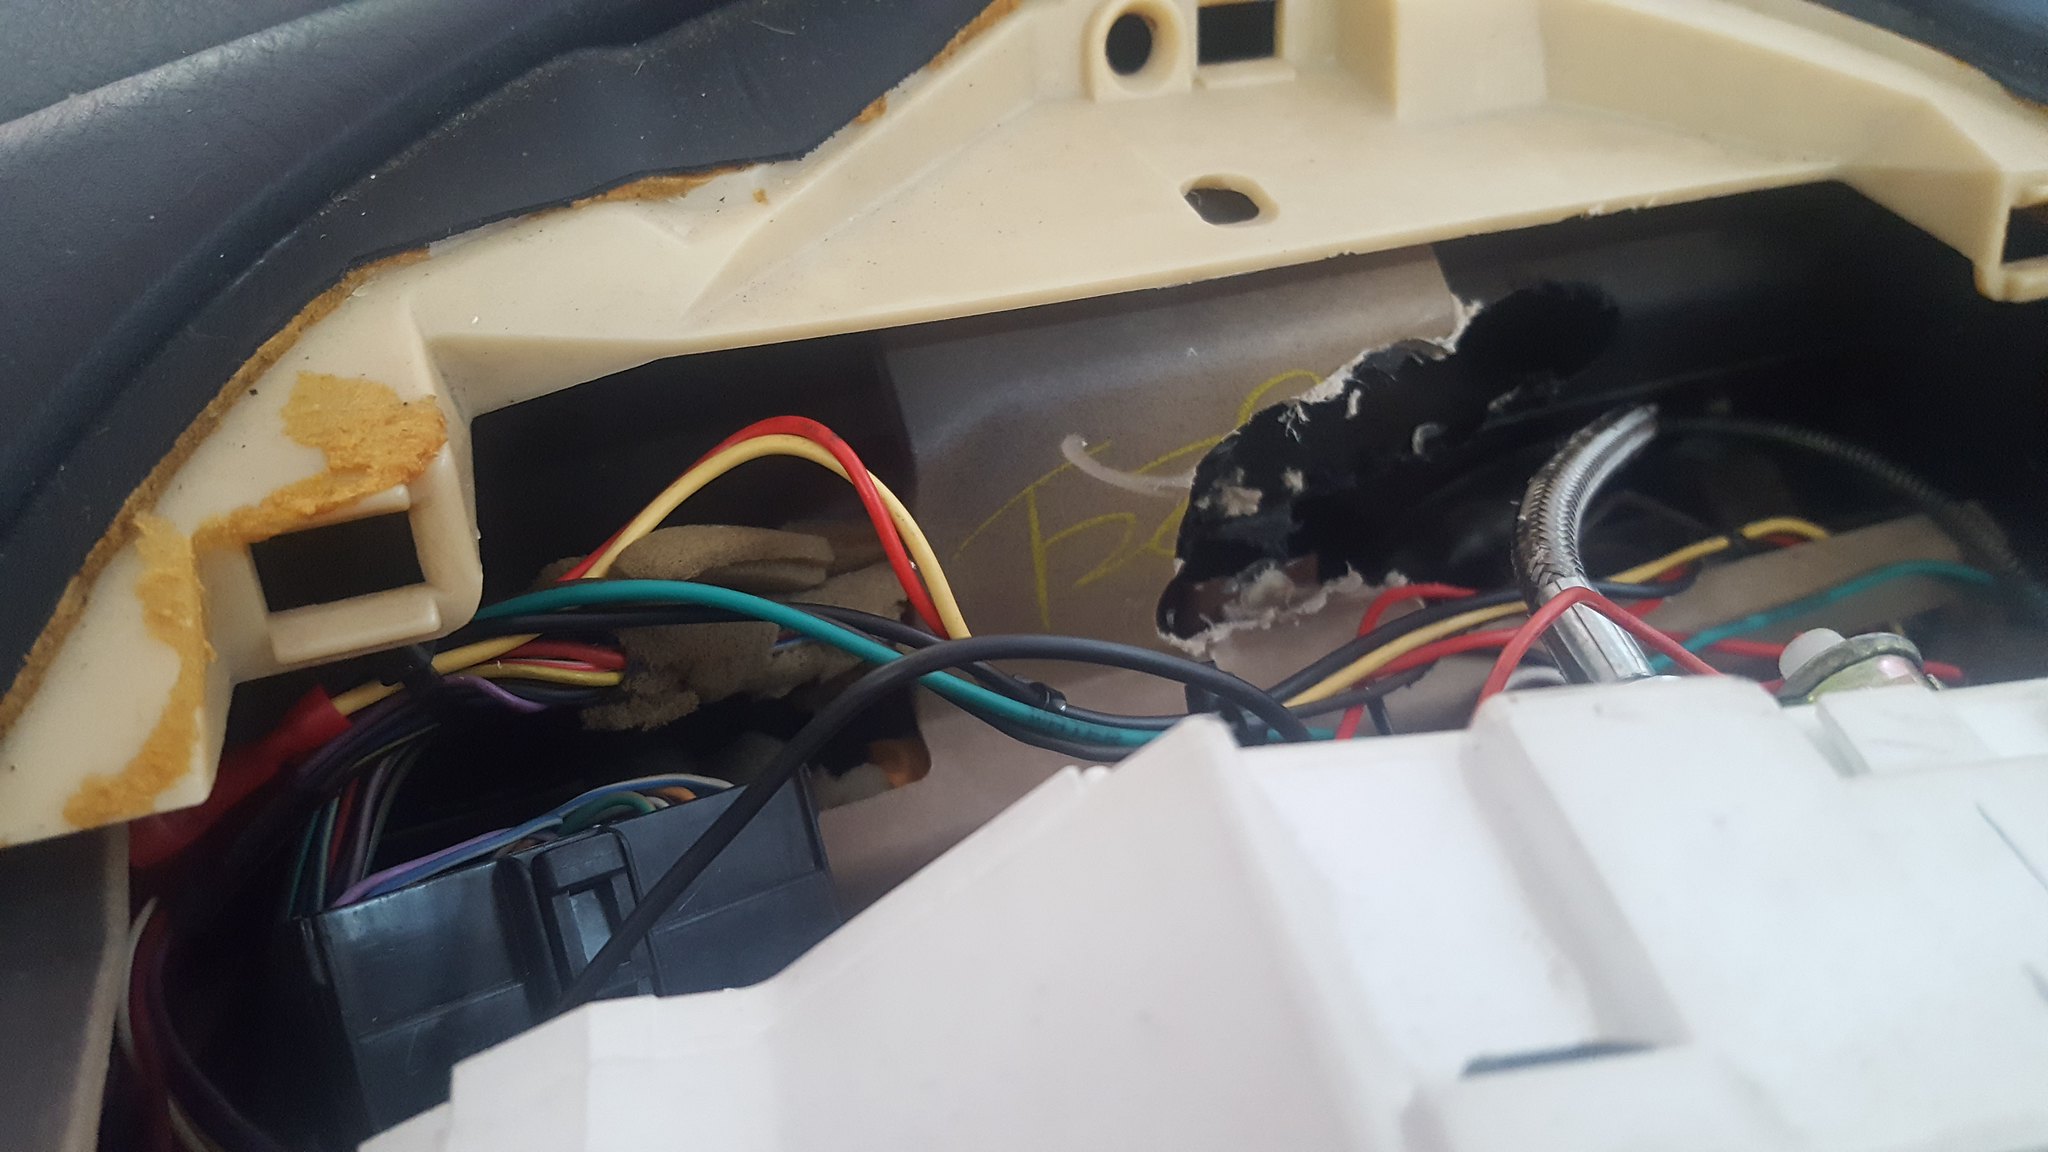
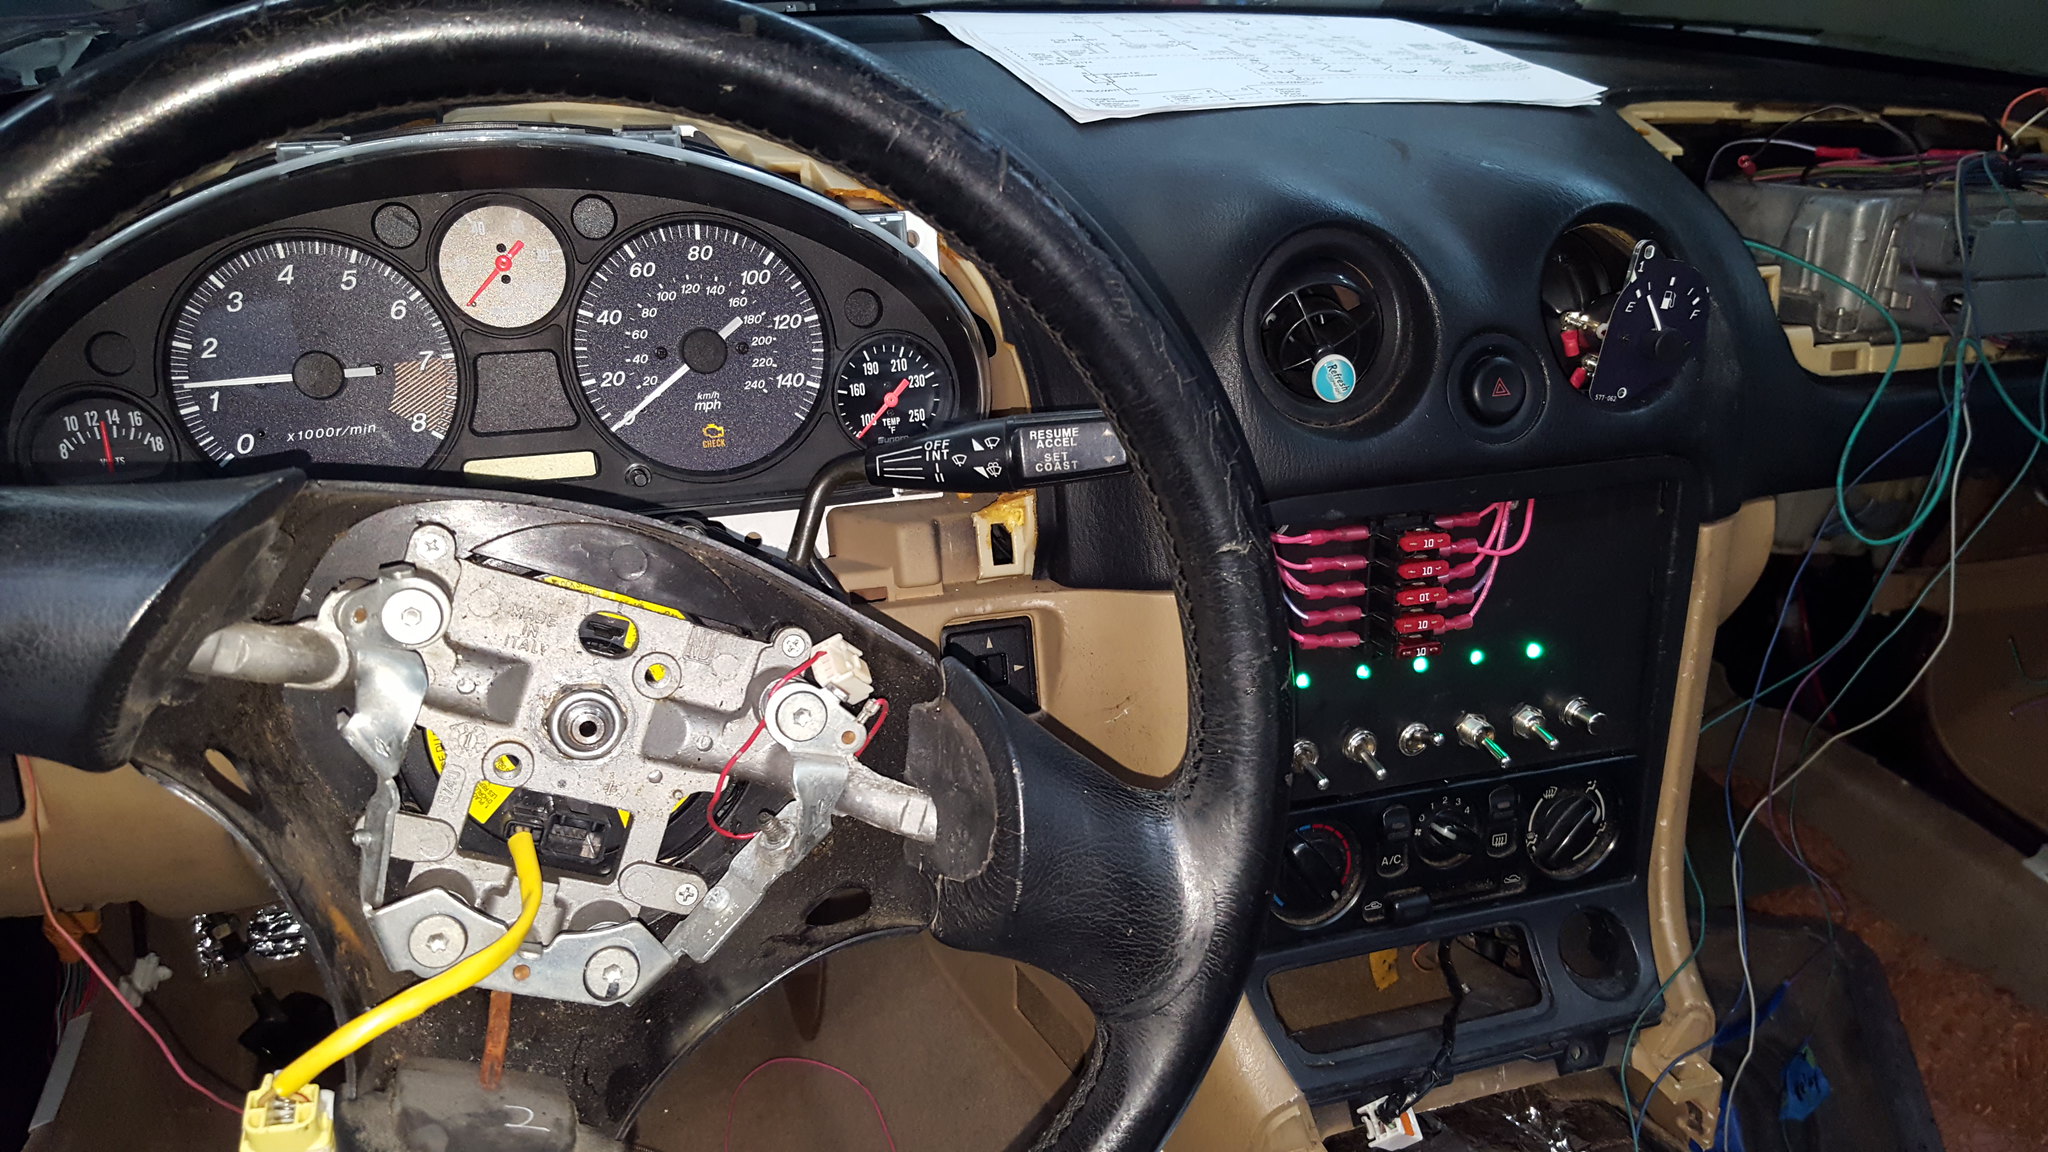
had to make some clearance for it behind the instrument panel.
 20181104_105627 by Michael Crawford, on Flickr
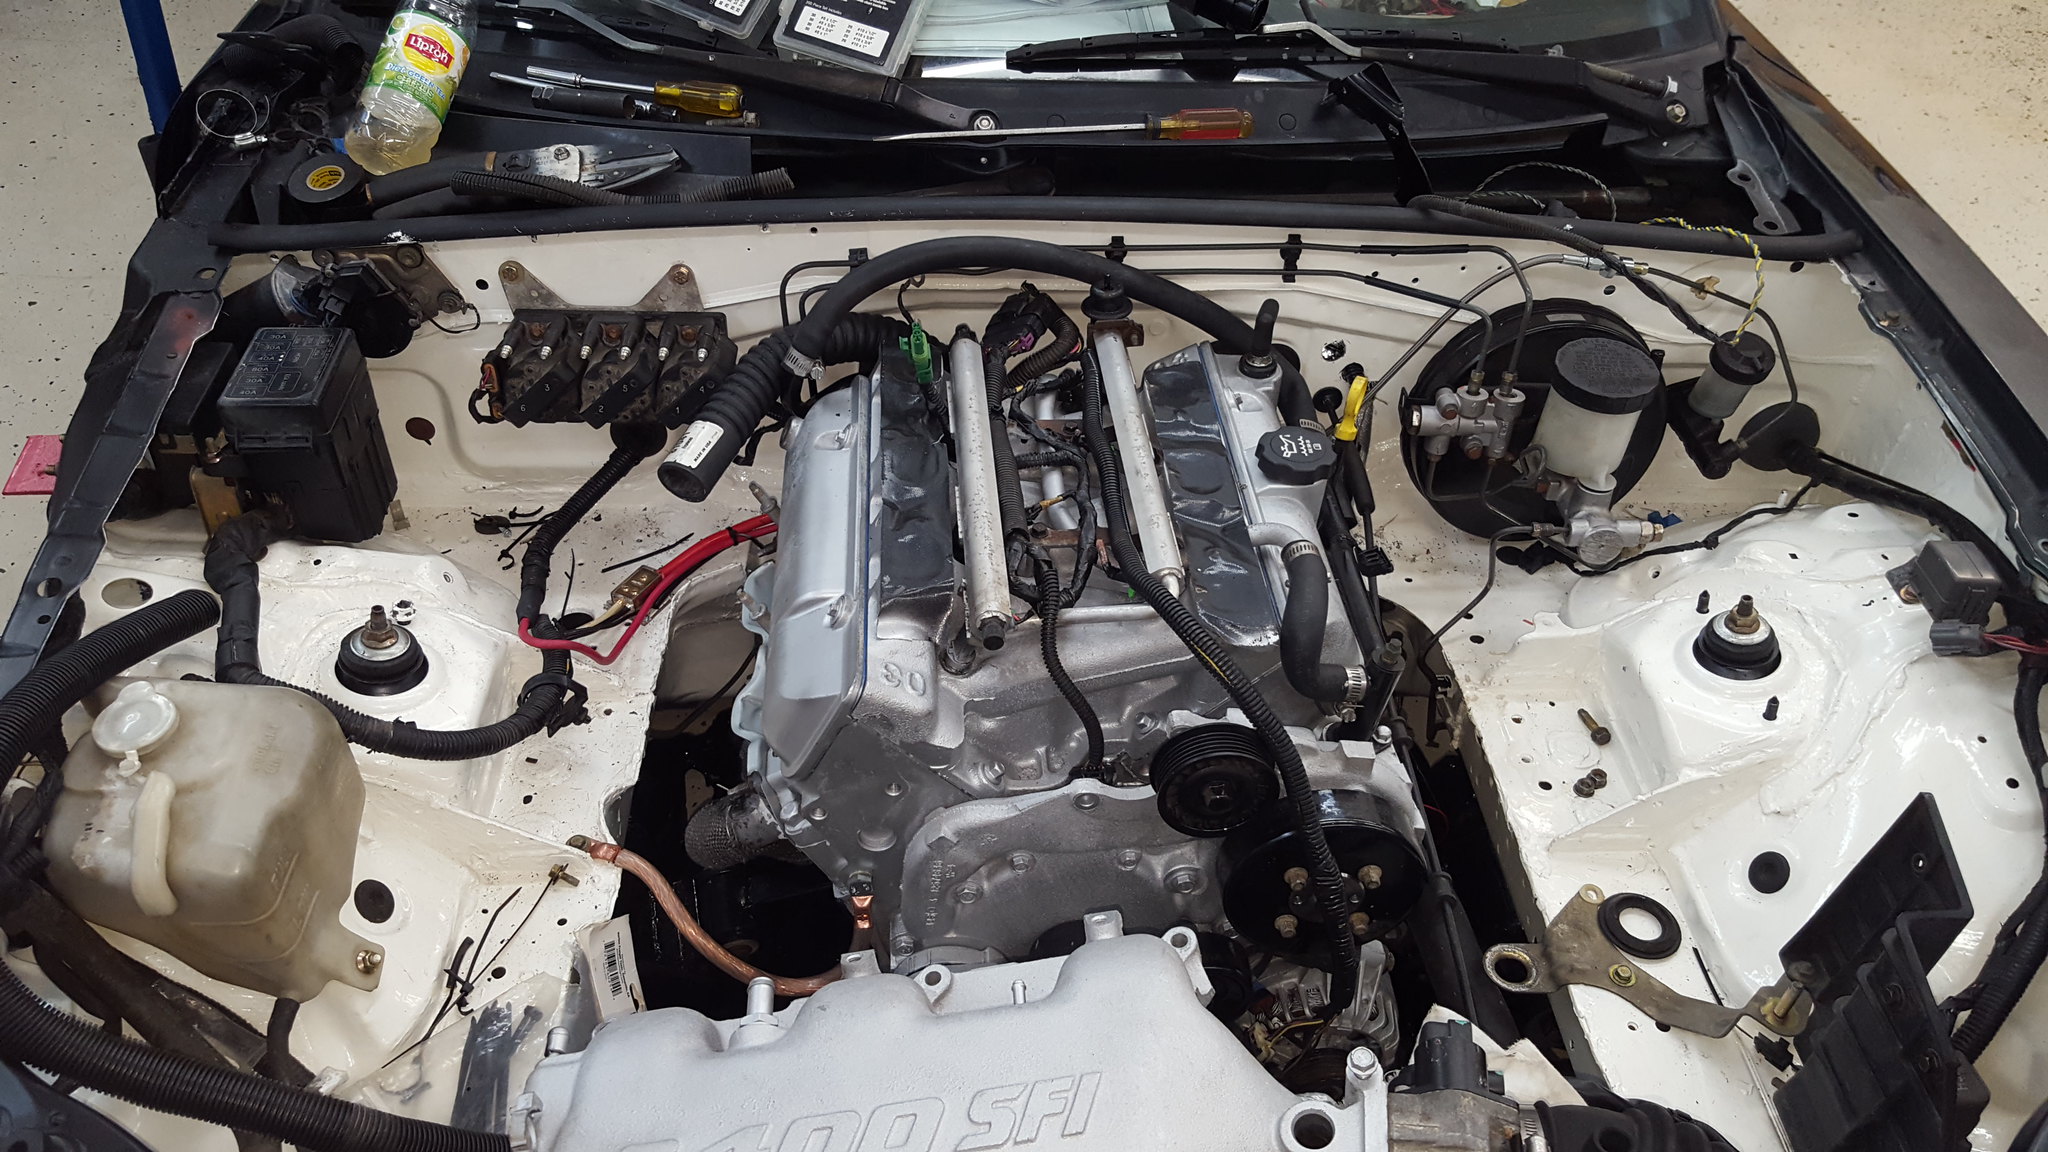
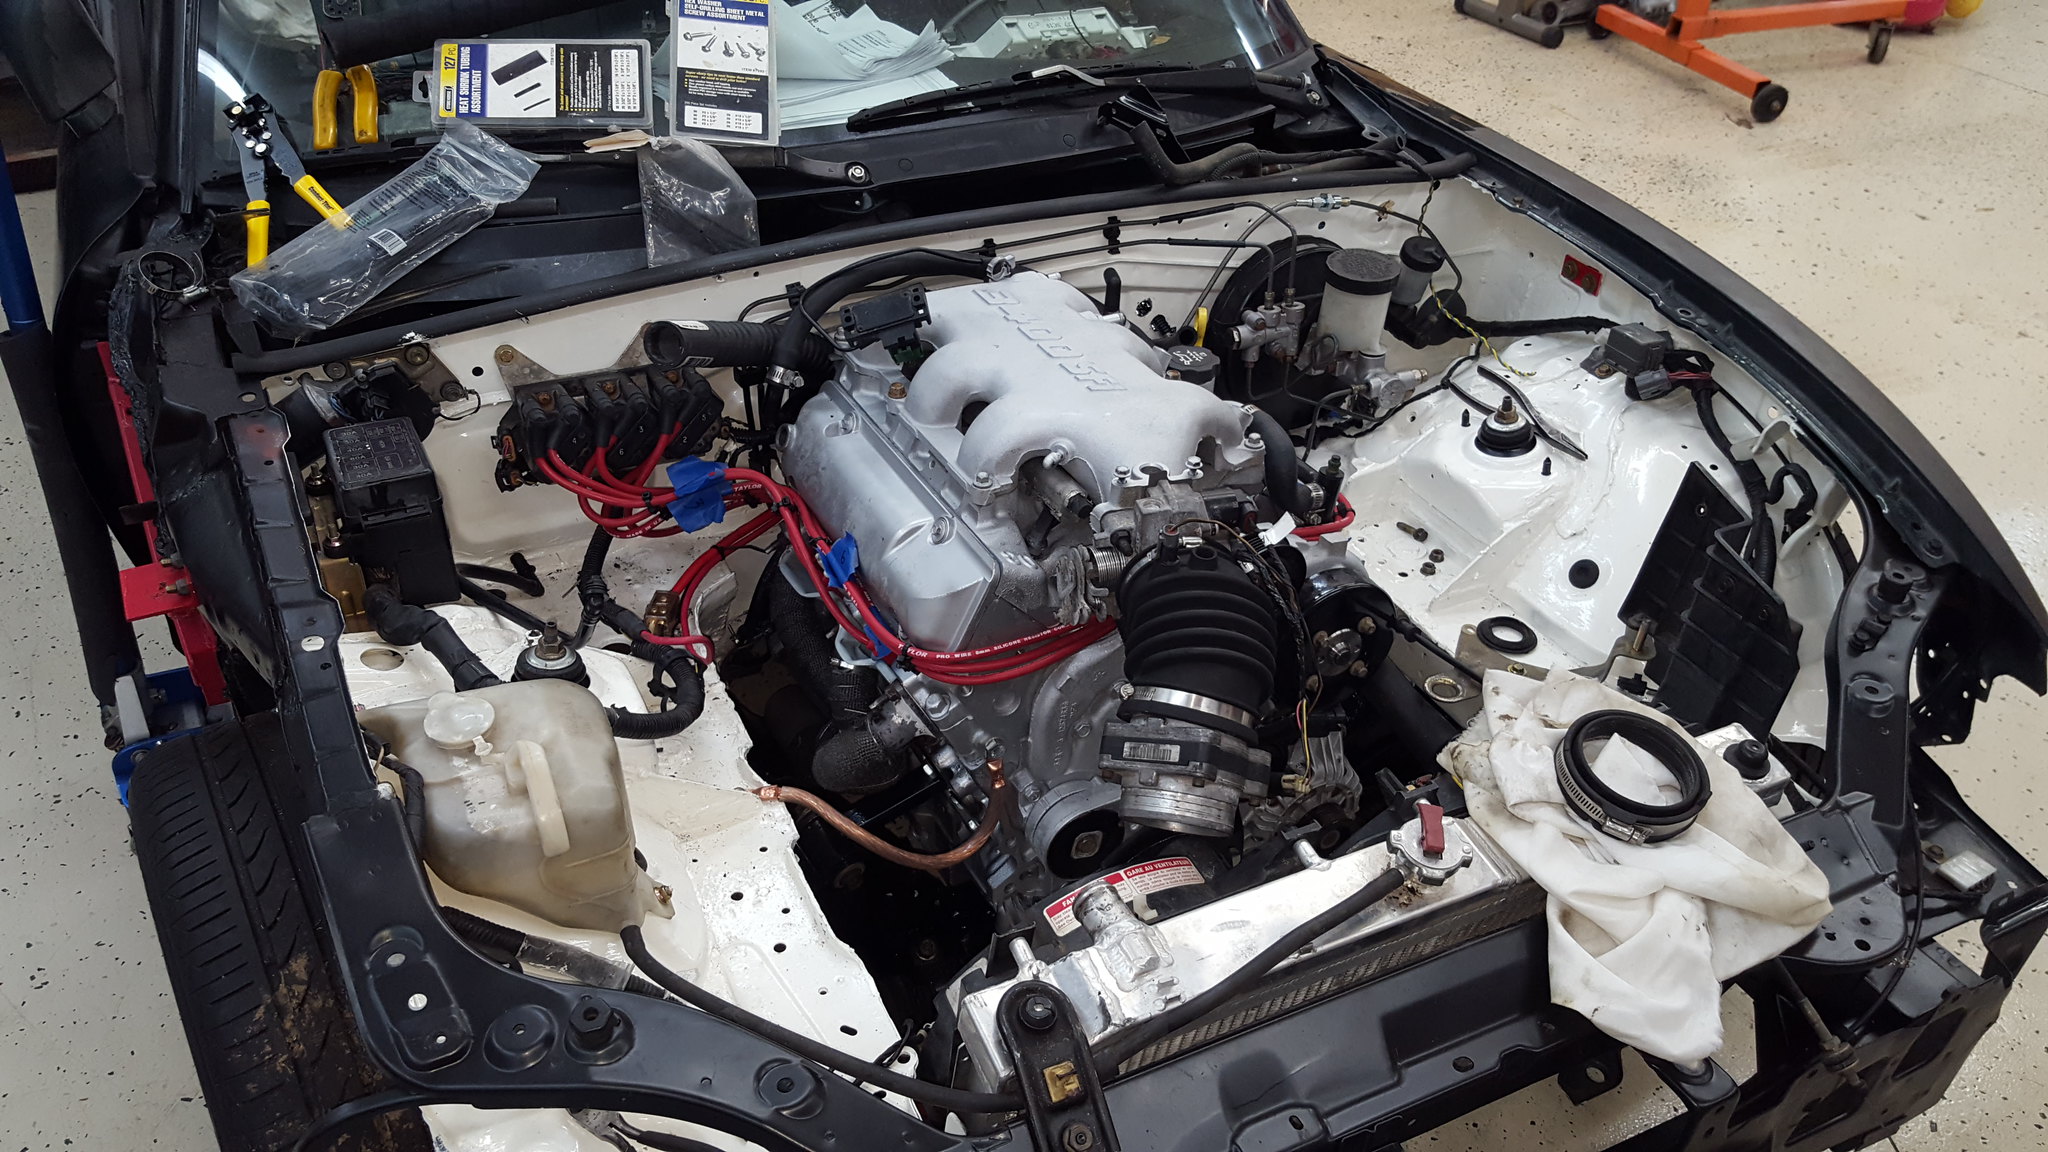
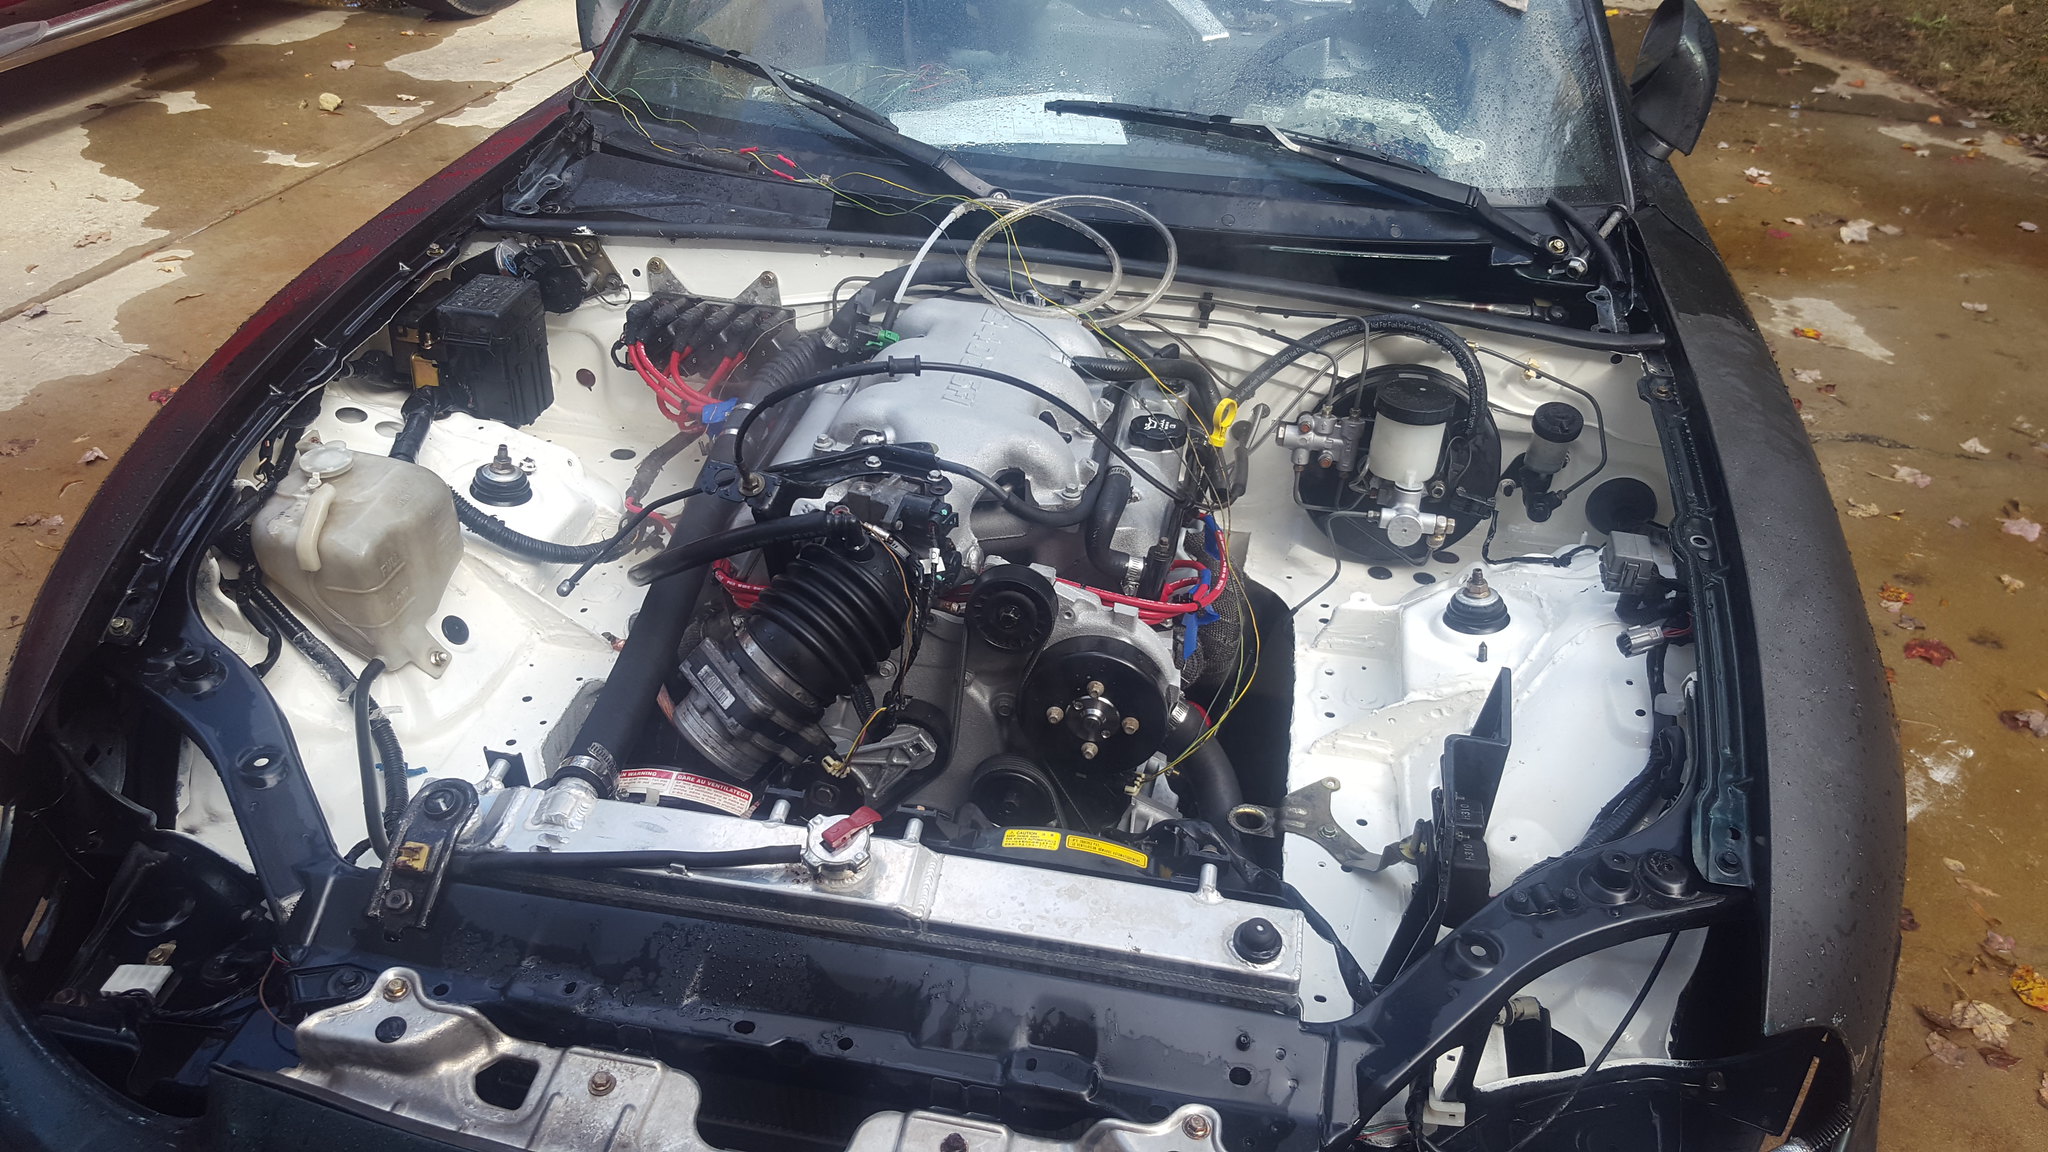
next, wiring and engine bay stuff.
Obviosly, youve seen that the engine is together and wired. But here's some details.
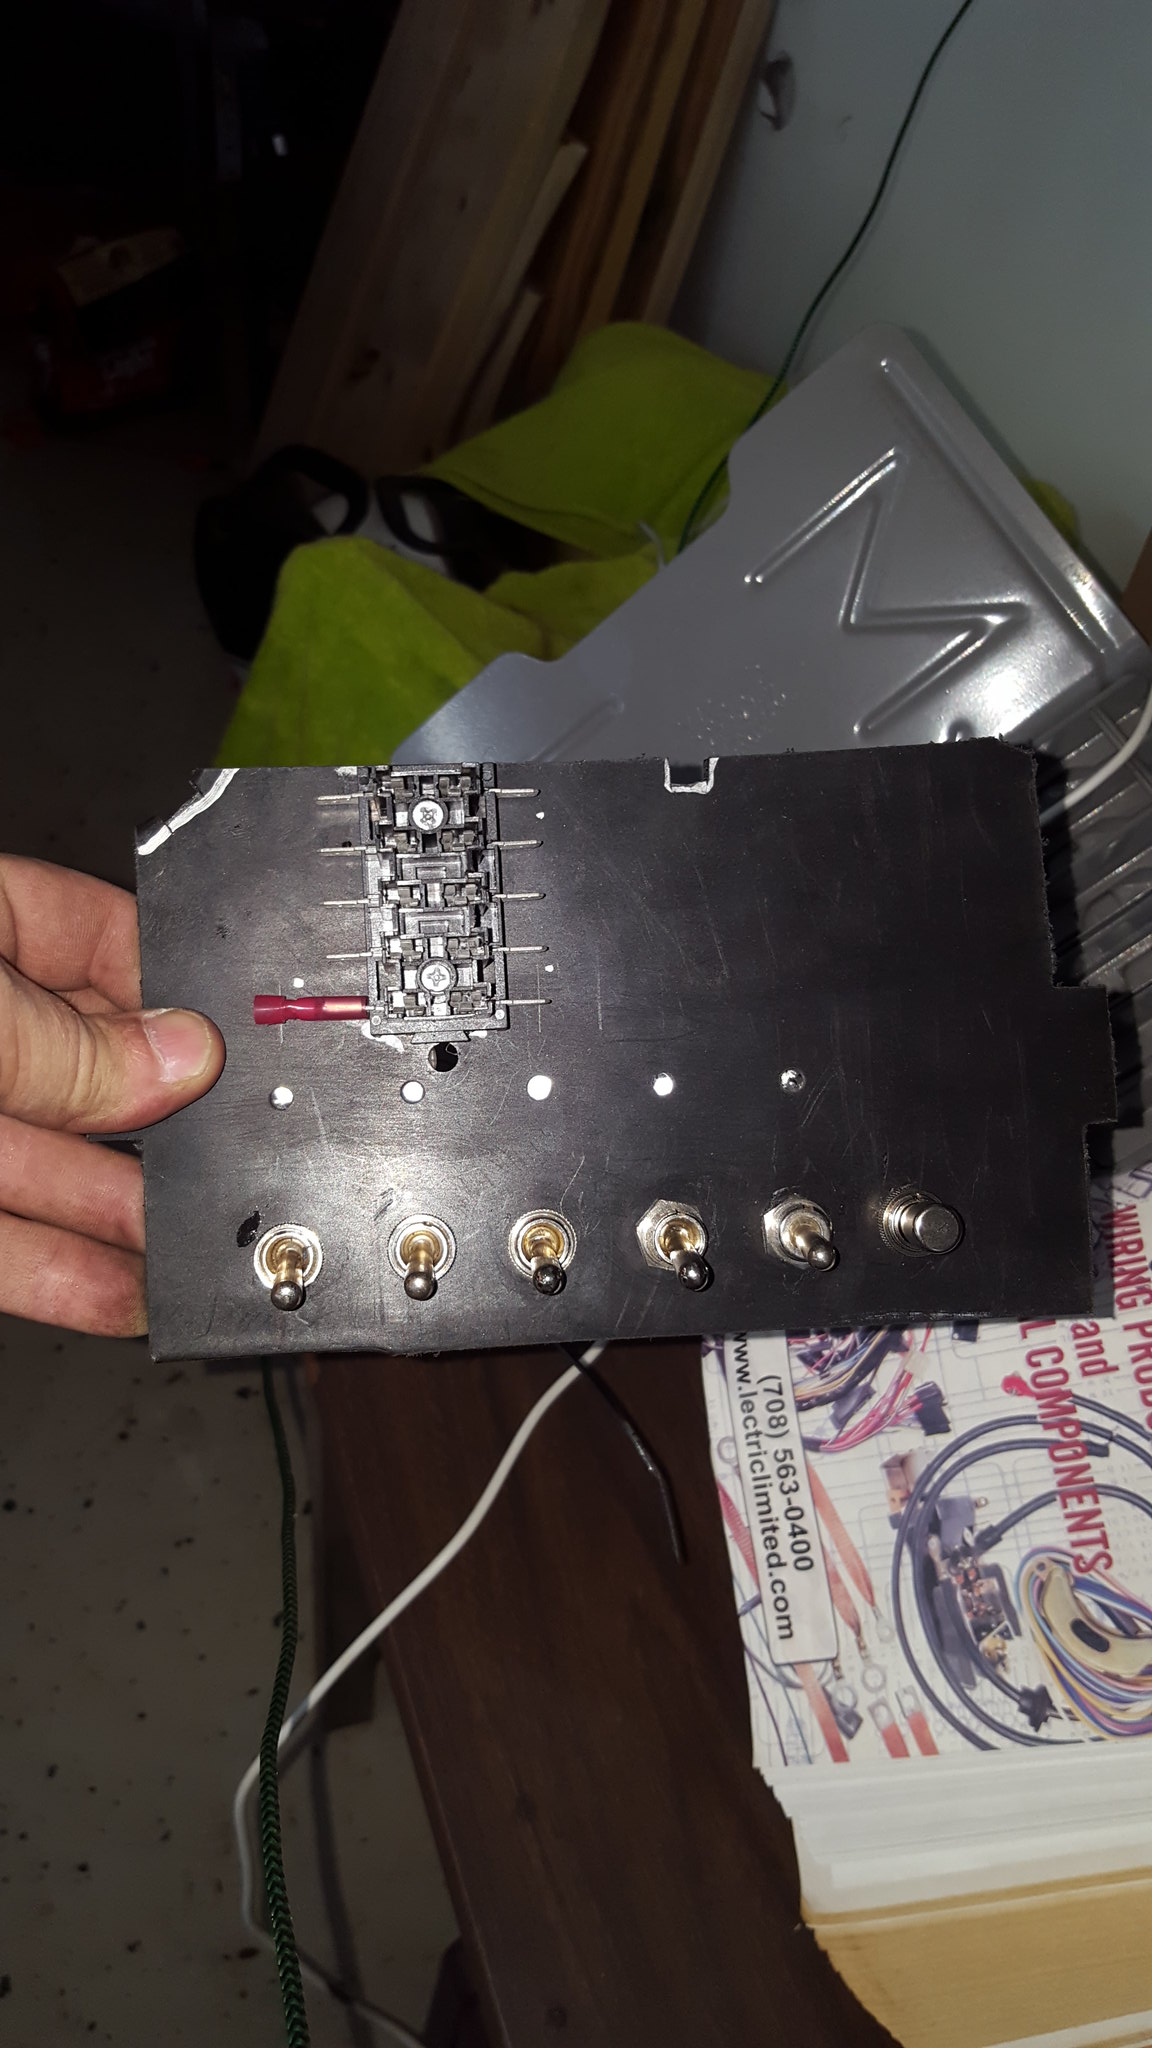
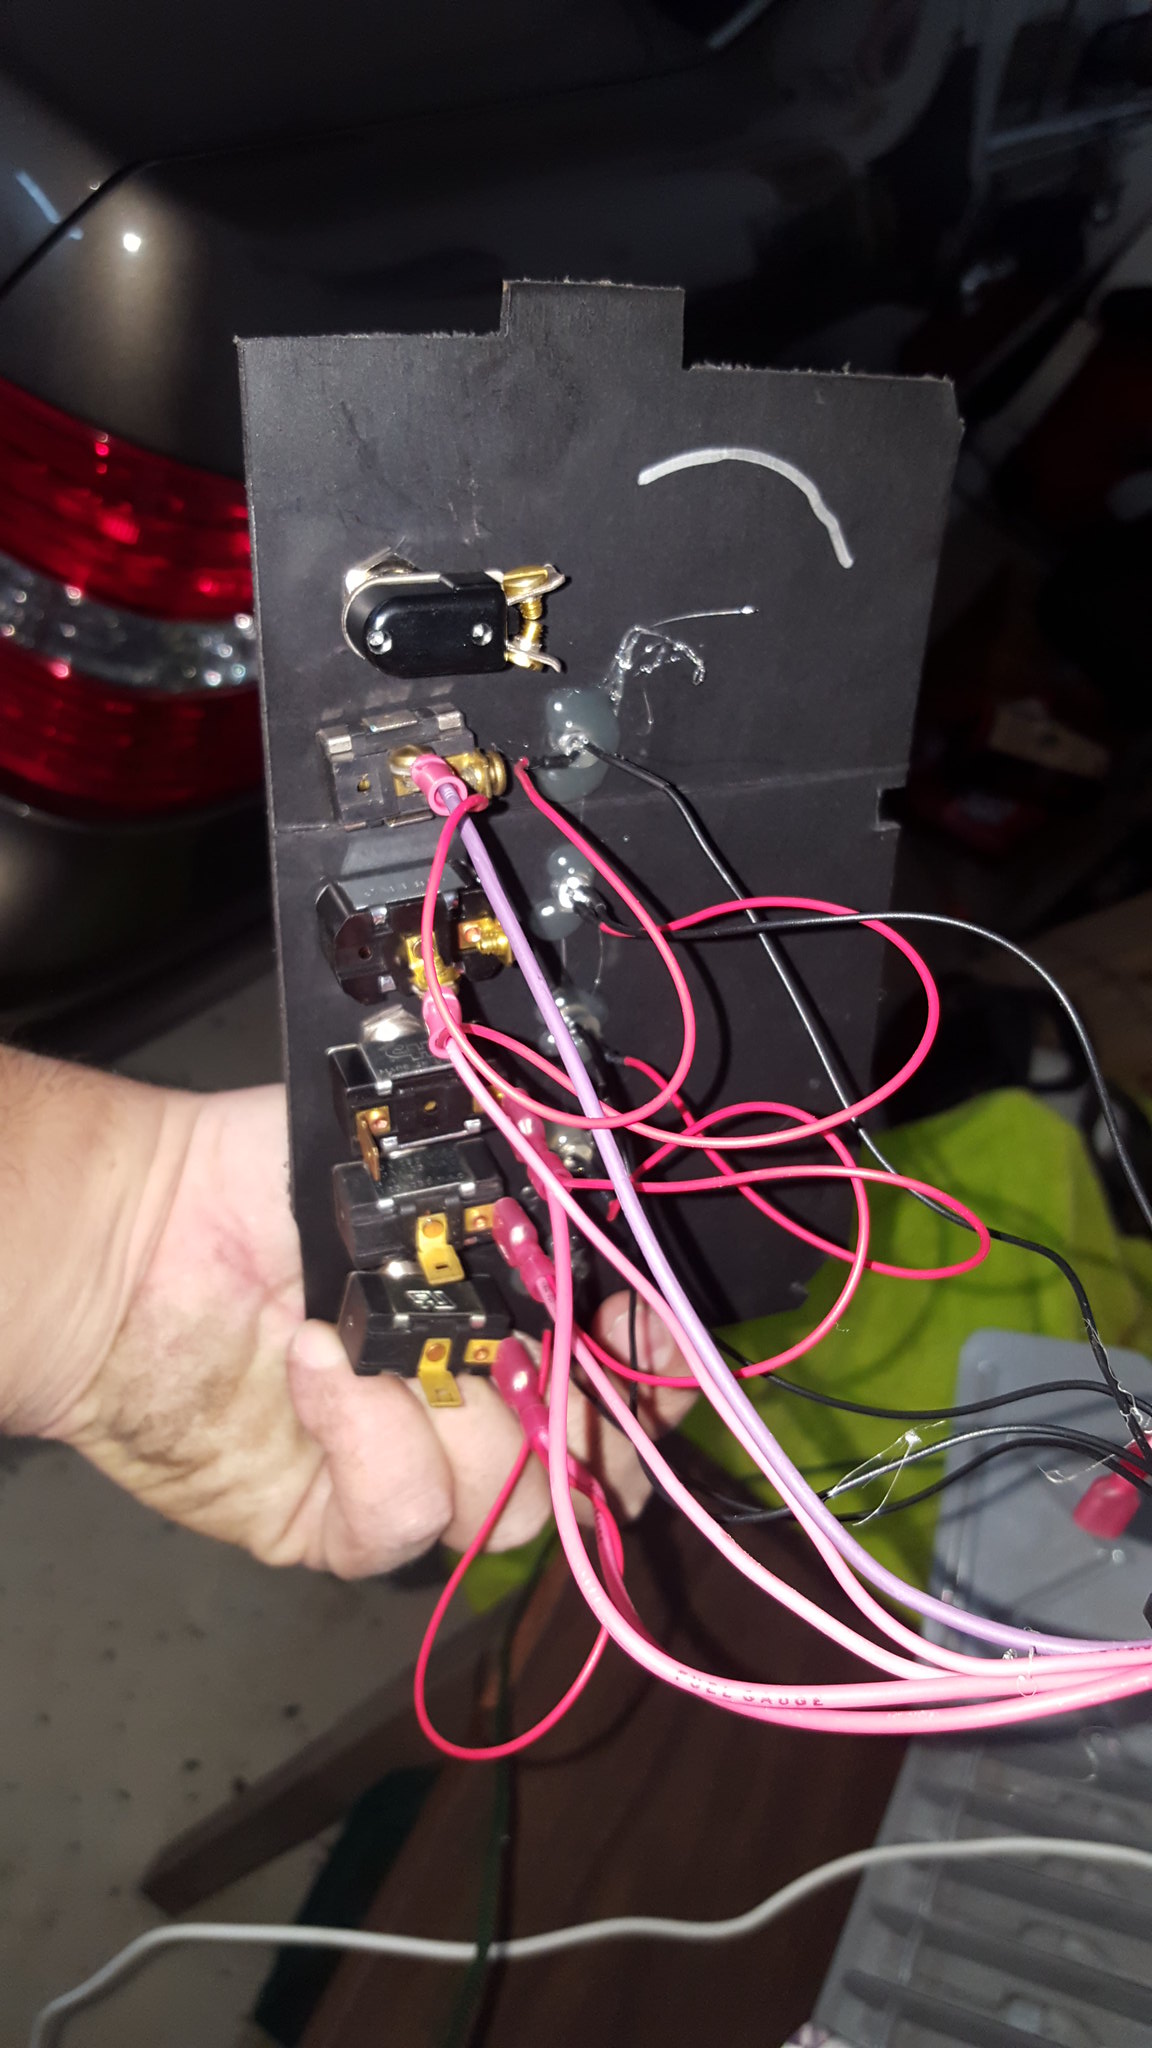
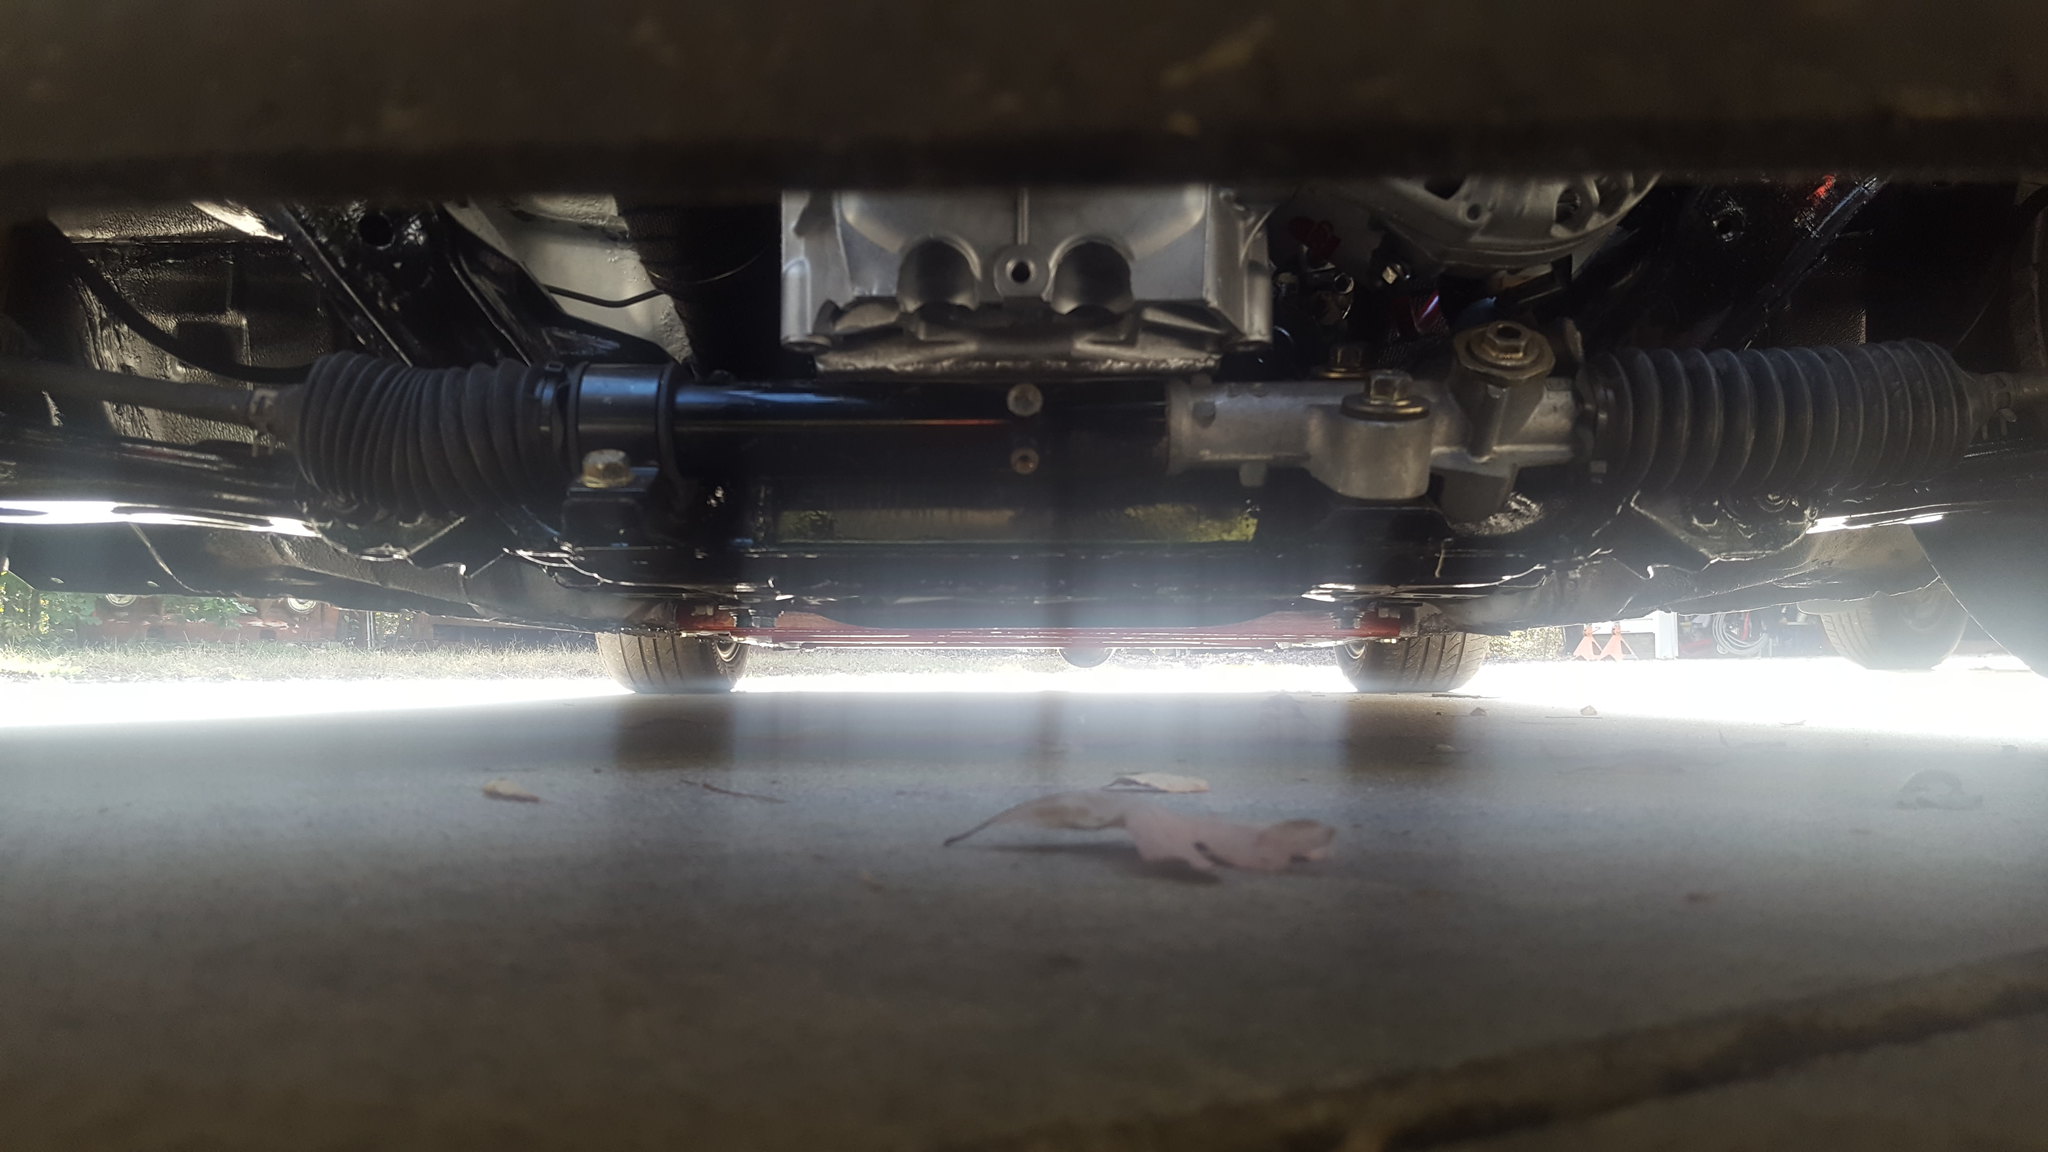
The ECM is run almost completely independent from the chassis. Only crossover points are the fan relays, fuel pump relay, OBD2 port, and instrument panel. I built a switch panel from scrap plastic, a free pull-a-part fuse block, some leftover LEDs, and used toggles. It has only now dawned on me that I could have relayed the fuse block, and made life much simpler. Thats revision 2 coming soon. Anyway, I did my best to make the whole engine bay side of things clean, neat, and mostly hidden. Routed the plug wires with zip tie looms, and trying my best to make the hoses neat and tidy (haven't done the fuel pressure regulator/MAP/crankcase vent yet). I'm happy with how its coming out for the most part.
 20181019_190432 by Michael Crawford, on Flickr
 20181019_190437 by Michael Crawford, on Flickr
 20181019_202227 by Michael Crawford, on Flickr
 20181021_102253 by Michael Crawford, on Flickr
 20181023_170526 by Michael Crawford, on Flickr
 20181023_180020 by Michael Crawford, on Flickr
 20181025_191007 by Michael Crawford, on Flickr
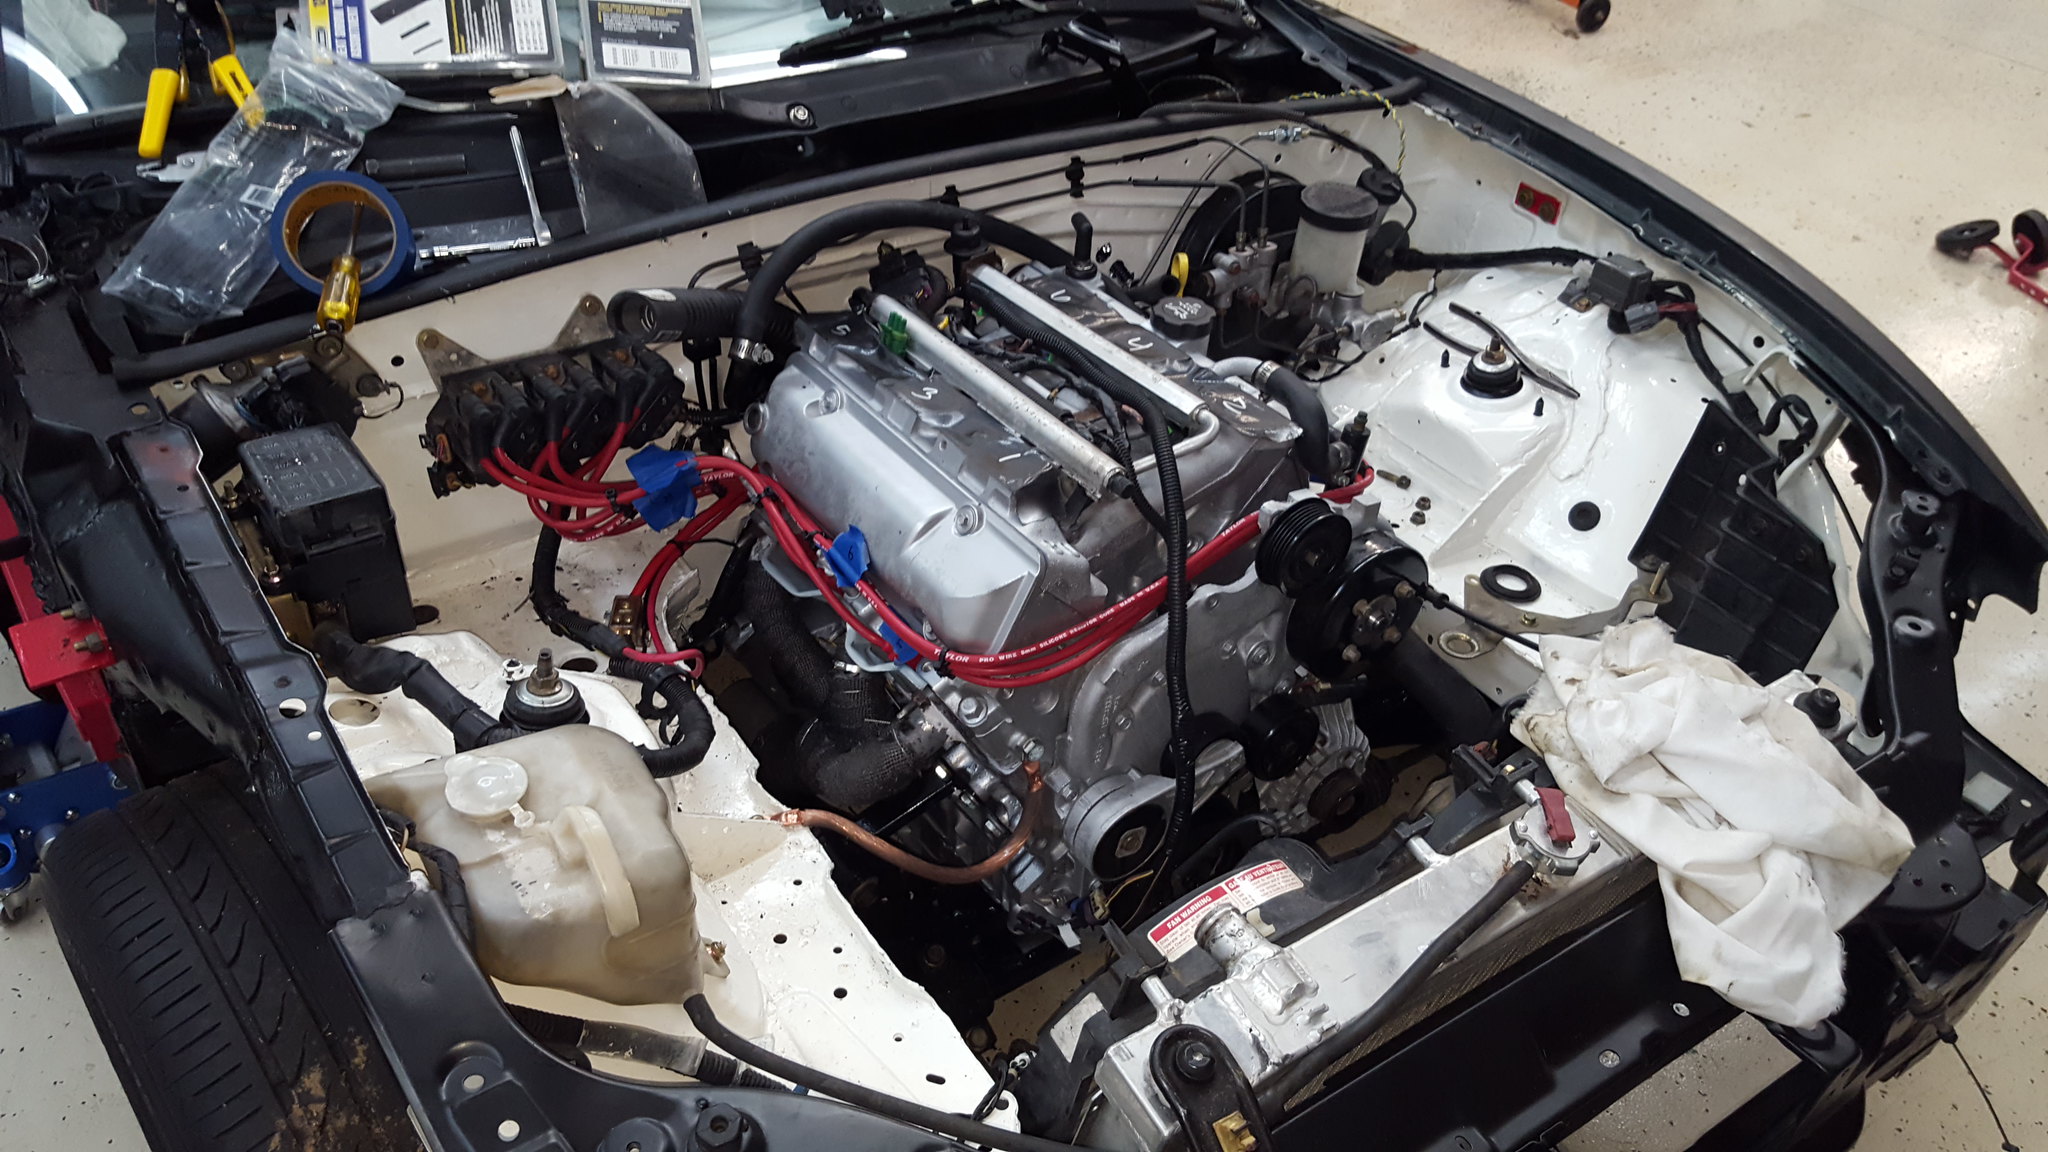
this brings us up to exhaust. At the end of the post will be a few YouTube links. Needless to say, exhaust on this was NOT optional. We were shooting fireballs from the open headers. But it RUNS now, and actually sounds good. I had to tweak the exhaust upon re-installation for no obvious reason, except the one where I forgot an oxygen sensor bung. But for no good reason the midpipes were now too short, so I had to extend the legs of my merge collector. And I also cut the mushroom heads off the hangars to make install and removal of the rear section easier. I also had to move the collector down towards the butterfly brace so it would stop hitting the driveshaft.
But its done now, and sounds GOOD. to me it sounds a lot like an indy car.
 20181104_105836 by Michael Crawford, on Flickr
 20181104_105844 by Michael Crawford, on Flickr
 20181104_105827 by Michael Crawford, on Flickr
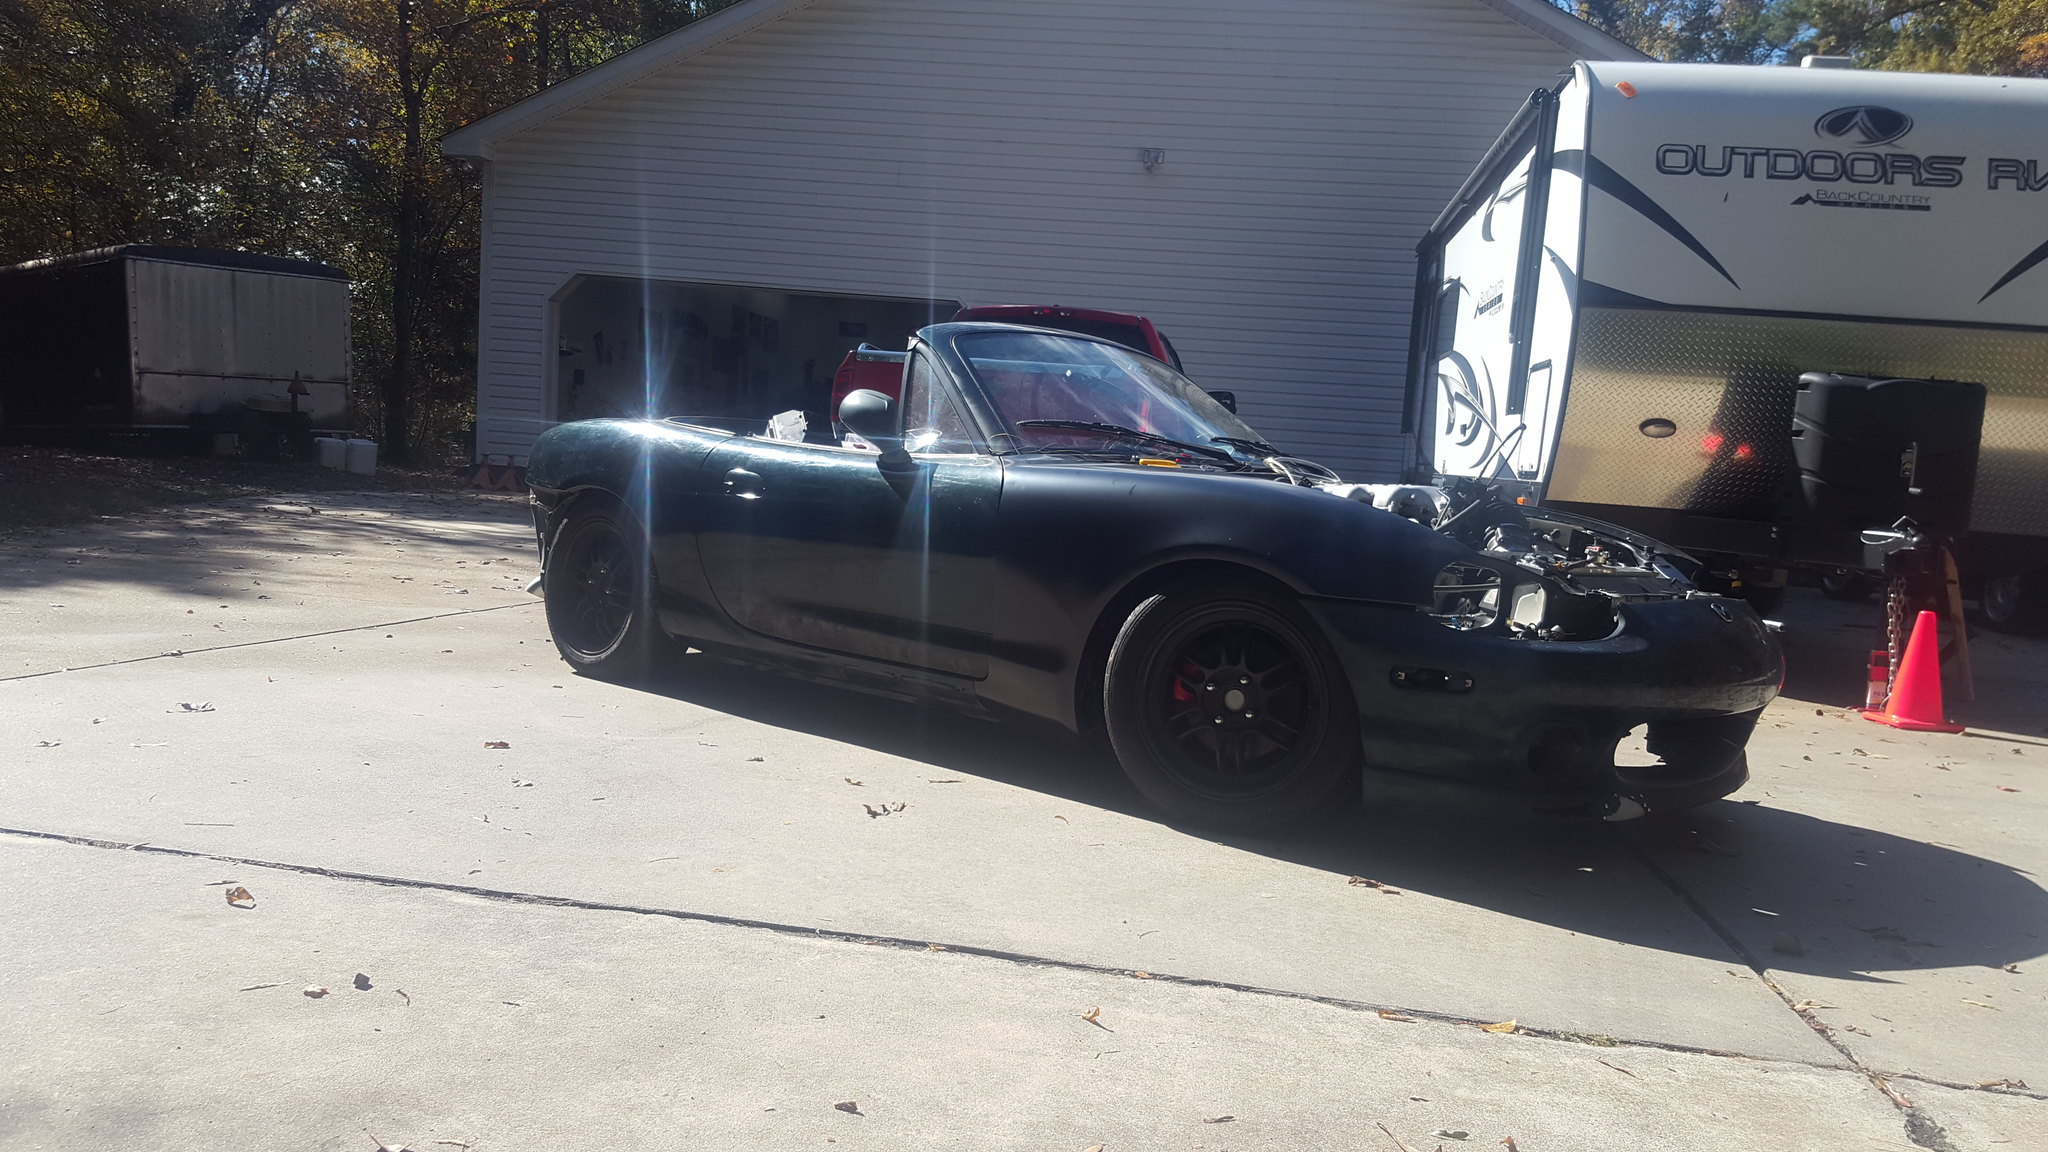
I backed it out in the driveway to wash the engine bay (it was FILTHY. Pure white looks great when its clean though) and settle the suspension. Its really, really low. The coilovers are and full drop, so it has plenty of room to go up.
 20181104_111727 by Michael Crawford, on Flickr
 20181104_111747 by Michael Crawford, on Flickr
 20181104_111826_001 by Michael Crawford, on Flickr
 20181104_112225 by Michael Crawford, on Flickr
 20181104_113433 by Michael Crawford, on Flickr
so, videos. Because everyone likes video. And these are monumental achievements for me. Near as I can tell, this is the first FWD 60*v6 in a miata that has ever been done. This is also proof that you don't have to spend thousands to do an engine swap. Or be a genius (cause im sure not!).
First fire:
legit first run time. It ran long enough to make us sick with the fumes from the header wrap and paint, and the fans to kick on.
shooting fireballs
and with exhaust
next steps are:
Figuring out why it has such nasty hesitation.
Figuring out how to get the OBD2 port functional
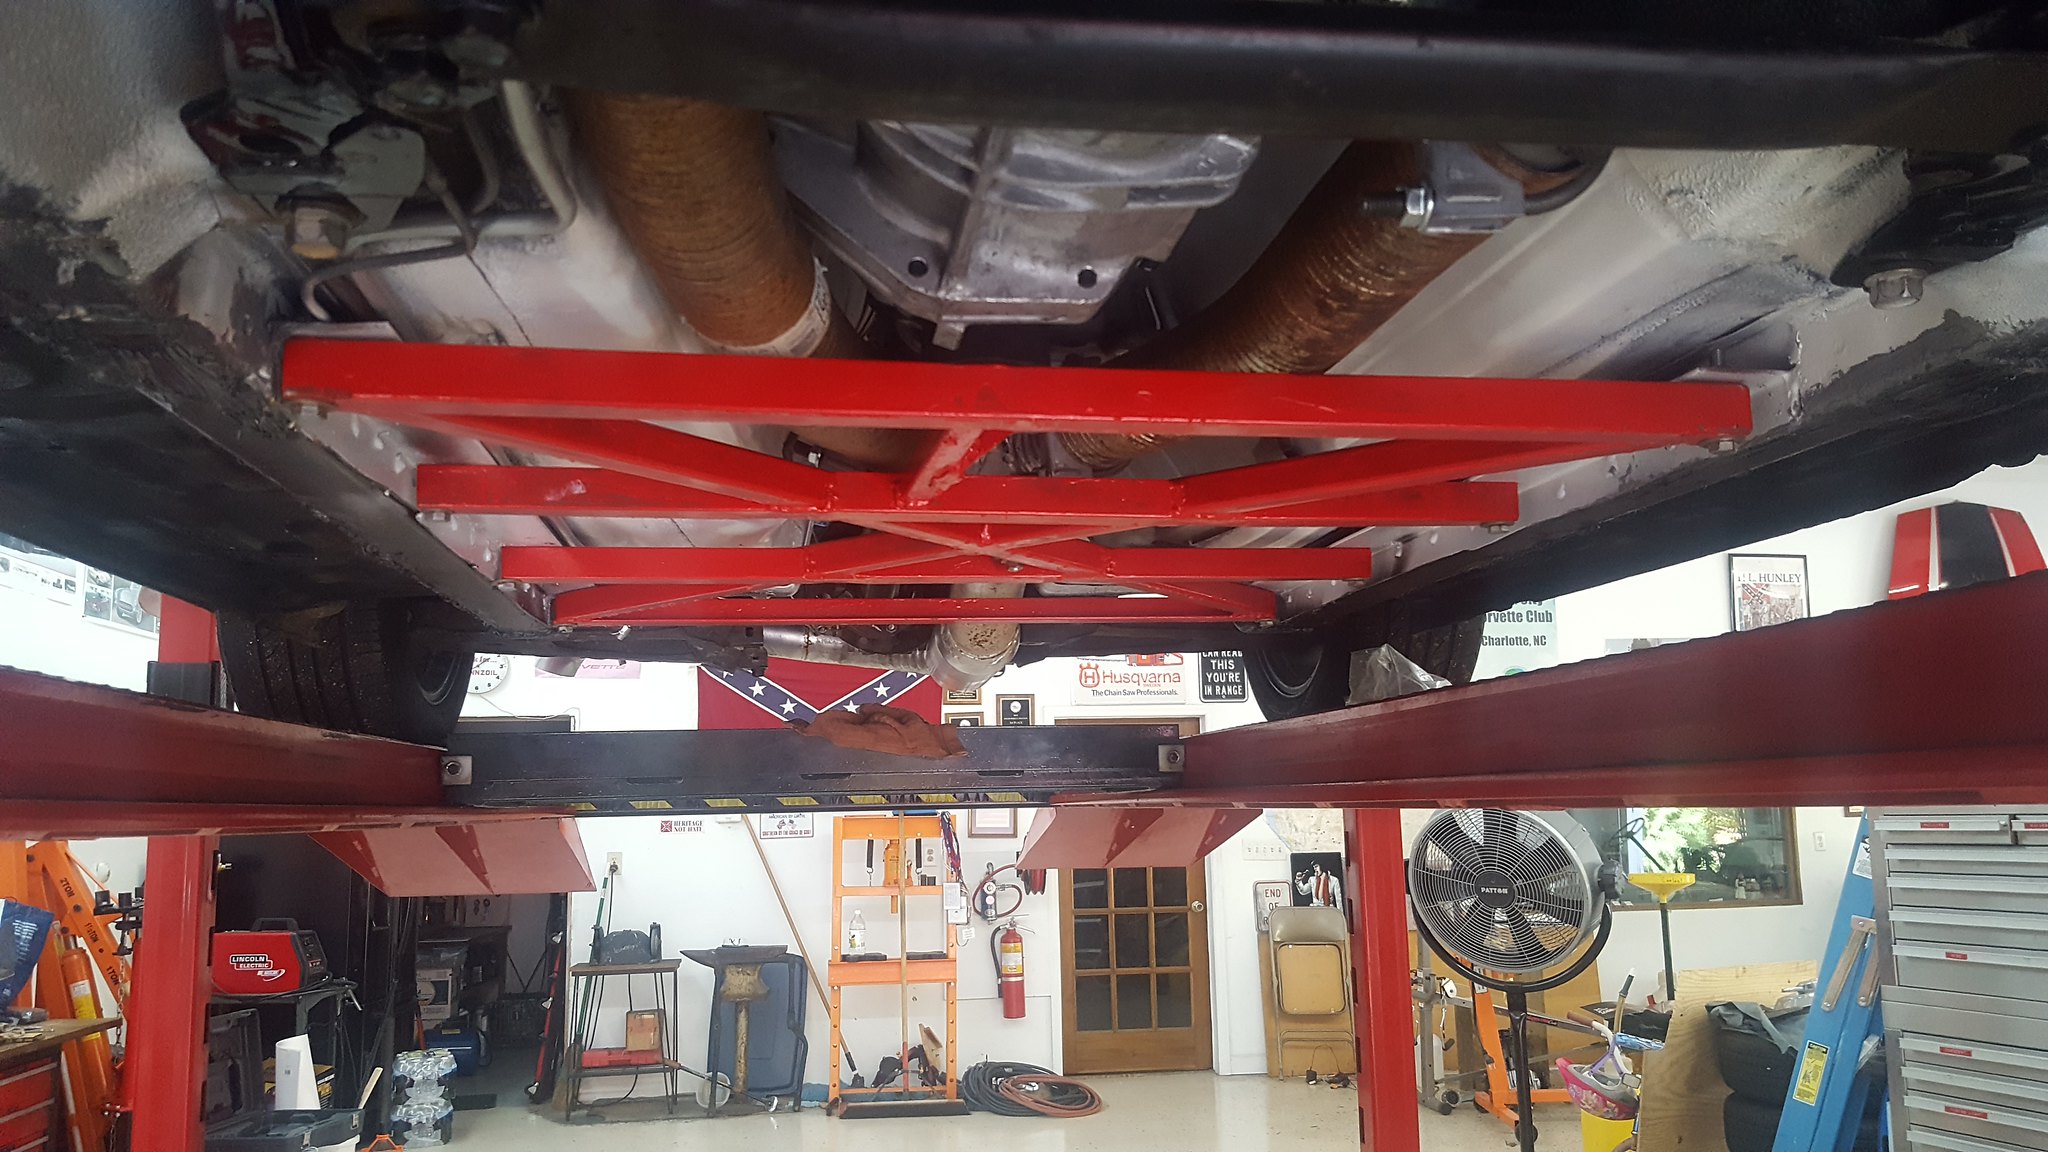
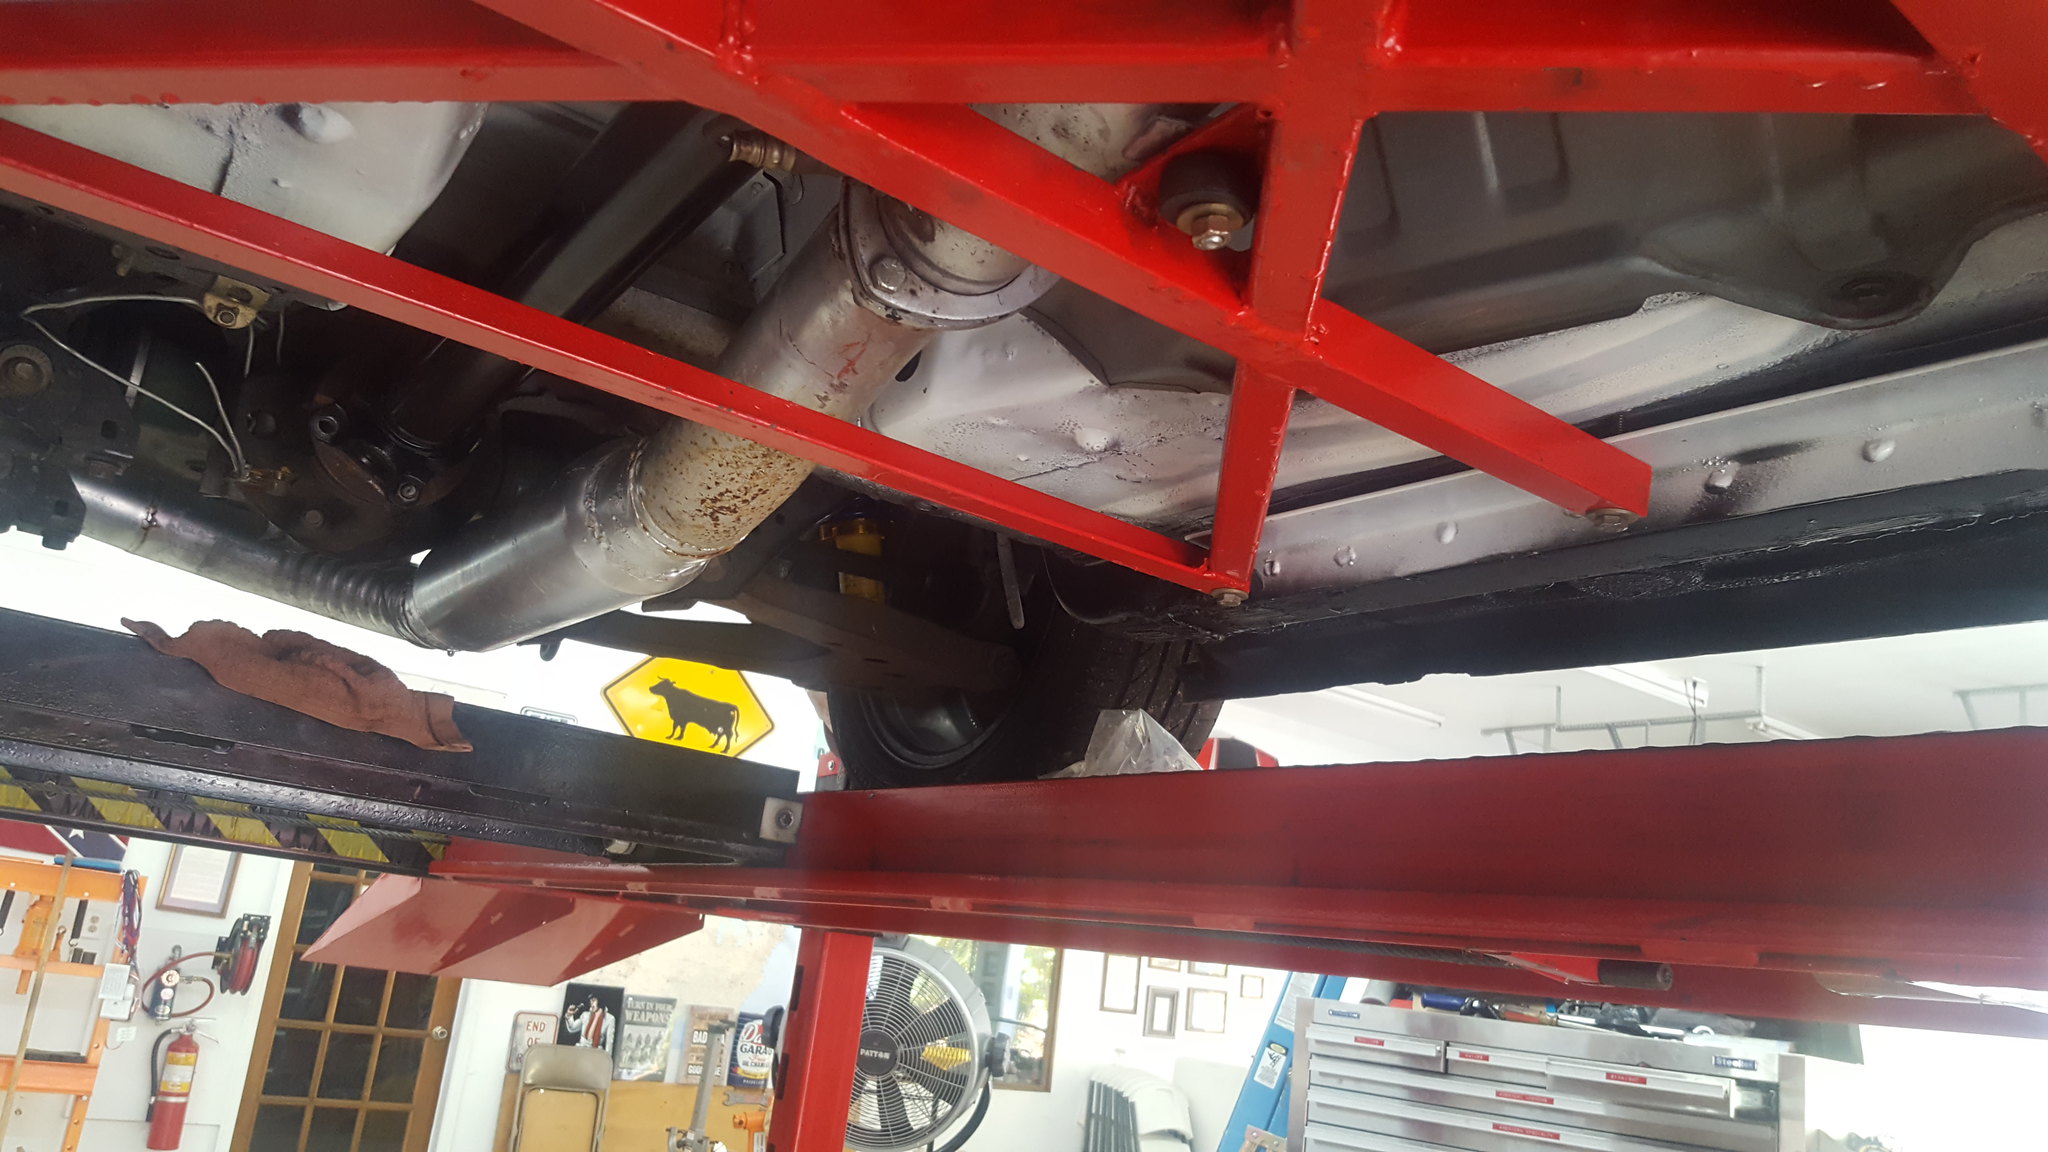
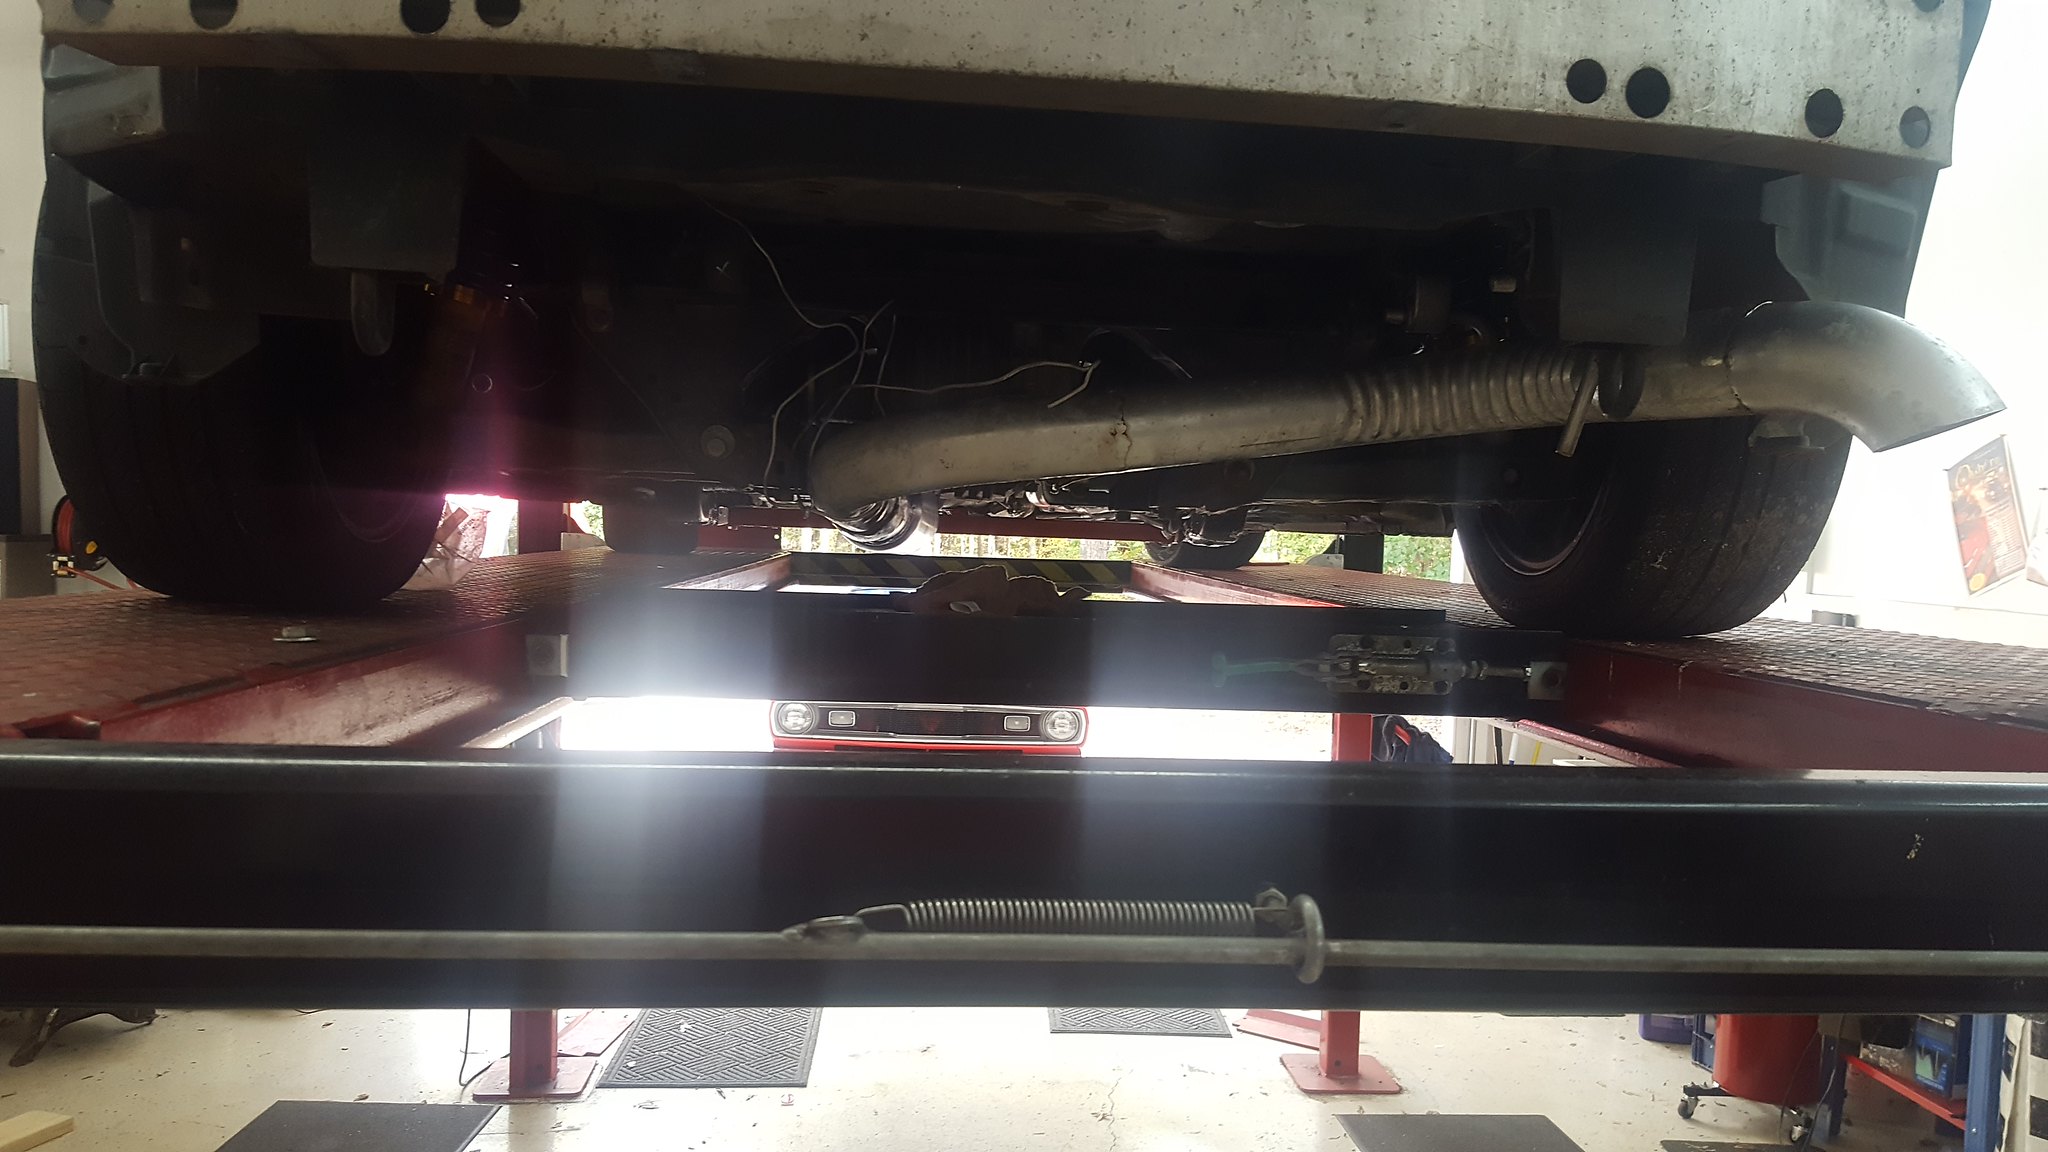
Figuring out how to support the differential without the PPF existing. Sold mount up front maybe?
Pulling and painting the rear suspension, as well as brakes
making a hood fit, and air cleaner assembly.
You'll need to log in to post.


