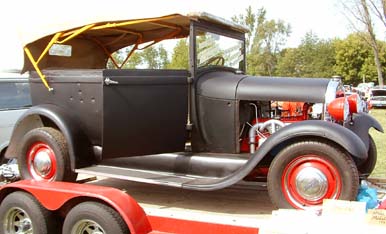
This is cool.
My neighbor retired from Ford. (Is there a plant in Lexington? If so, that's probably where he worked.) He comes over occasionally to hang out and talk while I'm working on the car. This morning when he came over, he gave me two of the metal shaping hammers that he used back in the day when he worked on the line.

It's not a bad way on a complex curve like that. I used to use three or four smaller pieces when I made the fenders on our racecar becuse I could shape them better and then weld them up on the car. Thanks for posting this. I want to do a something similar from scratch and this has been very helpful.
Pie cuts. Pros still use that technique.
awesome progress joey!! effin eh i wish i had the paatience to do all that, your about coastin now with all the positvie progress :) i need to get over there and check that thing out in person man, keep up all the good werk :)
Travis! Good to see you here. 
Today, I welded one of those 2x3 frame stiffeners I was talking about into place.
I'll get pictures up later.
Tomorrow, I'll try to get the other stiffener boxed in and welded into place. I'm contemplating some door jamb modifications on the driver's side, though. If I go through with those, they will need to happen before the stiffener is fabricated and installed.
JoeyM wrote:
I'm contemplating some door jamb modifications on the driver's side, though. If I go through with those, they will need to happen before the stiffener is fabricated and installed.
I made those changes this morning, and just finished altering the quarter panel to fit. What I was doing was moving the vertical portion of the driver's side rear quarter panel back 1.5 inches so that the door would look more like a datsun....
 ...and not a ford door.

I've been working on the chassis 2x3 stiffeners....One tube is in place, the other is being cut on the bandsaw.

Mental
SuperDork
3/28/11 1:55 a.m.
awesome, I love this thread.
Thanks. 
My 2x3 frame stiffeners are now boxed in and welded in place, and they make a huge difference.

I still had some decent light when I finished that, so I started to fab some metal to make the corner at the bottom/back of the passenger's side quarter panel. (You may recall that the sheet metal was a bit short there and missed covering the frame by a few inches. Here's a before shot
 I haven't uploaded any "after" shots, but the corner is now tacked into place.
OK, I finally put together an image that explains what I did last weekend.
 This weekend, I'll be partially boxing in the "frame rails"

The driver's side frame rail is boxed, although there's a bit more cosmetic welding to do. I'm headed back out to the shed to cut metal for the passenger's side.
At this point, I'm not worried about chassis stiffness.....the issues I'll have are probably going to be related to suspension or rear axle placement. (i.e. I think I can live with it  )
)
The passenger's side boxing plate has been cut, beveled, and tacked into place.
 I'll weld it in tomorrow .
The passenger's side boxing plate is welded in. I still need to grind it.

Most of the grinding is done. I got bored, so I started to add some fiberglass to the hood to strengthen some of my sheet metal welds that I don't trust.
 That should reinforce it while I grind down the beads on the inner surface. The plan is to get all the rust, paint, beads off the inside, glass it well, then clean off the outside and apply enough glass and/or bondo to get rid of the berkleying oil canning that I got from welding the sides together.
[EDIT: I just glassed the corner I had to pie-cut, also]
Oh, good news....I also pulled some thin corregated metal out of somebody's trash a few hours ago.
 I'll probably hammer/wheel it flat and then use it for interior skin.
The new drive shaft is a bit shorter than the original one. 

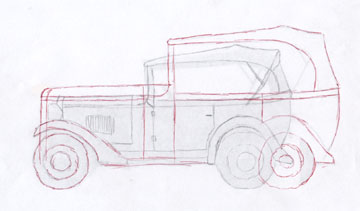
No major changes....I test fitted the new shaft. Since I don't have any new pictures that are worth posting, I'll give you something different: some doodles I came up with in 2007 after I first started toying with the idea of using a locost-derived chassis for this project. My early sketches looked a lot more like a lotus seven than a 1930s datsun. You can probably tell that I was reading the HAMB a lot at the time, too. 
My original doodle of a possible body design

a cleaned-up version of it superimposed on a lotus seven chassis

Even though it is not the route I ended up going, I'm still fond of this idea. I hope one of you guys builds something like it so I can see one on the road.

EricM
Dork
4/14/11 9:24 p.m.
You drive a storm? Winning!
Not as a DD, just my autocross toy. It's cheap and fun.
I won't be able to do this by October, but I'd eventually like to build a lake-style header for the L24 in this car[*]. I might, however be able to build a "boom hole"-type exhaust with a flared end.....something that resembles a straight pipe ending in a a trumpet-shaped tube like the ones in this lake header kit.

I just tried building a tube like that, starting with a piece of straight exhaust pipe. Applying an angle grinder, hose clamps and a welder gave it a taper...


...but not as pronounced as I would have liked.

I may try again, this time reversing the part that was pie cut; i.e. adding the material I remove at the narrow end to the wide end in order to make it wider. That ought to give it a much bigger amount of taper.
--
[*] - I think a single header on an inline six will look cool. Not quite as awesome as a header for an inline eight, but still kind of nifty.
Early 2007
JoeyM wrote:

By December 2007, the plan was still chopped/lowered/long, but it was starting to look like the original car.

By January of 2008, I had settled on the idea of near-stock, but scaled up in size so that it would not look odd with the longer-than-stock L24 engine from the donor.

I just shortened the collector that hooks to the exhaust manifold.

This was the only way I could think of to bring the exhaust out the side of the open engine bay without notching the dakota frame rail.
Here's a mock up of the exhaust

I put a few more pictures here


 I picked that idea up at the HAMB....it is certainly not the "right" way to shape metal, but it will do in a pinch. In the above pictures you can see that I cut the metal wrong, and that I'll need to add a little at the bottom, too. I have plenty, though, from the parts I cut out for the wheel wells, so that should not be an issue.


 ...and not a ford door.


 I haven't uploaded any "after" shots, but the corner is now tacked into place.
 This weekend, I'll be partially boxing in the "frame rails"
 I'll weld it in tomorrow .
 That should reinforce it while I grind down the beads on the inner surface. The plan is to get all the rust, paint, beads off the inside, glass it well, then clean off the outside and apply enough glass and/or bondo to get rid of the berkleying oil canning that I got from welding the sides together.
 I'll probably hammer/wheel it flat and then use it for interior skin.


