1 2
alpinecoupe
alpinecoupe New Reader
2/8/22 3:26 p.m.

I'm not sure this is the right forum for this because it's not necessarily a build thread, but I am building parts for different cars so that's cool, right?

During the pandemic I found myself working from home and having a bit more time on my hands because of the lack of a commute. I'm not real good as sitting idle so I thought it might be a good time to start trying to make my own carbon fiber parts. I've learned a lot (both what to do and what not to do) and I figured I can use this thread to track my progress.

The whole idea was born from low budget endurance racing with my brother and good friend. We knew we could slap on super expensive purchased parts onto a crap can car and get away with it so the gears started turning and I thought if we make them ourselves that will at least allow us a little leeway with various judges... hypothetically...I think...

So I started reading books and forums and finally started making some parts that I could pull molds from. I started with what was probably a terrible part for a beginner but it fits the needs of the car we were working on so naturally difficulty didn't matter - it was for a race car!

Due to a slight use of the green part of a race track we needed a new splitter. It seems like all the cars wanting to make larger downforce numbers in the front are using splitter vents of some kind. So I decided I would make some for myself as my first carbon project.

I'm lucky enough to have access to a 3D printer at work, and that good friend that I race with happens to draw things in Solidworks all day so I was able sort-of learned enough and use his skills to print a vent for myself. Here it is being epoxied together:

And after a significant amount of body filler, primer, clear coat, and sanding. The 3d printed plug is ready!
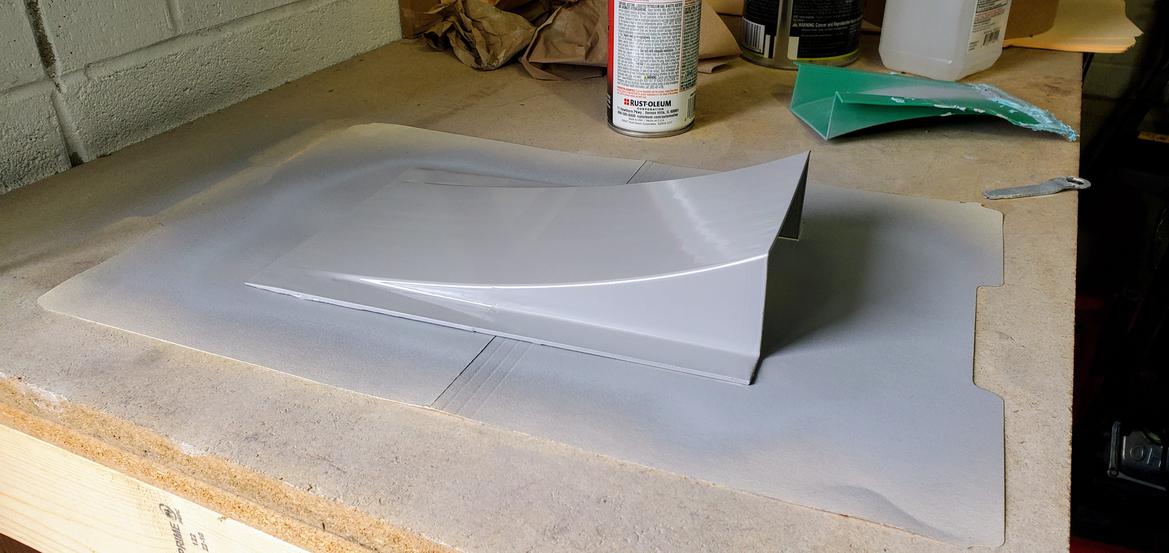
In making a mold the surface finish that you have in your plug will be transferred to the mold, so making the plug as perfect as possible saves considerable time in finish prepping the mold itself. The keen eyed observer will notice that while the surface finish here is pretty good I actually finished the wrong side of the part. Yep, the first instance of learning what not to do has occurred. 

If I were to use this part as my plug then I would end up with a very smooth finish on the part of the vent that wont ever see the air, so instead of making a plug of this part I printed a whole new one and primed, cleared, sanded, etc the inside of the 3d printed vent. 

I don't want this to get too long so Ill stop this one here and talk about the rest of the mold making on the next post.


californiamilleghia
californiamilleghia UltraDork
2/8/22 3:37 p.m.

Thanks for posting , its always interesting to see projects get done , 

I took a class years ago at the local college  on carbon fiber and fiberglass.

RacetruckRon
RacetruckRon GRM+ Memberand Dork
2/8/22 3:40 p.m.

Following with interest.  I've been slowly acquiring the tools to start doing composites.

MadScientistMatt
MadScientistMatt UltimaDork
2/8/22 3:58 p.m.

Is this a rear diffuser or a front splitter? Either way, I'm interested to see how this turns out. I've sometimes wondered if I could take a car hood and use it as a mold to make a composite replacement.

tuna55
tuna55 MegaDork
2/8/22 4:21 p.m.

Where did you get the materials? How much were they?

alpinecoupe
alpinecoupe New Reader
2/8/22 4:36 p.m.

So to make a mold I've found that having large flanges around the part gives makes everything easier - and this isn't just me it is one of the things that is suggested by the experts and they are absolutely right! It really give the ability to put vacuum bag material and all the other consumables on the part and have enough space to fit everything in whatever configuration that you need. I typically use corrugated sign board for the flanges - local HD has 4'x8' sheets for ~$25. 

Here's the beginning of the flange process (and yes, I'm still using the wrong side part - I didn't take pictures of myself doing it right, not sure why maybe I was just overly frustrated with myself :-)):

The signboard is just hot glued to the plug - luckily the 3d printed plastic held up to the heat - and for the joint were the signboard and plug meet I used some plasticine clay that I picked up at a Michaels hobby store - in the future I found specific "fillet wax" that is much softer and makes this process so much more enjoyable. I don't have good pictures of that process from this part but in later parts that I've made I'm sure I can find some.

Once the flanges are made it's time for gel coat and fiberglass. But first I brushed on a coat of PVA - this is a form of a released agent that puts a physical barrier between your plug and your mold. It compromises mold finish but essentially ensures that there won't be a chemical bond that forms between your plug and mold. Gelcoat- Fiberglass pictured below:

As I type this out I am reminded that I actually made a full mold of the wrong side of the vent - so I guess there was a lot to learn from this first one. Another thing to notice is that polyester resins and epoxy resins exotherm when they cure. So much so that they melt Solo cups if you are using them to hold your gel coat - like I was. You can see the result circled in red here:

That black gel coat is still stuck to my work bench...

Anyway, once the multiple layers of fiberglass mat were laid down and allowed to cure then you can de-mold the plug from the mold itself. 

So here it is, albeit the incorrect side of the part, but my first mold!

 The green tint that you see on parts of the mold is the PVA, which peels of in sheets and otherwise is water soluble so it washes off easily. And off to the right you can see the black clay that was used as the fillets I mentioned earlier. Overall the finish on this mold isn't unusable but it definitely isn't without it's issues. But that's ok! As I've mentioned too many times already - this is the wrong side :-)

Fast forward a good chunk of time and here is the mold - made with the same steps but of the correct side:

This is very dusty because I just trimmed the edges of the fiberglass mold off but the surface is good enough for a beginner to be happy with!

Next up, polishing the mold itself and then making some parts from it!


As a side note: I'm skipping a lot of the minute details in the process but if people are interested I can go through how many layers of fiberglass and all that. I just don't want to bog things down too much.


APEowner
APEowner GRM+ Memberand SuperDork
2/8/22 5:06 p.m.

Cool project.  I had to laugh at myself when I read you original post.  It took me a moment to figure out what the green part of the race track is.  In my defense, I mostly race in the southwest and our race tracks don't have green parts. Just various shades of brown.


alpinecoupe
alpinecoupe New Reader
2/8/22 5:44 p.m.
MadScientistMatt said:

Is this a rear diffuser or a front splitter? Either way, I'm interested to see how this turns out. I've sometimes wondered if I could take a car hood and use it as a mold to make a composite replacement.

This is a little vent for a front splitter. They go here (these are the test fit of the 3d printed models, not the carbon yet):


And, you absolutely can use a hood to make a mold - it's a pretty big undertaking but can be done for sure!

alpinecoupe
alpinecoupe New Reader
2/8/22 9:02 p.m.
tuna55 said:

Where did you get the materials? How much were they?

I've gotten materials from a few different sources but mostly I order from Composite Envisions and Express Composites. They are both reasonably local to me and small businesses. I've also ordered fabric from Soller Composites.

In terms of cost I just quickly figured costs of things and that small mold that I made here was probably about ~$150 worth of materials. 

​​​​

alpinecoupe
alpinecoupe New Reader
2/10/22 10:44 a.m.

Once I got this far it was a lot of finishing on the mold. Because I used the PVA on the plug it leaves a less than ideal surface on the mold so I ended up wet sanding and polishing the surface that would make contact with the carbon. I didn't go too far out on the flanges because those won't ever see anything except for bagging material. Once the mold was polished it was time to start prepping it with release agents. For this mold I went with just Partall Paste #2 wax. Many people that do this way more than me swear by using just this, it worked for me this time but I have recently switched to using a chemical release agent that in my experience works much better than just wax for my applications.

Tape off the edges where the vacuum bag tape will eventually go to ensure a good seal:

And then I started to figure out how the fabric was going to lay on the mold. Parts that have a couple of 90 degree angles like this were not ideal for my first part and it took me some time to work out how to make everything lay down flat. The nice part is the 2x2 twill weave fabric that was being used does conform pretty well but as you can see in the pictures there are areas that start to bunch and don't quite lay flat. Eventually I did make some relief cuts at those top corners - I just don't think I have any pictures of that.


Now that I had an idea about the fabric I was ready (well as ready as I was going to be) to try making the first part. I decided to do what is called a wet layup for this attempt. Which basically means that I would lay the fabric down on the mold, and then use a brush to paint/ stipple/ force the epoxy resin into the fabric. This is not the ideal way to make a perfect fabric/ resin ratio part but as a total novice I wasn't ready to try anything fancier than this. 

From here until it's vacuum bagged I don't have many pictures because my hands were messy from getting all of the resin into the 4 layers of fabric but in the end it looked like this under vacuum:

Here we can see the vacuum being pulled, and somewhat apparent is the layup order. Under the vacuum bag is a layer of bleeder cloth (it's job is to absorb some of the excess resin that is going to be squeezed out from being under vacuum), then there is a layer of peel ply (it's a green fabric that is coated so that it releases very easily from the epoxy resin and therefore the back of the carbon), then the 4 layers of carbon fabric. I alternated the direction of the fabric so that each layer was at 90 degrees to each other since the 2x2 fabric has slightly different properties based on which way the tows (bundles of thread that make up the fabric) are facing. The change in direction helps to minimize the amount of twist that occurs in the part; not such a big deal on a part that has so many angle features like this one but can become a big deal on larger flatter parts (like hoods, trunks, or just flat panels).

What you don't see in that photo is the absolute struggle I had to find all of the vacuum leaks, make the pleats in the bag so that it actually fit tight to the mold since the vacuum bag only stretches so far, and the overwhelming feeling of racing against the epoxy resin that is possibly curing while you are still trying to force it into the fabric, all while working in a garage during the summer that was 96 degrees. Certainly a stress and sweat inducing part of the project!

Now that it's under vacuum there is just a lot of wait time. This part I let sit under vacuum curing for 24 hours - adding heat reduces the cure time but I did not have an oven that I would have been allowed to use for such a project :-)

Once the 24 hours was up (and I waited almost exactly 24 hours and not a minute more - I was just too excited!) it was time to de mold the part. First, off comes all of the consumables (vacuum bag, peel ply, bleeder cloth) and then you are left with the matte finish the peel ply leaves:

Then pry up the carbon and hope to your lucky stars that it isn't stuck to your mold...

And we have a part!

There are definitely (many) imperfections and I'll go into what I did wrong and how to fix them in future parts in another post.


pinchvalve (Forum Supporter)
pinchvalve (Forum Supporter) MegaDork
2/10/22 10:56 a.m.

Very cool stuff. I built a lot of a boat over last winter and learned a little about working with fiberglass. Its a lot like baking in that the ratios of ingredients matter, the temperature matters and cleanliness matters. I liked the idea that you start with liquid and fabric and end up with a solid, rigid thing. good luck with carbon, it turned out well for Horatio Pagani! 

alpinecoupe
alpinecoupe New Reader
2/11/22 4:17 p.m.

Overall, for the first part that I had ever made I was really happy, if I made a part like this today I would be pretty disappointed with myself but as I have been uploading these images I realize that this first part was made 3 years ago! I've learned a lot since then!

So if we take a closer look at the part there are a couple of major areas of concern. 


First the yellow outline: This is where I naively put the vacuum connection on top of the carbon fabric. So all of the air that was being sucked from the inside of the vacuum bag went directly through the part, this caused an extreme dry spot and pretty big resin void in the carbon. So I learned that when doing a wet lay up like I did I can use an extra strip of bleeder cloth to create a pathway for the air to move while moving the vacuum inlet off of the part itself. The second one I made did not have the void because the vacuum was moved farther out onto the flange of the mold. Like this:

The giant red oval is a large area that suffered from what is known as "bridging." Basically the fabric doesn't make full contact with the mold and makes a "bridge" of fabric across the corner instead of fully sitting down into the 90 degree angle. I think what happened to me in this instance is I did not leave enough slack in the bag and therefore the bag couldn't fully press into the corners. Vacuum bag material only has so much stretch to it so placing pleats in the right spot to give some extra bag material for corners is essential. Placing pleats is definitely a skill that I have developed more over time and certainly a skill I did not have when making these pieces.

The second piece came out far better, less bridging and no gigantic resin void right at the front of the piece where air flow would be affected. Second pull:

 Then I trimmed the pieces up and I repaired the void and bridging in the first piece as best I could with some extra resin. This is not something I would typically do now - if a piece was that far gone I would just make another one but the repair provided another learning opportunity so I went for it. I also wasn't exactly sure if these pieces were even going to work on the car so I figured I had very little to lose by repairing it for the time being. After they were trimmed I put a little rattle can 2k clear coat on them to protect against UV degradation and to keep the epoxy resin from yellowing and called them done!

Thanks for reading this far! I've made some other pieces and tried different techniques that I'll post about too, hope it's been some what informative to read!

alpinecoupe
alpinecoupe New Reader
2/11/22 5:14 p.m.

Oh and the final resting place for these parts is in this:


alpinecoupe
alpinecoupe New Reader
2/23/22 1:27 a.m.

My next project attempt was to make some brake cooling ducts for the air dam that was going to be fitted above the front splitter that now has the 2 splitter vents installed in it. I had some brake cooling ducts that were going to be used on a previous version of the air dam but I wasn't entirely happy with how smooth the transitions were from the flange to the actual duct so I set out to make a mold of the part using a 2-part expanding foam. 

I basically taped the plastic duct down to a piece of signboard and poured the foam mix into the duct. Ended up with the inside cavity of the duct filled pretty well. Then I covered it in bondo, primed it, and clear coated it - with just some rattle can clear that I had laying around (big mistake). 

It looked like this: 

And then after many hours of sanding later, like this:

I used construction adhesive to put the foam plug onto that piece of mdf that has also been primed and clear coated. I used rattle can primer and rattle can clear for this one and that caused disaster when I tried to make the part. Turns out that the regular stuff that is in spray cans doesn't mix well with epoxy so it ends up sticking to it rather than nicely sliding off it as I was expecting. So even though I put 10 coats of Partall paste wax that is specifically designed to allow parts to part... they did not.

I did a wet layup of this as well, and then vacuum bagged it while it cured:

(Learned from my previous mistakes to move the vacuum port off of the part)

 When I went to de-mold the part I was feeling pretty good, things had gone smoother than the diffuser vents but then the reality of being a novice hit me. Instead of the part releasing nicely from the mold, the mold released itself from the mdf board. And all the foam was stuck inside my part.

So... the mold is ruined but I still think I can salvage the part... so I go to town chipping foam out of the carbon part.

Eventually I got all the foam out and while the mold is ruined, the part is still usable!

Needs to be trimmed but at least it wasn't a complete waste. I just need to make another mold... Ill save that for next post.

Thanks for reading!


alpinecoupe
alpinecoupe New Reader
3/4/22 12:42 p.m.

Started and finished making the mold for the brake ducts, used the gel coat/ fiberglass method to make this mold, and avoided using foam and such:

After about 4/5 layers of fiberglass on the back plugs could be popped off:

Did some wet sanding and buffing:

And then I realized that I wouldn't be able to vacuum bag this mold because of the massive holes that I left at the tops of the thing! Big time mistake! But, even though it left me frustrated before, I used a cup and more of the 2 part foam to make a "top" for the mold. 

Had to do a rough repair using fiberglass and gelcoat to cover the foam but since it will never be a place that touches carbon I wasn't really worried. I just needed it to be air tight. 

So I sanded a lot, and eventually had a workable mold:

After being polished and having chemical release agent applied:

Now we'll make part #2, and it won't get stuck on the mold!

alpinecoupe
alpinecoupe New Reader
3/8/22 10:57 a.m.

I spent a long time figuring out a better way to cut and position the fabric on this 2nd attempt. The first attempt I really just was happy that I was able to cover the whole thing. But this time I wanted to try and line up the fabric cut lines along the natural curves of the shape. I made some paper templates and then cut the fabric from those. Then got the other consumables cut, like the vacuum bag and breather cloth and was ready to go!

It was a little cold in the basement when I was making this part so I used a set of halogen spot lights to add some heat. This isn't the most elegant solution, making an oven would have been way better, but in the short term for this part it worked great! I rotated it a couple of times while the epoxy was setting to try and avoid hot spots and it cured up nicely.

Straight out of the mold before it was cleaned off - still need to wash off the release agents.


Trimmed both of them up and gave them a quick wash - but no clear coat yet. The one on the left is the first one I made and definitely is resin rich (meaning there is more resin than there should be in the part which makes it weaker) the one on the right is closer to the perfect resin:fabric ratio but might be a little bit dry (also not ideal) using resin infusion instead of wet-layup will fix this issue so that is what I decided to work on next. But before that here's a pic of them trimmed and not yet cleared - each one has a mass of less than 100g, I just can't remember the exact mass right now.


alpinecoupe
alpinecoupe New Reader
4/16/22 1:43 p.m.

As time went on I started trying out different projects and different  techniques. My dad wanted some headlight covers for his fox body and he had some that he liked but had a couple cracks in them. So I was able to do an "overlay" of carbon on them. This is a fairly basic technique where you just do a wet layup of carbon on top of whatever item you are wanting to coat. Many times the part that is being covered is left under the carbon just to give the visual effect of the carbon. In my case I didn't want or need the old headlight covers to be there so I coated them in release agent so I could pop them out after the carbon cured.


Trimmed and installed

Yes, the car is still road going so the covers can pop off easily if he ever needs to run the headlights but it is really just a fun car that only sees the sunny parts of a day.

alpinecoupe
alpinecoupe New Reader
4/18/22 11:55 a.m.

After this I started to read about resin/ vacuum infusion as a way to make carbon parts that are lighter and stronger than the wet-lay up/ vacuum bag parts that I had been making.

Essentially vacuum infusion allows you to put carbon into the mold while it is still just dry fabric, pull vacuum down on the part and then use that vacuum pressure that is inside of the bag to suck the resin throughout the mold and thus the layers of carbon that you have laid up. Sometime people call this "dry carbon" or advertise their parts as dry-carbon parts. Typically this is what they are referring to but in the composites community many people feel like this is a bit of a misnomer since the having carbon that is dry actually just means that you have fabric. All carbon has to have resin in it to work so none of it is truly "dry."

Any way, infusion is a more involved process but it works better for me since you can cut and lay up the carbon fiber layers a bit at your leisure. When doing a wet layup as soon as you mix your epoxy then you have a finite amount of time to use it all before it gels and then is wasted. As a parent of young children I can't always guarantee that I will have uninterrupted work time so doing infusion works out for me in multiple ways. 

To practice the technique I layup up a few layers of carbon just on a piece of glass. The nice part about using glass is that epoxy releases pretty well from it and the carbon will take on the surface finish of the molds surface finish. So if you want a nice glossy finish on your parts, made your mold nice and glossy - glass is perfect for this. 

Ok, on to some pictures, this is the general setup for a vacuum infusion: Glass, then carbon, then peel ply, then infusion mesh, then vacuum bag. And unlike in the wet layup where you just need a vacuum line, with infusion you need a vacuum line and a resin inlet line. 

The resin inlet is the front tube here connected to the spiral tube (where resin will be sucked in via the vacuum pressure) and the back line is the vacuum line (from where the air will be evacuated). 

Everything but the vacuum bag in place here:


Vacuum bag on and vacuum pulled. Here I'm checking for leaks. Usually I pull vacuum and leave everything alone for 30 minutes to see if there is a pressure drop. If it stays steady then I know I'm good to go. But again, the nice part about infusion is that I can pause the work at any of these points and come back to pick up right where I left off. In reality this leak down test lasted 8 hours while I had dinner and did the bedtime routine with the kids.

You can see that the pressure gauge is on top of the orange resin catch pot. This is a rather important addition to the vacuum infusion. Since I am going to be pulling resin using the vacuum pump it is possible that if resin gets into the vacuum line on the top of this picture that it could be pull all the way into the pump itself, and ruin the pump when the epoxy resin cures. Using a catch pot allows any of that run away resin to fall safely into the pot and not get to the vacuum pump. 

So once the leak down proves that there are no leaks in the bag then it's time to mix the epoxy resin and suck it through the part. 

The resin is starting to flow up that tube and as soon as the line clamp is released then it will flow through the part.

(Side note: the bag developed a substantial leak, thus all of the yellow tape every where. I got it sealed but it was stressful to try and find it as my resin was sitting there ready to cure in the cup).

Resin flowing through the part:

It's going slower on the right hand side because of the leak in the bag. It does even itself out over time because of the resin break that I put in the layup of the infusion mesh and peel ply - I didn't really get into the specifics of that but can incase someone is wondering what I'm talking about.

I let the part cure for 24 hours or so after the infusion - I didn't get out the heat source or I could have sped that cure time up. But then I de-molded the part and it looked like:

Pretty shiny and I was very happy with my first attempt at vacuum infusion! Yes there are a couple of spots that look dry/ scratched and after asking around I found that the release agent I used on the glass wasn't the best one I could have and that is why I got those marks. I change the release agent in the future and all those issues disappeared! 


californiamilleghia
californiamilleghia UltraDork
4/18/22 12:13 p.m.

Thanks for the write up , 

Somebeach (Forum Supporter)
Somebeach (Forum Supporter) HalfDork
4/18/22 4:15 p.m.

I am enjoying this thread. 
 

What are you using for a vacuum pump? Did you buy some type of kit for that with all the hoses and the expoxy catch pot? 

alpinecoupe
alpinecoupe New Reader
4/18/22 4:22 p.m.

At the same time I was working on the vacuum infusion stuff I switched out the m coupe for one of the LSx swapped 944's that my brother has in his stable. It is still street legal but only sees track duty. We were trying to figure out a way to fit wider rubber on the rear of the car so I asked if I could attempt to make some rear flares for it that might accommodate 315 to 335 section width tires. 

It started with a lot of spray foam from home depot and then a whole bunch of shaping...


Once I had the general shape in foam I decided to move over to coating the whole thing with joint compound, usually reserved for drywall repairs. While this wasn't as fast drying as Bondo or a typical body filler it sands down WAY faster, and is much cheaper when using this much of the stuff.

Then it was all more sanding and shaping, re-mudding, sanding and shaping.


I was finally pretty happy with the shape - although I thought I could keep tweaking things here and there and my wife finally said "just put some carbon on there!" She new I was paralyzed by trying to make it exactly perfect and in all honesty they aren't going to be and this is a racecar, so I just sent it.

I primed them just to give a good surface finish, and then covered it in packaging tape (this ensures a good release from the epoxy). Then did a wet layup of carbon over the top of everything.

I let this first layer cure up all the way and then came back through with some body filler to smooth everything out 100% before going over it with 2 more layers of carbon.

After the body filler, and then 2 more layers it fully cured and popped right off of the packaging tape.

Just trimmed it up and then tape fitted it back on to make sure it all still worked - it's dusty from the trimming, but it fits!

Thanks for coming along on the journey - I think next up I made a mold and part for the E30!


alpinecoupe
alpinecoupe New Reader
4/18/22 4:27 p.m.
Somebeach (Forum Supporter) said:

I am enjoying this thread. 
 

What are you using for a vacuum pump? Did you buy some type of kit for that with all the hoses and the expoxy catch pot? 

Awesome, I'm glad, thanks!

I have an amazon pump that was about a $100. Kozyuvac or something - absolutely nothing special but gets that job done for the size of parts that I make.

And the catch pot also came from amazon and was specifically designed for composites use - Bacoeng is the brand - and if I were doing it again I would buy a larger one so I could more easily degas my resin before infusing it. That's not strictly necessary but I feel like I would do it more often if I could easily fit my mixing cups in the chamber. I bought the specific fittings and hoses I needed to fit my pump from McMaster-Carr but that part isn't super difficult once you have the things sitting in front of you. 


2GRX7
2GRX7 Reader
4/19/22 10:49 a.m.

Love the packing tape as a release agent! I've used this stuff from Lowes....


It may be an easier starting point to use as I just poor it into a space between the panel and some cardboard.  Definitely less porous than the cans!

DjGreggieP
DjGreggieP HalfDork
4/19/22 2:20 p.m.

This is making it seem easier and easier to make some carbon fibre bits and pieces for my cars.... 

alpinecoupe
alpinecoupe New Reader
4/19/22 3:52 p.m.

In reply to 2GRX7 :

That makes sense, the spray foam from the cans is pretty porous. I do have some of the polyurethane expanding foam from Fibreglast that is mixed and really expands quite a bit that I use now if I need to do any foam stuff. It seems to have a good mix of expansion, less porosity than spray foam, but still easy to shape as needed.

But I'll look for this post mix next time I'm at the store as a good alternative!


1 2

You'll need to log in to post.

Our Preferred Partners
CJNKU1KGCNZ88fl3W2X56aSOpKv2Y5abH4De1jvEZX2qa4F5W8w9hApbY6pd7xsV