Trust me, this will save you much aggravation! I tried the usual recommendations (wrapping with tape) which did not work at all, went online and Summit Racing recommended buying a purpose built hose cutter ($$) and then I stumbled across this trick and figured I would try it first before ordering the cutter.... had them all done in a snap!
Finished the exhaust today! I am quite pleased with the turbo downpipe and how it mates up to the exhaust. The exhaust is all stainless from turbo flange to the mufflers and comes apart for any service needs, and most importantly should clear everything. I did have to trim an inch from the corner of the rear drivers side wheel well, but it was just cut straight, so no one would notice unless they study these things. Exhaust is now complete, bung for the WBO2 is installed and I am 99% sure it will clear the body without any issues as it is way forward from where I originally was measuring. I will build a few heat shields and the turbo will have a blanket on the hot end to try to keep some of the heat down. The downpipe is larger and the curves are all smooth, so it should flow fine.


clshore
New Reader
2/28/18 6:19 p.m.
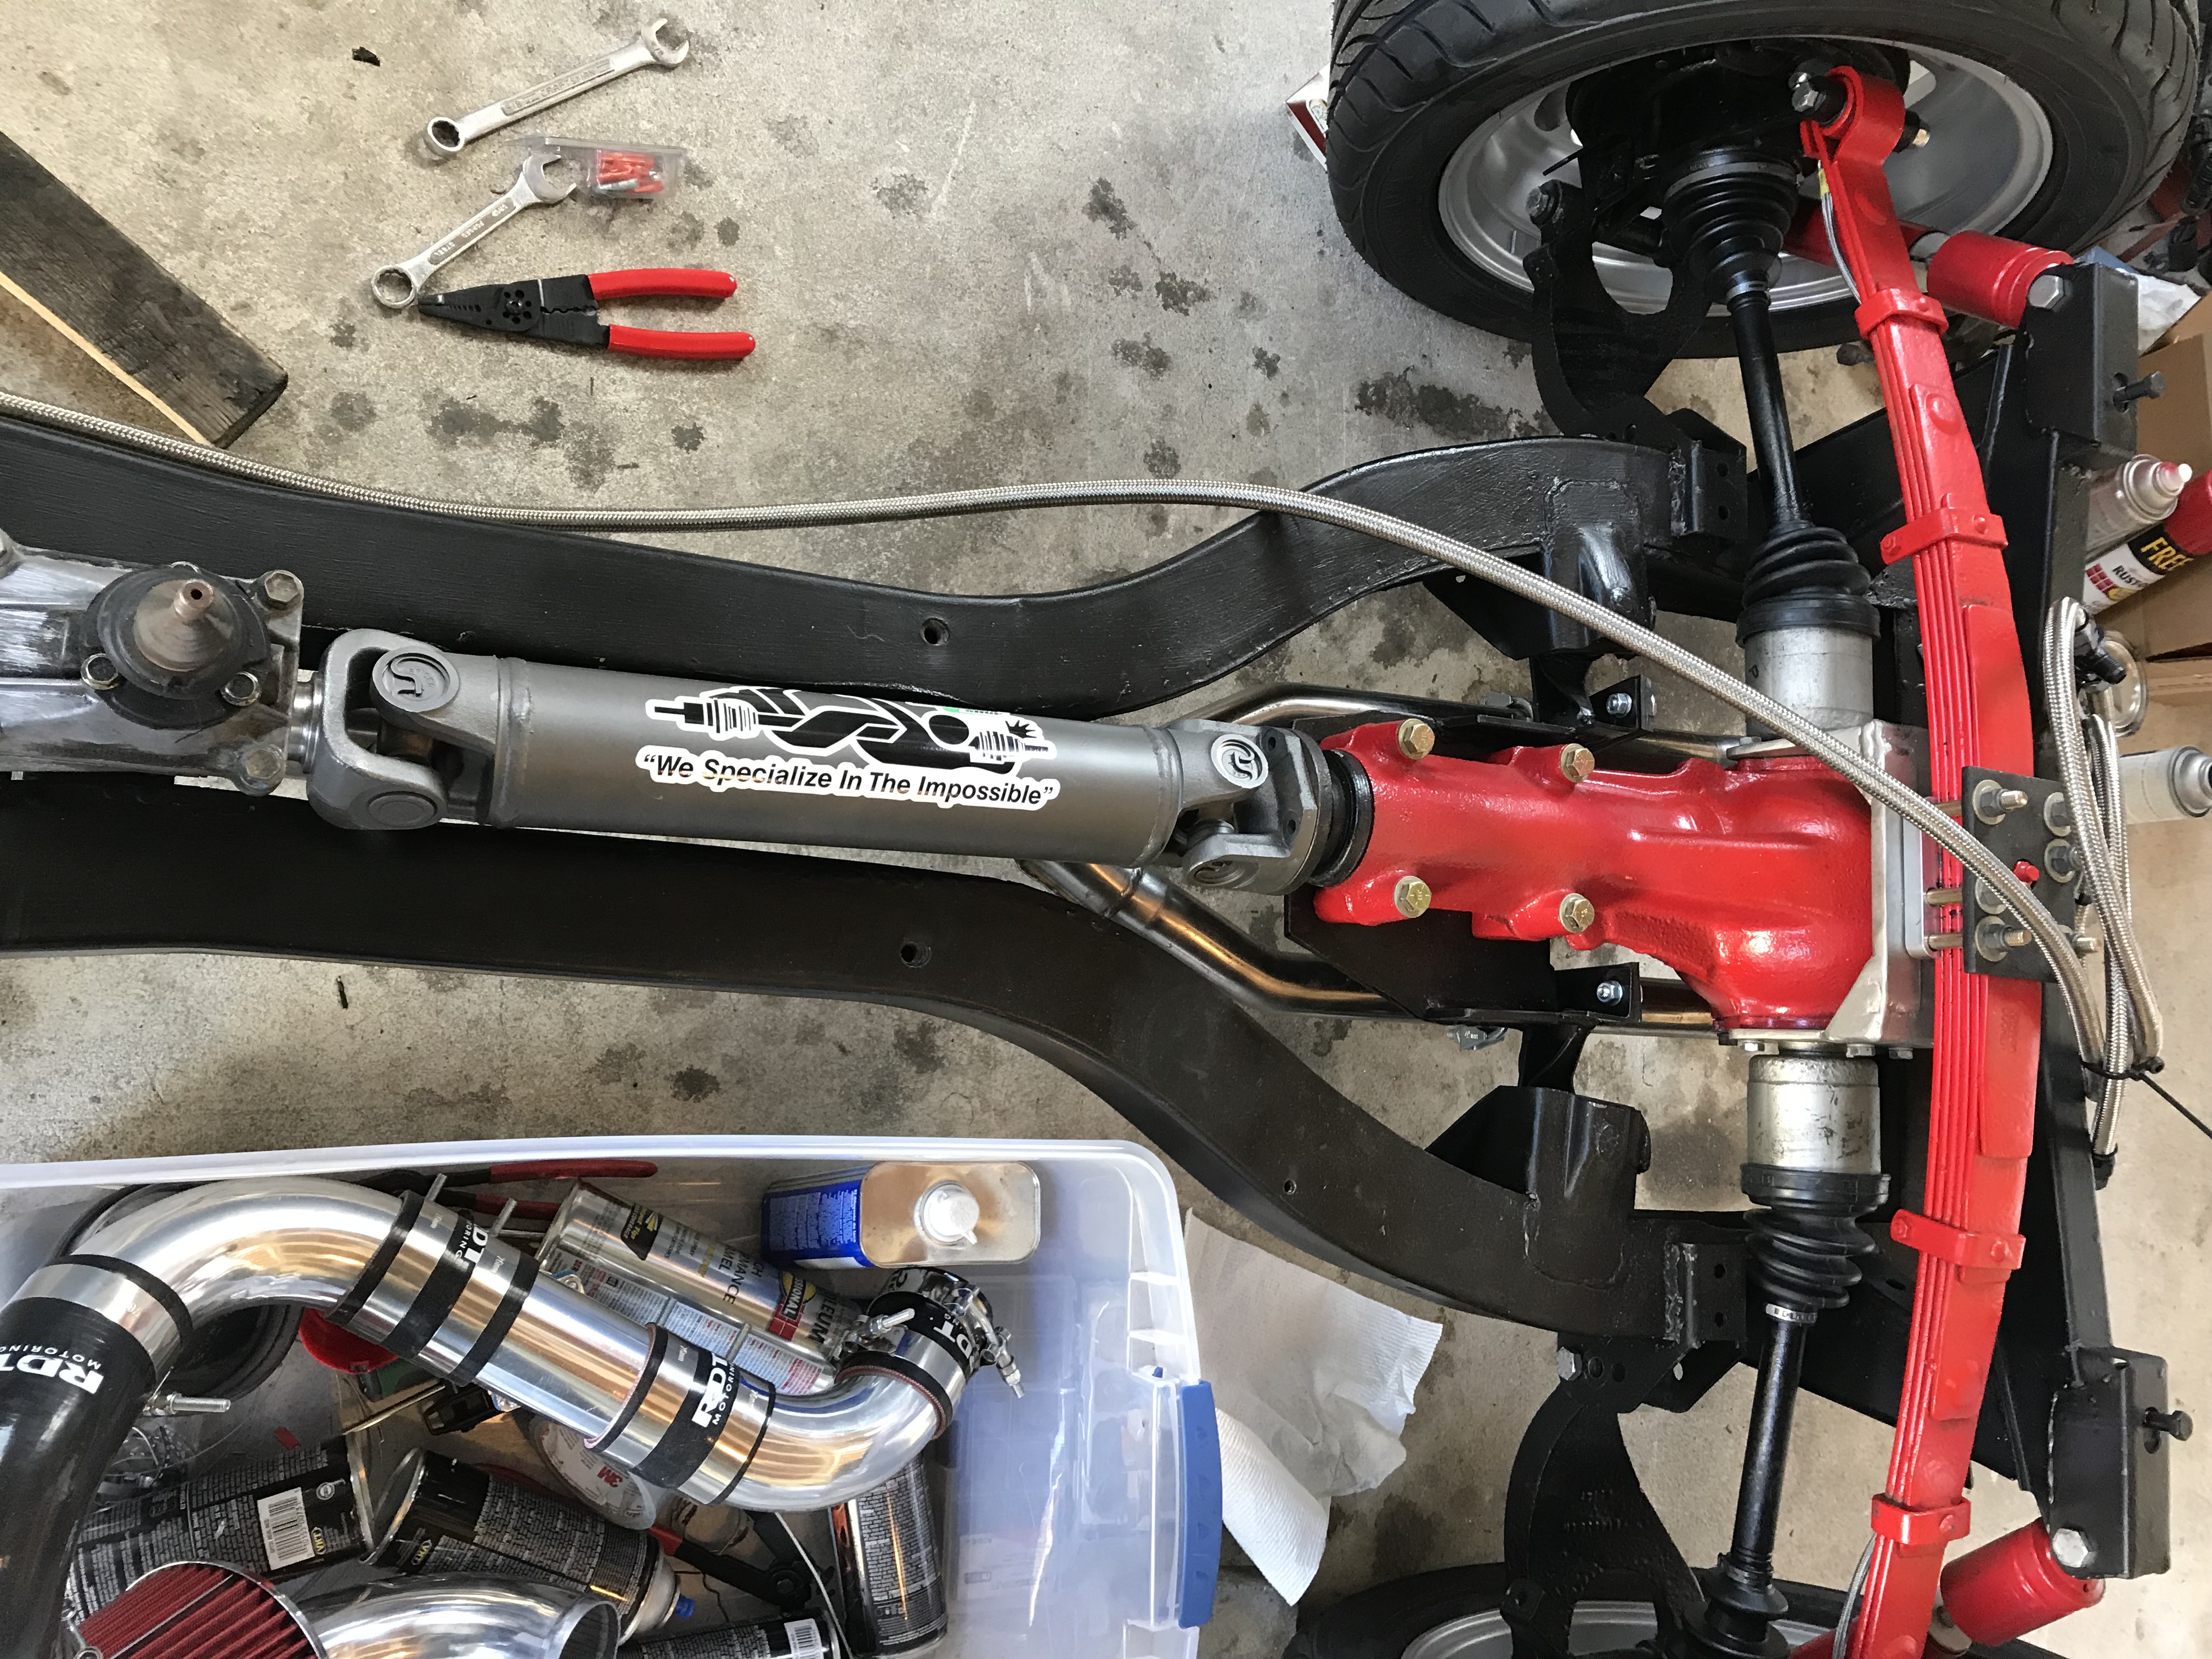
I'm looking at the first pic, and noticed that your left front vertical link looks funny.
Specifically, the trunnion angle looks wrong, the axis should line up with the centerline of the ball joint at the top, but does not.
I supect that the lower threaded part that screws into the trunnion is bent, a common enough occurrence.
Or maybe not, pix on the web are notoriously decieving.
But you may want to check it out.

manana
New Reader
2/28/18 9:42 p.m.
Absolutely stellar Dave, really nice work.
I've not had great luck with those band clamps and prefer the more unsightly flanges. Hope you have more success.
Carter, nice pick up.
Thanks Steve, I am hoping the band clamp will work as the engine is sitting in Delrin mounts so it won't move, so the exhaust should not rock back and forth like it would with stock rubber mounts. As you know, my biggest concerns were the tight dimensions and routing it so it could be serviced as well as not hitting anything critical.
Carter, thanks for mentioning it. I will take a look at the front uprights tomorrow, I had not notice anything unusual assembling them but the uprights were from my Spitfire race car and perhaps they are bent, I have a spare set if that is the case.
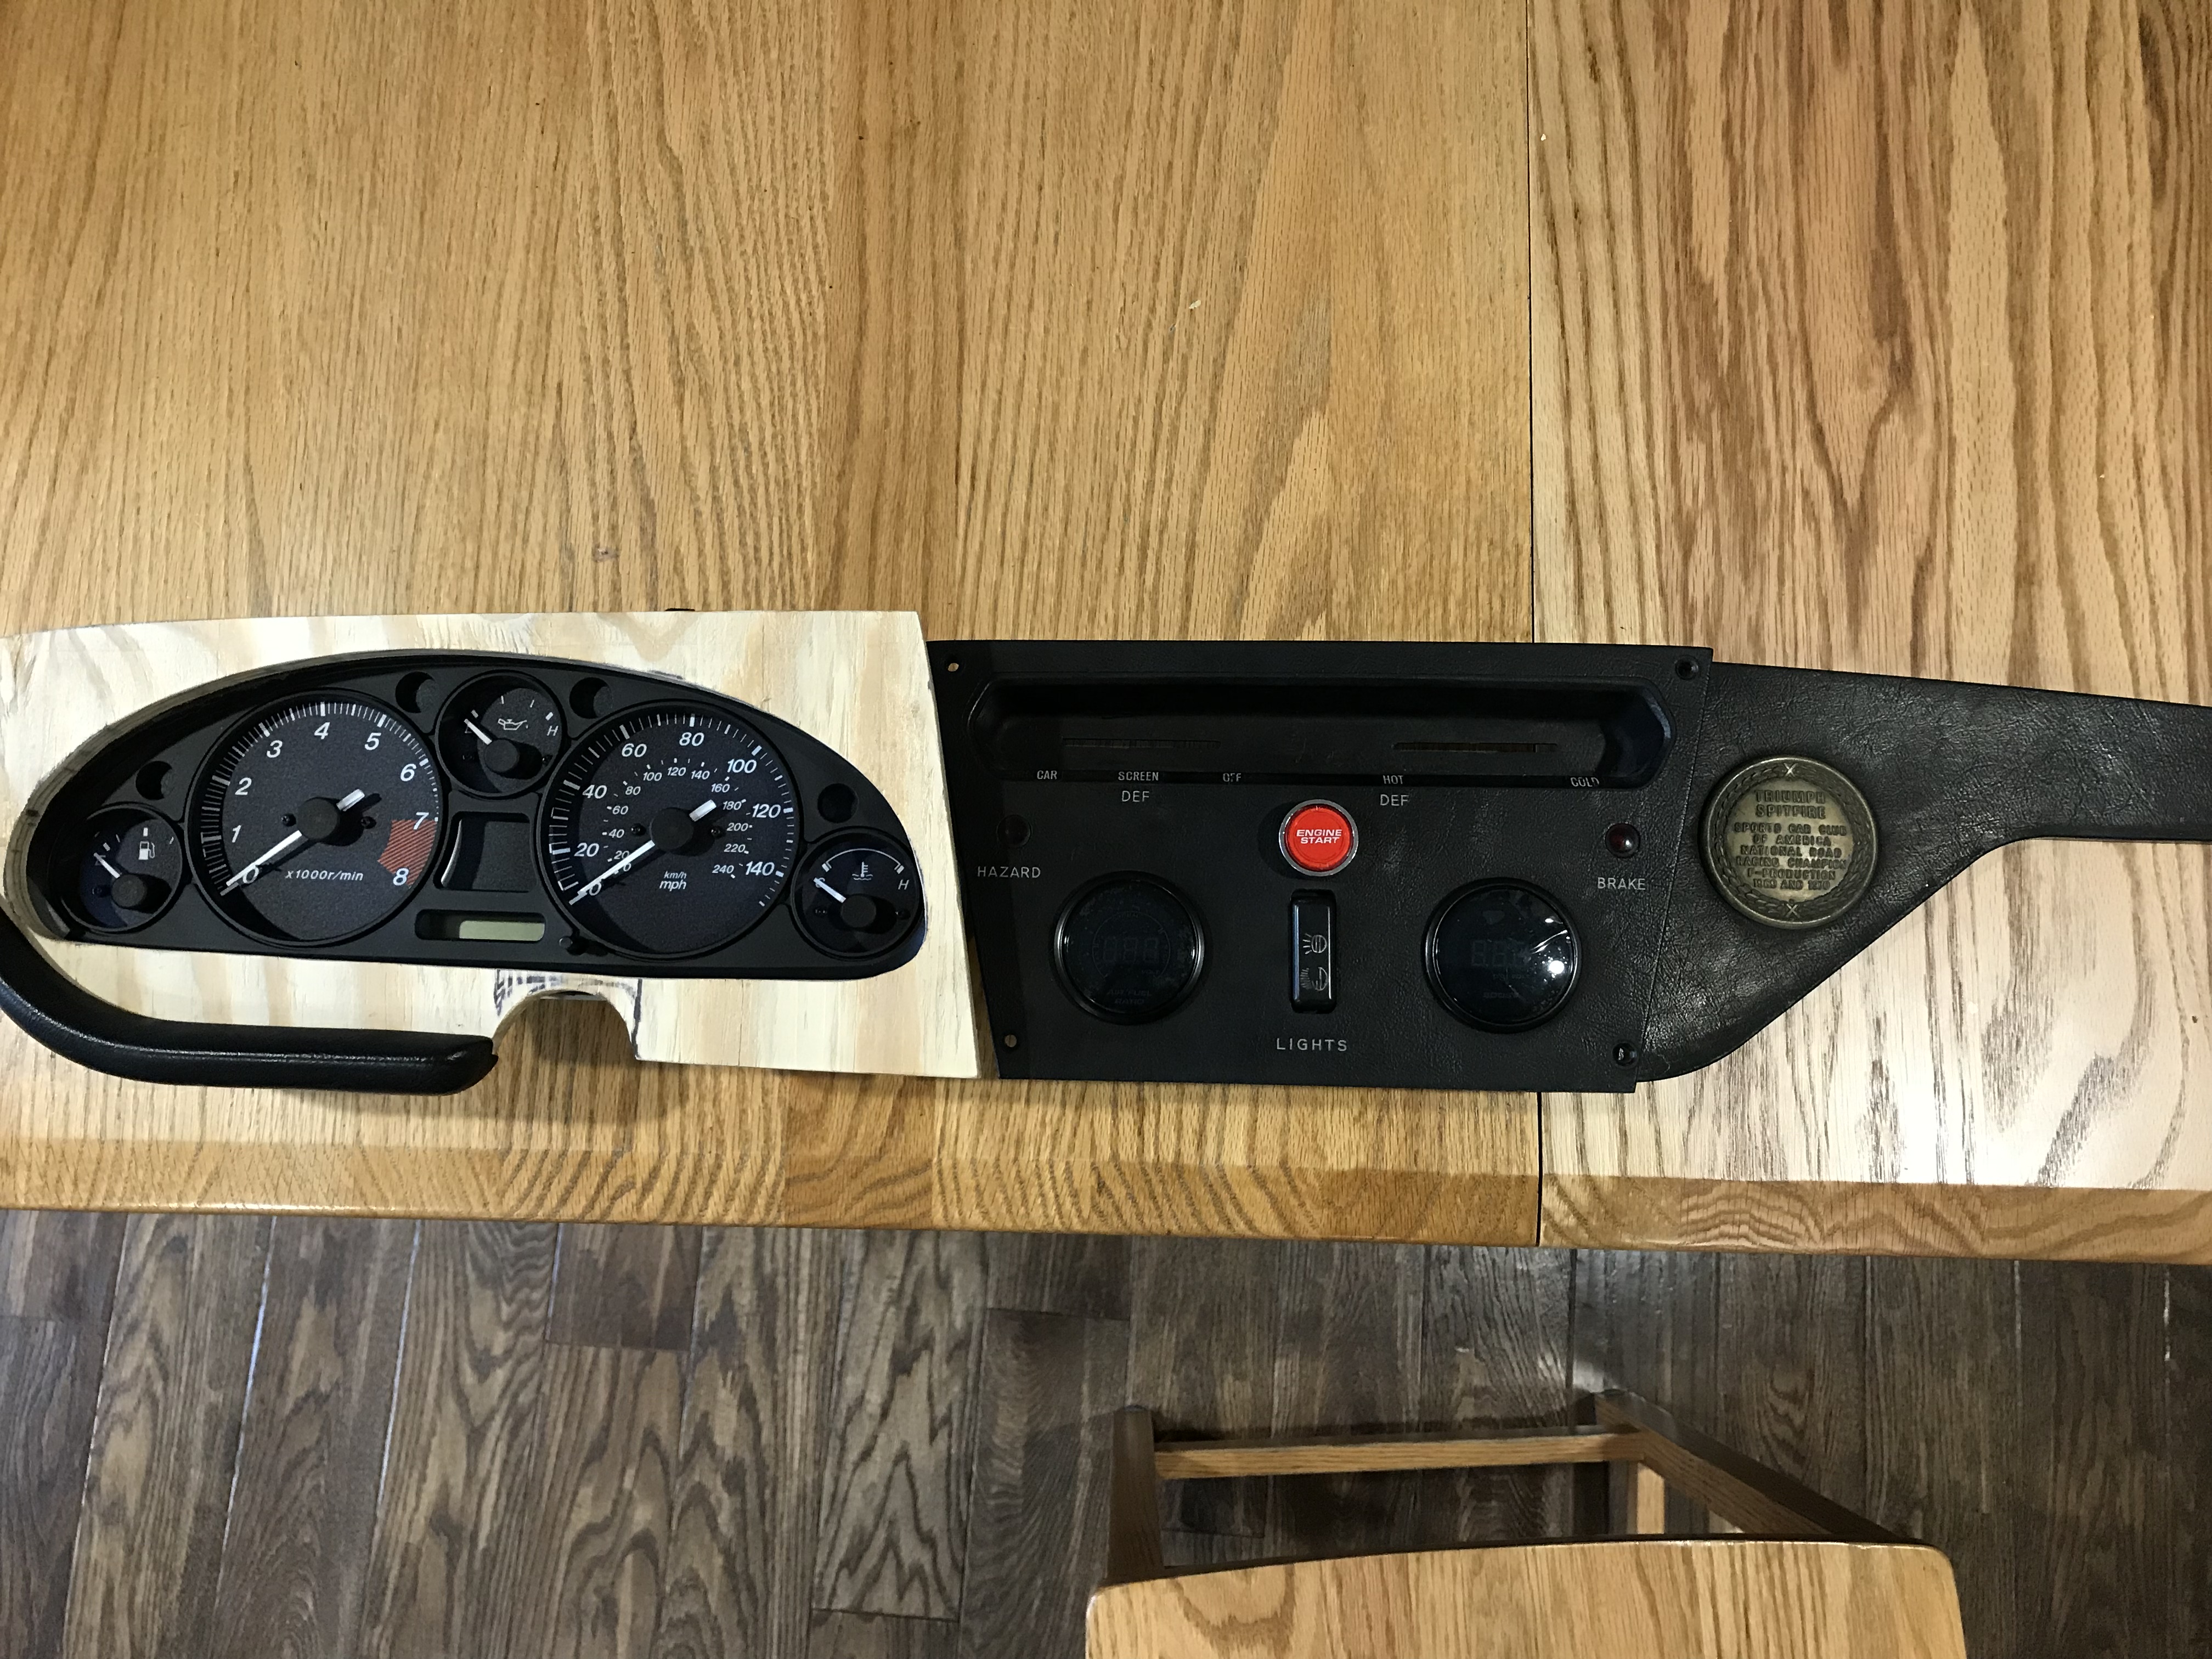
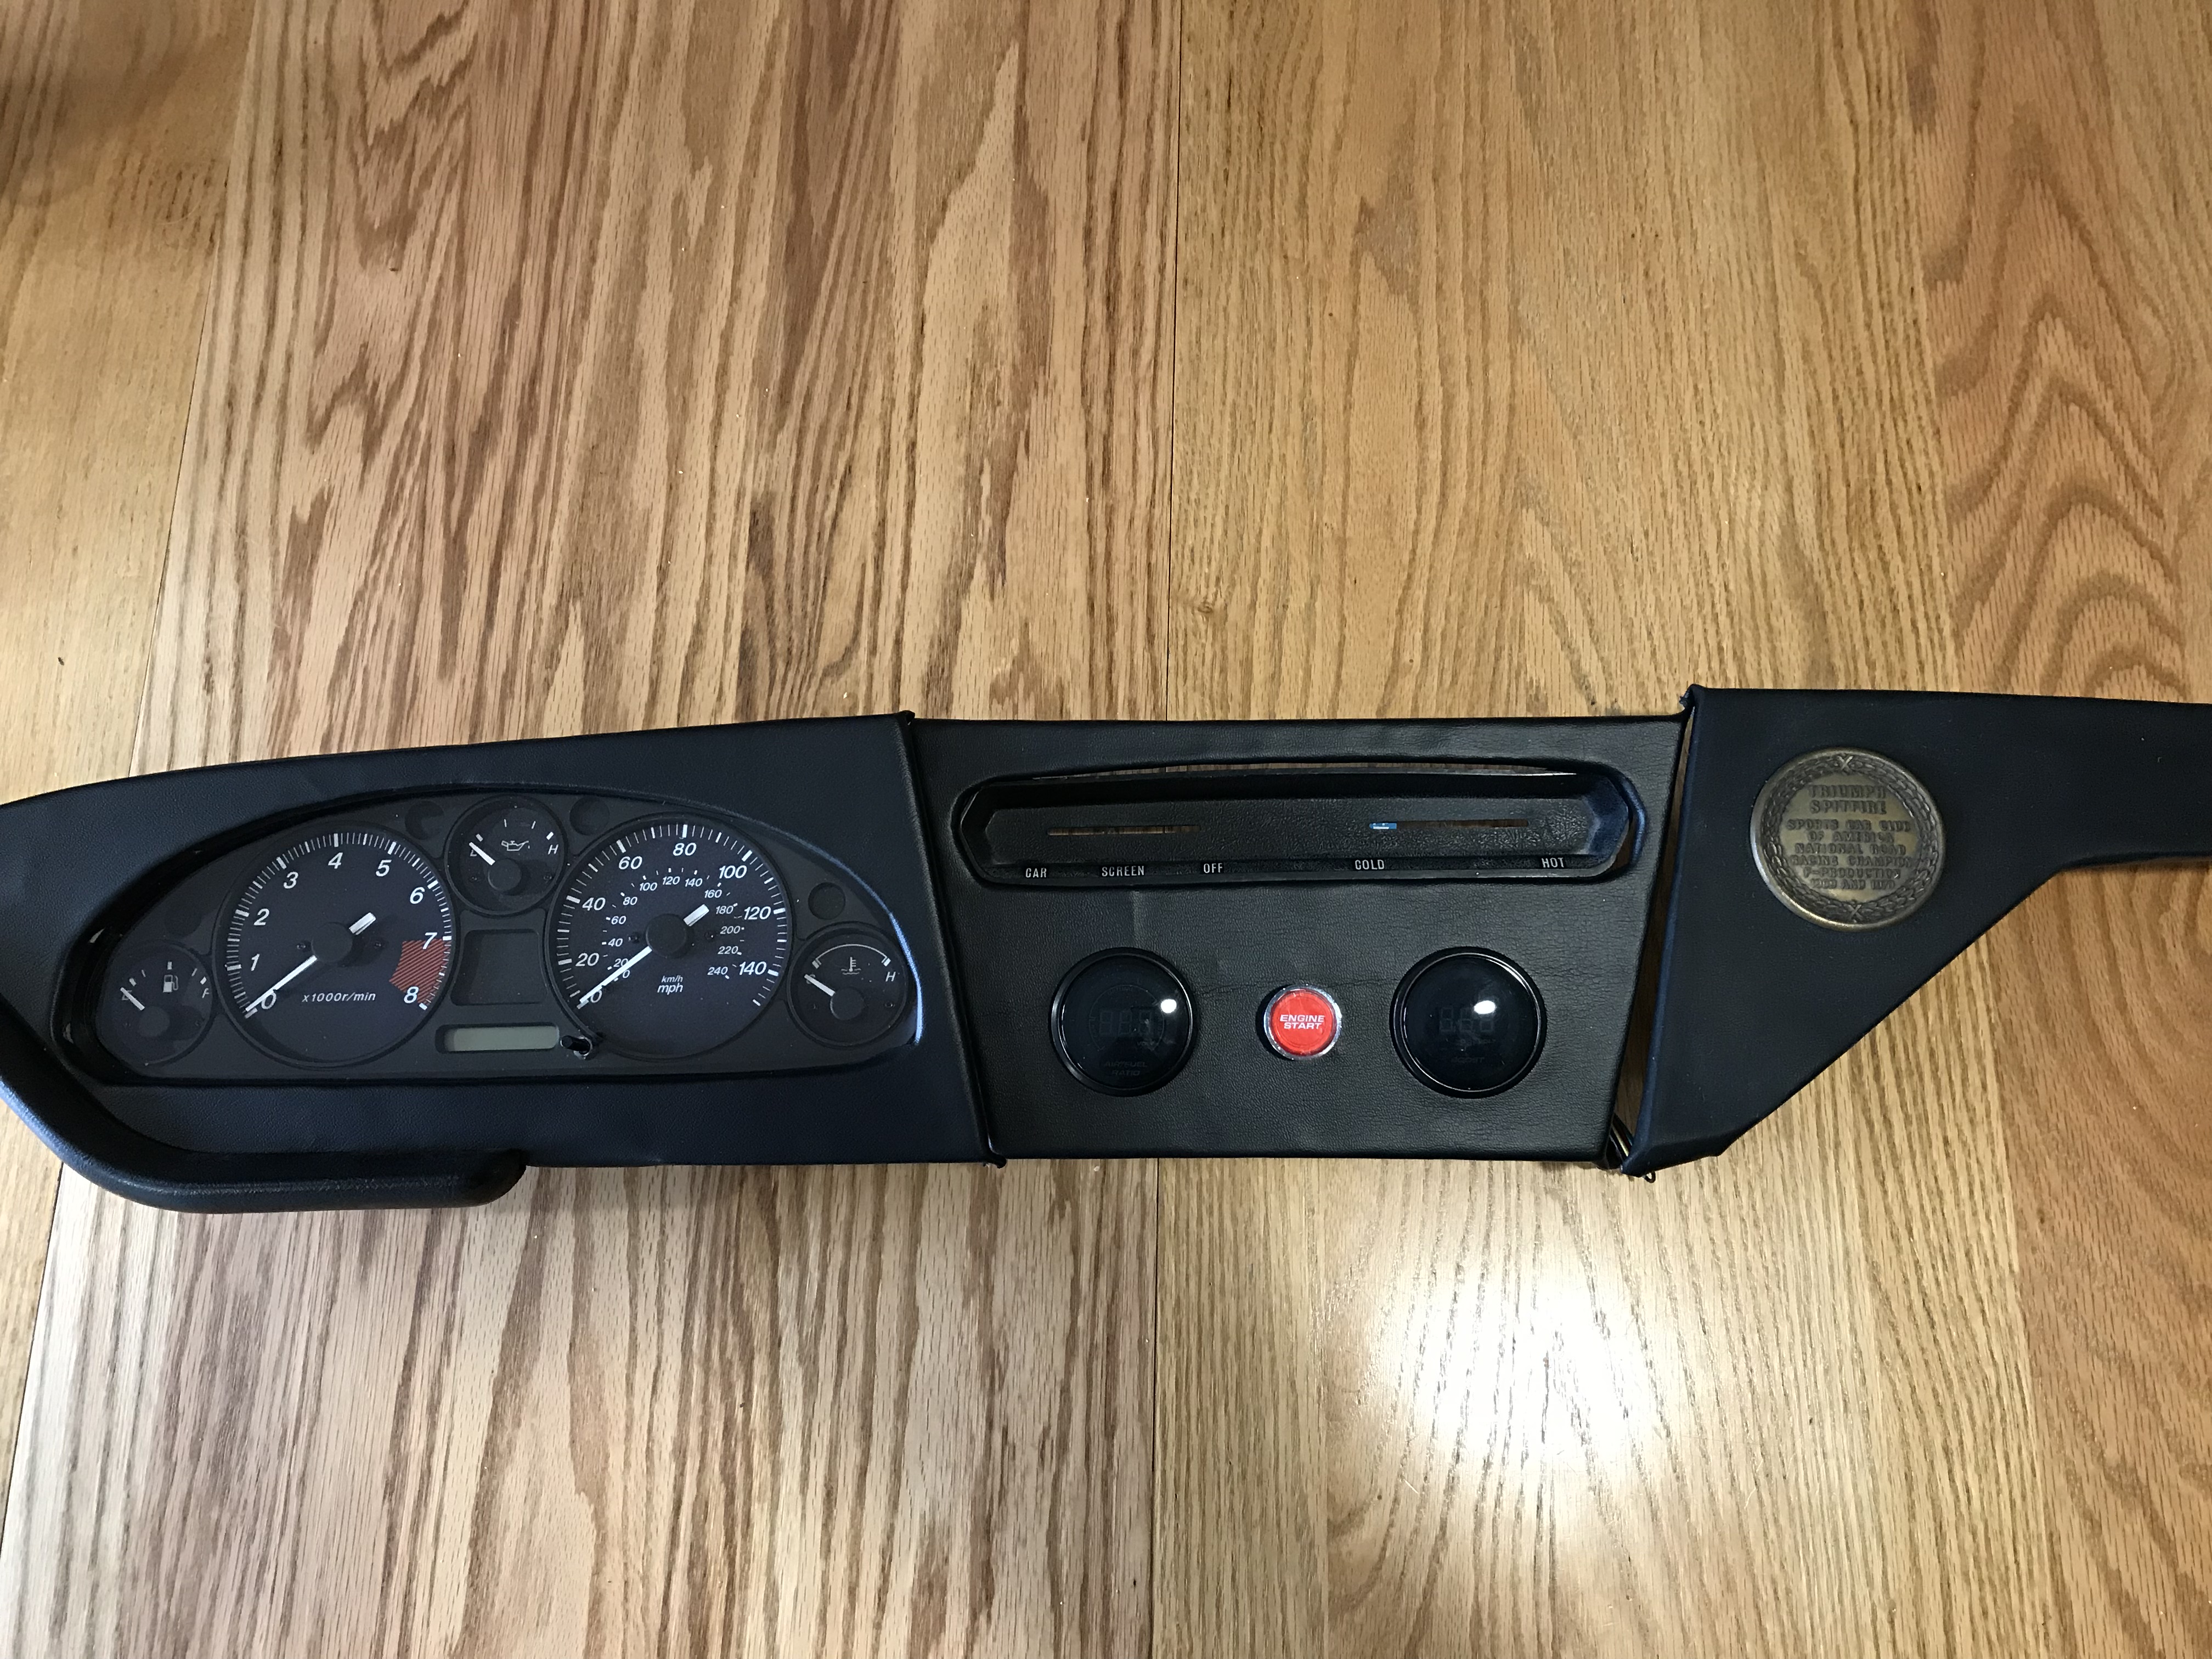
Cut out my drivers side dash board today. Basically since I am reusing the Miata cluster, I need a wood piece that I will wrap with black vinyl cloth and then use a piece of thin plexiglass and seal it on the back side. I'll do the same for the center and passenger sides, but just put the pieces in the MK plastic dash to see the layout. The gauges in the center are Fuel/Air and Boost, the starter button and the heater controls. The light switch will not be used on the final one as it is included in the Miata combo switch. I will be seeing how the Miata combo switch (wipers, lights, turn signals, can be installed on the Triumph steering column. This will save a ton of time for the wiring. The SCCA Champion badge will be transferred to the new dash!
manana
New Reader
3/2/18 12:12 p.m.
Tough to tell from the image but wondering how much it's offset to the left? I realize that would be for fitment into the panel, but.....
When I did my dash last time I was adamant that the signal indicator be centered so I could actually see it. I wonder if your most important gauge, the tach will be obscured by the steering wheel?
Saron81
New Reader
3/2/18 1:19 p.m.
I like that those gauges look like they could’ve come in it. Sometimes newer clusters look obviously out of place, but I think those will blend in nicely. Don’t know if it’s the simplicity of the round gauges replacing round gauges, or the font or what... but they work.

Won't know on that front for a couple of weeks, but don't think I have any real options if I am going to stick the cluster "as is" in the same space as the original tach and speedo. I do know it has been done before (see below), but it looks like they disassembled some of the gauge cluster. I want to keep this part simple, so I'll work with what I have done so far and see how it goes. I don't want to spend 40 hours on this part of the build, so the good thing, is once it is all put together and running, I can always change the panel in front of the driver or look at the option of disassembling and creating my own dash cluster out of the Miata parts. Fortunately that can all be done while this solution is working in the car this summer.
As it is, I do have to change the front steering column dash mount and the bracing to clearance it for the depth of the Miata cluster, but that will only make it better as I can weld in some strengthening in this area which is notoriously weak anyway. I should still be able to bolt in the transmission tunnel brace and will support the dash with some additional supports. Body work is coming in the next few weeks.
In reply to Saron81 :
Thanks, I agree that it is simple and won't jump out too much. What will jump out are the digital A/F and Boost gauges, but some of that is also by design  . They are all black when off, so you won't know it is that much different until you fire it up.
manana
New Reader
3/2/18 5:13 p.m.
Great plan Dave, those are the things that you can digest and then make them exactly as you like, whenever you like.
I still can't get over how fast you are moving; I got mine done quickly, but no where near as neat as yours.
The weekend was busy, but I still snuck in some time yesterday to work on the car. I had to raise rotisserie up about 10 inches on each side so the Spitfire body could be flipped over completely. I had some square tube that just happened to fit inside of the engine mounts I am using, so just added the extra lengh and cut and welded them up. Body is now upside down and ready for me to start drilling out the spot welds.
I have been surprised how fast it has gone as well, I think it is because I work from home and can find an hour or two each day to work on it.
In reply to dherr :
Looks like the Big Lepkowski could learn a thing or two from you. ;-)
He was over on Saturday and checked it out. He has a few more years of high school sports, my kids are all in college or launched now, so I definitely have more time available for this work
Drive shaft arrived, fits next piece of the puzzle completed.... In the past I have welded up my own, but feel much safer having one that has been balanced to 9,000 rpm beneath my right arm !
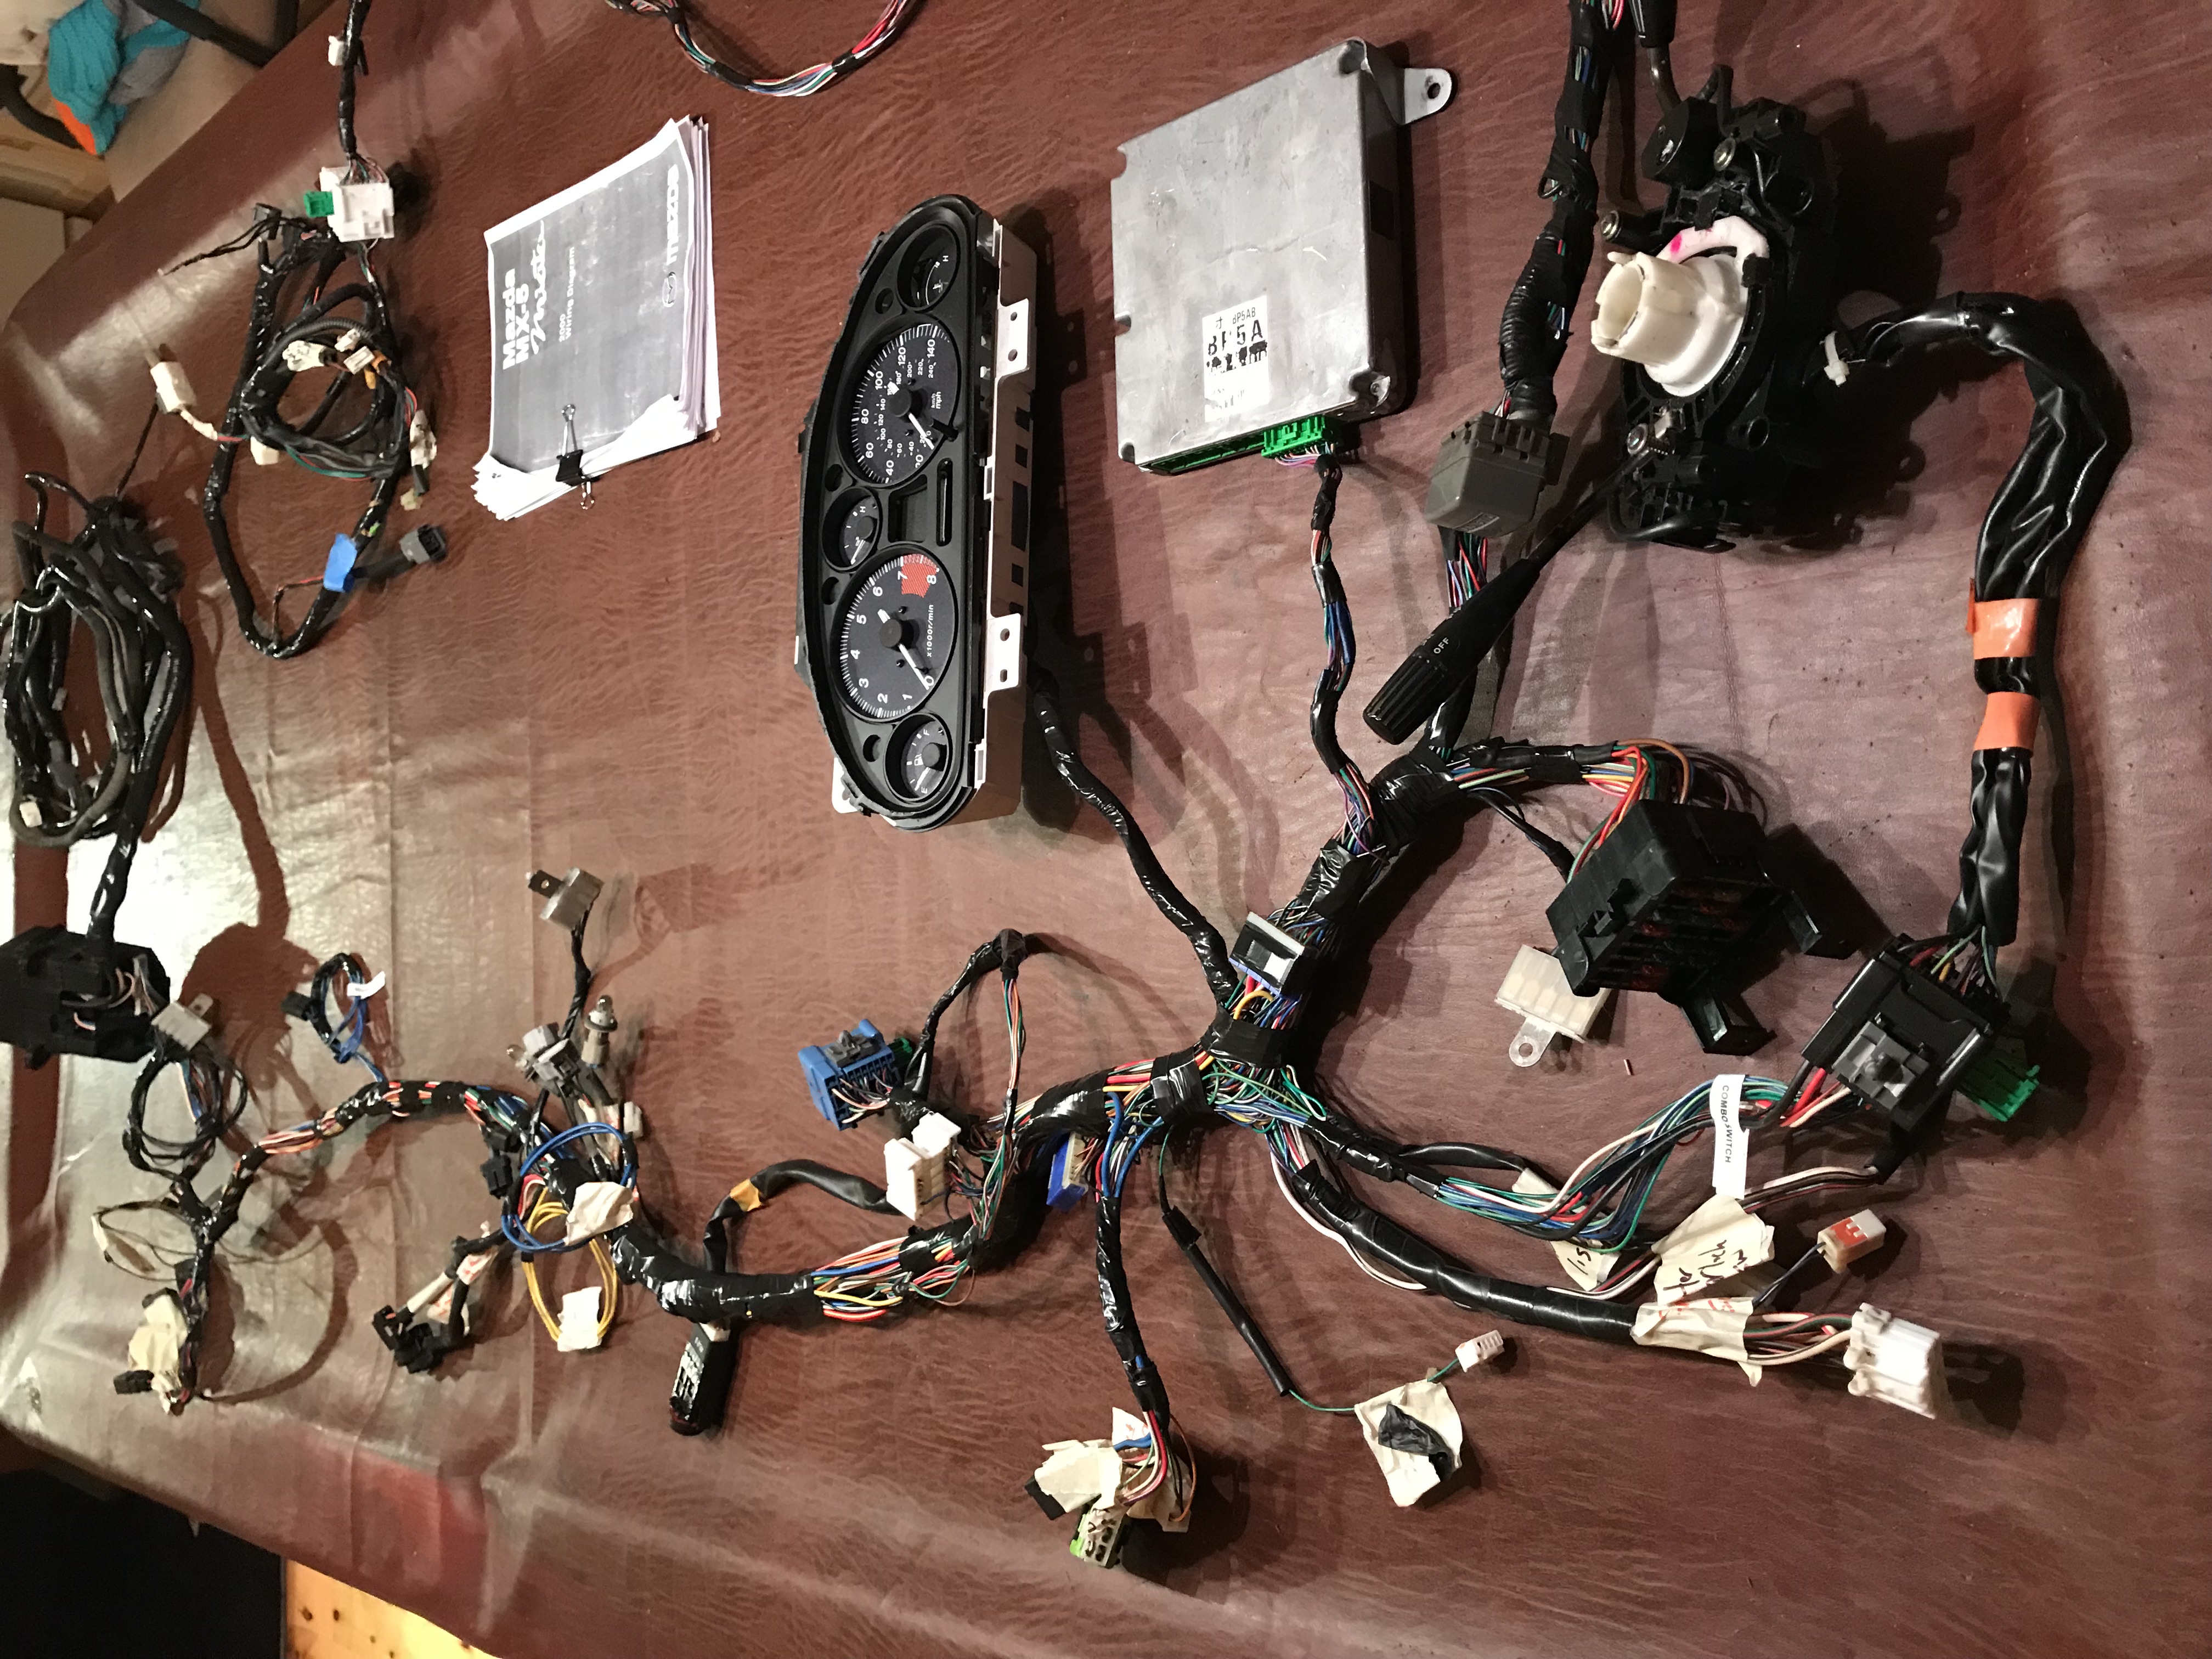
Finished the hardest part of the wiring work today. My complete cut down Miata wiring harness with all the circuits removed that I don't want or need in a Spitfire. I have labeled all the connections I need for the next part as well and moved the lights to the same side of the harness in the front for the tie into the Spitfire front light circuit. Basically I will need to fit this in the car and then decide if it needs to be shortened but I am 99% confident that I identified everything correctly. I'll work on the dash tomorrow and will need a small sub harness for the center gauges made up. So next steps on the harness would be to splice in the pieces that I can do now (like the ignition switch, starter button, brake switch).
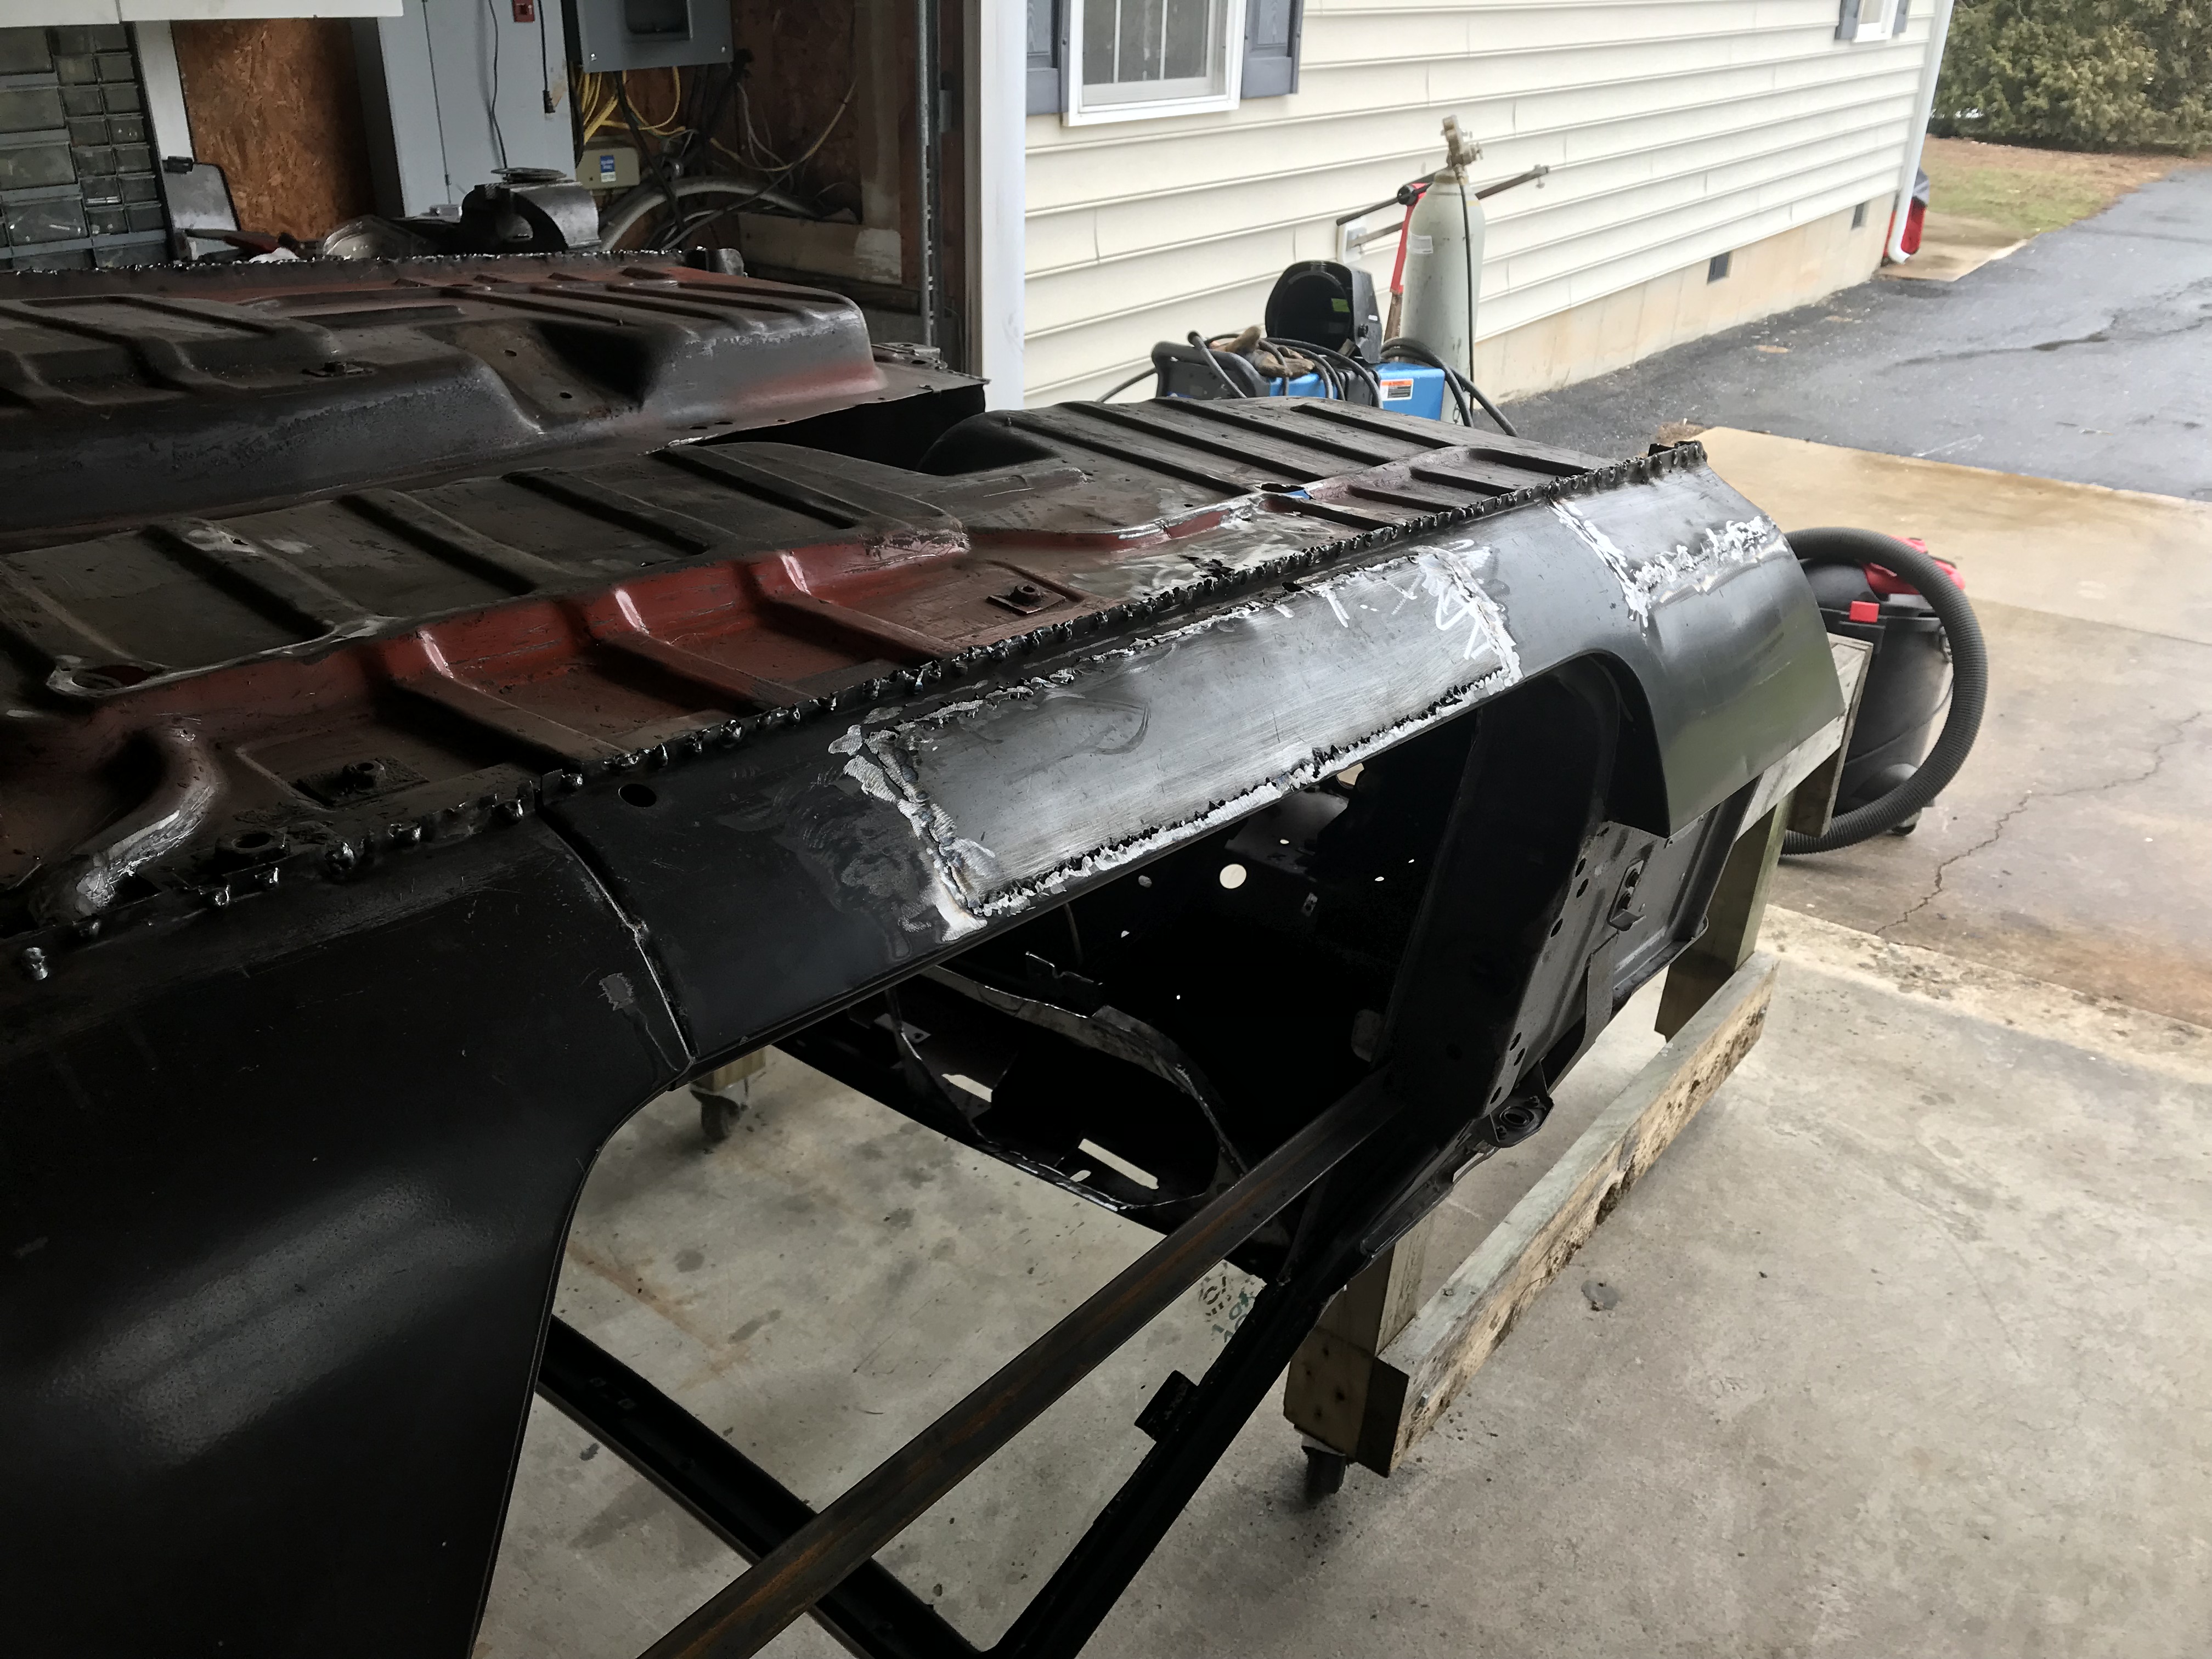
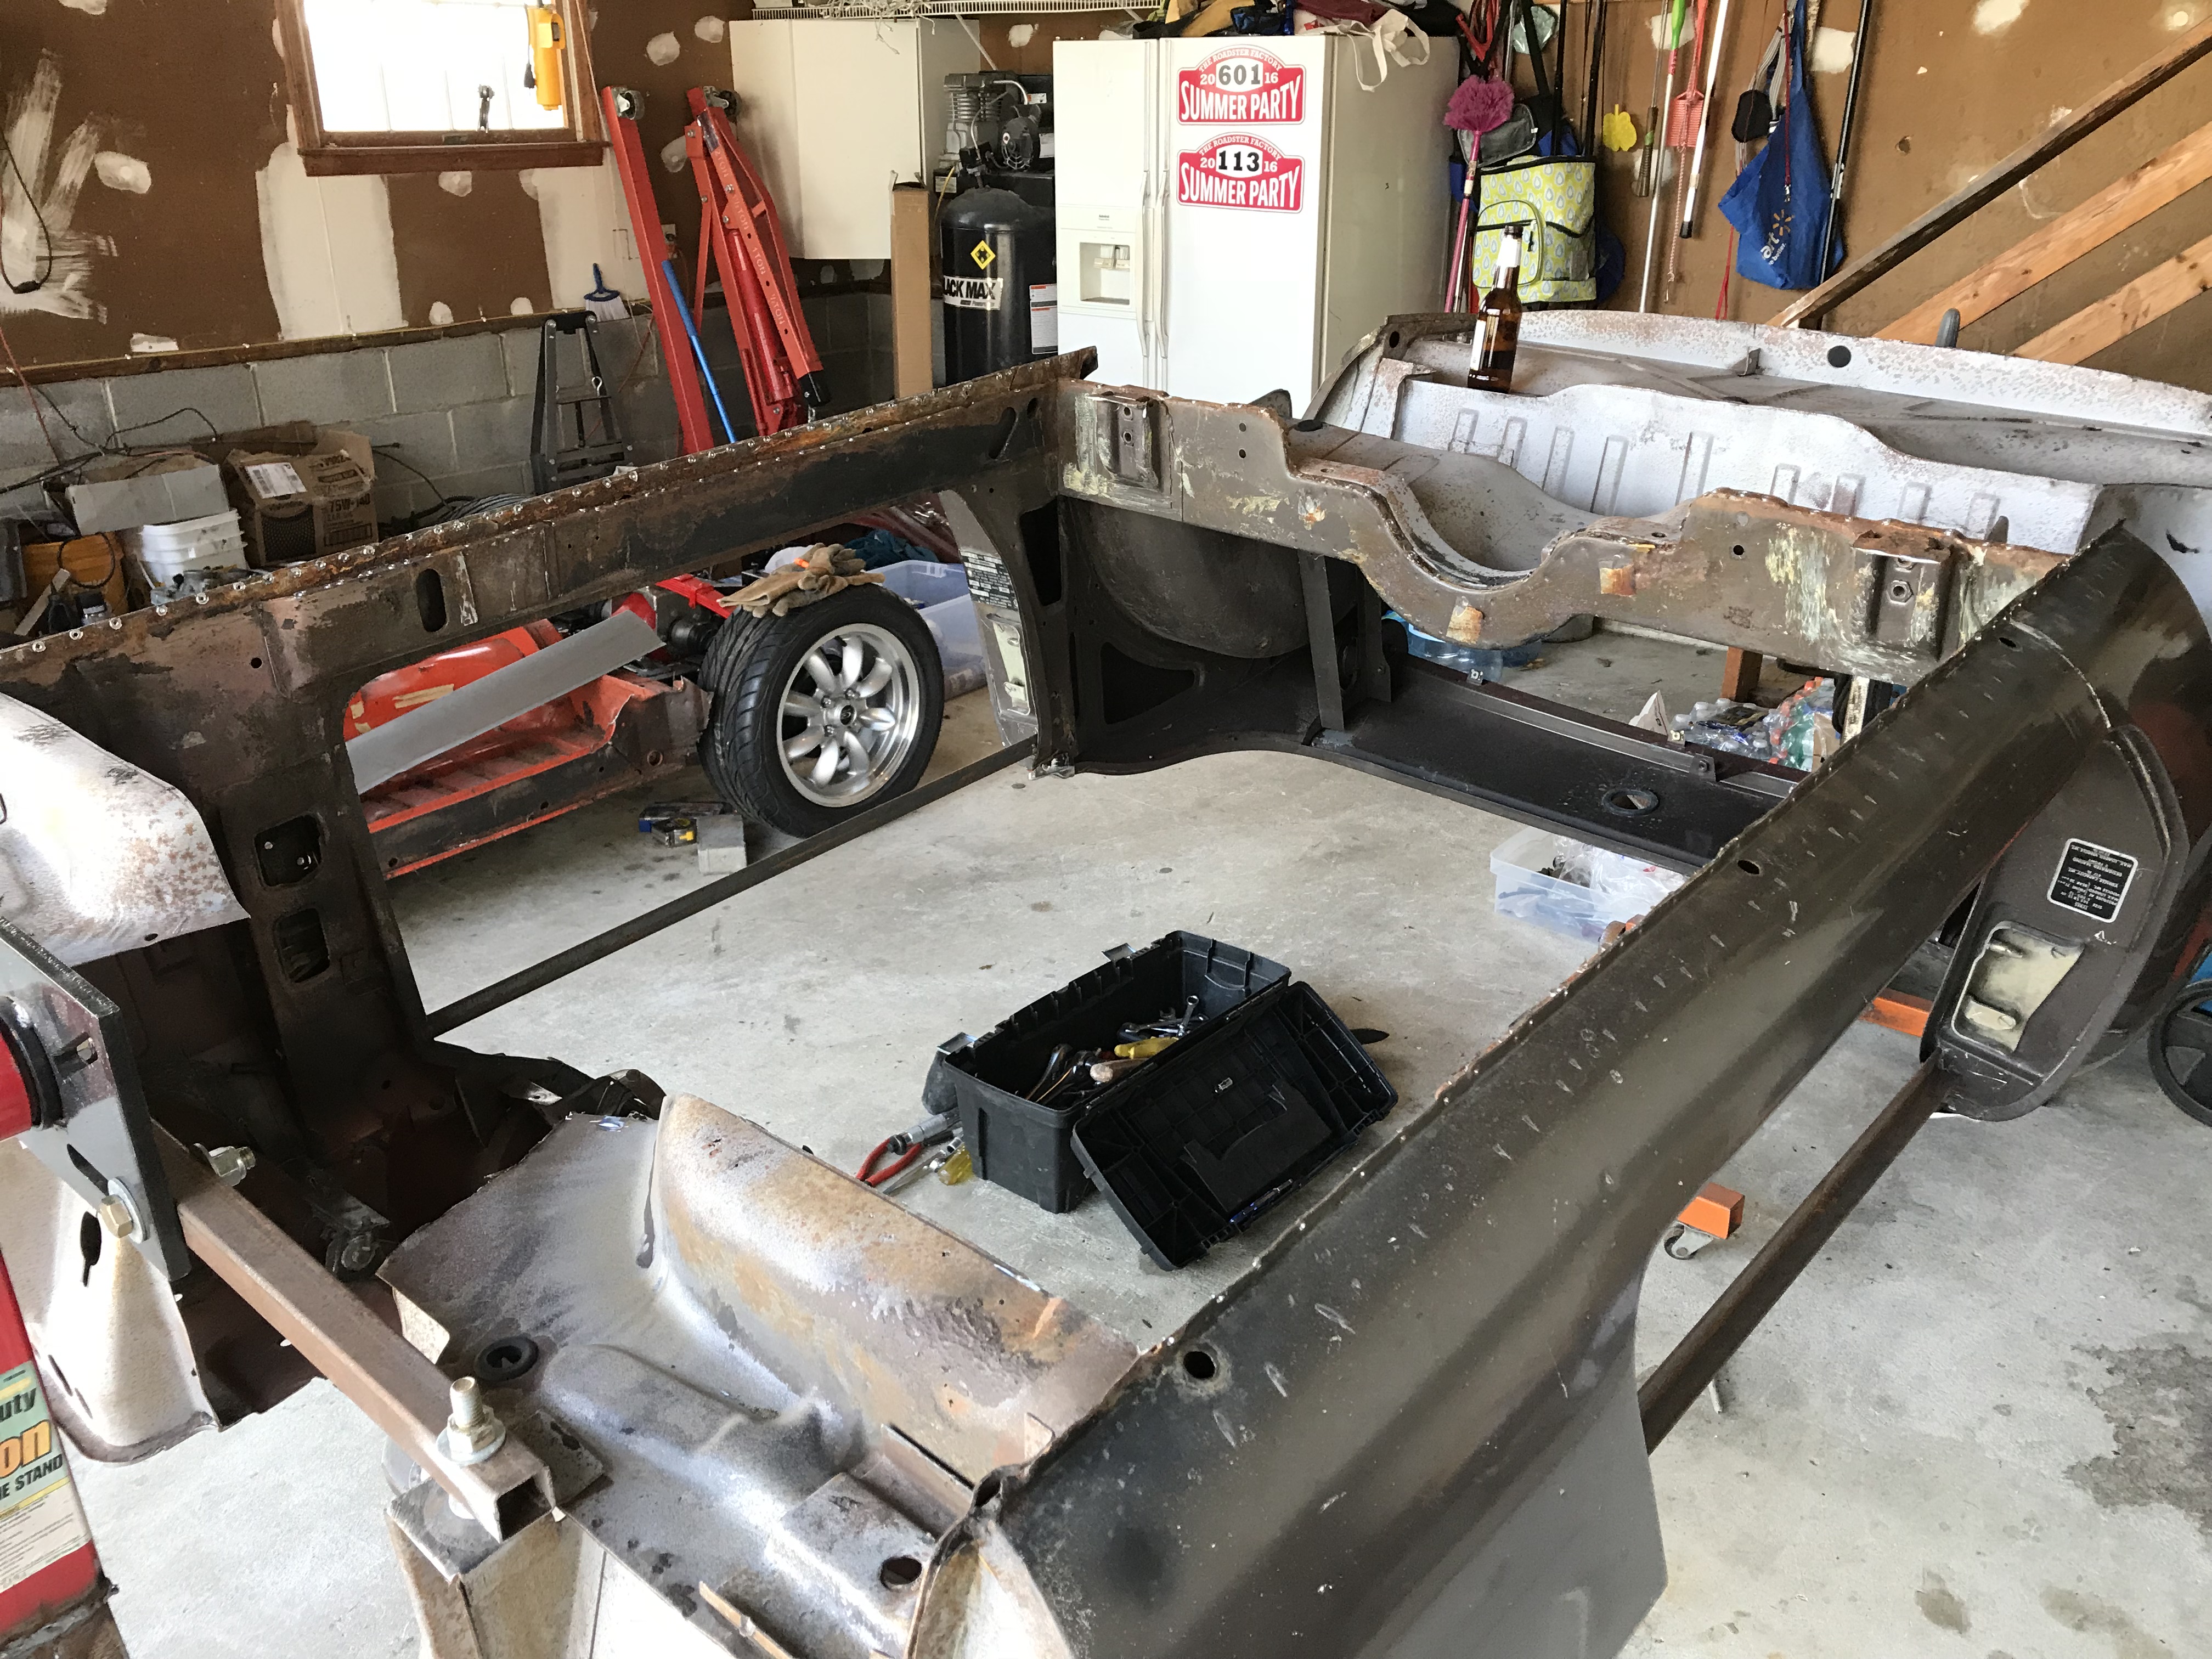
Body work day, drilled out all the spot welds and removed the floorboards today. will just need to clean it all up and then carefully prepare the floor boards I got a while back to weld back in. Glad I am replacing them as they were pretty rusty. I left the front of the floor pan in as they are not rusty and I have not decided if will cut them out completely or just but in the replacements. I'll cut out the bad rocker patches after the new floors are safely in place. Having the floors out and the body upside down will make it easier to figure out the dash modifications for the steering and the Miata gauge cluster.
Since you are keeping the miata cluster, may I make a suggestion? I haven't used these or this brand personally, but I think they look really good and would both differentiate your cluster from a stock miata cluster, and might actually help it fit the car even better.

^ CLASSIC BLACK BRUSHED STAINLESS STEEL GAUGE FACES

^ INSTRUMENT CLUSTER BEZEL, STAINLESS STEEL, MK1
Both from Jass Performance, they have some pretty neat stuff.
They do look good, I was considering one of these can easily added to it as the gauges will just be fastened to a dash panel. Right now, I am working on getting the turn signal controls onto the triumph steering column, which looks like it will be successful!
So I have determined that with the harness almost ready to go and the floors out, it is much easier to figure out the dash with the body upside down, since I have to clearance it anyway and that means I need to weld in more material for the steering support and dash support. So first order was to cut out the drivers side dash panel. I then cut a piece that allows me to put the Miata dash cluster and a piece of plexiglass flush behind the dash. I then need all the finished dash pieces so I can figure out everything and then weld in the supports. Dash panels are now plywood with the cutouts for what remains. I'll seal the cluster and the heater controls with some black sealant to fill in the gaps. Not perfect by any means, but will look good in the car. Next steps will be to finish the steering column with the Miata combo switches and then I can weld in the supports for the steering and dash around all of this.
I can always go back and make this prettier at some point, but for now it will be functional, and mount in the car and be connected to a proper harness, so pulling the panels in the future or adding a fancier dash display will be easy.
FYI, learned that it is not good to weld on a car upside down with the glass still in the car..... may have ruined my windshield even though i had it covered :-(
So I am out of town later this week and despite St. Patrick's Day being on a Saturday, I managed to get some work done. First of all, I had to finish figuring out my emergency brake, I ended up moving it back 6 inches and welded on the bracket. Looks like I can run the cable back 6 inches and exit the floor right at the rear bulkhead to meet the pivot point. With that settled, I could now disassemble the used floor pans. This involved drilling out what seemed like hundreds of spot welds and carefully separating the panels. I am pleased with the results, given that this was much cheaper than new floors.
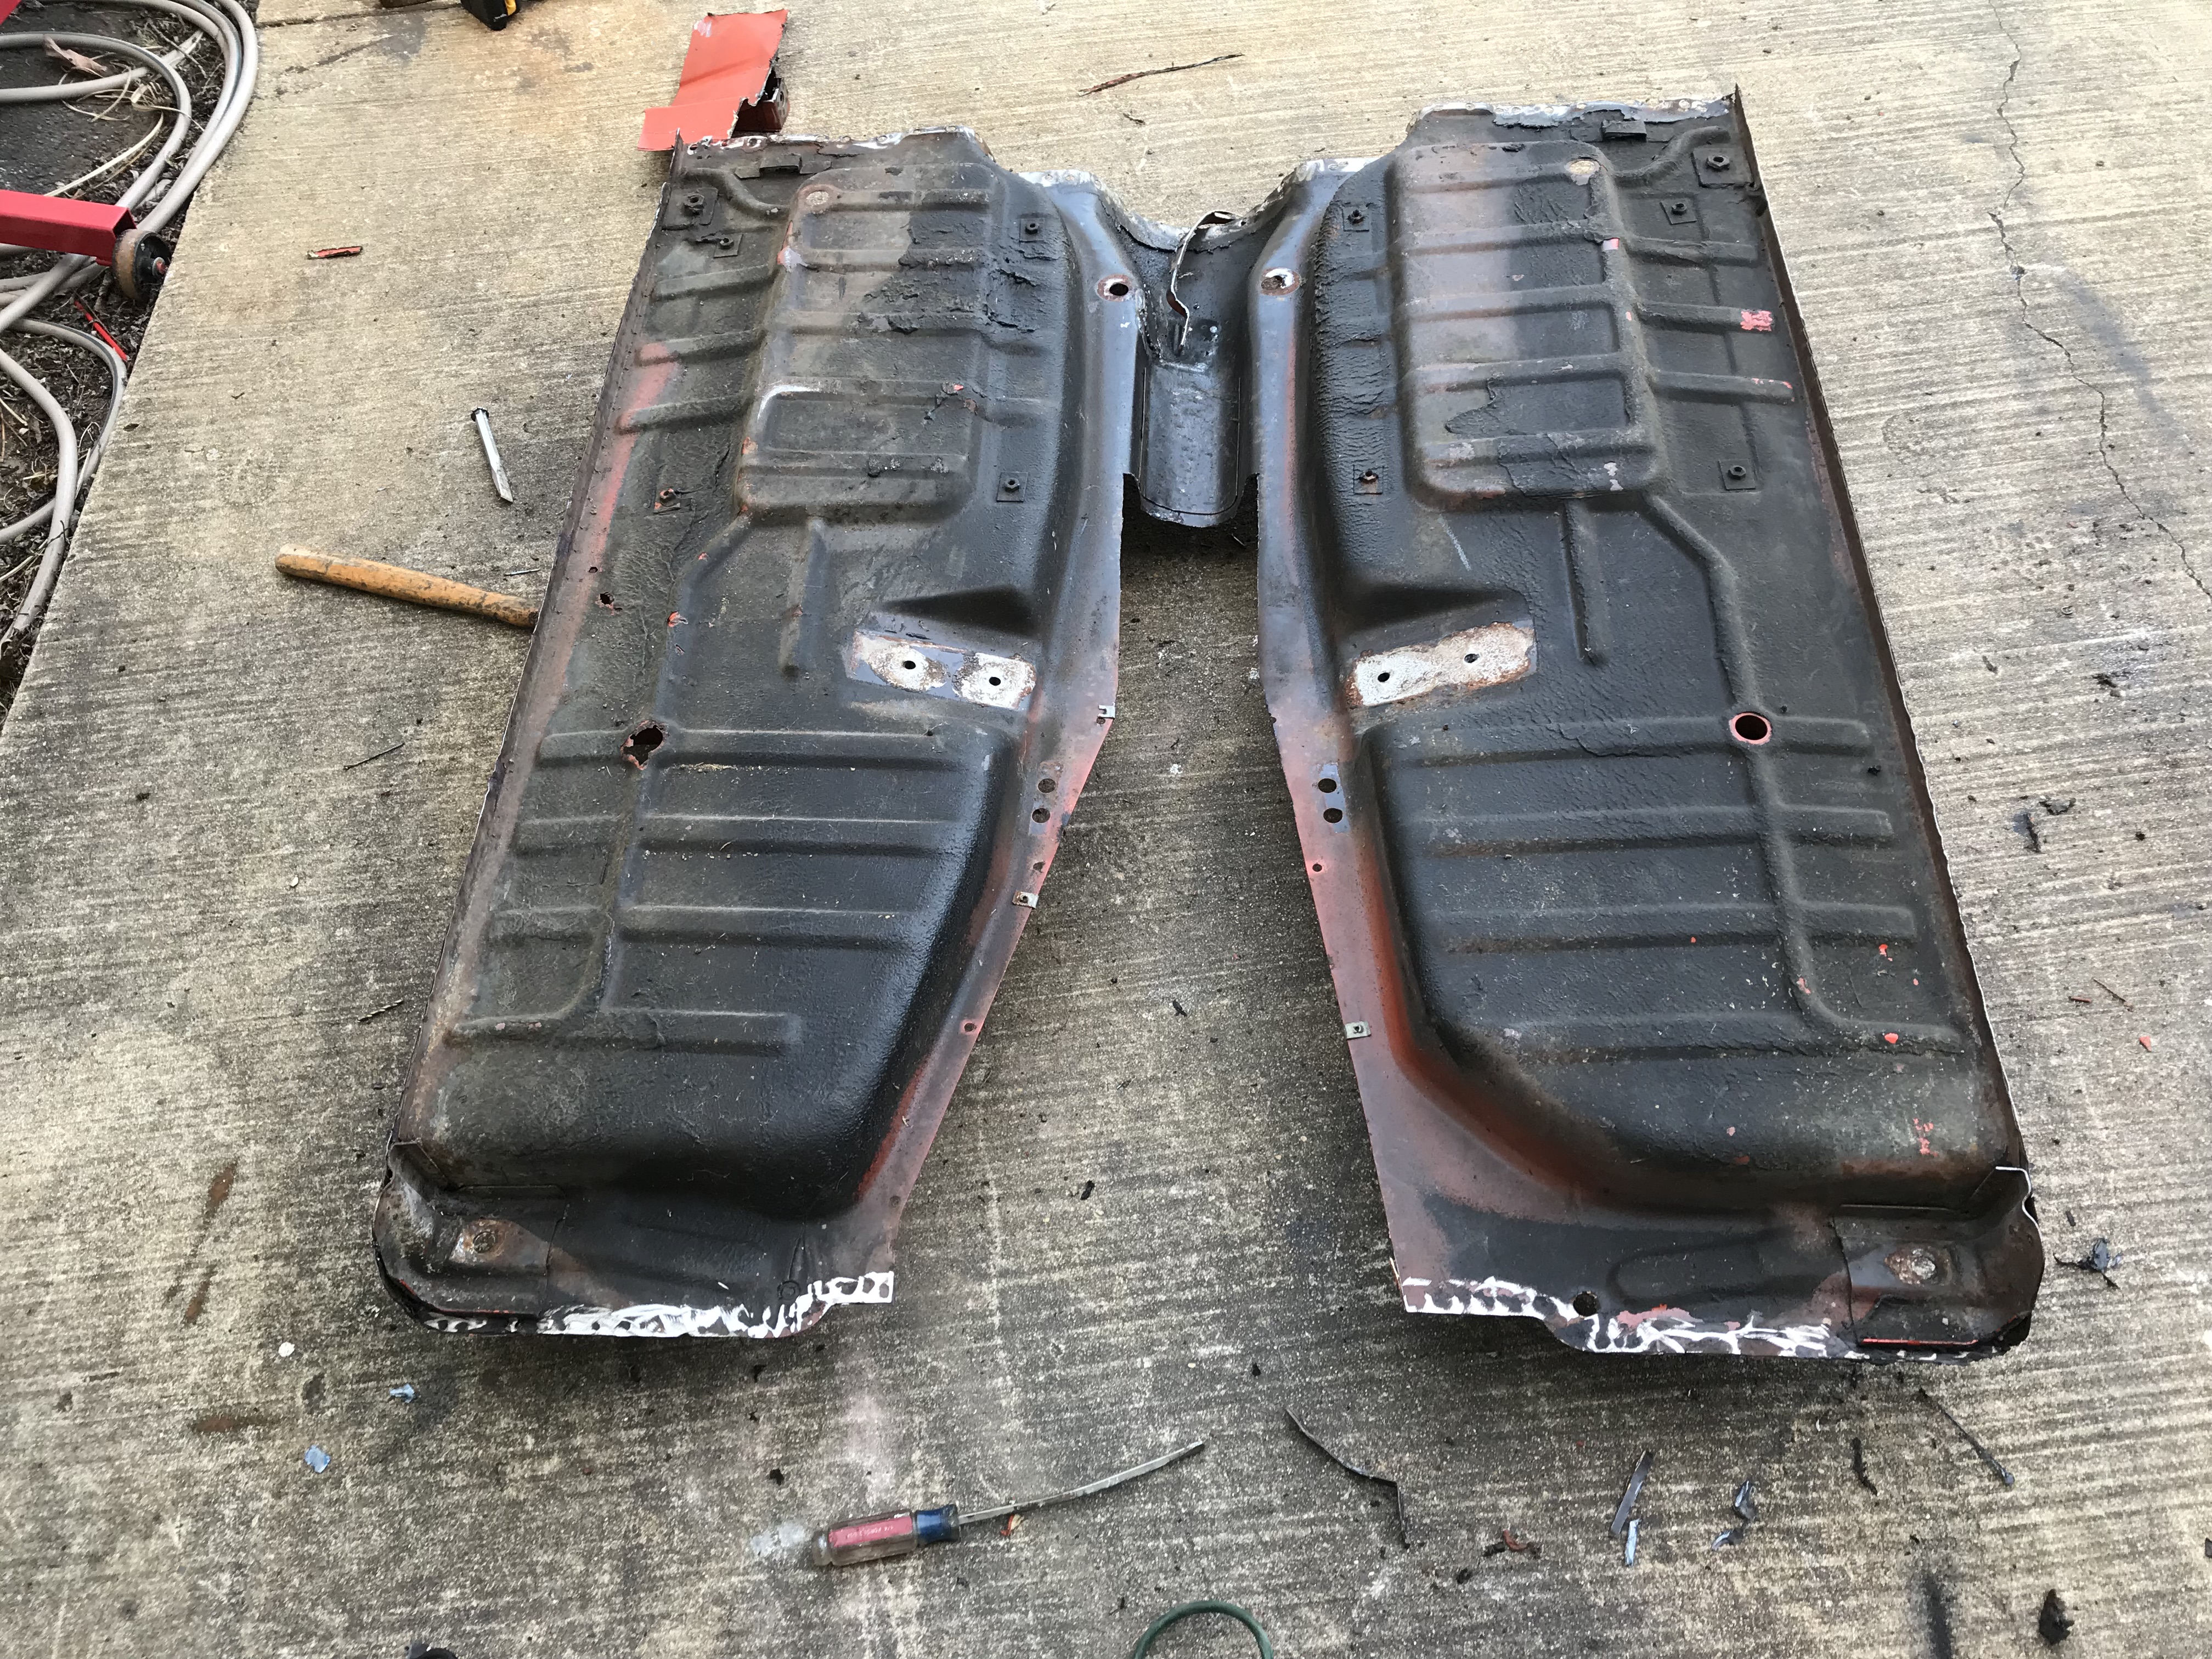
These used panels are not perfect, there are 4 spots I have to patch, but it is incredibly solid in comparison to what I removed. The inner rockers looked brand new, mine were full of surface rust. I was able to separate the floor pan, tunnel and inner rockers as one piece and then place it on body. I'll take some measurements before I weld it back in, but looking good.

Once the floors are in, then I will fix the driver's side rocker panel (patched), and then replace the rear valance. Goal is still to have the body ready to go back on the frame by the end of the month.
manana
New Reader
3/21/18 12:47 p.m.
Hey Dave, sorry I'm not getting my webpage updated with some other stuff you may find helpful.
I hope it's not too late but here's how I did mine. I only needed my Parking Brake Handle to go back about an inch or so, but I really didn't want to get messed up trying to weld those brackets back on and get the geometry and strength just right. So I just chopped out the entire assembly and welded it back in with a slight angle to accommodate the slightly higher transmission output.
One thing I almost goofed up was assembling the thing with the tranny, diff, and prop shaft installed but forgetting about removal. After welding it up I later went to pull the propshaft out of the tranny, it just barely made it! I have to make sure the u-joint is oriented just so or it is blocked by the downward sloping tunnel.
I think your entire assemble is tilted more than mine, so I don't expect the same issue, but just wanted to mention it.
Steve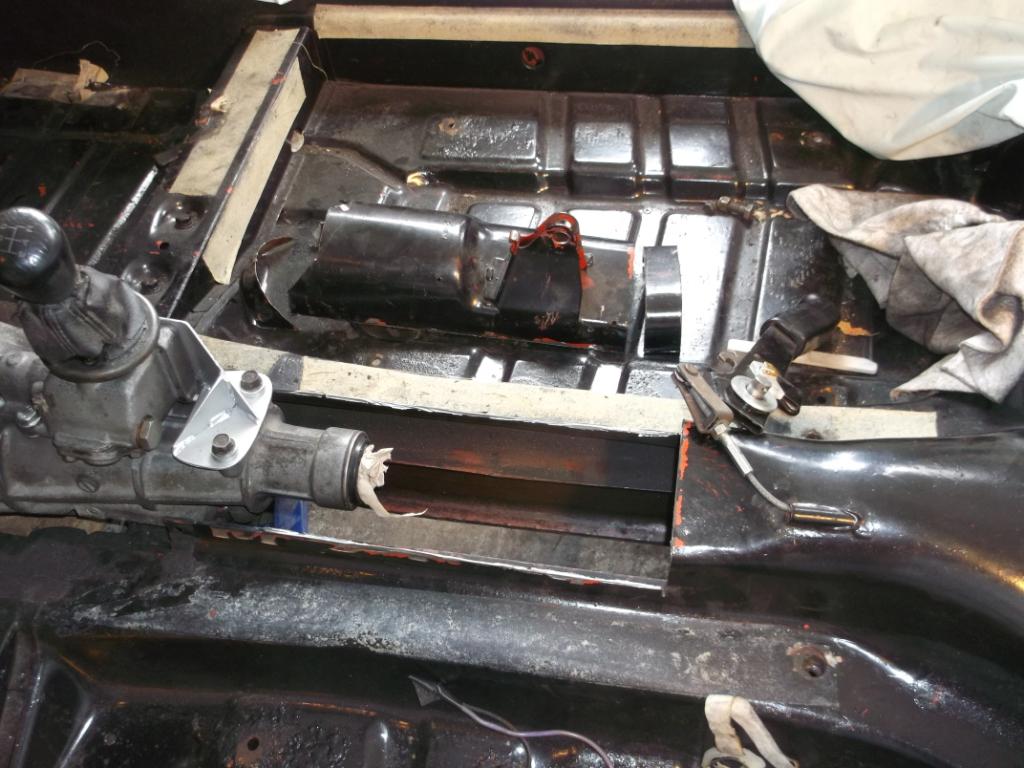
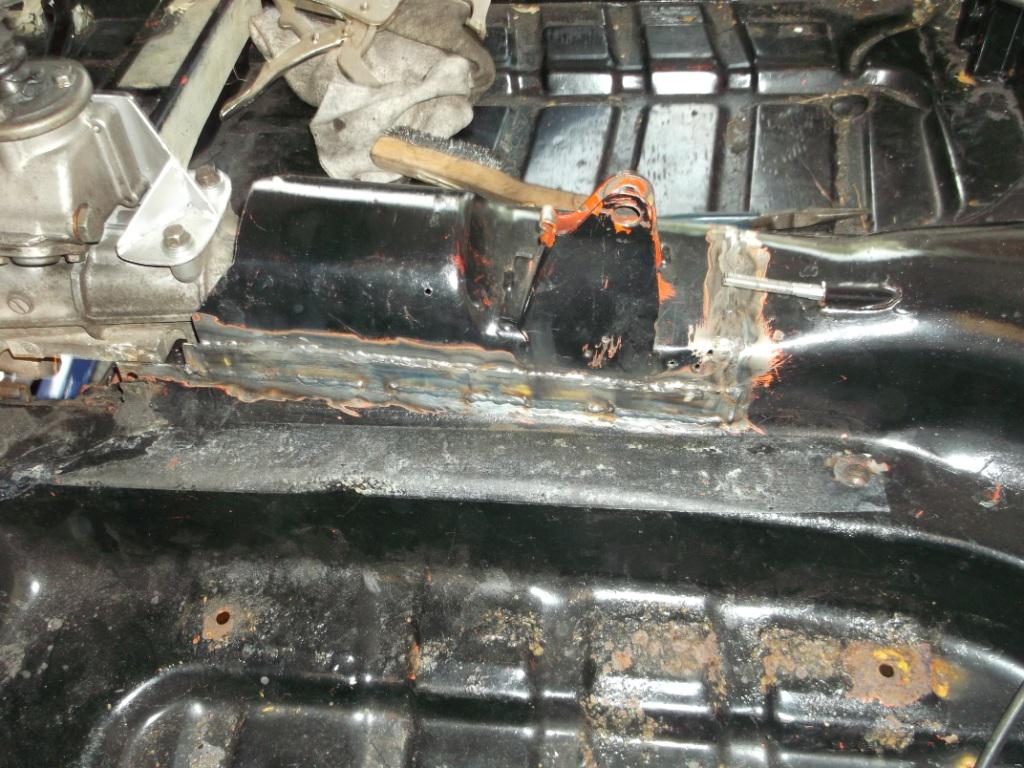
Steve, nice work on the emergency brake changes. I did not have that option as with the 6 speed, it needed to go back further, so my cable location will also have to move back. I am pretty sure it won't be a problem, but thanks for sharing your solution.
So the body work continues, the "new" floors are back in and welded, just need to grind down my "spot" welds and clean it up and seam seal everything. The driver's side floor is perfect, the passenger side does have several holes I need to patch, but nothing structural, just some areas where water must have been in the carpets so it went to the low spots. Compared to my old floors, these are great. I will finish the floors on the bottom side and install the rear valance next, then I'll be able to flip it back over and finish the inside and then flip it back over to complete the body work. I have decided to paint the rockers, rear valance and front valances in satin black, since they will need some some body work and the black will blend in. I also have patched my rockers on the driver's side as they had some soft spots, but the passenger side is completely solid. Body should be good to go and back on the frame in early April.