1 ... 3 4 5 6 7 8
docwyte
docwyte PowerDork
10/8/22 10:37 a.m.

In reply to thatsnowinnebago :

Yeah, honestly unless I really start to take this offroad on the passes here I don't see myself needing a winch.  I was able to ask on ih8mud and it looks like there's plenty of access for me to add one later with the bumper installed.  So I think I'm just going to install it without a winch for now.

docwyte
docwyte PowerDork
10/28/22 3:20 p.m.

Bought a cool rear hatch light off Amazon.  It arrived with zero instructions at all.  Like, nothing, nada, zero.  So I popped off the little panel on the rear cover where it goes and look around.  Not evident where it plugs in.  Search around and find a youtube video showing how to remove all the panels and where the harness plug is.  Friend and I pop off the panels, which is super easy, then spend probably 10 minutes searching for the harness.  Finally do, it's this one here, on the right hand side if you're facing away from the truck.  You need to pop off the clip holding it to the metal hatch

Run the wiring behind all the metal and plug it in.

Put all the panels back on.  While snapping in one of the side panels, realize that you were dumb and didn't take the plastic retainers off the body and put them back onto the trim.  Argh!  Shake the hatch so they fall to the bottom, then remove the inside tail light to find them.  Little bastards, there you are!

Carefully inspect all the trim panels to make sure all the clips are on them, remove another clip off the back of the metal hatch and put it on the trim.  Snap the trim back into place and struggle to plug in the 3rd brake light.  Finally done!  Push the button and nothing happens.  Hmmm?  Ask on 200 FB group, turns out it has an internal battery and you have to run the rear wiper some to charge it.  Do that and success!

docwyte
docwyte PowerDork
10/30/22 1:50 p.m.

Time for an oil change.  I also want to change the fluids in both diffs and the transfer case, along with lubing the driveshafts.  However I need to buy the oil for the diffs/t case and also buy a grease gun and grease.  So just did the oil change.  Last time I couldn't figure out how to do this without taking off all three of the ARB skid plates, which was a huge PITA.  Today I resolved to figure this out.

Turns out you can just remove the front skid plate and get to the oil filter cartridge.

The on the second skid plate ARB has this built in ramp for the oil to go...

I thought of putting tin foil down there too late....

My home made tool works well to drain the oil filter cartridge cleanly....

Then I put everything back together.  Wish I did have my grease gun for the driveshafts as 5 of the 6 zerk fittings were in perfect reach with the rig as it was.  Oh well.  Put 8 quarts of oil in, manual says 7.9.  Checked the level and it was on the middle of the dipstick.  I'll check it again once the oil is hot.  Also had to search on YouTube to remember how to reset the maintenance light on the center stack.  It's not in the NAV screen/settings menu, it's in the instrument cluster center display settings section...

docwyte
docwyte PowerDork
11/15/22 11:40 a.m.

Looking thru fb marketplace last week and I see a Jowett Performance oil filter cap listed.  Wait, what?  These are very hard to come by, until very recently they'd stopped making them.  They're not a wear item and there's NO reason to remove one, so I was pretty surprised.  Happily tho, as I bought it!  Ironically I'd put in an order for one a few weeks ago when they'd decided to make another run of them, but whatever.

These are super cool as they replace the plastic oil filter cartridge cap and have an oil release valve in them to drain the canister.  Got it from a toyota tech at my local dealer.  Story was the customer asked him to remove it as he didn't think the quick lube places would know what to do with it, which is probably correct.  Now why he was going to a quick lube place is a different thing entirely.

Since I was at the dealer I picked up a new air filter.  After 31k miles the stock one wasn't super dirty but dirty enough to replace...

Interestingly, I took the rig on a road trip to Albuquerque this past weekend.  It didn't get any better mpg on a long freeway cruise then before, which sorta surprised me and stunk.  But the motor has broken in even more and finally feels like it's got all its power.  Previous owner must've really not driven it correctly the first year or so...

docwyte
docwyte PowerDork
11/27/22 5:05 p.m.

Well, today was the day to lube the driveshafts and replace the fluids in both diffs and the transfer case.  Up on the lift it went, got underneath and of course none of the zerk fittings were in accessible places.  Doh!  Ok, lift the entire rig off the decks of the lift, go put it in neutral, then get underneath it again.  Now I can rotate the driveshafts and get to the zerks.  Easy.

There are 3 zerk fittings for each driveshaft.  one each for the spider joints and one for the slip fitting.  Here's a whole bunch of pics...

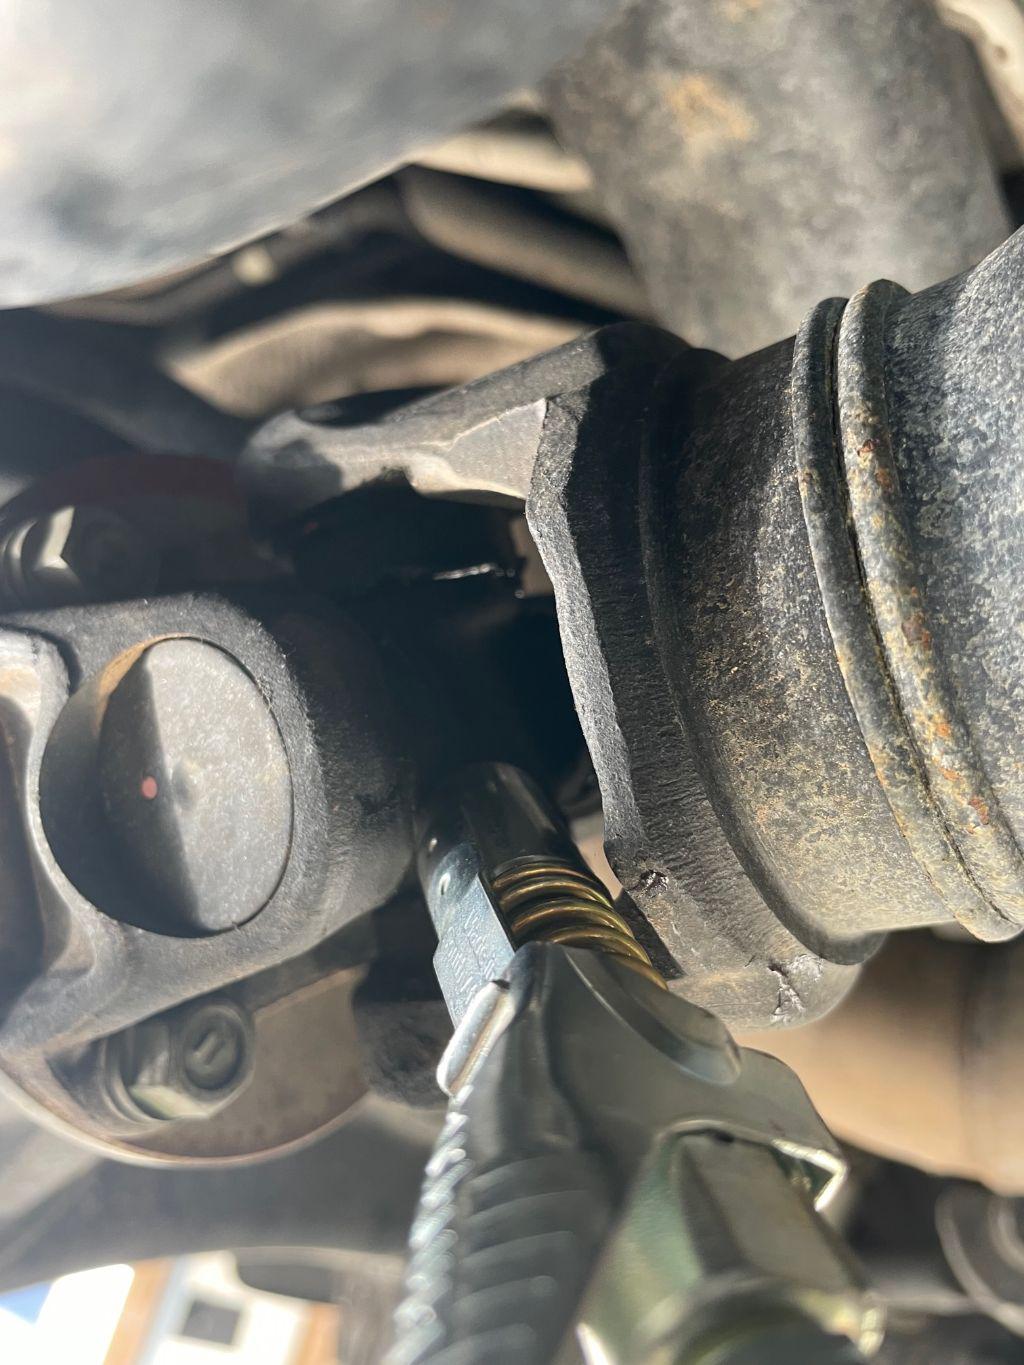
Interesting job, I've never done this before.  I guess my GX470 had zerks on the driveshafts but I was unaware of them and never lubed them.  Pretty easy to do, I like my lock n lube grease gun.

Next up was the diffs and transfer case.  I finally figured out how to use my Motive Power fill.  The drain plug on the rear diff was on super tight!  Yes, I cracked free the fill plug first.  They're 24mm.  Removed them, inspected the gaskets and replaced them.  Here's where I screwed up.  Toyota uses 3 different types of gaskets between the two diffs and the t case.  I couldn't really tell which ones were on the rear diff, so made an educated guess.  When I removed the plugs from the t case I discovered I'd used the t case gaskets on the rear diff.  Crap!

Not too much shmeg on the drain plug for the rear diff.

Filling it with the Power Fill was thankfully uneventful.  It took a lot tho, over a gallon of fluid.  Happy the power fill has a hook up for my air compressor...

There are two 24mm plugs for the t case.  Had to remove the skid plates and the t case skid plate to get at them.

Filled it up, then went to the front diff.  This one people complain about because the fill and drain plugs are 10mm allens.  Once again the drain plug was on way too tight, but I got it broken free, after I'd broken free the fill plug of course.

Filled it up and torqued everything to spec.  Not sure if the rear diff drain plug is weeping a bit or not.  I've got a piece of cardboard down with a clean paper towel on it to see.  I'm sure my OCD won't allow this to stand, even if it's not weeping.  I just need a friend to come over and help with this, as I don't want to dump out a gallon of fresh and expensive fluid.  So pull the plug, he puts his thumb over the hole, or pops in the fill plug, then I swap gaskets, and reinstall.  Top off the diff, swap gaskets on the fill plug and be done. 

If it's not weeping now, I'll do it this Friday morning.  If it's weeping I'll see if I can get someone over this afternoon....

Just checked the paper towel, it's dry after sitting for 2+ hours.  Think I'm good to wait till this Friday.  Whew! 

On another topic, I always change into garage clothes when I'm working out there.  Have ruined too many pants/shirts/shoes.  Well, I came in today and was horrified to see that I hadn't changed shoes!  Doh!  Gear oil spots all over my good sneaks!  Argh!  Hit them with some stain remover stuff and ran them thru the wash, looks like I got lucky....


docwyte
docwyte PowerDork
12/2/22 5:11 p.m.

Friend came over today and blocked off the drain hole in the diff so I could swap over the gaskets.  Getting the gasket off the fill plug sucked!  Happy I did it, just to make me feel better, even tho they weren't leaking.   Not happy about how low profile these plugs are, super easy to round them over.  Think I'm going to buy a new fill plug for the rear diff the next time I do this...

docwyte
docwyte PowerDork
12/10/22 12:44 p.m.

So interesting thing related to the suspension install.  While the overall height of the 200 didn't really change, the front end did lift 1.5".  What I noticed is now the headlights are aimed too high.  No problem, just adjust them down, right?  Well, some research on ih8mud revealed that Toyota didn't put a stop on the headlight adjusters and you can literally turn the projector off the adjuster, which ruins the headlight!  Then you get to spend $1500+ on a new headlight.  Well, I don't wanna do that! 

So instead you can adjust the headlight level rod that's mounted to the upper control arm on the drivers side rear.  Toyota puts it in a slotted mount, so I crawled underneath it today and using a 10mm socket moved it to the top of the range.  If that's not enough TJM does make an adjustable length rod to replace the stock rod and let me dial it in more.  Guess I'll find out tonight whether what I did is enough...

irish44j (Forum Supporter)
irish44j (Forum Supporter) MegaDork
12/10/22 2:06 p.m.

Didn't anyone tell you this is 'Murica, where people with big trucks are required to have their headlights shining ABOVE all normal cars? ;)

My Sequoia doesn't have the self-leveling headlights of course, and when towing they are a bit higher than I like....

docwyte
docwyte PowerDork
12/11/22 10:46 a.m.

In reply to irish44j (Forum Supporter) :

Ha!  Yeah, well I also like to see and the beams were sorta too high to be able to see well.  So interesting thing, I've owned this for almost a year and I can't recall ever seeing the headlights to the self leveling "dance" when I first turn them on.  I noticed this last night because I was looking for them to do it after I'd adjusted that rod.  Posted on ih8mud, another person told me his don't do it either and that a thread had gone on there where other people mentioned the same.  I've posted to the 200 FB group to see.  Maybe they don't do the alignment dance? 

Playing with that rod did seem to help tho...

On another note this thing has a wireless phone charger.  Which works great, until it cooks your phone.  It literally gets the phone so hot that the phone goes into "limp" mode.  WTF?  Is this something all the wireless chargers do?  Makes it pretty useless to use....

docwyte
docwyte PowerDork
12/12/22 9:41 a.m.

So several people have commented on the ih8mud thread and FB group that their 200's don't do the headlight alignment dance.  So, guess that's ok then.  Getting the tires rotated in a few weeks, but this thing is basically good to go until Spring.  At that point I'll install the Rhino bumper with the winch.

onemanarmy
onemanarmy Reader
12/12/22 4:24 p.m.

$1500 headlight?!   

Oh how the mighty have fallen.

docwyte
docwyte PowerDork
12/13/22 9:45 a.m.

In reply to onemanarmy :

That's the price of any modern Xenon/LED headlight now.  So not just a Toyota thing, basically any part of the front end is at least $1000 on a modern car.  Hence a small fender bender could easily total a car...

onemanarmy
onemanarmy Reader
12/13/22 11:12 a.m.

Yea...I get it.

A $1500 headlight is OK (maybe) for a quickly depreciating MB S-class.

Not a 'supposedly' go anywhere, last forever, be rugged and dependable, survive a war nameplate like Land Cruiser.   Just grinds my gears.   A $40 headlight surrounded by some simple sheet metal design is all that is needed.  Why so fancy/overdesigned/overengineerd/expensive?

docwyte
docwyte PowerDork
12/13/22 11:26 a.m.

In reply to onemanarmy :

Because most people don't want a candle as a headlight?  I mean, the difference in light output between a halogen bulb and an LED is crazy.  Plus the land cruiser sold for $85k here, at that price a halogen headlight isn't the proper equipment.

docwyte
docwyte PowerDork
2/13/23 5:57 p.m.

Did an oil change yesterday.  Got this new moldable mat thing that I used to funnel the oil and keep it off my skid plate.  It worked well at that but oil got everywhere!  It seemed like it was bouncing out of my oil tank pan, which stunk.

I also installed my Jowett Performance oil cap, with built in Fomoto valve, so next time that'll be a clean change.  Still pissed off at ARB for not putting an access panel in the front skid plate.  Taking that thing off and putting it back on is a major PITA, it weighs a ton! 

I also installed a longer linkage on the rear control arm to adjust the headlights.  It's meant for a Weber carb, lol!  Cost all of $16, which was nice.  Even though I moved the stock one up as far as it'd go, I was still getting flashed by some cars and it did seem like the headlights were too high.  The new linkage is quite a bit longer than stock and is also adjustable for length.  Right now I've got it in the shortest position and in the lowest spot on the bracket.  I need to drive the car at night and see what I think....

Lastly I ditched the center console phone mount.  It wasn't all that secure and people kept knocking it off when they hopped into the truck.  Got another one that sits near the passenger center vent, seems much more secure and is well out of the way of peoples knees, bags, etc.

thatsnowinnebago
thatsnowinnebago GRM+ Memberand UberDork
2/13/23 6:06 p.m.

The extra little things you have to do on somewhat modern stuff after modifying them cracks me up. Like my Xterra required an annoying reset of the steering angle sensor after installing my new suspension and you had to get a new headlight height sensor rod.

That said, it's not an unfair price to pay for how nice new things are though. I just find it amusing.

docwyte
docwyte PowerDork
2/13/23 6:16 p.m.

In reply to thatsnowinnebago :

Yeah, I'm a little baffled that I had to replace the linkage, I didn't raise the car all that much, maybe 1.5" up front?  Apparently you shouldn't ever touch the headlight adjusters themselves, Toyota didn't put a stop on them, you can literally adjust the projector off the rod, which then ruins it.  Only way to fix it is to buy a new headlight for $1500, which I definitely don't want to do!

CAinCA
CAinCA GRM+ Memberand Dork
2/13/23 6:22 p.m.

Sounds like it's time to get busy with a carbide hole saw and a jig saw or even better maybe you need to make friends with someone that owns a plasma cutter or water jet.  

docwyte
docwyte PowerDork
2/13/23 6:47 p.m.

In reply to CAinCA :

Well, the easy button is to sell these ARB skid plates and buy a set of Slee skid plates, which come with the access panel for the oil filter cartridge....

CAinCA
CAinCA GRM+ Memberand Dork
2/13/23 8:14 p.m.
docwyte said:

In reply to CAinCA :

Well, the easy button is to sell these ARB skid plates and buy a set of Slee skid plates, which come with the access panel for the oil filter cartridge....

Where's the fun in that? That doesn't scream "Grassroots" to me. To really fit in here you should use a cutting torch. LOL!

docwyte
docwyte PowerDork
2/14/23 9:53 a.m.

In reply to CAinCA :

Yeah, well it also isn't taking a cutting torch to a set of skid plates that cost $1200.  So they're still worth quite a bit used and Slee is local to me.  Happy to report that my headlights seem to be aimed where they ought to be now....

docwyte
docwyte PowerDork
5/5/23 4:31 p.m.

So successful winter season with the truck.  It's now been washed properly twice now but I still need to find 3 days to properly buff/polish/ceramic coat it.  Wasn't planning on it, but a friend sent me a link to a lightly used set of Slee step sliders that were local.  I reached out to the seller 30 minutes after he posted it, he got back to me this morning saying there was one person ahead of me, doh!  Luckily that guy couldn't pick them up this weekend, so I was next in line.  Very nice guy, not that far from my office actually. 

I'm going to drop by Slee this afternoon since they're 30 minutes from my house to show them the sliders and hardware.  That way I can buy whatever hardware I'm missing and install these in a few weeks.  Plan is to install the Rhino front bumper and winch next Friday, then I'll do the sliders maybe that weekend...

thatsnowinnebago
thatsnowinnebago GRM+ Memberand UberDork
5/5/23 5:13 p.m.

Sweet deal. Slee makes great stuff 

docwyte
docwyte PowerDork
5/5/23 7:26 p.m.

In reply to thatsnowinnebago :

Yep, got them for 1/2 price of new basically.  Really happy that Slee is local and I took the time to go out there to talk to them.  There was quite a bit of confusion between me and their sales guy.  There are two sets of instructions and two hardware kits for these.  One set for the Lexus version and another set for my Toyota.  There's an additional hardware kit you need for the Toyota's vs the Lexus's (Lexi?).  I already have the Lexus kit, which consists of the brackets and hardware needed to bolt the brackets and step plates onto the sliders.  Anyways, he brought out the Lexus kit, which had everything I already have, but didn't have the Toyota stuff I needed.  Then we went back and forth about what he had vs what I needed, as he said there was only one hardware kit.  I kept pointing out that the Lexus kit was missing riv nuts and string nuts that were on the parts list on the Toyota instructions. 

He kept telling me that the hardware kit I needed was part of the sliders themselves and not sold separately.  He refused to pull it from a complete slider set and just replace that, said his production team would have to make up the hardware set and that could take a few weeks.  Which was frustrating for me to hear, since I'd called him before I drove out there to make sure he had all the hardware in stock.

Finally, with both sets of instructions out on his desk, I pointed to the hardware list on the specific Toyota instructions and said "I need this.  I need this hardware set that goes to this set of instructions.  This is a different hardware kit from that (pointing to the Lexus instructions)"  Then he went into the back, talked with a service guy and came back with the hardware I needed.  There's NO way this would've happened over the phone, I definitely would've gotten the other hardware kit and then lots of back and forth.

Anyways, I have everything I need to install them now, well, besides a riv nut installation tool, which I'll buy from my local Harbor Freight.  My plan is to install the Rhino bumper and winch next Friday and get after these sliders sometime later.

docwyte
docwyte PowerDork
5/13/23 11:31 a.m.

Ok, so I did a really poor job of documenting this work.  Sorry?  I first tried to install the Rhino front bumper, but ran into a few snags.  I couldn't get these brackets to slide into the frame.

Also my frame rails have studs on them, which the Rhino instructions don't show

So I stopped, put the factory front bumper back on, then went and posted to ih8mud for answers.  Think I've got it figured out, everyone said to reuse the factory studs and I think I was trying to get that bracket into the frame 180 degrees out.  That welded nut is put into the bracket asymetrically and I was trying to put it into the frame long side first, I think it goes in short side first.

Anyways, since I wanted a win, I decided to install the Slee step sliders.  Their instructions are pretty good?  I don't know what it is about the off road companies and instructions, but in general, they leave a LOT to be desired.  It's like they're written for professional shops/fabricators as they seem to assume that you already know exactly how to assemble their product.  A little frustrating.

So remove the factory steps, there are 6 14mm bolts holding them on.  Look at the Slee instructions and identify the frame plugs you need to remove and the holes where the riv nuts will go.  You do need to drill one new hole on the front drivers side frame rail, hold up that bracket there and mark it.  For some reason Slee didn't use 1/2" riv nuts, but 17/32" ones.  I didn't have that drill bit size and my local hardware store didn't have a great selection of them, in fact, they only had one kind.  Which was a general purpose drill bit, not a specific metal cutting one.  So drilling those holes was a pita!  And I drill holes in things professionally, lol!

So, holes drilled, install the riv nuts.  I'd bought a tool from Harbor Freight for this, once I figured out you can't compress the riv nut completely in one go, it worked fine.  So you need to get tension on the arms, then squeeze them together.  Screw the mandrel in some more, squeeze the arms together, rinse, lather, repeat until done.

After that you get to install some "string nuts" into the frame, which are nuts that Slee has welded arms to, so you can slide them into the frame, reach the hole you want, then thread in a bolt.  You do that to two holes on each frame rail.  Then you use those to hang the slider in place.  Then you put bolts into the riv nuts, then you slide in a few more string nuts and thread bolts into those.  The string nut/bolt on the very back of the frame rail is a real pita, just angles and all.  After that you slide a Z nut into the tranny crossmember and grab that with a bolt.  Now tighten everything up and check for spacing/level.  Luckily mine were pretty much good to go.

This job is much easier with a friend and a lift.  Doing this solo, on your back in the driveway would really suck!

I'm going to try and install the Rhino bumper/winch again next Friday.  Now that I know how to take apart the factory bumper it should go pretty quickly.

1 ... 3 4 5 6 7 8

You'll need to log in to post.

Our Preferred Partners
6awsrrjYZC5R3Jr9WnbQ1BIqwJPx1APZQ9pQC8sGfj2fqWm5A40hoSaRrW7x6dJJ