1 ... 7 8 9
WondrousBread
WondrousBread Reader
7/26/24 10:13 p.m.

I just can't leave well-enough alone!

My car runs very well with the Z32 MAF, but I felt like there was some area for improvement. I noticed that the signal would bounce around a lot (a lot only being 0.05 or 0.1 V, but that is significant in MAF terms). This wasn't much of an issue except that I had to turn up the MAF Averaging setting to smooth it out a bit, and this setting dampens response time which means you need more acceleration enrichment correction. I also think that the Z32 design suffers a bit from reversion because the wire is sitting in the open. So air can bounce back and swirl in the pipe and the Z32 design might be more susceptible to noise. Lastly, there was some noise in the system even with the car off which leads me to believe the sensor itself is a bit finicky.

I decided to give the R35 MAF a try. It seems like there are plenty of variations on this sensor design (the slot style) and also lots of people using them in standalone applications. The sensor is designed to minimize reversion and also includes an integrated IAT sensor. I thought that it would be easy to find data for this sensor as well, although I failed to account for the fact that the different variety of slot style sensors makes it difficult to find the correct voltage curve, and also that Hitachi doesn't actually make the datasheet available for this sensor. But those are solvable issues.

I picked up a sensor (Hitachi MAF0031) and wired it up to test:


0.34V at zero airflow. Blowing on the sensor changed the reading which confirmed I had the wiring correct.

I found a helpful document that showed the pinout, but the IAT sensor had some confusing nomenclature. I expected it to be a simple thermistor,but the phrasing in the document called one pin "IAT Signal" and the other "IAT Ground". This had me wondering if it was a 0-5V sensor powered from the same 12V supply as the MAF sensor, but it turns out that the document was just awkwardly phrased. It is, in fact, a plain old thermistor:


Before the sensor arrived I had actually started designing the housing. I needed a mounting boss for the sensor and didn't find a free 3D design for the boss on it's own. Either it was a paid design or it was already part of a tube. So I found this diagram and made my own.

Step one was to import the diagram into Fusion 360 as a canvas:


There's a very convenient function in Fusion that lets you pick two points and provide the distance between them, then the software will automatically scale for you. In this case I used the two bolt holes.

Then I spent a few minutes drawing all of the lines:


And a few more extruding:


Done. I'm glad I started learning Fusion; Blender would have taken ages to achieve the same result. Not that Blender is bad, but it isn't really designed for CAD. I fell into the trap of becoming comfortable with the software I knew rather than trying to learn something more appropriate for the job. Using Blender for CAD is like deciding to cut down a tree with a hand-saw when a chainsaw is available that will do the job in 1/10 the time (Fusion).

I imported an existing adapter tube from Thingiverse. I've used this tube in the past when I was running a speed-density tune, and it works really well (as long as it's printed in something like polycarbonate that can withstand the heat). The only tricky thing is that since it's an STL mesh and not a solid, it's not as easy to modify in Fusion.

I located the sensor boss as far back in the tube as possible, and made an educated guess with a set of calipers to try and locate the opening for the hot-wire right in the center of the tube:


Then used Fusion's excellent "To Surface" setting in the Extrude tool:


Lastly, Extrude-Cut the opening for the slot:


I printed one with my remaining PC filament, but unfortunately ran out just before the end of the print. It was certainly good enough for testing though:


The fit on the sensor is about 90% of the way there. I moved the sealing surface on the inside of the boss up 0.5mm, and the flats the screws tighten up against also up 0.5mm.


I did a pretty good job centering the hot-wire too. I later revised the design and moved it down a few more millimeters.

To be continued

WondrousBread
WondrousBread Reader
7/26/24 10:14 p.m.

While waiting for another role of PC filament I decided to test out the sensor using the first tube I printed. I took out the airbox (a literal 2 minute job, I love working on FCs) and realized I had completely forgotten to account for clearance when designing the tube:


It's a really, really tight fit due to the shape of the airbox:


But happily my new design still fits:


The next one (printing as I type this) moves the sensor down about 5mm, so clearance is even better. Changing the sensor will still be an airbox-out job, but like I said before that isn't exactly an arduous task.

Lastly, I wired up the sensor by just connecting the exposed pigtail wires to the Z32 connector I added to the harness last time:


That's obviously for testing purposes only, and to shake out any possible issues without making a permanent change to the harness. The IAT wires are just extended over to the stock connector on the dynamic chamber.

I couldn't find the calibration for the thermistor, so I took a resistance reading at room temperature and compared it to a plain old mercury thermometer. Then I did the same comparison at 45C with a heater, and also at -20C in the freezer. This lets me input the three points into the MS3X and it will generate a curve. I kind of don't like how this feature is implemented (it would be nice to see the curve) but it does work.

I also couldn't find a flow-curve for the stock sensor. There are plenty out there for the PMAS HPX sensors but I couldn't find a stock R35 curve. I decided to just fire up the car, and I was able to get a (crappy) idle by multiplying my prior curve by 1.5 or so. I found that the reading wanted to jump around a lot (more so than the Z32 sensor even) but that can also happen when the engine is running poorly and vacuum is inconsistent so I don't know whether it's a problem yet.

I was also operating under the assumption that the two curves had a similar slope. Simply multiplying the curve by some number (in my case 1.5) assumes that both curves are increasing at the same rate as the line moves rightward. Meanwhile if the Z32 flow increased by 15g/sec from 1V to 2V and 100g/sec from 2V to 3V (arbitrary numbers I chose), there's nothing to say the R35 MAF couldn't increase 15g/sec from 1V to 2V and 45g/sec from 2V to 3V. I'm probably not explaining that well, but that's the best I can do.

With my current flow-curve obviously insufficient, I played with the PMAS HPX transfer function generator to try and get a better curve. The generator tool is an Excel spreadsheet that allows you to input the diameter of the pipe and then returns a flow-curve. This is what it gave me:


I'm not using all of the resolution the MS3X gives me, since I haven't rescaled the curve. But assuming it's in the ballpark this should be good enough for testing until I rescale and actually spend time tuning it. I should have the new tube printed by sometime tomorrow, so if all goes well I can take it for a drive and see what happens.

Until next time

WondrousBread
WondrousBread Reader
8/12/24 7:53 p.m.

I was able to fix the 3D printer for about $40, but I ended up returning the MAF I bought. One thing I noticed was that when idling the signal would jump around (a lot, much more than the Z32 sensor). I also noticed that there were no part numbers on the supposedly "new OEM" Hitachi sensor, and some scratches from it being installed previously. I assume the Amazon seller was selling used aftermarket parts instead of OEM, and I didn't really feel like investing the time to tune a sensor of unknown quality and origin. I will pick that project up again sometime with a proper OEM MAF.

I ended up spending a bit of time and money on something entirely unrelated - the steering wheel. But first here's a refresher on my adventures with the prior steering wheel (feel free to skip to the photos if you aren't interested).

When I bought the car it had the stock 380mm wheel. This is a slightly larger size than normal, and like most people I kind of wanted a 350mm wheel but didn't really feel like buying one since the stock wheel worked fine. I did however have one strange issue which is that the horn would go off randomly. I had already resoldered the body CPU more than once and failed to resolve this issue, and I noticed that it would only happen when turning the wheel (and only sometimes).

This came to a head when the horn started blaring in a Tim Horton's parking lot and wouldn't go off (terrifying some poor old man trying to park his car nearby). I just ended up lifting the hood and pulling the negative cable off the battery with my hands (yes, I've replaced the terminal since then) and then reaching my hands through the grill and unplugging the horns.

Driving around without a horn isn't safe, so I ended up buying a "genuine" Momo wheel on eBay and an NRG short hub. Then when they arrived I realized that the wheel hit the turn-signal paddle and I needed a spacer to push it away from the dash. The spacer I picked was a shiny one that I kind of liked at the time but would later be a bit too "busy" for my taste.

Oh, and the problem with the original wheel? Well there was no obvious issue that would cause the horn to go off, but eventually I shook the wheel in just the right way and a tiny little screw fell out. It wasn't an OEM screw and I have no idea how it found it's way into my steering wheel. I assume that every so often it would land in just the right place and bridge the contacts for the horn button before falling back out again.

The new wheel worked fine for a few years, but I carelessly bent it last year (or the year before? I don't know anymore). A shop that had done an alignment for me a few years back cranked the NRG hub down on the column so hard that it started to damage the splines on the hub, and bottomed out the hub slipring against the sprung contact for the horn (if that doesn't make sense there will be photos shortly). I was able to later pull the hub off the column directly, but not before putting a small (but noticeable) bend into the wheel itself.

I could live with a bent wheel (I have better ways to spend my money) but then a few weeks ago someone cut me off, and when I pressed on the horn button it just blew apart in my hand. Gee, I sure showed that guy! Turns out the plastic in the horn button was very brittle after almost a decade and it finally gave out. So now I was in the position of needing to replace the button, as well as wanting a non-bent steering wheel and a less eye-catching spacer.

I grabbed another "genuine" Momo wheel off eBay, and supplemented it with a "genuine" Momo quick-release. It does the same job as the spacer, except all black and with the added safety benefit of being able to remove the steering wheel quickly in an accident. It's fairly unlikely I'd survive an accident since most of the cars on the road nowadays are trucks with a hood-line higher than my head or 5000lbs SUVs that could drive up my car like a ramp, but every little bit helps.

Here's the old wheel:


It actually felt really nice to drive with. The bulges at 10 and 2 made it really easy to grip. However, the whole wheel doesn't really "fit" the aesthetic of the car in my opinion. It's not terrible, just a little bit out of place.

Speaking of out of place, here's the spacer:


Too shiny. And speaking of out of place (again), here's the issue I mentioned with the horn slipring:


The hub isn't supposed to sit down that far on the column. Instead of the horn contact being held against the slipring by spring tension, it's compressed against the slipring. I had fixed this issue in the past, but due to some damage to the splines it doesn't require that much torque to compress it down this far. A new hub is probably a good idea, but I'll get to that later.

Looking at the hub, I also had to address a design flaw. The slipring and the plastic ring it fits onto can move a little bit independently of the hub itself. This causes the wire for the horn to bend a bit and then eventually it breaks. This is of course aggravated by the extra friction on the slipring from the over-compressed horn contact, which means when I turn the hub the slipring really does not want to turn with it (placing tension on the wire):


So I designed a little tube to take up the slack:


Resoldered a new wire (had to center the wire in the middle of the solder joint or the tube won't sit flat):


Dropped the tube in:


Put the whole assembly on the back of the hub:


And there we go. I put a dab of hot-glue on either side just for some strain-relief and to prevent any rattling.

With that done, I had to install the quick-release. It's a bolt-on install, but the height of the Rx7 column nut will compress the wires for the horn when installed and could wear through the insulation. So I had to use a file to grind a little channel for the wires to go into:


I also reattached the ground wire using that little threaded hole, but forgot to photograph it.

Then the wheel bolts onto the front part of the quick-release, and it clicks into place:


All black, and complete with speed-holes!

Clearance for the horn button is very tight, so I made some custom wires:


This still barely clears, but with the spring for the horn button installed (not in the photograph above) it fits securely.

To be continued

WondrousBread
WondrousBread Reader
8/12/24 7:54 p.m.


Overall it works pretty well. I was able to carefully find a sweet-spot between installing the hub securely but not bottoming out the horn contact, so I can get away with using this hub. I used blue Loctite to be safe and have been checking every couple of days, no sign of the nut loosening yet.

Despite it looking a little bit cheap, I really like the pleather on this wheel. It's grippy enough that it doesn't slide around, but smooth enough that loosening my grip when exiting a corner lets the wheel return naturally. Speaking of which, the poor returnability of the steering wheel that I had been experiencing is basically gone. I think it was a combination of friction from the horn slipring and some friction from the steering column trim (which I trimmed back a bit further when I had it off).

The only thing I'm not super happy with is how far the wheel sits from the turn-signal paddle:


This is the sort of thing that wouldn't be a problem on most cars but is a problem on Rx7s due to Mazda's weird choice to use a paddle instead of a stalk for the turn signals (and cruise control, if equipped). I actually really like the paddle, but it does make the steering wheel situation a little weird. I think I can get used to it though.

Until next time

Indy - Guy
Indy - Guy UltimaDork
8/12/24 9:35 p.m.

In reply to WondrousBread :

Nice work. Wheel looks good 👍

WondrousBread
WondrousBread Reader
8/19/24 4:08 p.m.

Light on photos this time, but I always try to log even minor repairs so I can refer back to them in a few years when I've forgotten them. I have a terrible memory. You wouldn't believe the number of times I google an Rx7 related question and find my own answers from years ago.

This actually took place a few weeks ago, but I was driving near my house and when I changed into second I got a really big "CLACK" noise from the transmission. I was on it pretty hard (around 7500rpm) but even so, that shouldn't happen.

When I got home my dad asked if I was sure I had my foot all the way down on the clutch, and I was. But it did raise the question of whether the clutch was properly adjusted. I remembered two things:

1. The clutch master and slave had both been replaced, but the fluid in the reservoir would still turn black and need to be replaced every few months. I had been putting off replacing the hose.

2. I have never adjusted the pedal freeplay in the clutch.

I figured I would try the freeplay first and then look at the hydraulics later. The freeplay is adjusted by loosening a 12mm lock-nut and then spinning the pushrod on the pedal in or out. You don't need to mess around with removing the c-clip and clevis pin - ask how I know. Adjusting the freeplay so that there was only about 1/2" of space at the top of the pedal seemed to work and I was pretty happy with it.

I thought about putting the hydraulics on the back-burner, but the decision was made for me when I was moving the car in the driveway and the clutch pedal stopped coming up. My dad helped me roll the Rx7 back into it's spot and I took out the old hydraulics:


Now the only original part here should be the hose, but as I was changing this out I got to thinking how foolish it was of me to continue using a 38 year old rubber hose. The fluid has been changed more than once and it still came out looking like the black goo from the X-Files. I can only assume this is from the inside of the rubber hose, although I thought they were PTFE lined so maybe it was something else.

About $80 on Rockauto got me some brand new parts:


I sprung for the Exedy cylinders, and I think the hose is a Dorman? They all seemed to be really good quality.

I didn't take any pictures of the process (I rarely do when hydraulic fluid is involved). Removal and re-installation took a cumulative 30 minutes. I think even the bleeding process only took like 10 minutes total, plus 5 minutes vigorously washing anywhere that the fluid may have dripped below the cylinder. After the replacement all is well.

I have been finding myself wanting a lighter flywheel and more aggressive clutch lately. The heavy stock flywheel is kind of nice when you're learning to drive (this was my first car 8 years ago) but once you're experienced driving manual, you can shift a lot faster than the stock flywheel will allow. Plus I notice that when my current clutch (Exedy stock replacement) is hot after a long drive it isn't as grippy as I would like. I can replace the clutch / flywheel in only a few hours, but considering that none of the parts involved (S4 counterweight, lightened flywheel, grippier clutch) would transfer to the Turbo II engine I'm not really sure whether I want to spend on it.

Until next time

WondrousBread
WondrousBread Reader
10/12/24 10:31 p.m.

I made a small change on my Rx7 recently. A long time ago I purchased this rear camber link:


It's the common style for the FC you've probably seen 100 times. By pulling the back of the rear subframe up or down, you can use it to adjust static camber on both wheels. This is a neat design that has a right-hand thread on top and a left-hand thread on bottom, so by loosening the lock nuts and rotating the center sleeve you can adjust it in-situ without having to remove either end. This makes it a lot easier to get an alignment at some known point and then dial it in later however I want.

There's only one problem, which is that it transmits too much NVH to the cabin for my liking. Now, there is an off-the-shelf solution from Mazdatrix:

https://mazdatrix.com/product/susp-c...86-92-rear-rb/

But frankly I think that's a bit expensive for what it is. Almost $200 USD, and it still requires you to unbolt one end to adjust it. So I started making my own solution.

First I measured the threads on the existing rod ends:


M14x2.0, 40mm threaded length. Finding appropriate threaded rod would prove to be a bit of a challenge, but certainly doable.

I purchased a stock camber rod a few months ago and finally got around to seeing what it was made of:


The inside is actually 13mm so you could possibly find some way to tap it for threads, but I wouldn't end up doing that. I actually thought this was a solid rod originally, and I had a weird idea to cut the link in half along the centerline and lathe it down to 14mm before using a die to cut threads. The hollow rod ended up making this easier because the new threads would self-center.

Speaking of new threads, I had some trouble finding 14x2.0 threaded rod near me. But I did find something on Amazon that would work:


Yup. I found it was actually cheaper to buy and cut up two new rod ends than it was to buy threaded rod in that size. The angle grinder made quick work of it:


I felt a bit weird cutting up a rod end to get threaded rod. Sort of like I was unmaking something rather than making something? It's like taking apart a cake to make flour.

After cleaning up the end using a bench grinder, I checked the alignment 10 times and then clamped it firmly in the vise and checked another ten times:


Then I went to work welding it. I didn't want to put too much heat into this piece lest I damage the bushing, so I did four tacks and then dumped it in some water. Then after it cooled I dried it off and did the remaining welds. Fortunately there was no damage.

Here's a comparison:


So you can see my idea here. All the benefits of the Mazdatrix piece except at a total cost of about $110 CAD (not including the camber link I already had). I had measured the link carefully so I could adjust it back to the desired length, and here's how it ended up:


And we're done. With it reinstalled, there is a noticeable (if not dramatic) difference in NVH. I think the next step is to replace my remaining poly bushings with OEM rubber ones, and I already have most of them in a box waiting. Since it's almost winter I might find the time to do it before spring.

More urgent though is the painful amount of body flex. Driving my Mazda 3 has made me used to a much more solid chassis. The FC is very bendy by comparison. My frame of reference is always skewed on this sort of thing since it was my first car, but the FC could definitely use some improvements. There are off the shelf braces available but of course I've decided to do things the hard way, so that will probably the next thing I post about once I have made more progress.

Until next time

WondrousBread
WondrousBread Reader
11/3/24 7:59 p.m.

I talked about wanting strut braces in my last post and I started on that project, but I realized there was a related issue I should address first. The alternator sits way too high.

For anyone who hasn't read that part of this thread, I'm using a Ford 3G alternator out of a Ford Taurus. This requires a custom bracket I made like 8 years ago and a small adapter for the wiring harness, as well as an upgraded 4 gauge alternator cable. This worked very well and got me 130A of charging power, but unfortunately it does sit a little high:


This is an old picture, but it illustrates the issue. The alternator is physically larger of course, but the bracket also moves the mounting ear up and to the left. This basically results in a translation of the entire alternator up a couple inches from stock. When trying to find a strut-brace solution, this means that off-the-shelf braces might not fit and any custom solution I build will need to be further forward and upward. It also probably won't fit with a top-mount intercooler so I would have had to find something else before swapping the engines.

Fortunately there is a solution:


If this looks familiar, it should. It's the exact same alternator internally but it's from a Ford Contour. The case design has a few things I like:

- Saddle mount so I don't need an adapter
- Adjustment ear lower so the alternator can tuck lower
- Positive terminal pointing upwards so I can easily install the cable

I wasn't sure it was the right one (some Contours apparently have a different front case design so the pulleys won't work) but it was $50 on RockAuto so I decided to gamble. I haven't even seen a Contour in about a decade, so I don't think I would be able to find a better deal on a used unit anyways.

I have a box of 3G spares to raid for a regulator and dual-v pulley:


Why do I need a regulator? Well, I don't exactly. The alternator came with a perfectly good one, but the Taurus plug matches the adapter already on my car:


Really it was just a time-saver vs. finding the Contour specific plug. Installed:


Then it was just a matter of swapping on the appropriate v-pulley:


And the alternator was good to go install on the car. I used many (many) washers for the saddle mount as it's a lot wider than the original one. I had read that you can just use the air-pump adjuster in the place of the stock alternator adjuster, but it didn't fit quite right for me. I ended up finding a spare alternator adjuster bracket I had, and then hammering it flat and shortening it. Then I added a mounting hole and bolted it up:


Sure, the adjuster looks a little weird. But it works fine and you can see how much lower it tucks. I'll also need to get another charge cable as mine is a bit too short to be routed neatly behind the alternator. The current routing is ugly but it did let me drive the car for now.

You can see how close it fits to the water pump housing now:


And comparing the height, you can see just how much space is gained up top compared to the Taurus alternator:


This alternator now fits 100% below the ridges on the dynamic chamber. I've also seen pictures of it bolted up with a stock intercooler, so I know it'll clear that too.

In other news it's officially winter:


I know winter has come when all the leaves fall off of the Ginkgo tree. They always fall all in one day, and that's not even 1/5 of them.


I'll update as soon as I neaten up the wiring for the alternator and hopefully I'll have a strut brace solution by then as well.

Until next time smiley

WondrousBread
WondrousBread Reader
1/25/25 9:12 p.m.

I've finally found what I hope will be an acceptable solution for the aux port actuation that I worked on in post 8 of this thread.

For new readers, I'm going to recap from the beginning. It also helps explain what my goals were with this project.

On a rotary engine the port timing is controlled by the footprint of the intake and exhaust ports. Smaller intake ports with an earlier closing time promote better idle, and larger intake ports with a later closing time improve performance (to a point, of course). In a piston engine this is normally controlled with a VVT actuator, but since there are no cams in a rotary engine, Mazda's answer to this problem are the auxiliary ports:


These ports have sleeves inside of them. Normally the sleeve is closed, which means that the engine runs only on the smaller port (closing at 40 degrees). This is helpful for idle and midrange, where the extra port area kills air velocity. Then at higher load, a set of actuators rotate the sleeves, opening the port:


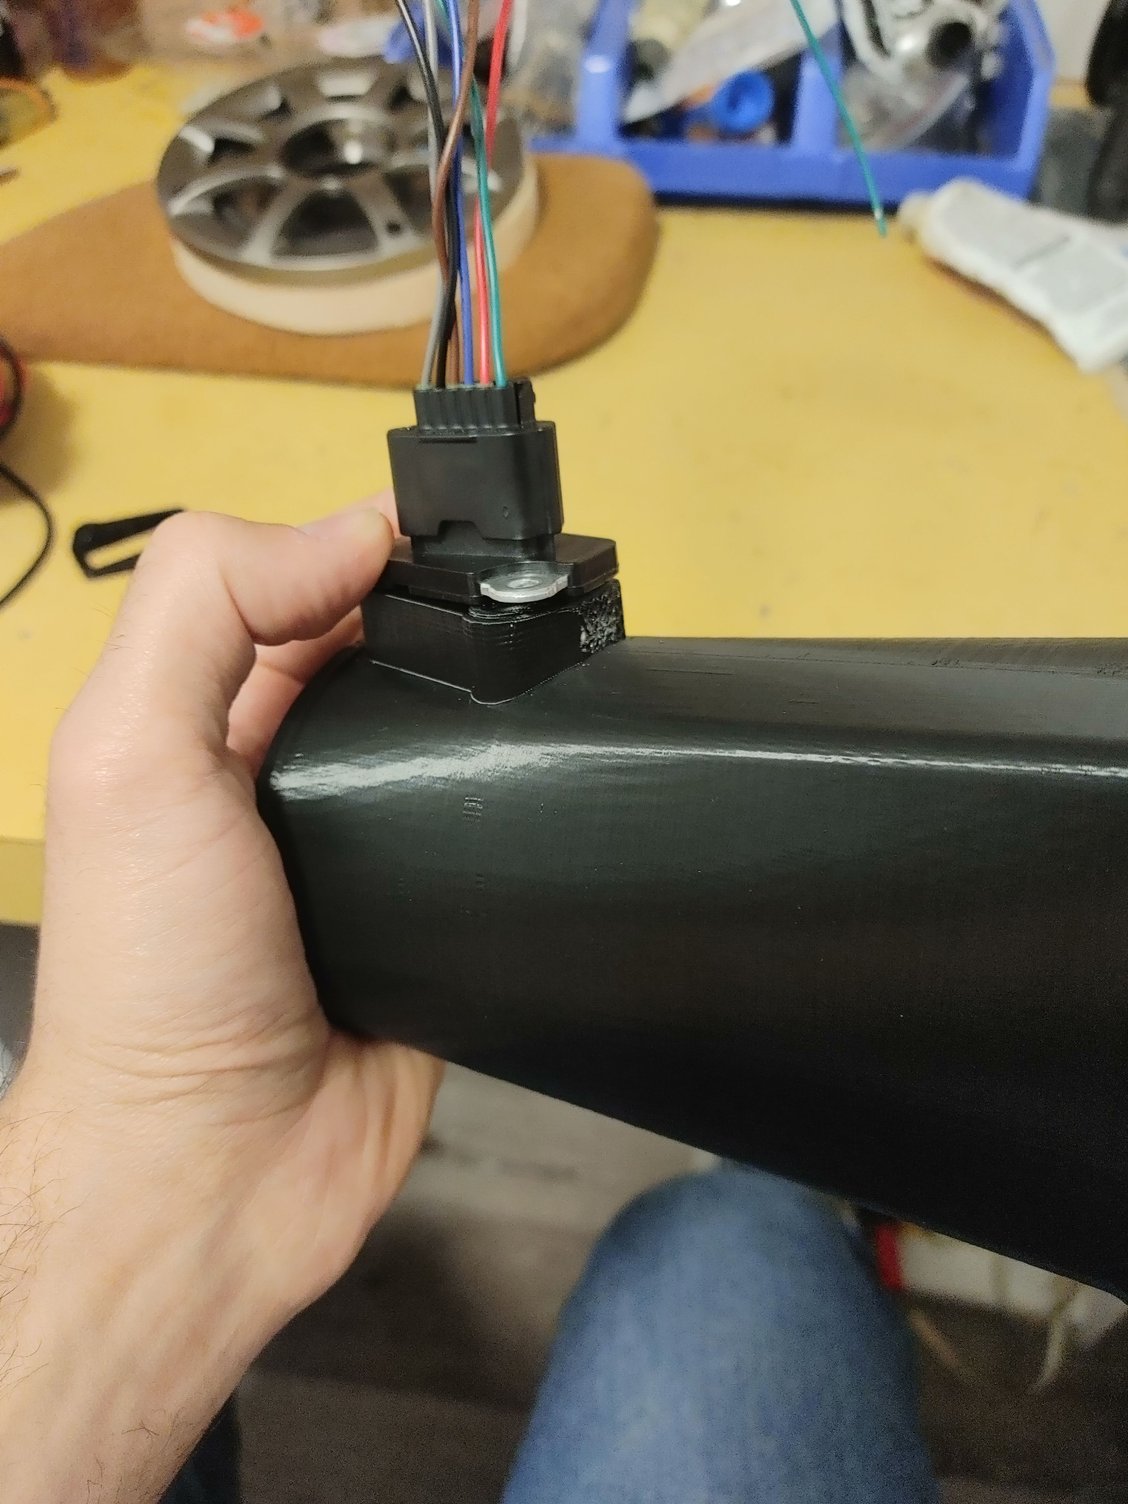
The actuator looks like this (on S4 models):


The little tube to the left is a pickup that connects to the exhaust. As you cross about 4000rpm, the back-pressure in the exhaust drives these actuators and the ports start to open up. This presents an obvious problem with an aftermarket exhaust - where do you get this pressure from? Most exhausts don't have the pickup for the tube, and even if you wanted to add a tube the aftermarket exhaust probably won't have as much back-pressure. There are a few solutions I've heard of (and tried):

- Use air from the air pump (with or without an RPM switch)
- Use an electric air pump and an RPM switch
- I've read of at least one person saying they used cable actuation connected to the throttle (for which I can no longer find the post)

There are problems with all of the above:

- The air pump builds pressure way too early (2000rpm) which means the ports are opening about 2500rpm earlier than they should
- Most electric air pumps are an impeller style. After testing, I was not able to find any that build enough pressure at the outlet to budge the actuators at all. I've read of people using an aquarium pump, but I have my doubts about that pump surviving a long time under the hood of a car
- Even if you did get either of the above to work, an RPM switch is the wrong approach. We want to actuate the ports based on load (in my case MAF), not RPM. At light load above 4000 rpm the ports being open is worse than them being closed. Now I know that light load above 4k is not a common situation, but my point stands.
- A throttle cable has a similar problem, which is that now it's tied to throttle-position instead of MAF. If you floor the throttle from idle, even before you leave idle the ports are already all the way open.

I experimented awhile ago (see page 8) with using air pumps, MAC valves driven via PWM, etc to try and have the ECU control the ports based on MAF. But there wasn't any solution that I was happy with.

Recently I decided to pick this project back up. Here were my goals:

1. The ports should open at the appropriate time, consistently (I could never get this to happen with the air pump options).
2. I should be able to control them with the ECU, and adjust the opening time.
3. They should be controllable based on MAF
4. The solution should be reliable
5. (Nice to have, but not 100% required) I should have infinite control over the port position, not just simple open / closed control.

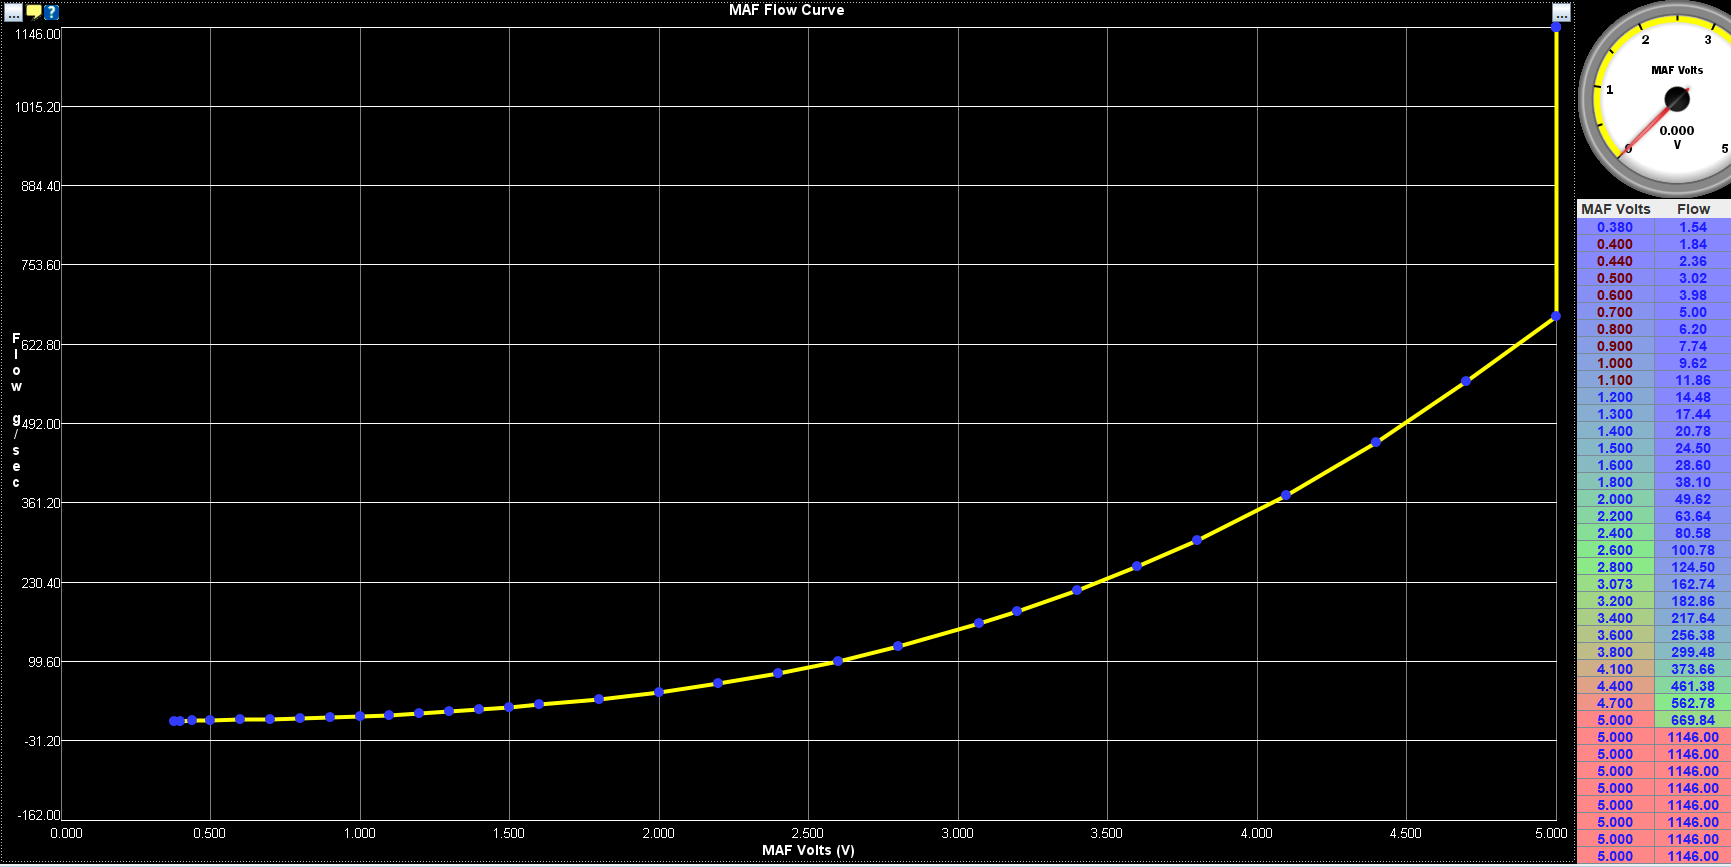
Why did I want number 5? Well, one thing I noticed when testing with the air pump and a MAC valve is that it's not difficult to get the ports to open, but it's difficult to get them to stay part of the way open. I wanted a way to have the ports not just be open or closed (40 degrees vs. 80 degrees closing time) but to be able to hold them at say 60 degrees closing time. This would maximize the area under the curve in the powerband. Speaking of which, here is some data I took from a log:


It's a bit crude since I'm using MAF as a proxy for power, but since I don't have a dyno this will have to do. The first thing to notice is that the closed ports flow a lot more until about 4250 rpm, and then the gap starts to narrow. At about 5250 rpm the open ports surpass the closed ports in terms of airflow, and after that there's no contest. I think the weird dip at 6250rpm was tune related, but this was several months ago so I don't recall the exact cause.

Anyways, this begs the question - if 80 degrees close time is flowing more at 5250 rpm than 40 degrees close time, is 50 degrees close-time outflowing both 40 and 80 at 5250 rpm? Ideally, I should be able to start opening the ports at around 4250 rpm and open them smoothly until they reach full open at say 5750 or 6000 rpm. More testing would be required to determine the exact transition points.

I'd seen a photo online of someone using solenoids to pull the ports open, but I originally scrapped that idea for a few reasons. Mostly that it required mounting some return springs (with no good OEM location to mount them to) and also that I was concerned with reliability because of the short duty cycle and the fact that the solenoids would sit above the exhaust manifold.

But then I saw these on Amazon and I did some more thinking:


They have an integrated return spring, so that simplifies the bracketry. They have 60N of force which should be much more than required to open the ports. They fit in the available space, and they also had a clevis that looked like it might fit the stock linkages. And at 3A each, they could hypothetically be PWM driven by my Megasquirt. So I ordered a set for about $40 and did some testing:


The first thing I tried was powering it for awhile and seeing how hot it got. The answer is "not very". It has more than enough strength to pull the ports open, and the "3 seconds 80 degrees temperature rise" in the description didn't seem to occur. It definitely got warm, but not that hot (even after 10 seconds). I didn't end up pushing it because at some point I would burn out the solenoid. Even with the added exhaust heat I'm confident that these will last a good long while. Besides, how often am I above 6000 rpm with the pedal flat-out for more than a few seconds? Every time I shift it will drop back down below the threshold anyways.

Worst case scenario, these are pretty cheap. I can always replace it if I burn one out.

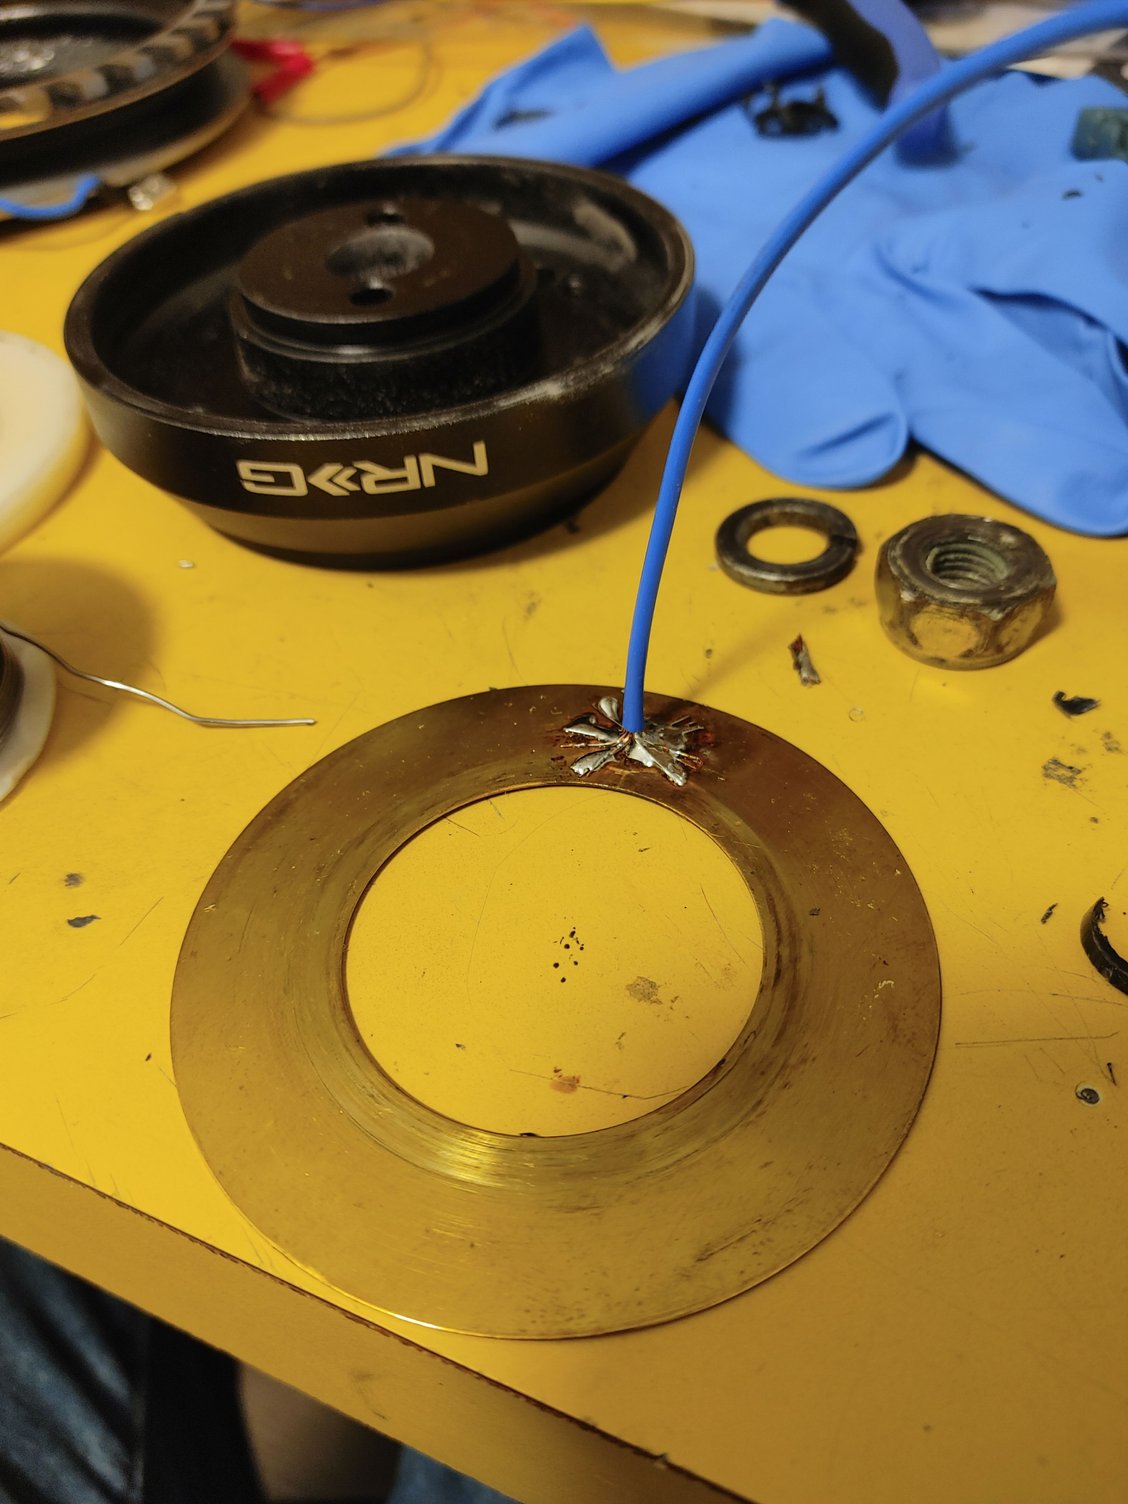
You can also see the mounting plate and linkage. That linkage is for testing only, since I was in the middle of fixing my 3D printer at the time. The linkage is required not only because of the fact the sleeve is rotating, but also because the actuator is positioned somewhere in the center of this rotation. So when the actuator starts moving the linkage ends up pivoting from one side to the other. I'm probably not describing that well, but suffice it to say the linkage is required. Here is a mock-up with a drill bit since I didn't have an appropriately sized screw and some M8 nuts used as washers:


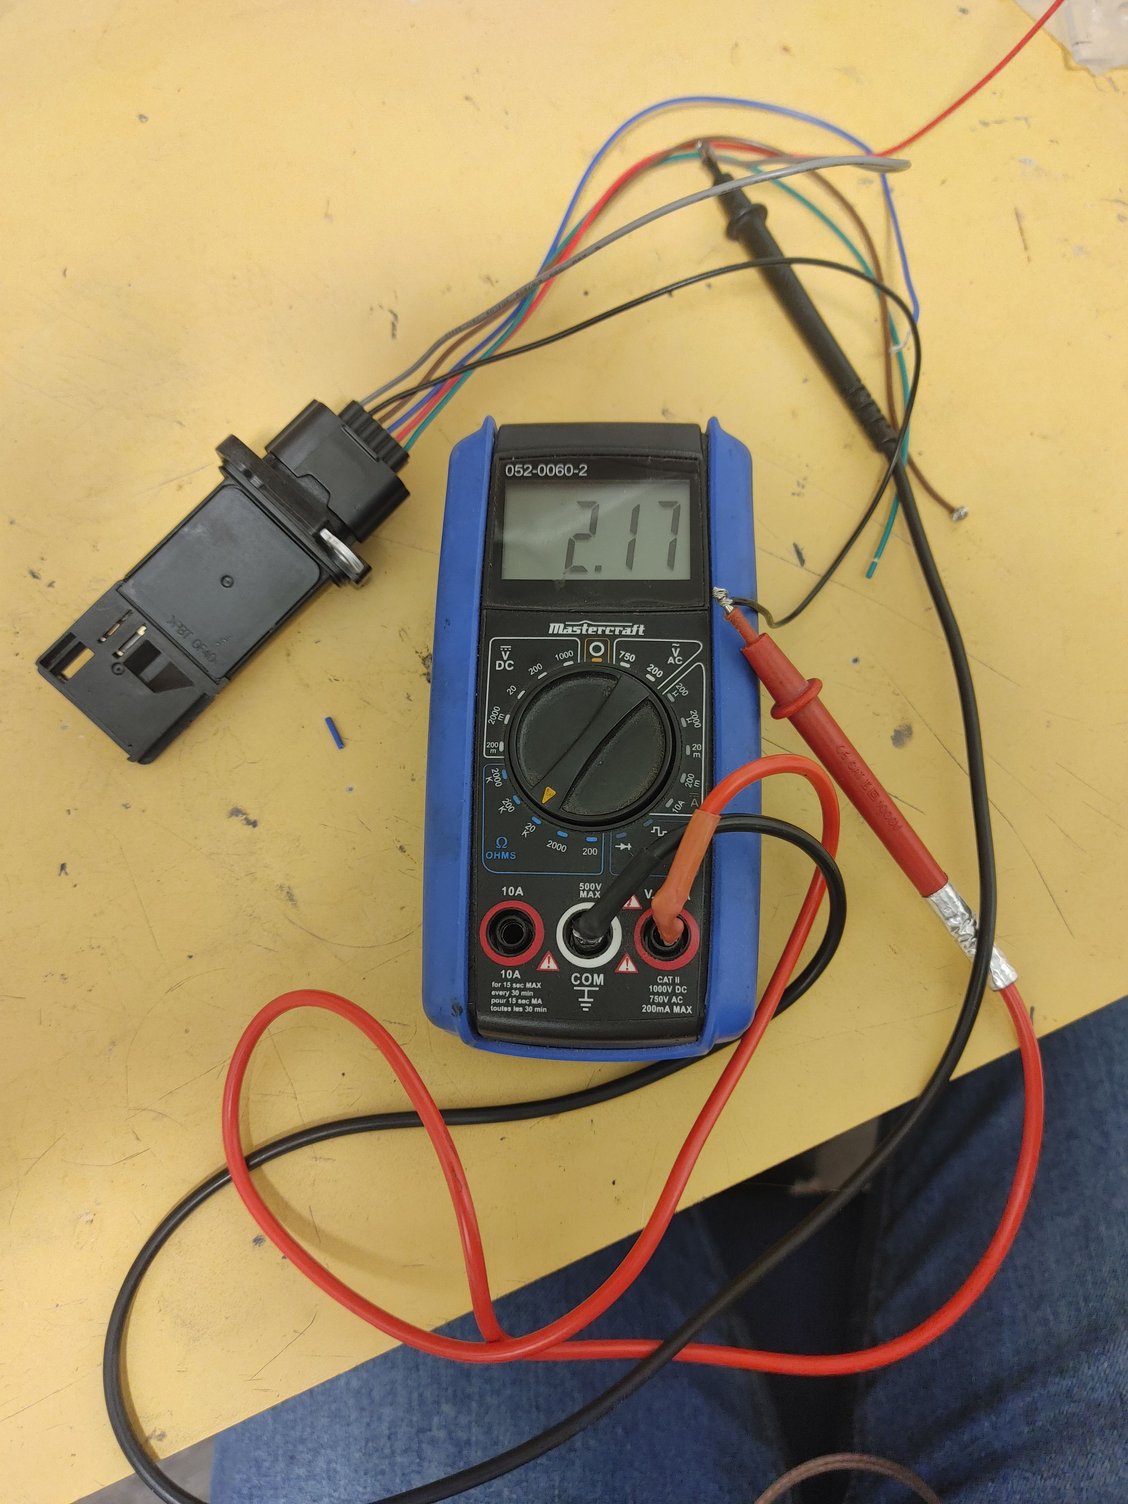
I tested it and confirmed that it absolutely had enough power to pull the ports open. The return spring was a bit too weak, so I removed the circlip and stretched it taller before putting it back and that fixed the issue.

Now I mentioned wanting to have infinite control of the position of the ports, so I rigged up a simple system to PWM the solenoids with a microcontroller and see what PWM duty corresponded to what port position. But I noticed something interesting which is that any duty sufficient to move the solenoid would open the ports all the way. I could slow the opening a bit but I couldn't halt it at say 50% open. I realized there was something I hadn't considered with the solenoids, which is that the power required to pull them inwards decreases as the rod enters the coil. This makes perfect sense and I'm not sure why I didn't think of it before. It's possible there is some sort of solution involving a progressive spring for the shaft that increases spring tension as the shaft moves inwards, but for now I'll have to shelve that particular goal.

I also noticed something interesting, which is that the stock actuators don't open the ports all the way. Before the actuator rod hits the inner stop, the actuator itself runs out of travel. You can see how far they open in the second photo of this post. Meanwhile the solenoids have travel to spare, so the actuator rod hits the inner stop and the sleeve opens further:


This is about 2-3mm more open than stock. I could probably get it to open further by filing down the inner stop. That will be a project for another day.

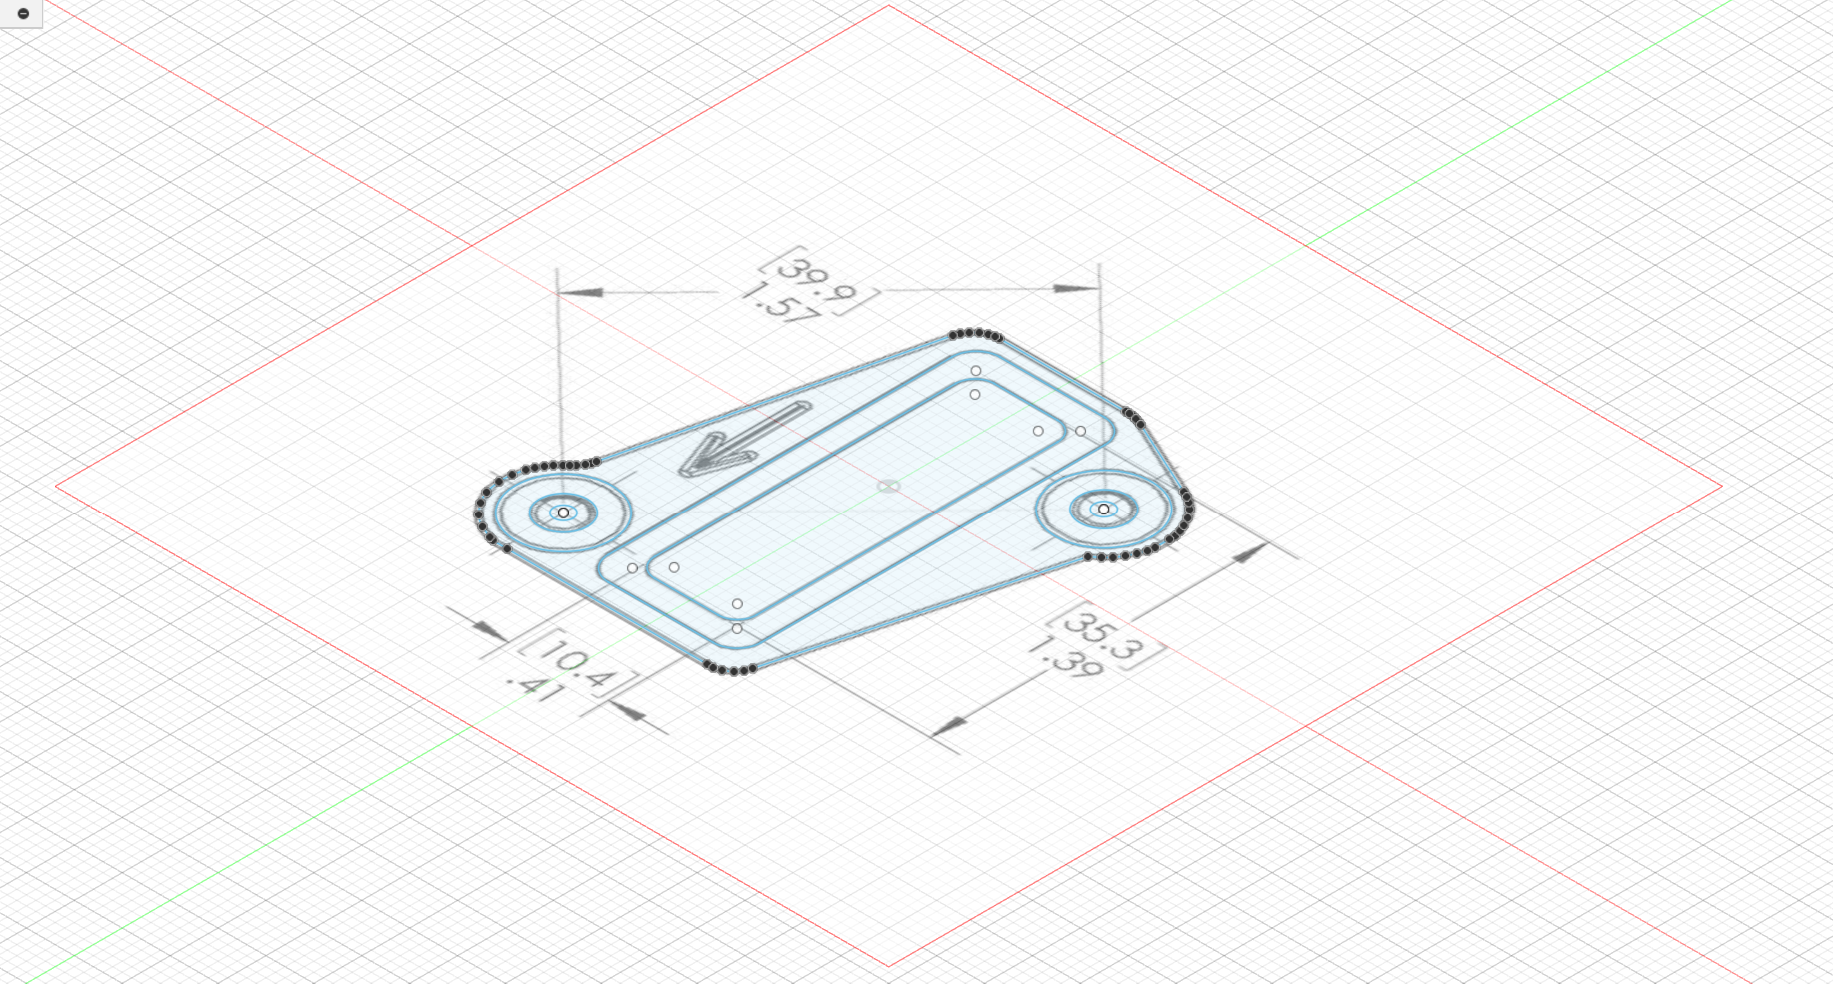
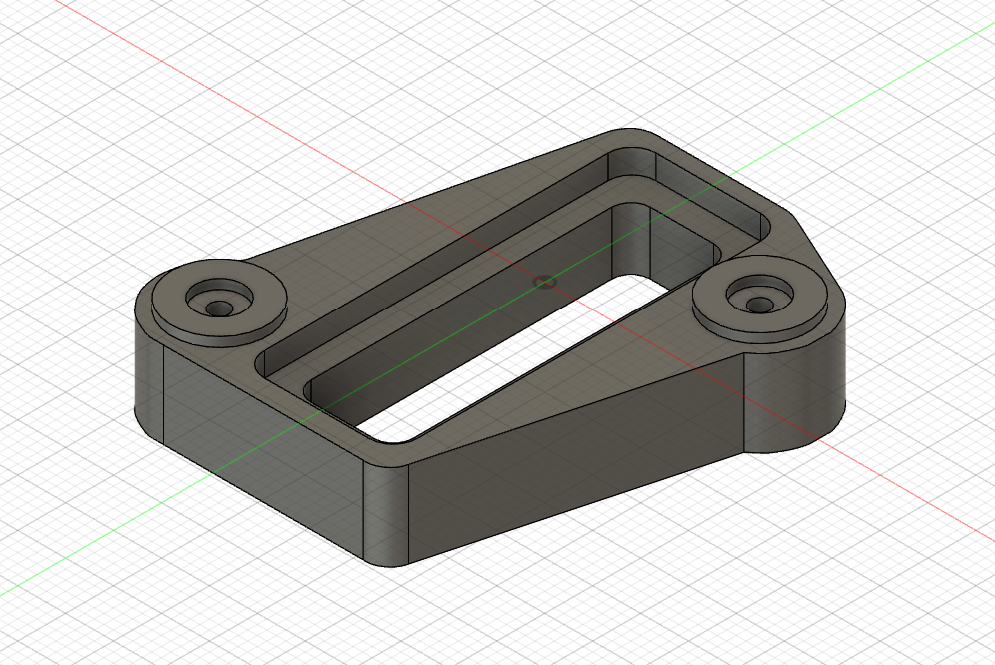
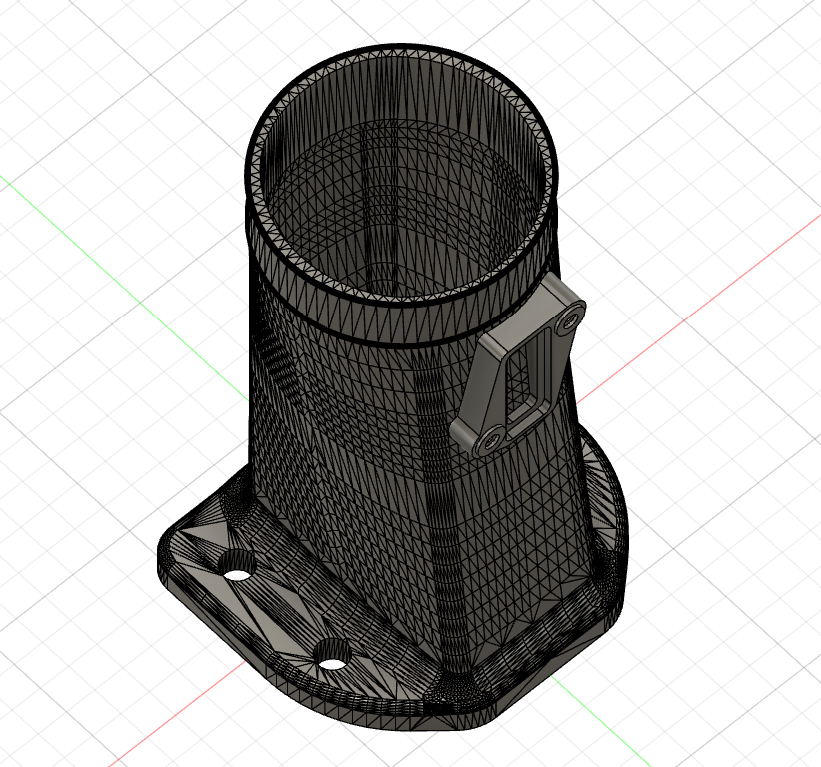
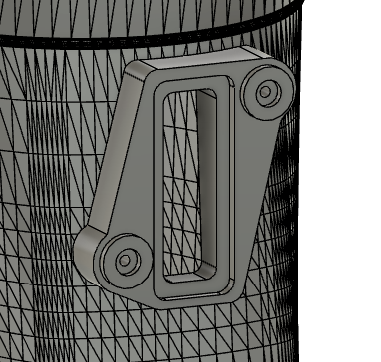
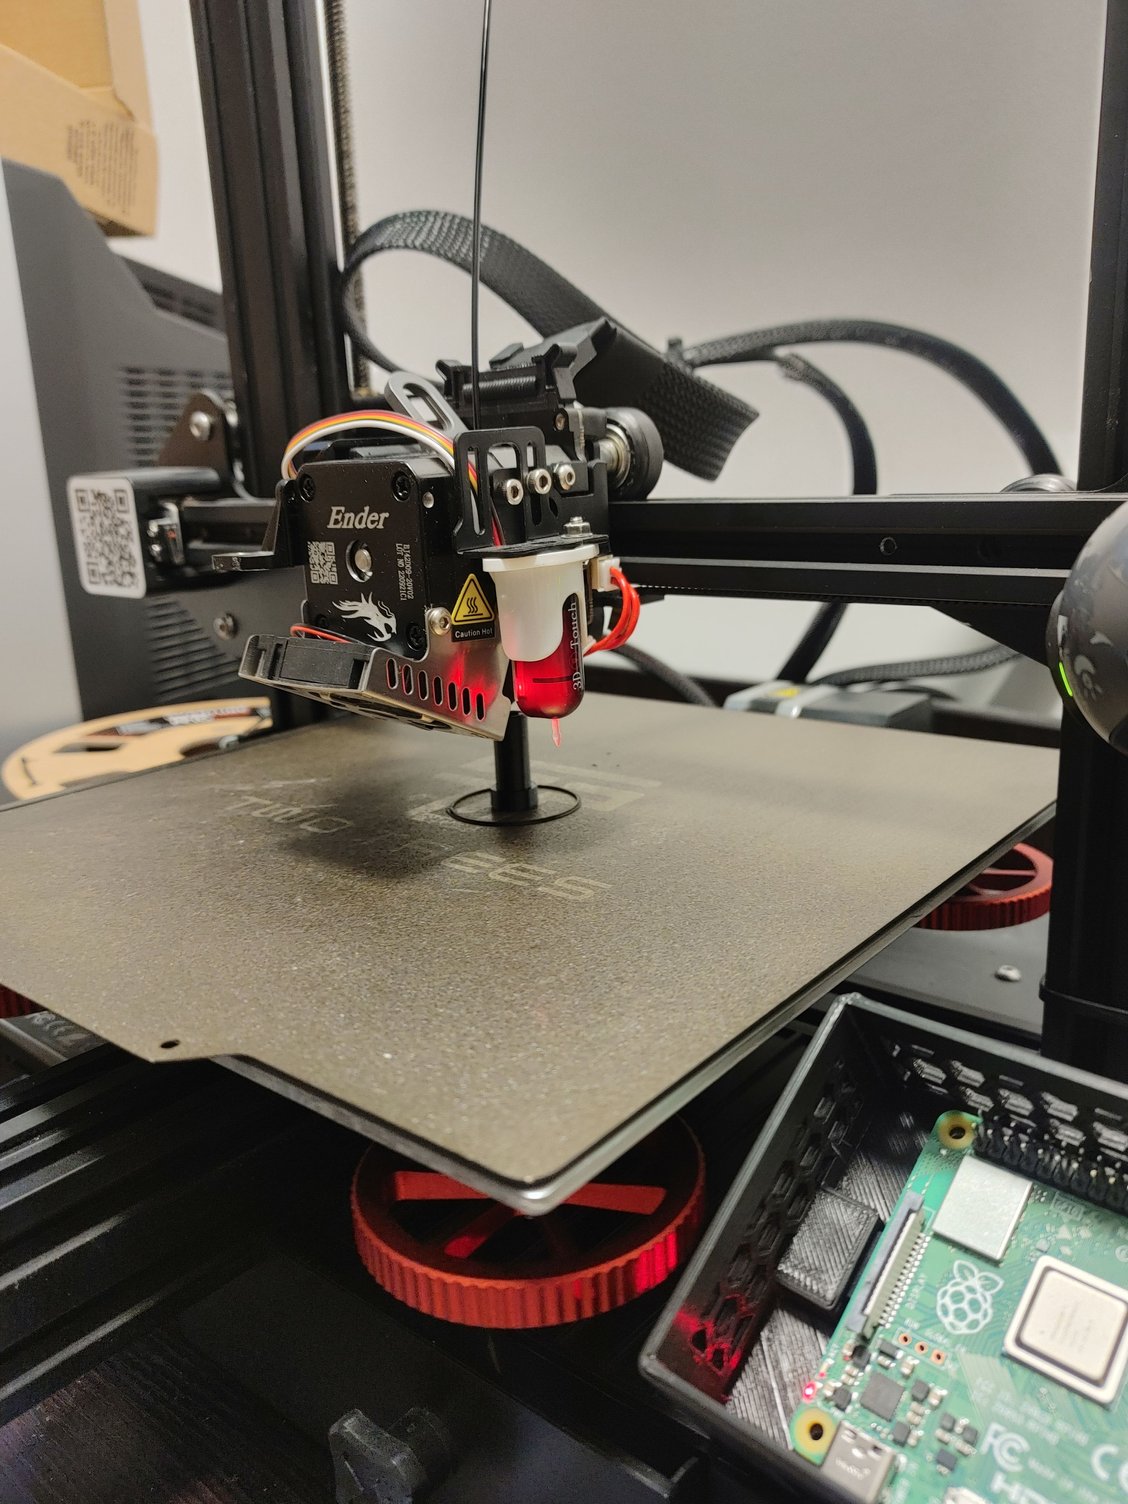
With my 3D printer fixed I made a replacement for the linkage:


In testing I found that flat linkages tended to try and slip off the actuator rod pawl if the solenoid shaft rotated a bit in either direction. So this design fits neatly into the solenoid clevis and has about 10mm of sleeve engagement on the actuator shaft. With some silicone grease everything is nice and smooth.

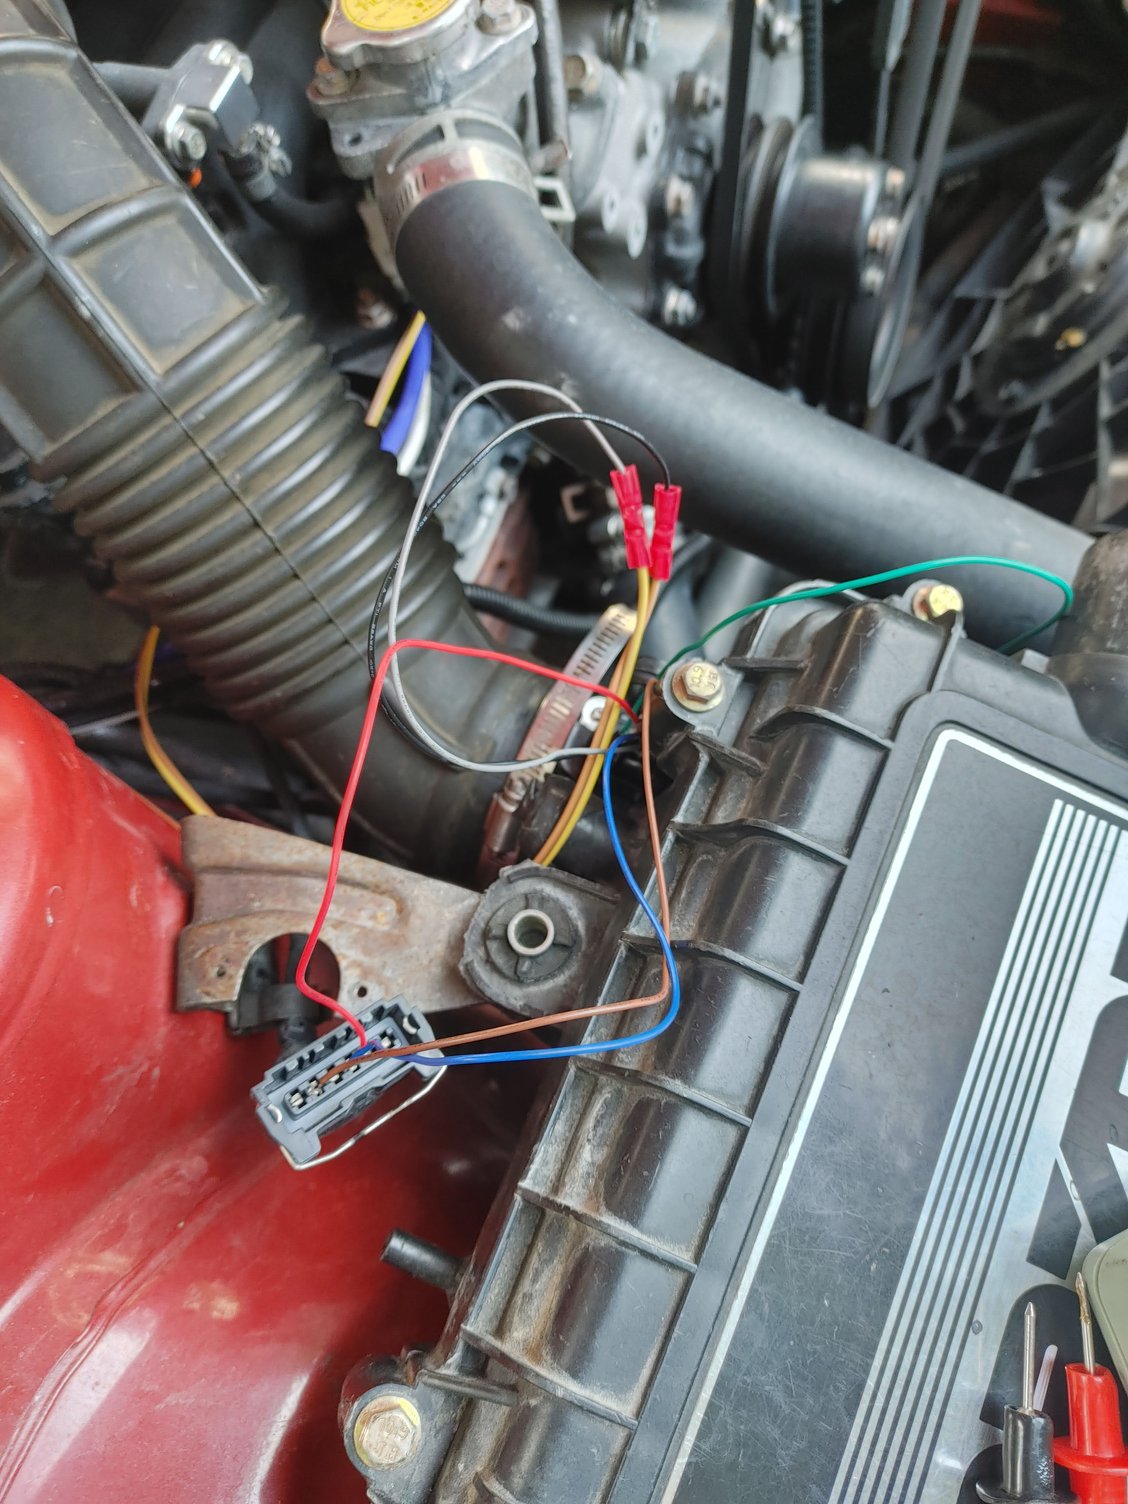
Since PWM won't help me on this project, I elected to run a relay so there is less load on the Megasquirt. It mounts to the passenger shock tower. Here's some night photography of the solenoids installed:


I still need to loom up the wiring, but otherwise it's done.

And the results? Well, it works. I can use the Megasquirt to open and close the ports when I want, and there is a way to reference it to MAF so it will do what I need. They also open slowly enough that I think if I start opening them at 100 g/sec of airflow they will take enough time to open that it smooths the transition and (mostly) achieves the effect I was looking for regarding infinite control. It's not as good as real infinite control, but it's what I have for now.

Idle and off-idle is also noticeably better with these ports open. Once the weather warms up enough for me to actually drive the car, I'll report back with the results vis-a-vis power and in the summer I'll have to test them on a hot day to see what reliability is like. Fingers-crossed that this pans out and I don't need to go back to the drawing board, because at some point it just makes more sense to focus that effort on swapping in the Turbo II engine I've been sitting on for three years.

Until next time

1 ... 7 8 9

You'll need to log in to post.

Our Preferred Partners
PxMB5bUFJ4YwWFnbjvFXsSLCGKrQJou3tt8cnDtuaEYGirkNpHdtTHQJKBgq2x2K