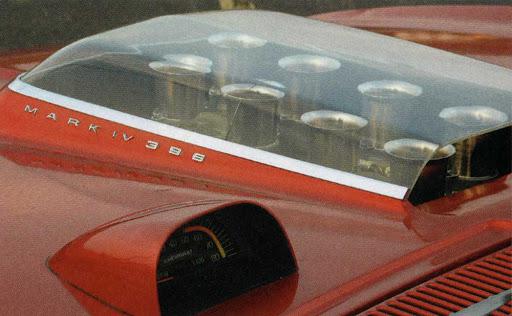
Something of this nature is the goal. It turns out I need a 3.5" hood scoop to clear my stacks and that is just unfortunate because such a tall hood scoop is..unsightly...but lexan allows some visual cheating to lower the visual height of the scoop. So what I want to form is essentially what they have here...a compound curved cowl looking thing. And the tools I have at my disposal are...an oven and some wood to make a drape-form with. Can compound curves be done with that or am I out of luck without a vacuum/pressure mold?

Cooter
UberDork
5/25/21 7:07 a.m.
I have a similar project rattling around in the Job Jar in the back of my mind.
You would have to experiment with a frame for the straight surfaces and pressure for the rounded ones, but it could be done with some patience.
Make a mold that can stand high temps.
Build pizza oven. Drape piece over hot mold.
I believe that is how barris and the others did things like that.
HOW TO VACUUM FORM RC BODY AT HOME - YouTube Making a hood scoop should be pretty straight forward.
Vacuum forming is the answer. Very easy to do.
I used to have a setup to make racing windscreens for spridgets. The key to the setup was there was a lower and upper mold that would press together - the mold was lined with felt and some petroleum jelly. the lexan was heated up hanging (over 100C I think) and then quickly set on the lower mold and pressed with the upper mold.
The mold itself was just plywood with some 1x inside, nothing fancy.
This company has been around forever , the website shows a lot of things they have made , some amazing stuff !
https://www.aircraftwindshield.com/
there are youtube videos including a WW2 one about making canopies for airplanes ,
I always wonder how many bad ones they make before they show you the good one and how "Easy" it was :)

No Time
SuperDork
5/25/21 8:12 a.m.
You can add vacuum to your mold at home.
Make your wood mold, then transfer it to plaster mold so you can smooth and shape the contours to get to the shape you want. It will be a multi step process since you'll want a positive mold.
You can put nylons over the mold to allow vacuum to make it all the way around the mold and draw in the plastic. you'll have to do some sanding and polishing, but it will help pull it tight to the mold to get all the contours to transfer to the plastic.
I can explain more about the process I used when thermoforming in a previous career if you decide to try using vacuum.
In reply to No Time :
So I am wanting a plug then? Why plaster? Sanding and smoothing can be done easily enough with short-strand fiberglass skimmed over a wood plug(or even putty for that matter) Also...I am unsure what you mean by nylons.
I assume with a vacuum mold the process would be to heat the polycarbonate in the oven, then take it out and drape it over the plug? Just trying to get a picture of how it would work.
No Time
SuperDork
5/26/21 9:00 a.m.
In reply to Wicked93gs :
When I was doing thermoforming it was to make custom orthotics for ankles and lower limbs. We would use fiberglass cast tape to wrap the limb to create a negative mold, then we'd fill the cast with plaster (including a pipe for holding), and make any modifications to the shape by adding or removing plaster.
The plaster is easy to work with and you can remove or add material easily to create the shape you want.
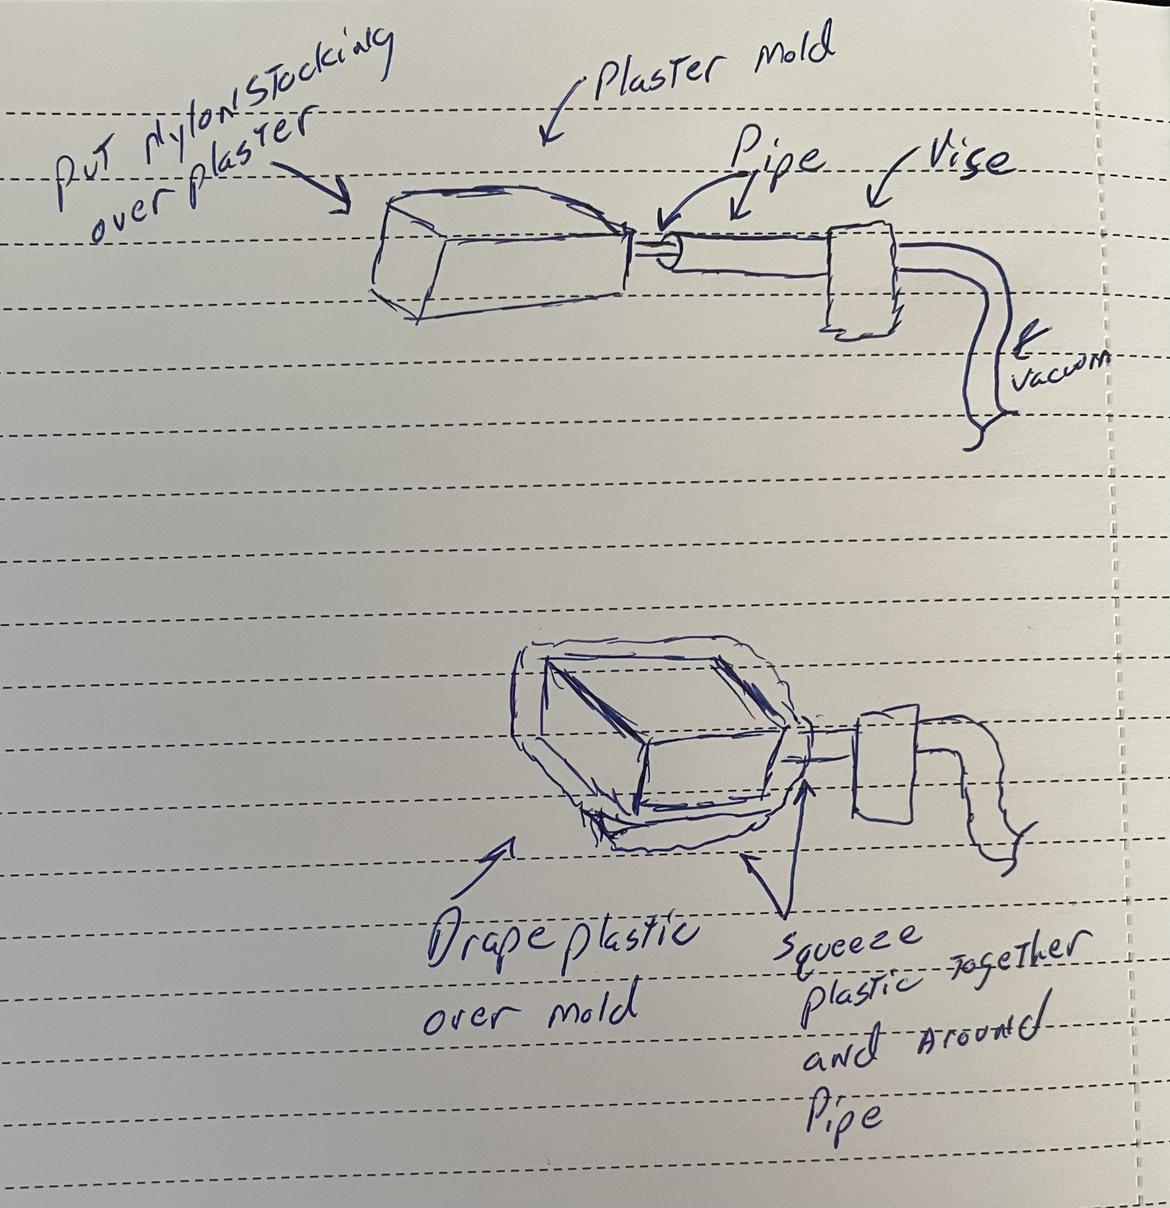
The nylon over the mold is just nylon stockings to provide space for air to be pulled out.
When forming the plastic, we would heat it, then drape it over the plaster mold sealing it to itself in a location that was going to be cut away. The plastic would also be squeezed around the pipe connected to the vacuum source. The vacuum wasn't turned on until after the plastic was draped and sealed so it was a bit more forgiving when getting it positioned.
Here's a rough sketch of the setup:
In reply to No Time :
Clearer, but I am not understanding how vacuum is being pulled through solid plaster. I guess it wouldn't need to if the plastic surounded it on all sides, but surrounding a 3 dimensional shape on all sides with a flat piece of plastic(even soft and malleable) well enough to create a vacuum doesn't seem possible.
Am I to assume you cast a pipe into the middle then drill small holes through the mold into the pipe? How many holes are needed per square foot that way?
No Time
SuperDork
5/26/21 10:13 a.m.
In reply to Wicked93gs :
The vacuum isn't pulled through the plaster.
The nylon stocking is put over the plaster and the weave of the nylon creates the necessary space for the air to be pulled out from between the plastic and the mold.
In reply to No Time :
Ok...then how do you connect the dead-air space(nylon) to the vacuum source(actual shop vac or vacuum pump)? That is what I thought the pipe was for...but I guess its just to hold the plug.
No Time
SuperDork
5/26/21 10:52 a.m.
We had a piece of 2" iron pipe with a fitting that connected it to a vacuum source. That pipe was held in a vise to support the mold.
The mold had a piece of 1" iron pipe in it that stuck out far enough to support the mold when inserted into the 2" pipe. It was import to not seal off the annulus between the 1" and 2" pipe. The nylon can be stretched 1-2" onto the 2" pipe and taped to the OD of the 2" pipe
The seal between the vacuum source and space between the mold and plastic was connected to vacuum by wrapping the softened plastic around the 2" pipe.
In reply to No Time :
The polycarbonate must get a lot softer than I was imagining if you are able to wrap it around something like that.
No Time
SuperDork
5/27/21 7:52 a.m.
I think I missed the part about polycarbonate.
We used a lot of different materials, I know we used polypropylene, polyethylene, surlyn, and others. I don't recall if polycarbonate was one of them.
We would get the plastic hot enough that it sagged when moving it from the oven to the mold, and when draped over the mold it would conform pretty well and hang down on the sides before pressing the edges together and turning on the vacuum.
Here's a video showing the process:
That explains it a lot more clearly. I think the best approach for me will be the slot-car body approach though...simply because I don't actually need a full 3-D shape...the bottom will be open. I think its also going to be easiest for me to work with MDF for the plug itself. I have decided in the end to get the most hood clearance for the stacks I am going to need an air box instead of just filters...so I will end up with what is essentially a shaker assembly on top of the engine protruding through the hood with the polycarbonate being the top of the airbox, the base plate I will just fab from some sheet metal:


