1 2
oldeskewltoy
oldeskewltoy HalfDork
8/26/12 2:59 p.m.

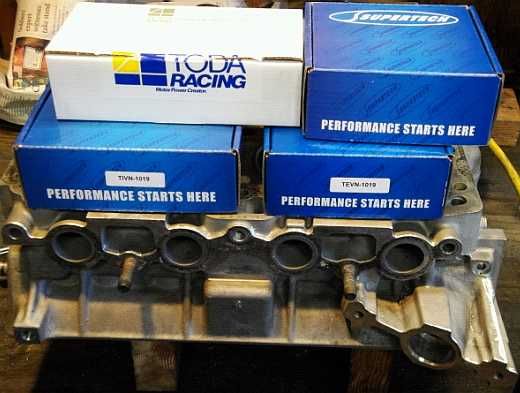
This is my first posting in GRM of my work porting, and rebuilding 4AGE cylinder heads. This is my 19th head that I've begun - OST-019: Collaboration

OST-019 can be considered a collaboration from a few different view points...

1) My client is having a SoCal shop(name withheld unless they release me) rebuild his engine, so this is my first collaboration with another shop.

2) A looser definition for collaboration would be that this is not just a smallport head porting job, but it is also a port adapter to head porting job. I'm to port a largeport to smallport adapter as well.
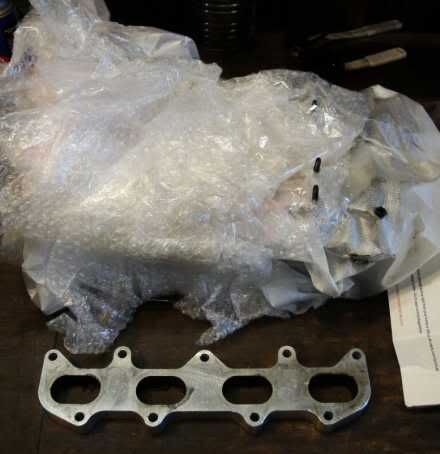
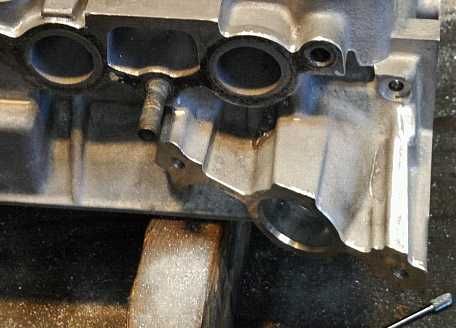
The head and adapter arrive...
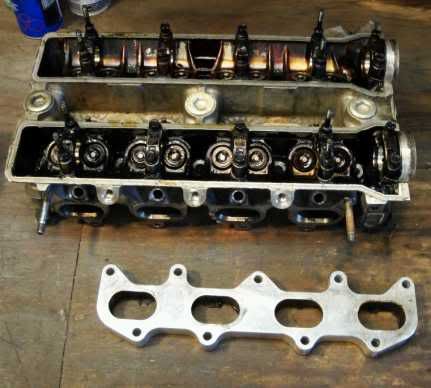
VERY dirty

No biggy, I'll get it cleaned too.

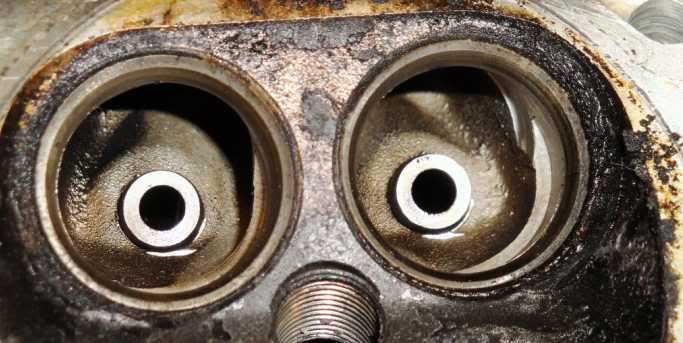
Anyone see the 1st sign of disturbed airflow???
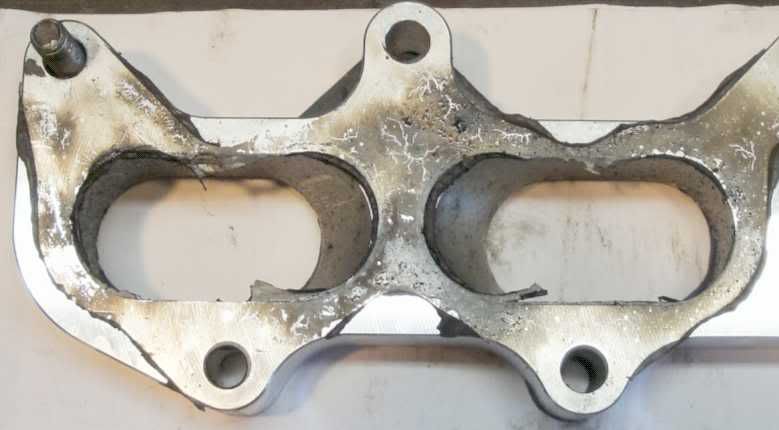
WAAAAY too much FIPG/RTV... but there is far more wrong in there then just poor assembly

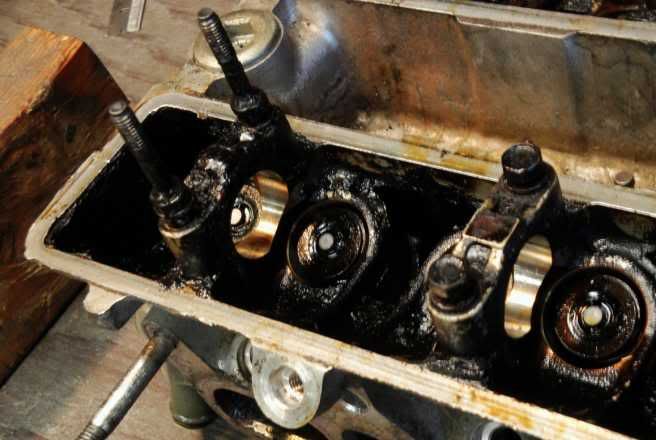
Here is some GREAT news... intake cam journal bearings #4 and #5... although the area is heavily sludged... the journals show no damage. #4 and #5 intake cam journals are the LAST place that gets oil... so clean journals means it might be dirty, but it did have oil.
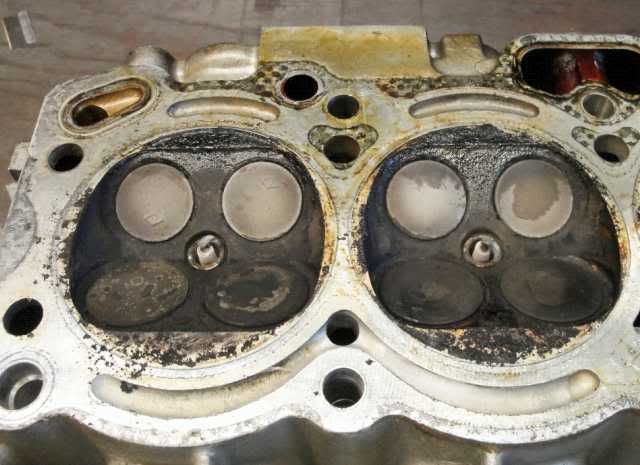
Here are the chambers before dis-assembly...

1 and #2
3 and #4
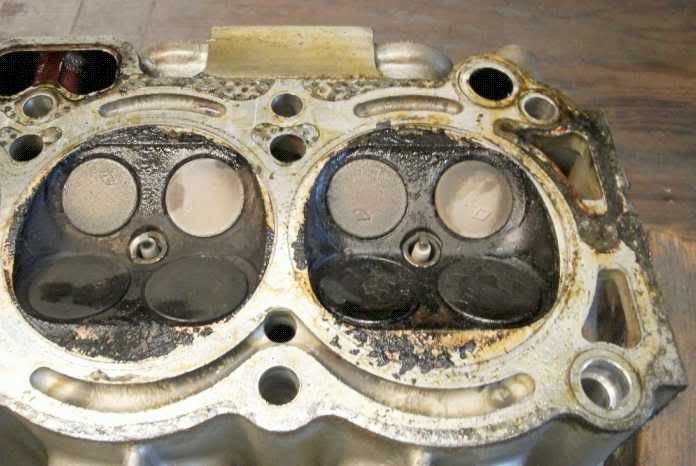
I don't think I have to make note of the HEAVY oily carbon build up....

Here is the head, now disassembled, showing why there is so much crud... ALL the exhaust valve seals are showing heavy leakage
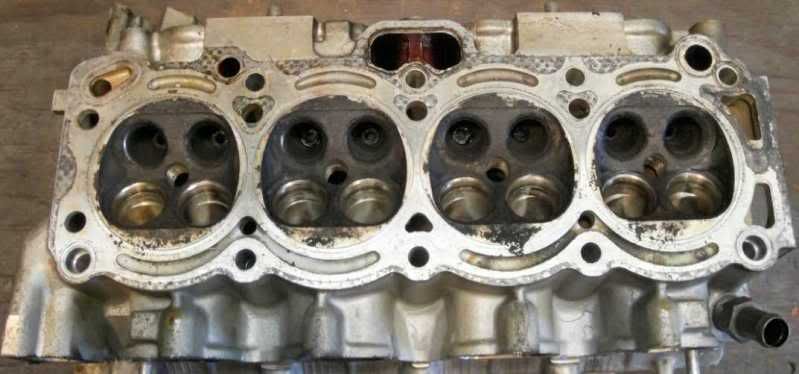
More to come.......

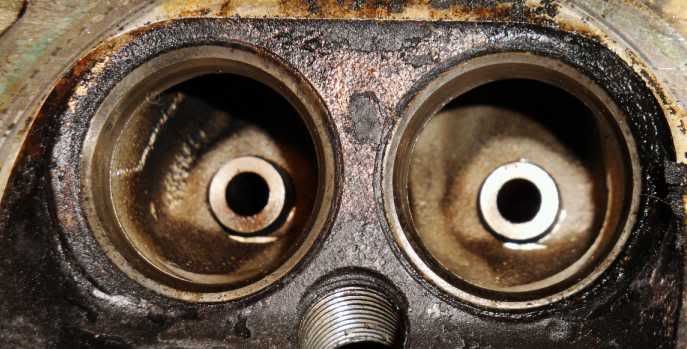
Psssst... can anyone detect the SERIOUS flaw I see?

Hint - flaw is one of poor quality control...

Ojala
Ojala GRM+ Memberand Reader
8/26/12 3:35 p.m.

I know next to nothing about the 4age, but I am impressed that the bearing journals were in good shape considering how gunked up this head is.

Edit:
Whats up with that upper right coolant passage?

ansonivan
ansonivan Dork
8/26/12 6:34 p.m.
oldeskewltoy wrote: Psssst... can anyone detect the SERIOUS flaw I see? Hint - flaw is one of poor quality control...
Valve seats not aligned with the ports causing a huge transition step?

oldeskewltoy
oldeskewltoy HalfDork
8/27/12 2:40 p.m.

coolant passage is likely caused by earlier type headgasket prior to factory change to include a rubber seal

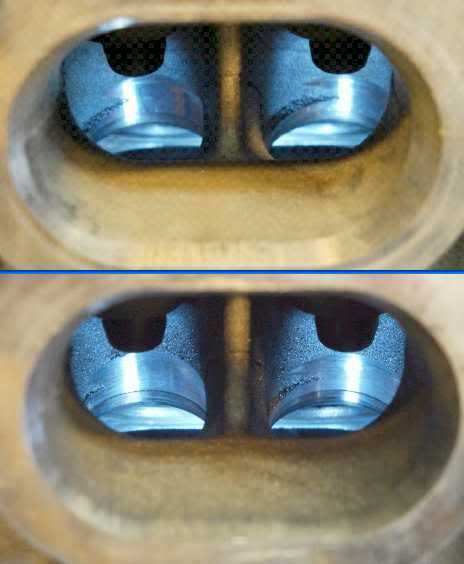
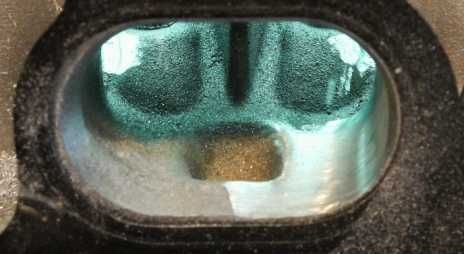
ansonivan - you are indeed correct! bowl and seats for #4 are quite bad.....

the 2 views are of the same chamber... the views are slightly off angle to better show the bowls and seats

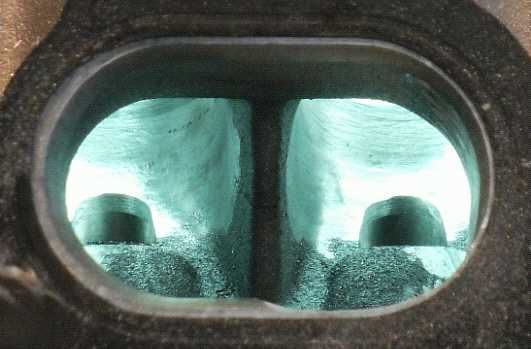
For comparison... this is chamber 2.

As bad as that is... when porting you must remember the direction of flow... the flaw above is bad enough, it pinches the airflow, but the real criminal in this port isn't the flaw you see....

its the flaw you DON'T see that is the problem!!!!

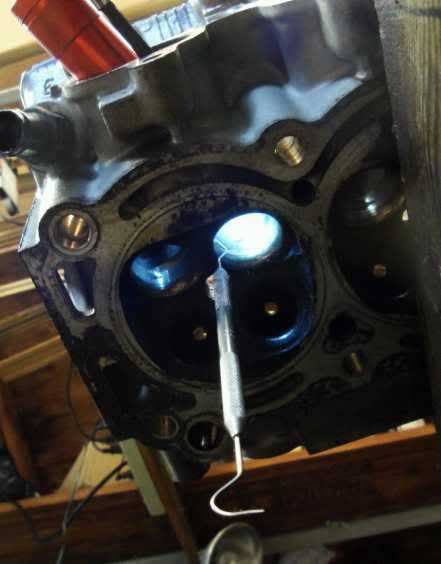
The above view is from below, the head is hung over the edge of the bench, the dental tool is hanging on the inside of the mismatched seat/bowl. This flaw is far more serious, as it not only pinches flow but it causes serious eddies which cause far more flow issues.

fidelity101
fidelity101 New Reader
8/27/12 3:49 p.m.

I like keeping all the valves in (that you're going to re-use or use) and polish the combustion chamber and the bottom of the valves, reflect that heat back into the combustion process, more efficient! Less resistant to carbon build up too.

oldeskewltoy
oldeskewltoy HalfDork
8/27/12 4:47 p.m.
fidelity101 wrote: I like keeping all the valves in (that you're going to re-use or use) and polish the combustion chamber and the bottom of the valves, reflect that heat back into the combustion process, more efficient! Less resistant to carbon build up too.

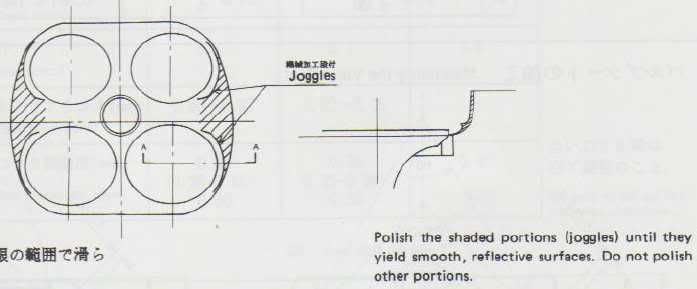
TRD specs for N2 AE86 and AE92 "joggle" removal/ chamber deshrouding.

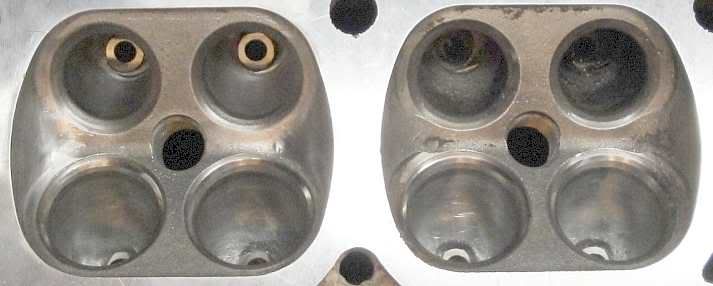
a chamber from one of my previous builds. Something else I do... I deburr the chambers edge - you can see the rough edge on the chamber on the right, the left chamber shows a perfectly smooth edge
oldeskewltoy
oldeskewltoy HalfDork
8/27/12 7:25 p.m.
from another forum wrote: So is replacing the seat a must in a situation like this? Or is grinding down the seat to the bowl an option? I'd guess it depends on the amount you have to grind down as long as you don't get to the face/valve contact surface?

The mismatch can't really be fixed because the seat is located at the center of the guide. The guides would need to be moved... :thumbdown

I will be consulting with a VERY exp person on this... as of now I see three options... 1) Cut the seat back upto the contact point of the valve... as you suggest. I've done this before.... but not nearly with as bad a seat* 2) put a shallow taper on the bowl to seat area. This isn't ideal, but it will smooth the flow past the seat. 3) this head becomes a core for use as an O/S valve head, while a more suitable head is found.

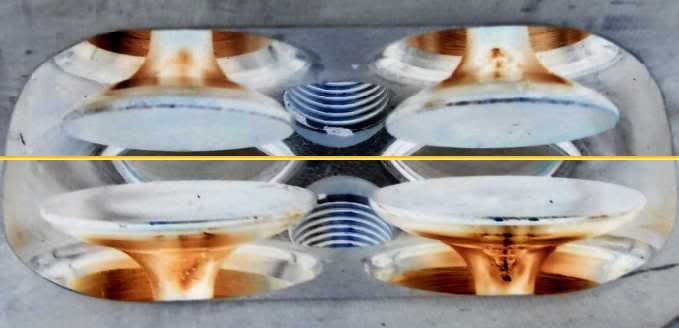
  • I did a bit of creative negative lighting to show some of the specifics of the valves, and seats.
    If you look carefully(bottom valves... far left side of seats), this set up shows thinned seats - note the 3rd angle changes its thickness as you scan from right to left
Dr. Hess
Dr. Hess UltimaDork
8/27/12 7:59 p.m.

How about just telling him to get you another head?

oldeskewltoy
oldeskewltoy HalfDork
8/27/12 10:07 p.m.
Dr. Hess wrote: How about just telling him to get you another head?

option 3 above.... yep

dean1484
dean1484 GRM+ Memberand UltraDork
8/28/12 6:33 a.m.

I have done a lot of 4age work in the past and have ported / polished / machined many of these heads / motors and I have never seen one as bad as that in terms of casting quality.

A couple things.

What do you do about return oil flow? I found a lot of improvements can be made in this department. Both in the head and in thw block.

Do you do any work to the cooling chambers and the coolant ports? Again a lot of cleanup can be made here as well as to the block.

Getting off topic but do you do any work to the block? I found that there is all of casting slag in the bottom of block as well as restrictions in the oil return ports. Big improvements can be made in oil return flow form the head if you take care of these issues with the 4age block. Less important for a street motor but for road course / racing use it helps a lot.

The 4age head and block really need to be addressed as a complete package when looking at oil return and coolant flow. Many people think that porting and polishing of the intake and exhaust are where you need to stop. Working on coolant flow and oil return will get you a lot more durability and service life.

fidelity101
fidelity101 New Reader
8/28/12 7:11 a.m.

In reply to oldeskewltoy:

very nice! I love OEMs who have documents out on how to make their stuff faster haha

Nashco
Nashco UltraDork
8/28/12 11:06 a.m.

Wouldn't another option be to have the head welded to fill the gap and then port as necessary to clean it up? Welding heads that are hard to track down is a pretty common practice. Not that this head is extremely rare or in otherwise great shape, just another option to keep in mind.

That is pretty bad quality control to have such a major misalignment in a relatively modern head. Shows just how tolerant their design was of flaws, I guess.

Bryce

oldeskewltoy
oldeskewltoy HalfDork
8/28/12 12:07 p.m.

Dean - I will often do major deburring like this...

I also deburr the internal drains themselves. In the block, removing all the casting surface does allow the oil returning to drain quicker(shed easier).

This head is a street head, I will deburr around obviously bad cooling passages... mostly @ the outlets/inlets

Bryce - This could likely be welded... BUT... since the welding is so close to the seat, it likely should be removed to properly build up the splitter. As you state, if this was harder to find, or more valuable... it might be worthwhile to hold on to it... but the likelyhood is this will either got to the dump, or be made into an O/S valve head like this one was....

pinchvalve
pinchvalve GRM+ Memberand UltimaDork
8/28/12 12:23 p.m.

You really have to know what you are looking for there!

dean1484
dean1484 GRM+ Memberand UltraDork
8/28/12 4:08 p.m.

Yep those photos show what I am taking about. And yes cleaning up the oil return ports and matching them to the block is what I was getting as as well as removing all the casting slag and casting lines in the bottom of the block.

If you ever open one up and see this look for "Eichmeier Motors" or "Eichmeier Engineering" Of just "EE" Stamped inside the block. It is probably one I did. I stamped all the blocks / motors I did internally. The later ones being just EE and the early ones being the Eichmeier Motors. I probably only stamped a handful with Eichmeier Engineering before going to the EE stamping.

noddaz
noddaz GRM+ Memberand Reader
8/28/12 8:27 p.m.

Outstanding write up on some basic head flow information... And the fixing there of...

oldeskewltoy
oldeskewltoy HalfDork
8/29/12 12:20 p.m.

The clients head is so poorly cast, we jointly decided to replace his. I checked my inventory on smallport head, all of them show some signs of poor placement... but a pair of mine have significantly less splitter mismatch. I chose one of those, and it is @ the shop getting cleaned.

oldeskewltoy wrote: WAAAAY too much FIPG/RTV... but there is far more wrong in there then just poor assembly

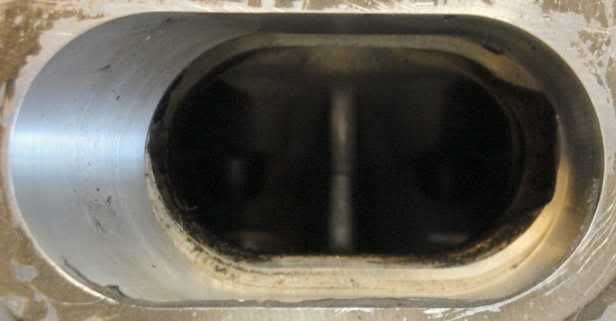
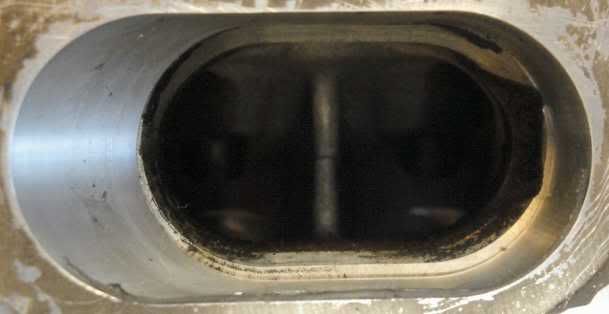
As bad as the bowl and seat are, or were.... the adapter my client is using (well known - name deleted) is poorly manufactured. There is a serious mismatch in the adapter as well.....

The gaskets I'm using are OEM Toyota... The ports are mis aligned by approximately 2.5mm. Now you can see the likely reason the gasket was not used in favor of the chemical sealant, the installer didn't want 2.5mm of gasket invading the airstream.

The problem isn't just the gaskets.... following are 2 views of the same port, one allowed to rest on the end studs, and one with the adapter pushed vertically on the end studs..

down

up

although it is better... the mismatch causes severely disturbed air, and not only is the bottom a problem, but with the roof of the adapter 2.5mm down, the highspeed, high pressure flow along the port roof and walls is significantly compromised.

I could port the top, and try to fill the bottom with a chemical compound...

and then I had a brainfart.... I'll slot all the bolts holes(about 4mm down), if need be I'll make the holes slots clean through. Once all the bolt holes are slotted, the 2 end holes I'll drill from the top(4mm bit), and cut 4mm threads through. then I';ll use 4mm bolts to raise the entire adapter to fit perfectly along the bottom, thus allowing me to have full clearance along the roof as well. I'll hand port and little discrepancies.

Curmudgeon
Curmudgeon MegaDork
8/29/12 12:30 p.m.

Nice work! I used to do a little of that on old Honda singles, to get rid of the step between the intake and the head I'd bolt it in place, then grind the port opening so the intake and head matched. Of course, if it was ever removed it took some fiddling to line it up again...

oldeskewltoy
oldeskewltoy HalfDork
8/29/12 1:01 p.m.
Curmudgeon wrote: Nice work! I used to do a little of that on old Honda singles, to get rid of the step between the intake and the head I'd bolt it in place, then grind the port opening so the intake and head matched. Of course, if it was ever removed it took some fiddling to line it up again...

that is why I plan on drilling and tapping the 2 end bolt holes in the adapter... since I'm not assembling the engine, I want it to fit, and adding the screws on the end should allow the assembler to fit it, and it should fit as it did when I match it and set the screws

Nashco
Nashco UltraDork
8/29/12 1:23 p.m.

For what it's worth, I wouldn't trust a 4mm screw to hold up to the typical vibration and heat cycling you're going to see on the intake, especially with a steel screw in aluminum thread. Another thought is to drill a slightly larger diameter hole (with the correct center), install a sleeve/bushing, and peen it into place (or use aluminum and a spot weld). You'll still have your (mostly) idiot proof locating holes, but won't have two tiny screws that may cause issues in the future.

Bryce

oldeskewltoy
oldeskewltoy HalfDork
8/29/12 2:34 p.m.
Nashco wrote: For what it's worth, I wouldn't trust a 4mm screw to hold up to the typical vibration and heat cycling you're going to see on the intake, especially with a steel screw in aluminum thread. Another thought is to drill a slightly larger diameter hole (with the correct center), install a sleeve/bushing, and peen it into place (or use aluminum and a spot weld). You'll still have your (mostly) idiot proof locating holes, but won't have two tiny screws that may cause issues in the future. Bryce

The slotting of the bolt holes... I need Jesse's mill set up.... any idea when that might be......

now where's that whistling emoticon when you want one....

oldeskewltoy
oldeskewltoy HalfDork
8/29/12 6:11 p.m.

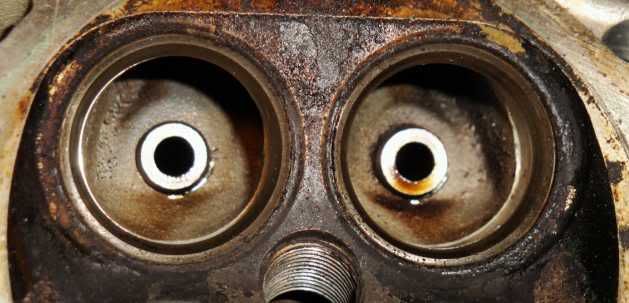
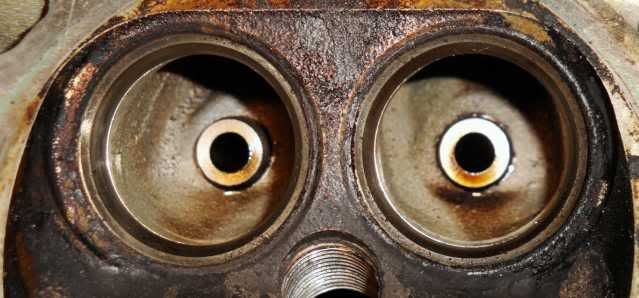
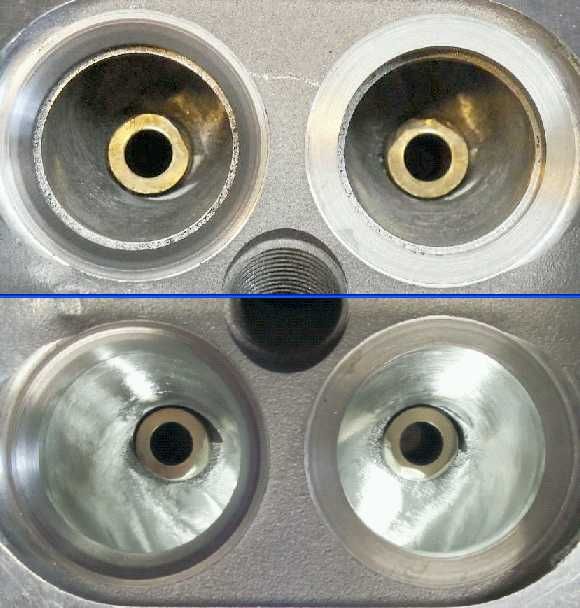
Now that both heads are back from getting cleaned....... a much clearer view of the overall problem can be shown.....

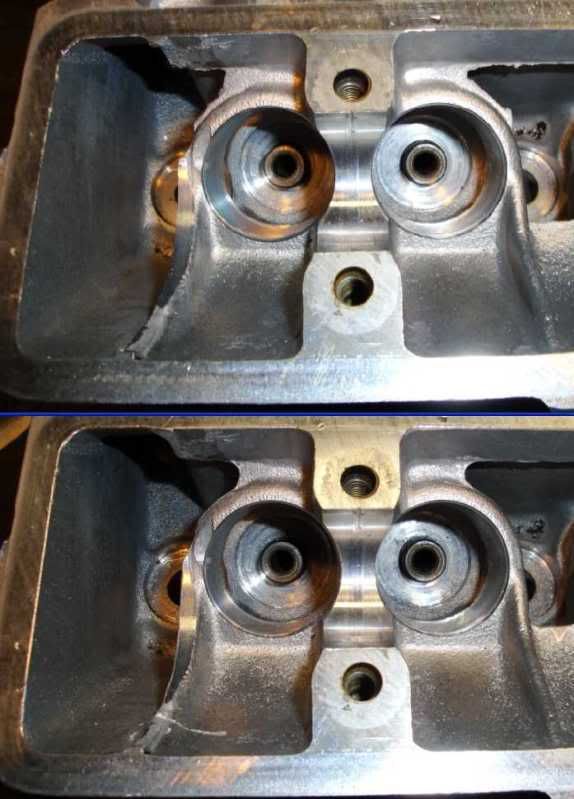
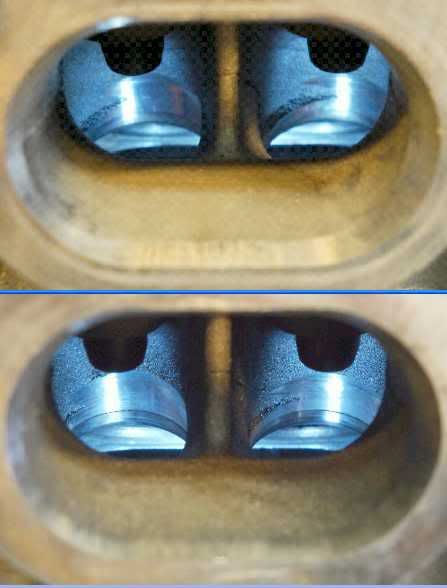
Below are 2 2-panel photos, the top views in each are the clients #4 port/bowls/seats, the lower view the replacement head showing #4 port/bowls/seats.

The first 2 panel shows the #4 port walls aligned....

and in this view... the guides are now what the photo is aligned on... NOT the port walls

As I stated to my client... the top head has nothing wrong with it... it ccould be still used, but for purposes of supplying a ported performance oriented head, the lower view(head) is a far better starting point

oldeskewltoy
oldeskewltoy HalfDork
9/10/12 6:04 p.m.

Well... this has been a quiet thread.... because I went on a short vacation.

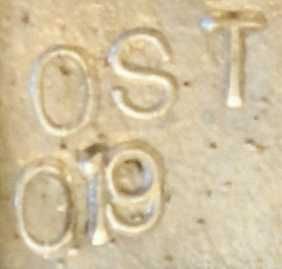
Now that I'm back... we can get back into the "new" OST-019 head. I've stripped the poorly cast head of its serial number... and I've added it to the new head.....

a bit squeezed... but legible....

Since I'm waiting on valves and guides, the beginning process for this head will be an overall deburring, as well as cam journal polishing.

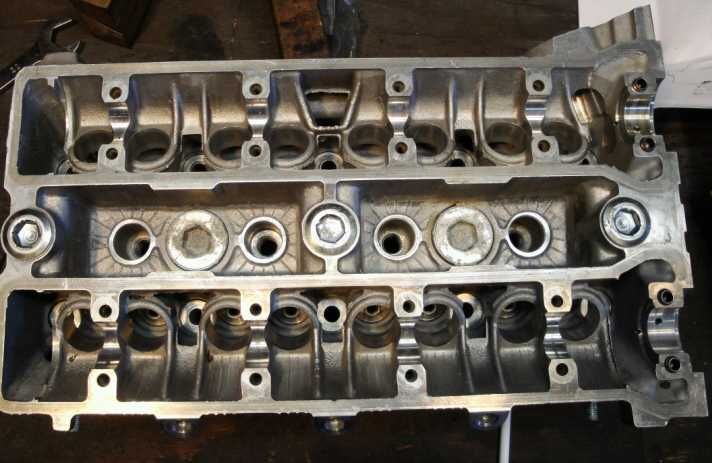
The head prior to de-burring...

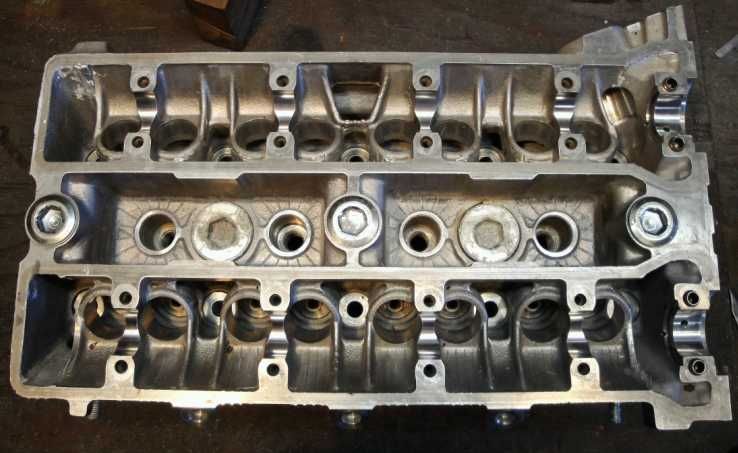
And after....

Can you spot all the areas I've de-burred???

more to come.......

oldeskewltoy
oldeskewltoy HalfDork
9/12/12 1:24 p.m.

Everywhere there is an edge... I de-burred. Even areas not in this view... EVERY casting line, and machined edge... around the entire head got de-burred.

In the shot below... if you can tear your eyes away from all of the nice shiny new valves, springs, and guides... you can see quite a bit of the additional deburring this head received.

Here is a closer view... as you can see, I've gone over most, if not all the edges, and I've removed all the nasty bits...

even that big nasty ridge under the distributor mount is smooth.

oldeskewltoy
oldeskewltoy Dork
9/12/12 5:07 p.m.

The bowls have had a basic shaping to them, they now match the valve seats. Note each port has a 2mm - 4mm bevel around the entire port. If you are sharp eyed, you'll note the far right port shows a bit of port work already

Here is a closer view of that port work....

Not an uncommon scene in one of my smallport heads - half done showing before and after in the same shot. I've removed the pocket @ the junction of port roof/wall and bowl roof/wall, but there is a lot more there then just a bit of smooth transition.

Maybe this view will help....

The right hand side of the port roof has moved significantly - the right hand side manifold edge is no closer to the gasket then the left hand side. What has changed is the bevel has been removed, and the port roof now has a gradual taper forward to the base of the splitter/guide bosses. This gradual taper allows for more high pressure air, while @ the same time beginning to get the air charge bending towards the valve.

1 2

You'll need to log in to post.

Our Preferred Partners
13go07dIupTzxOT0VOScu6hgLW8GDskQYAVUli6hGsHYVFR3Zr1wUFaFJFFbYKJp